- Настройка PXE-сервера для загрузки Windows PE Configure a PXE server to load Windows PE
- Необходимые условия Prerequisites
- Шаг 1: скопируйте исходные файлы Windows PE Step 1: Copy Windows PE source files
- Шаг 2: настройка параметров загрузки и копирование файла BCD Step 2: Configure boot settings and copy the BCD file
- Сводка по процессу загрузки PXE PXE boot process summary
- Pxe boot сервер windows
- Configure a PXE server to load WindowsВ PE
- Prerequisites
- Step 1: Copy Windows PE source files
- Step 2: Configure boot settings and copy the BCD file
- PXE boot process summary
Настройка PXE-сервера для загрузки Windows PE Configure a PXE server to load Windows PE
Относится к Applies to
В этом пошаговом руководстве описано, как настроить PXE-сервер для загрузки Windows PE при запуске клиентского компьютера по сети. This walkthrough describes how to configure a PXE server to load Windows PE by booting a client computer from the network. С помощью средств Windows PE и файла образа Windows 10 можно установить Windows 10 по сети. Using the Windows PE tools and a Windows 10 image file, you can install Windows 10 from the network.
Необходимые условия Prerequisites
- Компьютер развертывания: компьютер с набором оценки и развертывания Windows (Windows ADK) и надстройкой Windows PE с установленным ADK. A deployment computer: A computer with the Windows Assessment and Deployment Kit (Windows ADK) and the Windows PE add-on with ADK installed.
- DHCP-сервер: DHCP-сервер или прокси-сервер DHCP, настроенный для отправки ответов на запросы PXE-клиентов. A DHCP server: A DHCP server or DHCP proxy configured to respond to PXE client requests is required.
- PXE-сервер: сервер под управлением службы TFTP, на котором могут размещаться файлы загрузки Windows PE для скачивания клиентом. A PXE server: A server running the TFTP service that can host Windows PE boot files that the client will download.
- Файловый сервер: сервер с общей сетевой папкой. A file server: A server hosting a network file share.
Все четыре перечисленных выше роли могут размещаться на одном компьютере, также можно выделить отдельный компьютер для каждой роли. All four of the roles specified above can be hosted on the same computer or each can be on a separate computer.
Шаг 1: скопируйте исходные файлы Windows PE Step 1: Copy Windows PE source files
На компьютере развертывания: нажмите Пуск и введите развертывание. On the deployment computer, click Start, and type deployment.
Щелкните правой кнопкой мыши элемент Среда средств развертывания и работы с образами и затем нажмите Запуск от имени администратора. Right-click Deployment and Imaging Tools Environment and then click Run as administrator. Будет запущен ярлык среды средств развертывания и создания образов, который открывает окно командной строки и автоматически задает переменные среды таким образом, чтобы они указывали на все необходимые средства. The Deployment and Imaging Tools Environment shortcut opens a Command Prompt window and automatically sets environment variables to point to all the necessary tools.
Чтобы скопировать базовые файлы Windows PE в новую папку, выполните следующую команду. Run the following command to copy the base Windows PE files into a new folder. Сценарий требует два аргумента: архитектуру оборудования и целевое расположение. The script requires two arguments: hardware architecture and destination location. Значение может быть x86, amd64 или arm, а может соответствовать пути к локальному каталогу. The value of can be x86, amd64, or arm and is a path to a local directory. Если каталог еще не существует, он будет создан. If the directory does not already exist, it will be created.
Например, следующая команда копирует файлы архитектуры amd64 в каталог C:\winpe_amd64: For example, the following command copies amd64 architecture files to the C:\winpe_amd64 directory:
Сценарий создает структуру каталогов назначения и копирует все необходимые файлы для этой архитектуры. The script creates the destination directory structure and copies all the necessary files for that architecture. В предыдущем примере создаются следующие каталоги: In the previous example, the following directories are created:
Подключите базовый образ Windows PE (winpe.wim) в каталог \mount с помощью средства DISM. Mount the base Windows PE image (winpe.wim) to the \mount directory using the DISM tool. При подключении файла образа его содержимое распаковывается в папку, что позволяет вносить изменения напрямую или с помощью таких программ, как DISM. Mounting an image file unpacks the file contents into a folder so that you can make changes directly or by using tools such as DISM. См. приведенный ниже пример. See the following example.
Убедитесь, что отображается сообщение «Операция завершена успешно». Verify that «The operation completed successfully» is displayed. Примечание. Чтобы просмотреть подключенные в настоящее время образы, введите dism /get-MountedWiminfo. Note: To view currently mounted images, type dism /get-MountedWiminfo.
Выполните сопоставление общего сетевого ресурса корневому каталогу TFTP на сервере PXE/TFTP и создайте папку \Boot. Map a network share to the root TFTP directory on the PXE/TFTP server and create a \Boot folder. Обратитесь к документации сервера TFTP, чтобы определить корневой каталог сервера TFTP, а затем включите общий доступ к этой папке и убедитесь, что она доступна в сети. Consult your TFTP server documentation to determine the root TFTP server directory, then enable sharing for this directory, and verify it can be accessed on the network. В следующем примере имя сервера PXE имеет значение PXE-1, а общий доступ к корневому каталогу TFTP предоставляется с помощью сетевого пути \\PXE-1\TFTPRoot: In the following example, the PXE server name is PXE-1 and the TFTP root directory is shared using a network path of \\PXE-1\TFTPRoot:
Скопируйте файлы загрузки PXE из подключенного каталога в папку \boot. Copy the PXE boot files from the mounted directory to the \boot folder. Пример. For example:
Скопируйте файл boot.sdi на сервер PXE/TFTP. Copy the boot.sdi file to the PXE/TFTP server.
Скопируйте загрузочный образ Windows PE (boot.wim) в папку \boot. Copy the bootable Windows PE image (boot.wim) to the \boot folder.
(Необязательно) Скопируйте в папку \boot шрифты true type (Optional) Copy true type fonts to the \boot folder
Шаг 2: настройка параметров загрузки и копирование файла BCD Step 2: Configure boot settings and copy the BCD file
Создайте хранилище BCD с помощью bcdedit.exe: Create a BCD store using bcdedit.exe:
Настройте параметры RAMDISK: Configure RAMDISK settings:
Последняя команда возвращает идентификатор GUID, например: The last command will return a GUID, for example:
Скопируйте этот идентификатор GUID для использования в следующих командах. Copy this GUID for use in the next set of commands. В каждой приведенной команде замените «GUID1» своим идентификатором GUID. In each command shown, replace «GUID1» with your GUID.
Создайте новую загрузочную запись приложения для образа Windows PE: Create a new boot application entry for the Windows PE image:
Настройте параметры BOOTMGR (не забудьте заменить GUID1 в третьей команде своим идентификатором GUID): Configure BOOTMGR settings (remember to replace GUID1 in the third command with your GUID):
Скопируйте файл BCD на свой TFTP-сервер: Copy the BCD file to your TFTP server:
Теперь ваш сервер PXE/TFTP настроен. Your PXE/TFTP server is now configured. Можно просмотреть установленные параметры BCD с помощью команды bcdedit /store /enum all. You can view the BCD settings that have been configured using the command bcdedit /store /enum all. См. следующий пример. See the following example. Примечание. Ваш идентификатор GUID будет отличаться от приведенного ниже. Note: Your GUID will be different than the one shown below.
Если вы запустите процесс загрузки PXE, но получите сообщение об ошибке «Данные конфигурации загрузки для компьютера отсутствуют или содержат ошибки», убедитесь, что каталог \boot установлен в правильном корневом каталоге сервера TFTP. If you start the PXE boot process, but receive the error that «The boot configuration data for your PC is missing or contains errors» then verify that \boot directory is installed under the correct TFTP server root directory. В используемом здесь примере имя этого каталога — TFTPRoot, но сервер TFTP может быть другим. In the example used here the name of this directory is TFTPRoot, but your TFTP server might be different.
Сводка по процессу загрузки PXE PXE boot process summary
В следующей таблице приведены основные сведения о процессе загрузки PXE-клиента. The following summarizes the PXE client boot process.
Pxe boot сервер windows

Как установить загрузочный PXE сервер для установки Windows, Linux, ESXI 5.5-21 часть. Добавляем Windows-01
Всем привет продолжаем настройку установки Windows с PXE сервера. В 21 части мы с вами создали файлы pxeboot.n12 и winpe.wim, сегодня займемся настройкой Данных Конфигурации Загрузки BCD. Что такое хранилище данных конфигурации загрузки?
Хранилище данных конфигурации загрузки содержит параметры конфигурации загрузки и контролирует запуск операционных систем Microsoft® Windows 7 и Microsoft Windows Server 2008 R2. Эти параметры ранее хранились в файле Boot.ini (для операционных систем на базе BIOS) либо в памяти NVRAM (для операционных систем на базе EFI (Extensible Firmware Interface)). Для изменения кода Windows, который запускается перед загрузкой операционной системы, можно воспользоваться программой командной строки Bcdedit.exe, с помощью которой можно добавлять, удалять, изменять и дополнять записи в хранилище данных конфигурации загрузки.
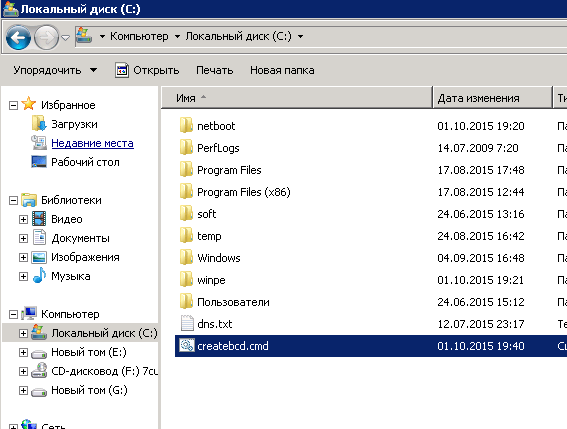
Создадим новый текстовый файл createbcd со следующим содержанием.
Копируем данный скрипт на диск С, прямо в корень.
Как установить загрузочный PXE сервер для установки Windows, Linux, ESXI 5.5-22 часть. Добавляем Windows-01
Открываем командную строку, переходим в корень диска С и вводим команду
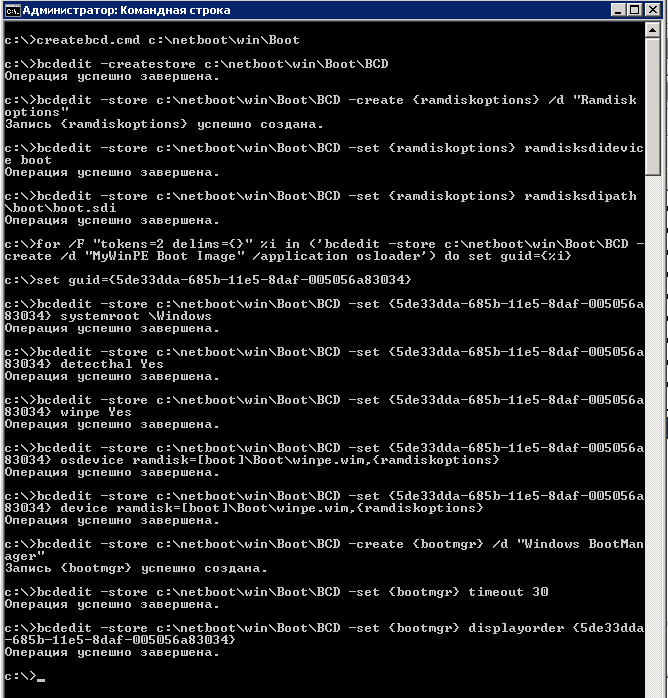
Как установить загрузочный PXE сервер для установки Windows, Linux, ESXI 5.5-22 часть. Добавляем Windows-02
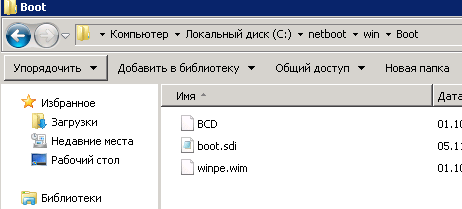
По завершении вы найдете новые файлы, которые нам понадобятся BCD и boot.sdi
Как установить загрузочный PXE сервер для установки Windows, Linux, ESXI 5.5-22 часть. Добавляем Windows-03
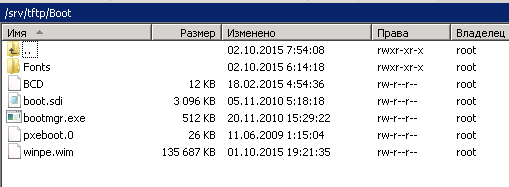
По сути для установки Windows по сети через PXE у нас все готово. Переходим на сервере PXE в каталог tftp сервера, создаем там папку Boot и копируем в него созданные ранее файлы BCD, boot.sdi, bootmgr.exe, pxeboot.n12 нужно переименовать в pxeboot.0, winpe,wim. Папку Fonts можно взять с установочного диска. Так же в корень самого tftp кладем файл bootmgr.exe.
Как установить загрузочный PXE сервер для установки Windows, Linux, ESXI 5.5-22 часть. Добавляем Windows-05
В третьей части мы с вами создали загрузочное меню для Windows. Теперь отредактируем конфиг Windows меню. Для начала давайте укажем для Windows Server 2008 R2 загружаться с файла pxeboot.0
Configure a PXE server to load WindowsВ PE
Applies to
This walkthrough describes how to configure a PXE server to load WindowsВ PE by booting a client computer from the network. Using the Windows PE tools and a Windows 10 image file, you can install Windows 10 from the network.
Prerequisites
- A deployment computer: A computer with the Windows Assessment and Deployment Kit (WindowsВ ADK) and the Windows PE add-on with ADK installed.
- A DHCP server: A DHCP server or DHCP proxy configured to respond to PXE client requests is required.
- A PXE server: A server running the TFTP service that can host Windows PE boot files that the client will download.
- A file server: A server hosting a network file share.
All four of the roles specified above can be hosted on the same computer or each can be on a separate computer.
Step 1: Copy Windows PE source files
On the deployment computer, click Start, and type deployment.
Right-click Deployment and Imaging Tools Environment and then click Run as administrator. The Deployment and Imaging Tools Environment shortcut opens a Command Prompt window and automatically sets environment variables to point to all the necessary tools.
Run the following command to copy the base WindowsВ PE files into a new folder. The script requires two arguments: hardware architecture and destination location. The value of can be x86, amd64, or arm and is a path to a local directory. If the directory does not already exist, it will be created.
For example, the following command copies amd64 architecture files to the C:\winpe_amd64 directory:
The script creates the destination directory structure and copies all the necessary files for that architecture. In the previous example, the following directories are created:
Mount the base WindowsВ PE image (winpe.wim) to the \mount directory using the DISM tool. Mounting an image file unpacks the file contents into a folder so that you can make changes directly or by using tools such as DISM. See the following example.
Verify that «The operation completed successfully» is displayed. Note: To view currently mounted images, type dism /get-MountedWiminfo.
Map a network share to the root TFTP directory on the PXE/TFTP server and create a \Boot folder. Consult your TFTP server documentation to determine the root TFTP server directory, then enable sharing for this directory, and verify it can be accessed on the network. In the following example, the PXE server name is PXE-1 and the TFTP root directory is shared using a network path of \\PXE-1\TFTPRoot:
Copy the PXE boot files from the mounted directory to the \boot folder. For example:
Copy the boot.sdi file to the PXE/TFTP server.
Copy the bootable WindowsВ PE image (boot.wim) to the \boot folder.
(Optional) Copy true type fonts to the \boot folder
Step 2: Configure boot settings and copy the BCD file
Create a BCD store using bcdedit.exe:
Configure RAMDISK settings:
The last command will return a GUID, for example:
Copy this GUID for use in the next set of commands. In each command shown, replace «GUID1» with your GUID.
Create a new boot application entry for the WindowsВ PE image:
Configure BOOTMGR settings (remember to replace GUID1 in the third command with your GUID):
Copy the BCD file to your TFTP server:
Your PXE/TFTP server is now configured. You can view the BCD settings that have been configured using the command bcdedit /store /enum all. See the following example. Note: Your GUID will be different than the one shown below.
If you start the PXE boot process, but receive the error that «The boot configuration data for your PC is missing or contains errors» then verify that \boot directory is installed under the correct TFTP server root directory. In the example used here the name of this directory is TFTPRoot, but your TFTP server might be different.
PXE boot process summary
The following summarizes the PXE client boot process.


