- Griffon’s IT Library
- Simple IT Library for the rest of us
- Ubuntu – Setup PXE Server using pxelinux files only (Bios & UEFI Support)
- Overview
- Assumptions
- Step by Step Guide
- Step 1 – Download UEFI PXELINUX Files
- Step 2 – copy the pxelinux uefi files to the correct location
- Step 3 – create the pxelinux boot menu
- Step 4 – Create symbolic link to boot folder
- Step 5 – Update the dnsmasq.conf file
- Step 6 – Try to boot your PXE client
- Final Notes
- Griffon’s IT Library
- Simple IT Library for the rest of us
- Ubuntu – Ultimate PXE Server Setup – BIOS & UEFI Support
- Overview
- Assumptions
- Step by Step Guide
- Step 0 – Install Ubuntu 18.04.2 Server Edition
- Step 1 – Set a Static IP address on your Ubuntu Server
- Step 2 – Build up your PXE Server
- Step 2.1 – Install apache web server
- Step 2.2 – Install NFS packages
- Step 2.3 – Install dnsmasq packages
- Step 3 – Create the TFTP Folder Structure
- Step 4 – Upload source files on your PXE Server
- Step 5 – Configuring your NFS Server Settings
- Step 6 – Configuring the dnsmasq services
- Step 7 – Uploading all the necessary files in your TFTP folder Structure
- Step 7.1 – populate bios folder
- Step 7.2 – Populate boot folder
- Step 7.3 – Populate grub folder
- Step 7.4 – Create/update the grub.cfg
- Step 8 – Test your configuration
- Final Notes
Griffon’s IT Library
Simple IT Library for the rest of us
Ubuntu – Setup PXE Server using pxelinux files only (Bios & UEFI Support)
This post is a continuation of our previous post about setting up a PXE Server that can be used to deploy BIOS or UEFI Based systems. Our PXE Server setup has been using the pxelinux files for the bios client and the grub software to boot UEFI client. As mentioned in the previous post, this configuration seems the best option nowadays because the pxelinux files are not signed for secure boot in UEFI and thus have a limited interest in production environment.
However, some people have been requesting and asking if it would be possible to use only PXELINUX files to support BIOS and UEFI based systems. This post will investigate this option and provide a quick step by step instructions. So, let’s see if this is a viable solution….
Overview
Assumptions
To be able to use this guide, you will need to first follow the instructions in our previous post as it explains how to setup the full TFTP/PXE infrastructure. We will not repeat here all the steps already provided. The following assumptions have been made as well
- Hyper-v platform is used to emulated UEFI based virtual machines
- VM Generation 2 will be used in order to have UEFI and SecureBoot option is Disabled (because pxelinux uefi are not supported when secure boot is enabled)
- You have internet connection in order to download additional necessary packages
- You have followed the instructions from our previous post to install DHCP/PXE/TFTP and create the tftp folder structure
Step by Step Guide
Step 1 – Download UEFI PXELINUX Files
So, the first step is to obtain the necessary pxelinux files. The version of pxelinux that you will be using is really important. We have tried the latest version of the package but this one didn’t worked at all. We had an error message about packet size issue. So, we had to downgrade and select another package. We have download the previous version (i.e. 6.03-pre9). So, in your Ubuntu server, in your console, execute the following commands
After downloading it, we can extract the content of the compressed file by executing the following command
Step 2 – copy the pxelinux uefi files to the correct location
It’s time to copy the files to the correct location. Before doing this, we will create a new subfolder under our /tftp root folder. We will create the /tftp/uefi folder that would be used to host the pxelinux UEFI files needed. So, as a first step, we will execute the following command
Now, we can copy the necessary pxelinux files into the proper location.
Step 3 – create the pxelinux boot menu
Here again, nothing new. we need to create the proper folder structure so the pxe boot loader knows where to get the necessary files. We will first create an additional subfolder under /tftp/uefi called pxelinux.cfg. So, execute the following command
We can now copy the file for the boot menu from the bios folder. We will issue the following command
Step 4 – Create symbolic link to boot folder
We are almost done with the folder structure preparations. We now need to create a symbolic link to the /tftp/boot folder so the pxelinux boot loader knows where to find the necessary files to boot from. To create this symbolic link, you will simply execute the following command
Step 5 – Update the dnsmasq.conf file
The pxe client needs to know where to find the file it will boot from. In our previous post, we have been using the grub software file and we have made a reference of it in the /etc/dnsmasq.conf. So, because we want to use the syslinux.efi instead of the bootx64.efi file, we will comment the last line of the file and we have added the following line
dhcp-boot=tag:efi-x86_64,uefi/syslinux.efi
To have the change applied to your system, you will need to restart the dnsmasq service. To perform such task, you will execute the following command
Then, you should check that the dnsmasq is started correctly and that no errors are reported by issuing the command
Step 6 – Try to boot your PXE client
Before trying your pxe uefi boot solution, you will need to ensure that you have disabled the secure boot option in your virtual machine (see screenshot below). If you have enabled the secure boot, the pxe boot process will fail immediately (when using uefi pxelinux files . )
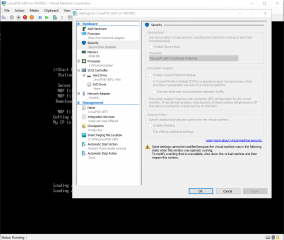
Click on picture for better resolution
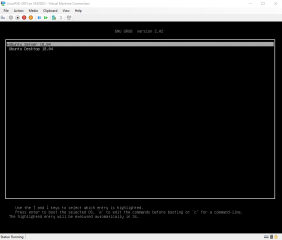
If your virtual machine is configured correctly, you should see the pxelinux menu (with some noise in the background) and you should be able to boot from network.
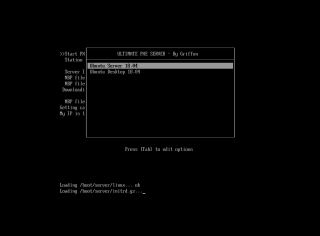
Click on picture for better resolution
Important ! The performance are really bad with these files. The BIOS version will boot in a few seconds. The UEFI process might take several minutes before you see the server wizard installer or the Ubuntu desktop live file system and perform your installation
Click on picture for better resolution
Final Notes
This is it for this post ! After a lot of trial an error, we succeeded in implementing a pxe server using only pxelinux technology. However, because of the limitations and performance issues we have encountered with the uefi version of pxelinux file, this pxelinux solution only will probably never be used in a production infrastructure. The uefi pxelinux does not support uefi machines with secure boot enabled and the download process of the 40 MB initial boot files take multiple minutes. For us, it’s a no go !
To complete this serie about pxe server and linux, we might want to investigate the option to have a pxe server using only grub files….. we will see if we have time to do that… but at the moment we are really busy working on other topics, so we will see
Источник
Griffon’s IT Library
Simple IT Library for the rest of us
Ubuntu – Ultimate PXE Server Setup – BIOS & UEFI Support
In our previous posts (see here, here and here) ,about PXE technology and how to deploy Ubuntu machine through the network, we have seen that since the introduction of UEFI technology and secure boot, the process has changed a little bit and there is a need to combined technologies in order to be able to deploy Ubuntu operating system. It seems that the standard and well accepted approach is to combine pxelinux technology for BIOS-Based systems and to use grub boot loader for UEFI-Based systems.
Technically, it’s possible to use only PXELinux solution in order to Deploy operating systems to BIOS or UEFI based systems. However, some significant limitations exists. These limitations are
- pxelinux cannot be used against UEFI systems when Secure Boot option is enabled (the bootloader is not signed for UEFI secure boot support!!)
- pxelinux on UEFI systems has slow performance issues (related to tftp block size and this seems not to be fixed yet…)
On the other hand, it’s seems also possible to get rid of pxelinux technology completely and replace it with the grub technology. Grub solution can be used to deploy Operating systems on BIOS and UEFI based systems. The advantage of Grub is that all the necessary files have been signed and can be used when secure boot option has been enabled. In some future posts (maybe), just for the challenge, we might provide guidance on how to setup a PXE Server using only PXELinux technology and/or using only grub technology.
In this post (or series of posts), we will provide again a kind of step by step guide in order to setup a PXE Server that can serve at the same time BIOS or UEFI Based systems… It’s should be quite straight forward as most of the aspects have been already discussed in some previous posts.
Overview
This guide will explain how to configure your dhcp/pxe/tftp server infrastructure to support BIOS and UEFI-based systems network installation. This guide will mix PXELinux and grub technology. This combination seems the one that provides the best results when there is a need to deploy operating systems on UEFI or BIOS based systems. Because grub files are signed, this setup will also support UEFI and secure boot option enabled as well
The pxelinux bootloader will be used when BIOS Based systems need to be installed. Grub bootloader approach will be used when UEFI Systems needs to be deployed. The selection of the bootloader will be done automatically when the client boots. The boot process with include a packet information that will tell the PXE server which bootloader to use….
To deploy Ubuntu operating system through the network, necessary infrastructure and server services needs to be present on the network. DHCP, DNS, TFTP, Web and File services are needed in order to build up the needed PXE infrastructure.
Assumptions
The following assumptions have been made in order to have this scenario working
- Hyper-v platform is used to emulated UEFI based virtual machines
- VM Generation 2 will be used in order to have UEFI and SecureBoot option is Enabled (detailed instruction can be found here)
- You have internet connection in order to download additional necessary packages
- You have Ubuntu 18.04 Server ISO or installation files
- You have Ubuntu 18.04 Desktop ISO or installation files
Step by Step Guide
Step 0 – Install Ubuntu 18.04.2 Server Edition
In this post, we will be using Ubuntu 18.04.2 Server as the PXE server. Ubuntu 18.04.2 has been selected because this is a Long Term Service (LTS) release. This post will not explain how to install an Ubuntu server. When your installation is completed, move to the next step
Step 1 – Set a Static IP address on your Ubuntu Server
Ubuntu Server has no Desktop interface available by default. We will need to perform most of the actions through command lines. No fear, you will see it’s quite easy actually. To set a static ip address on your Ubuntu Server, you will need to edit the following file /etc/netplan/50-cloud-init.yaml.
To edit this file, issue the following command
Replace the content of the file with the following one (you might need to update the information based on your infrastructure
In order to apply the changes, we need to execute this command as well
Finally, check that the ip address has been set correctly by issuing the following command
Step 2 – Build up your PXE Server
In this post, we assume that the Ubuntu Server will be hosting all the necessary services needed to implement a proper PXE Infrastructure. To setup a pxe infra, we need to install the following packages
- dnsmasq (providing DHCP,DNS and TFTP services),
- apache web for storage purposes and
- NFS packages if you are planning to deploy Ubuntu Desktop through your PXE infrastructure.
Step 2.1 – Install apache web server
To install the apache package, you will issue the following command
Step 2.2 – Install NFS packages
NFS packages will provide file services capabilities. To install the nfs packages, execute the following commands
Step 2.3 – Install dnsmasq packages
To install the dnsmasq package, you will issue the following command
Step 3 – Create the TFTP Folder Structure
We will create a folder called tftp at root of the filesystem (/tftp). Within this folder, the following structure will be create
To create this structure, you will need to execute the following commands
Step 4 – Upload source files on your PXE Server
Because you are using the Apache Web server, we will be copying all sources files under /var/www/html directory. We will copy the iso files contents of Ubuntu 18.04 Desktop and Ubuntu Server under this location. We will create the following structure first
You can obviously add other version of Ubuntu files and your structure could look like the following
So, mount your iso file into your Ubuntu server. To mount it, issue the following command
Copy the files from the iso image into the correct directory. You can use the following syntax to perform the operation
When the copy is finished, unmount the iso/DVD image from your machine by issuing the following command
Repeat the operation for each operating system sources files you want to copy on your PXE Server
Step 5 – Configuring your NFS Server Settings
Since our folder structure is ready, we can start configuring the different services that are used by the PXE server. To ensure that our directory structure is accessible through the network and through the nfs protocol, we will need to edit the following file by issuing the following command
Insert at the bottom of the file, the path where you have stored your installation files, which subnet can access it and which kind of right you want to grant. In our scenario, we want to grant access to the following directory /var/www/html/bionic/desktop through the network subnet 192.168.1.0/24 and we are granting read only access (ro). So, at the end of the file, we would add the following line
When this has been done, it’s time to restart the nfs service. To do that, you simply execute the following command
Step 6 – Configuring the dnsmasq services
Almost there ! Now, we need to configure the dnsmasq service which will provide the glue between the different services. dnsmasq configuration file will be used to provide the necessary information to the pxe client when it boots. This file will dictate where to look for pxe bootloader based on the client architecture (uefi or bios). So, let’s edit the /etc/dnsmasq.conf file and at the bottom add the following information
To edit the configuration file, issue the following command
Copy and update the following information at the bottom of the file
To have the change applied to your system, you will need to restart the dnsmasq service. To perform such task, you will execute the following command
Then, you should check that the dnsmasq is started correctly and that no errors are reported by issuing the command
Step 7 – Uploading all the necessary files in your TFTP folder Structure
We are almost ready ! Now, we need to get the necessary file placed in your tftp folder in order to have pxe capability.
Step 7.1 – populate bios folder
In the /tftp/bios folder, we will place the pxelinux files needed. To obtain the pxelinux files, you can download the files from the following url (https://mirrors.edge.kernel.org/pub/linux/utils/boot/syslinux/Testing/6.04/). Then, you can copy the following files from pxelinux sources files to /tftp/bios folder
You will also need to create a symbolic link to the /tftp/boot folder. You will need to issue the following command
We will also need to create the folder called pxelinux.cfg under the /tftp/bios folder. Inside this folder, we will create an empty file called default. This file control the pxelinux behavior. We will populate it with the following code
You are ready to move to the next section
Step 7.2 – Populate boot folder
In this step, we need to place the correct bootloader in order for the installation process to start accordingly. Under the /tftp/boot folder, we will create 2 sub folders to make a distinction between the server and the desktop bootloader files. So the folder structure will look like the following
We will copy the necessary files from the /var/www/html location. Issue the following commands to copy the necessary files to the correct location
Step 7.3 – Populate grub folder
Finally, we need to populate the grub folder. This folder contains the files that are needed to boot uefi systems. So, in your system, you will execute the following commands. The commands below basically will download the necessary signed bootloader files and grub files needed by PXE server and extract the contents on their dedicated folders (shim and grub)
When this is done, we can simply copy the needed file into the tftp boot folder. So, execute the following commands. Change the path accordingly based on your settings…
Finally, we will copy two additional files from the source iso image. They will server as base for the next step. So, execute the following commands
Step 7.4 – Create/update the grub.cfg
We are almost done ! Now, we need to create also a boot menu and get the proper option available and working. The grub boot loader reads information from the grub.cfg file. If you have followed this step by step guide, the content of the grub.cfg file should look like this
Step 8 – Test your configuration
This is the fun part ! If everything is working as expected, when you boot your Bios client, you should see the pxelinux boot loader showing up. As you can see on the screenshot below, we have customized a little bit the look’n feel of the boot menu in order to match to the grub boot menu.
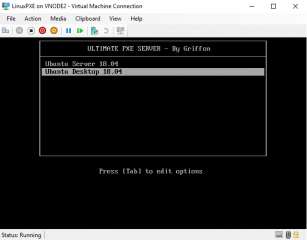
Click on picture for better resolution
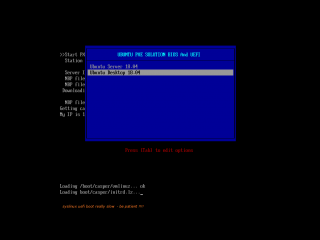
Doing the same for UEFI computers, you should see a boot menu similar to the following..
Click on picture for better resolution
Final Notes
This is it for this post ! We have provided here a step by step guide in order to setup a PXE server on an Ubuntu Server. This installation guide provides a lot of information and could be used in a bunch of scenarios. Our implementation offers the following benefits
- can be used to deploy Ubuntu Server or Ubuntu Desktop
- can be used against BIOS system or UEFI Systems
- using the minimum necessary files needed to provide pxe boot functionalities
- provide framework to customize the boot menu so it might fit your corporate identity
We might not have finished our investigations around PXE, PXELinux and Grub solutions. In a future post, we might want to provide some guidances on how to build a PXE server using only PxELInux files or using only Grub Files
Источник


