- Как установить PyCharm на Manjaro 20
- Как установить PyCharm на Manjaro 20
- Установите PyCharm на Manjaro 20 Nibia
- Шаг 1. Перед тем, как запустить руководство, приведенное ниже, убедитесь, что наша система обновлена:
- Шаг 2. Включите snapd в системе Manjaro.
- Шаг 3. Установка PyCharm на Manjaro 20.
- Шаг 4. Доступ к PyCharm на Manjaro.
- Install PyCharm
- System requirements
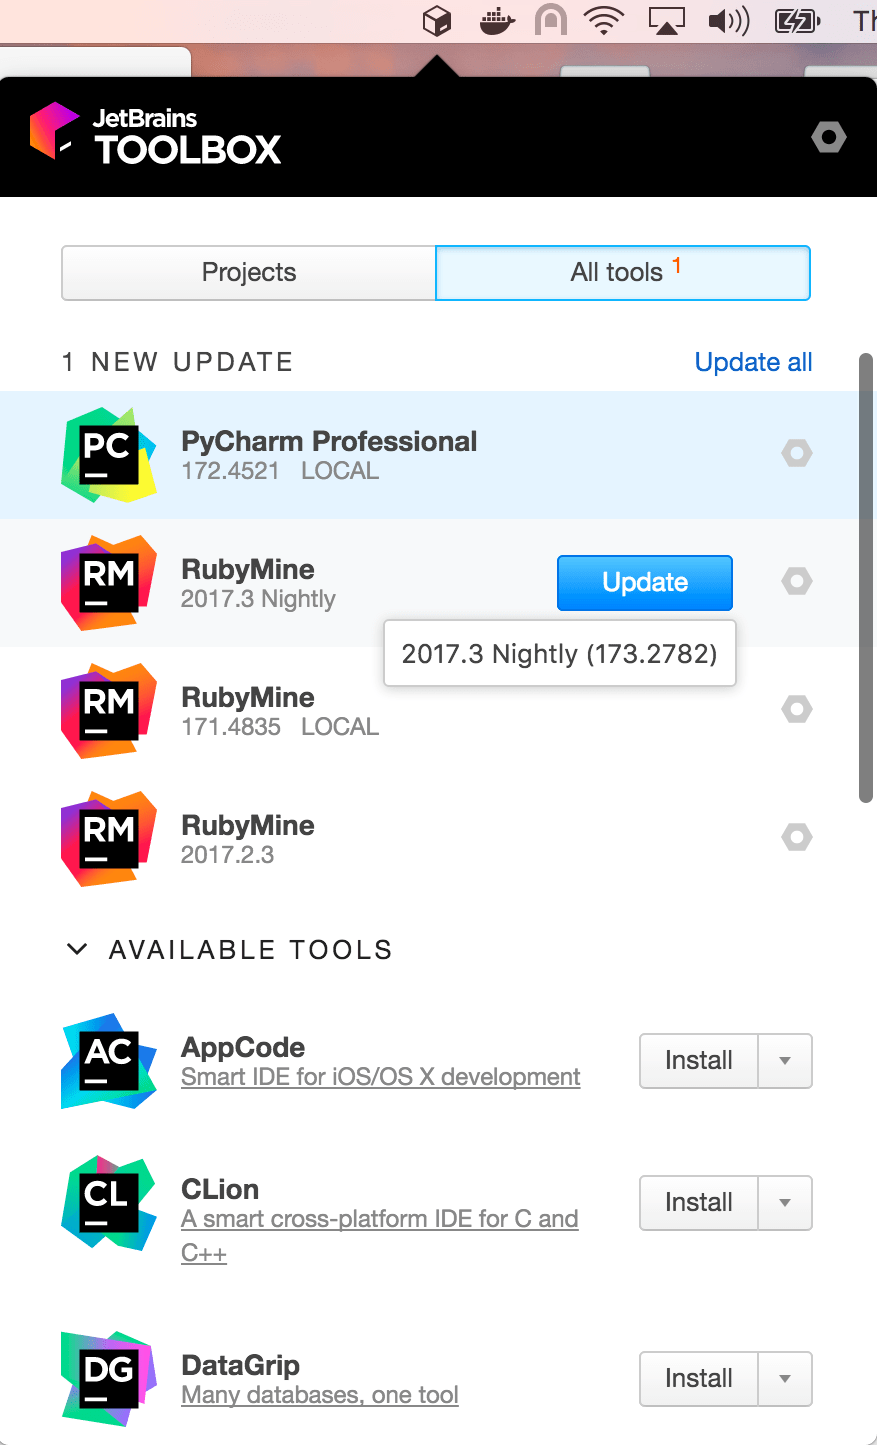
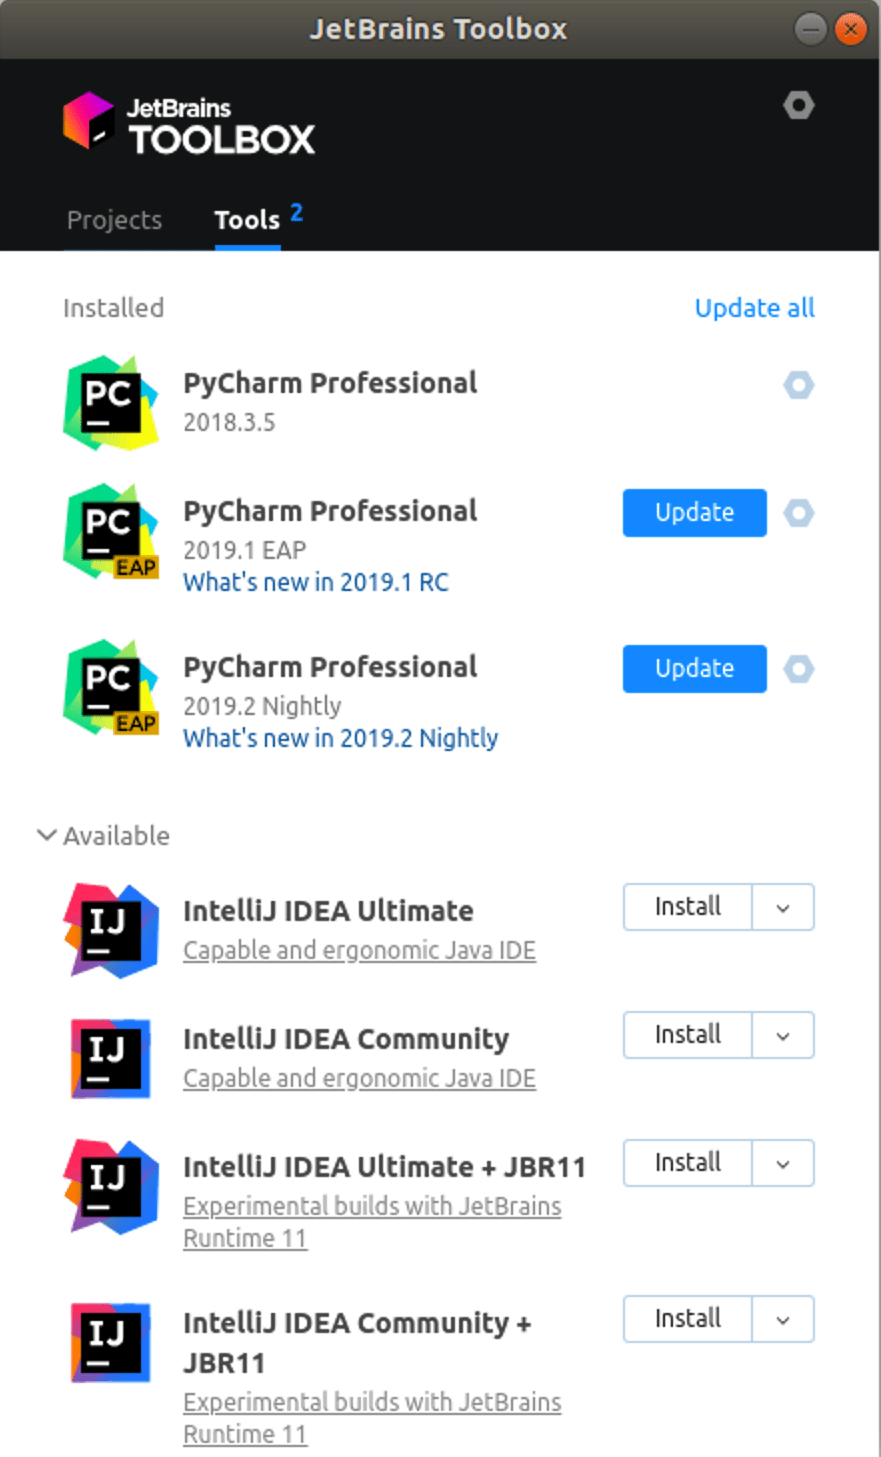
- Install using the Toolbox App
- Install the Toolbox App
- Install the Toolbox App
- Install the Toolbox App
- Standalone installation
- Install using tar archives
- Install using snap packages
- Silent installation on Windows
- Silent configuration file
- Install pycharm-professional on Manjaro Linux
- pycharm-professional
- PyCharm Professional Edition
- Details for pycharm-professional
- Enable snaps on Manjaro Linux and install pycharm-professional
- Enable snapd
- Install pycharm-professional
- Pycharm ��� linux manjaro
- Intelligent Recommendation
- How to connect to the database with Pycharm Community Edition
- How to change the port number pycharm Community Edition
- Pycharm Community Edition, how to create a Flask framework
- How to add Database tools in Pycharm (Community Edition)
- How to install pycharm professional edition
- More Recommendation
- About pycharm community edition
- Install MongoDB Community Edition under Linux
- Install gitlab community edition on linux server
- Install IntelliJ IDEA Community Edition under Linux
- Install IntelliJ IDEA Community Edition under Linux
Как установить PyCharm на Manjaro 20

Как установить PyCharm на Manjaro 20
В этом руководстве мы покажем вам, как установить PyCharm на Manjaro 20. Для тех из вас, кто не знал, PyCharm — это интеллектуальная и полнофункциональная IDE для Python, разработанная JetBrains. Он также обеспечивает поддержку Javascript, Typescript, CSS и т. Д. Вы также можете расширить возможности PyCharm с помощью плагинов. Используя плагины PyCharm, вы также можете получить поддержку таких фреймворков, как Django, Flask. Мы также можем использовать PyCharm для других языков программирования, таких как HTML, SQL, Javascript, CSS и других. PyCharm доступен в трех редакциях: Professional, Community и Edu. Редакции Community и Edu — это проекты с открытым исходным кодом, они бесплатны, но имеют меньше функций. PyCharm Edu предоставляет курсы и помогает научиться программировать на Python. Профессиональная версия является коммерческой и предоставляет отличный набор инструментов и функций.
В этой статье предполагается, что у вас есть хотя бы базовые знания Linux, вы знаете, как использовать оболочку, и, что наиболее важно, вы размещаете свой сайт на собственном VPS. Установка довольно проста и предполагает, что вы работаете с учетной записью root, в противном случае вам может потребоваться добавить ‘ sudo ‘ к командам для получения привилегий root. Я покажу вам пошаговую установку PyCharm CE на Manjaro 20 ( Nibia ).
Установите PyCharm на Manjaro 20 Nibia
Шаг 1. Перед тем, как запустить руководство, приведенное ниже, убедитесь, что наша система обновлена:
Шаг 2. Включите snapd в системе Manjaro.
Теперь выполните следующую команду, чтобы установить пакеты Snap:
Шаг 3. Установка PyCharm на Manjaro 20.
Чтобы установить PyCharm CE, просто используйте следующую команду:
Шаг 4. Доступ к PyCharm на Manjaro.
После успешной установки PyCharm в вашей системе Manjaro теперь вы можете перейти в меню приложения и найти там PyCharm. Вы должны увидеть значок кода PyCharm.
Поздравляю! Вы успешно установили PyCharm . Благодарим за использование этого руководства для установки последней версии PyCharm в системе Manjaro. Для получения дополнительной помощи или полезной информации мы рекомендуем вам посетить официальный сайт PyCharm .
Источник
Install PyCharm
PyCharm is a cross-platform IDE that provides consistent experience on the Windows, macOS, and Linux operating systems.
PyCharm is available in three editions: Professional , Community , and Edu . The Community and Edu editions are open-source projects and they are free, but they have fewer features. PyCharm Edu provides courses and helps you learn programming with Python. The Professional edition is commercial, and provides an outstanding set of tools and features. For details, see the editions comparison matrix.
System requirements
| Requirement | Minimum | Recommended |
|---|---|---|
| RAM | 4 GB of free RAM | 8 GB of total system RAM |
| CPU | Any modern CPU | Multi-core CPU. PyCharm supports multithreading for different operations and processes making it faster the more CPU cores it can use. |
| Disk space | 2.5 GB and another 1 GB for caches | SSD drive with at least 5 GB of free space |
| Monitor resolution | 1024×768 | 1920×1080 |
| Operating system | Latest 64-bit version of Windows, macOS, or Linux (for example, Debian, Ubuntu, or RHEL) |
You do not need to install Java to run PyCharm because JetBrains Runtime is bundled with the IDE (based on JRE 11).
Python 2: version 2.7
Python 3: from the version 3.6 up to the version 3.10
Install using the Toolbox App
The JetBrains Toolbox App is the recommended tool to install JetBrains products. Use it to install and manage different products or several versions of the same product, including Early Access Program (EAP) and Nightly releases, update and roll back when necessary, and easily remove any tool. The Toolbox App maintains a list of all your projects to quickly open any project in the right IDE and version.
Install the Toolbox App
Download the installer .exe from the Toolbox App web page.
Run the installer and follow the wizard steps.
After you run the Toolbox App, click its icon in the notification area and select which product and version you want to install.

Log in to your JetBrains Account from the Toolbox App and it will automatically activate the available licenses for any IDE that you install.
Install the Toolbox App
Download the disk image .dmg from the Toolbox App web page.
There are separate disk images for Intel and Apple Silicon processors.
Mount the image and drag the JetBrains Toolbox app to the Applications folder.
After you run the Toolbox App, click its icon in the main menu and select which product and version you want to install.
Log in to your JetBrains Account from the Toolbox App and it will automatically activate the available licenses for any IDE that you install.
Install the Toolbox App
Download the tarball .tar.gz from the Toolbox App web page.
Extract the tarball to a directory that supports file execution.
For example, if the downloaded version is 1.17.7391, you can extract it to the recommended /opt directory using the following command:
Execute the jetbrains-toolbox binary from the extracted directory to run the Toolbox App and select which product and version you want to install. After you run the Toolbox App for the first time, it will automatically add the Toolbox App icon to the main menu.
Log in to your JetBrains Account from the Toolbox App and it will automatically activate the available licenses for any IDE that you install.
You can use this shell script that automatically downloads the tarball with the latest version of the Toolbox App, extracts it to the recommended /opt directory, and creates a symbolic link in the /usr/local/bin directory.
Standalone installation
Install PyCharm manually to manage the location of every instance and all the configuration files. For example, if you have a policy that requires specific install locations.
To verify the integrity of the installer, use the SHA checksum linked from the Download page.
Run the installer and follow the wizard steps.
Mind the following options in the installation wizard
64-bit launcher : Adds a launching icon to the Desktop.
Open Folder as Project : Adds an option to the folder context menu that will allow opening the selected directory as a PyCharm project.
.py : Establishes an association with Python files to open them in PyCharm.
Add launchers dir to the PATH : Allows running this PyCharm instance from the Console without specifying the path to it.
To run PyCharm, find it in the Windows Start menu or use the desktop shortcut. You can also run the launcher batch script or executable in the installation directory under bin .
There are separate disk images for Intel and Apple Silicon processors.
To verify the integrity of the downloaded disk image, use the SHA checksum linked from the Download page.
Mount the image and drag the PyCharm app to the Applications folder.
Run the PyCharm app from the Applications directory, Launchpad, or Spotlight.
Install using tar archives
Unpack the pycharm-*.tar.gz file to a different folder, if your current Download folder doesn’t support file execution:
The recommended installation location according to the filesystem hierarchy standard (FHS) is /opt . To install PyCharm into this directory, enter the following command:
To verify integrity of the downloaded archive, use the SHA checksum linked from the Download page.
Switch to the bin subdirectory:
Run pycharm.sh from the bin subdirectory.
Install using snap packages
For Ubuntu 16.04 and later, you can use snap packages to install PyCharm.
PyCharm is distributed via two channels:
The stable channel includes only stable versions. To install the latest stable release of PyCharm, run the following command:
The —classic option is required because the PyCharm snap requires full access to the system, like a traditionally packaged application.
The edge channel includes EAP builds. To install the latest EAP build of PyCharm, run the following command:
Run pycharm-professional , pycharm-community , or pycharm-educational in the Terminal.
To create a desktop entry, do one of the following:
On the Welcome screen, click Configure | Create Desktop Entry
From the main menu, click Tools | Create Desktop Entry
When you run PyCharm for the first time, some steps are required to complete the installation, customize your instance, and start working with the IDE.
For information about the location of the default IDE directories with user-specific files, see Directories used by the IDE.
Silent installation on Windows
Silent installation is performed without any user interface. It can be used by network administrators to install PyCharm on a number of machines and avoid interrupting other users.
To perform silent install, run the installer with the following switches:
/S : Enable silent install
/CONFIG : Specify the path to the silent configuration file
/D : Specify the path to the installation directory
This parameter must be the last in the command line and it should not contain any quotes even if the path contains blank spaces.
To check for issues during the installation process, add the /LOG switch with the log file path and name between the /S and /D parameters. The installer will generate the specified log file. For example:
Silent configuration file
The silent configuration file defines the options for installing PyCharm. With the default options, silent installation is performed only for the current user: mode=user . If you want to install PyCharm for all users, change the value of the installation mode option to mode=admin and run the installer as an administrator.
The default silent configuration file is unique for each JetBrains product. You can modify it to enable or disable various installation options as necessary.
It is possible to perform silent installation without the configuration file. In this case, omit the /CONFIG switch and run the installer as an administrator. Without the silent configuration file, the installer will ignore all additional options: it will not create desktop shortcuts, add associations, or update the PATH variable. However, it will still create a shortcut in the Start menu under JetBrains .
Источник
Install pycharm-professional
on Manjaro Linux
pycharm-professional
- jetbrains
 Verified account
 - Development
 Verified account
PyCharm Professional Edition
Python IDE for professional developers. Save time while PyCharm takes care of the routine. Focus on bigger things and embrace the keyboard-centric approach to get the most of PyCharm’s many productivity features.
Details for pycharm-professional
Enable snaps on Manjaro Linux and install pycharm-professional
Snaps are applications packaged with all their dependencies to run on all popular Linux distributions from a single build. They update automatically and roll back gracefully.
Snaps are discoverable and installable from the Snap Store, an app store with an audience of millions.
Enable snapd
Snapd can be installed from Manjaro’s Add/Remove Software application (Pamac), found in the launch menu. From the application, search for snapd, select the result, and click Apply.
Alternatively, snapd can be installed from the command line:
Once installed, the systemd unit that manages the main snap communication socket needs to be enabled:
To enable classic snap support, enter the following to create a symbolic link between /var/lib/snapd/snap and /snap :
Either log out and back in again, or restart your system, to ensure snap’s paths are updated correctly.
Install pycharm-professional
To install pycharm-professional, simply use the following command:
Источник
Pycharm ��� linux manjaro
direct sudo pacman -S pycharm The Professional version is shown, and Community is open source and free, and is sufficient for developing small Python projects. If you want to download the Community version, use the following command
sudo pacman -S pycharm-community-edition
PyCharm can create an independent virtual environment for each Python project and choose a different Python version, great

Intelligent Recommendation

How to connect to the database with Pycharm Community Edition
Connect to the database with Pycharm Community Edition Pycharm Community Edition Installation process Pycharm Community Edition Pycharm Community Edition is a tool that is less than the professional, .

How to change the port number pycharm Community Edition
When you run djiango project, often a problem occupied port number, description of the problem: Traceback (most recent call last): solution is as follows: 1, first click run, and then select Edit conf.

Pycharm Community Edition, how to create a Flask framework
Project scene: When we get the data, we want to visualize the data. And our Pycharm is a community version, how to use the Flask framework Solution: Install Flask Right click on the upper left corner.

How to add Database tools in Pycharm (Community Edition)
1. Open the File menu and select the Setting button to set; 2, select Plugins, enter Database in the middle search bar, search; 3, install Database Navigator; 4, restart pycharm, then you can see the .

How to install pycharm professional edition
Download the Po sister toolkit link:https://pan.baidu.com/s/1fHOthqxElAdvUFWBhMYnTwExtraction code: 3mv7 Go to the official website to find the previous version, if it is before 2020.1.3, I will downl.
More Recommendation

About pycharm community edition
Download and install pycharm Download URL: https://www.jetbrains.com/pycharm/download/#section=windows According to your needs, download and install the professional version (paid) or the community ve.
Install MongoDB Community Edition under Linux
Environmental description CentOS7 64-bit (only supports 64-bit) This installation is for MongoDB version 3.6 MongoDB’s support for various platforms platform 3.6 Communities and businesses 3.4 Communi.

Install gitlab community edition on linux server
Write in front: Document Last Update Date 2019/12/11 The server needs at least 4G RAM! ! ! ! ! Very important, 2G can only run very very badly, there will be many problems, you will think it is a bug.

Install IntelliJ IDEA Community Edition under Linux
just nowInstalled IntelliJ IDEA Community Edition 2016.1.3(64) under Windows7,again Install IntelliJ IDEA Ultimate Edition under WindowsXP,againInstall IntelliJ IDEA Community Edition under Mac OS, Le.
Install IntelliJ IDEA Community Edition under Linux
Just now Installed IntelliJ IDEA Community Edition 2016.1.3(64) under Windows7,again Install IntelliJ IDEA Ultimate Edition under WindowsXP,againInstall IntelliJ IDEA Community Edition under Mac OS, L.
Источник


