You can evaluate PyCharm for up to 30 days. After that, buy and register a license to continue using the product.
PyCharm Community Edition and PyCharm Edu are free and can be used without any license. You cannot upgrade to PyCharm Professional: download and install it separately as described in Install PyCharm.
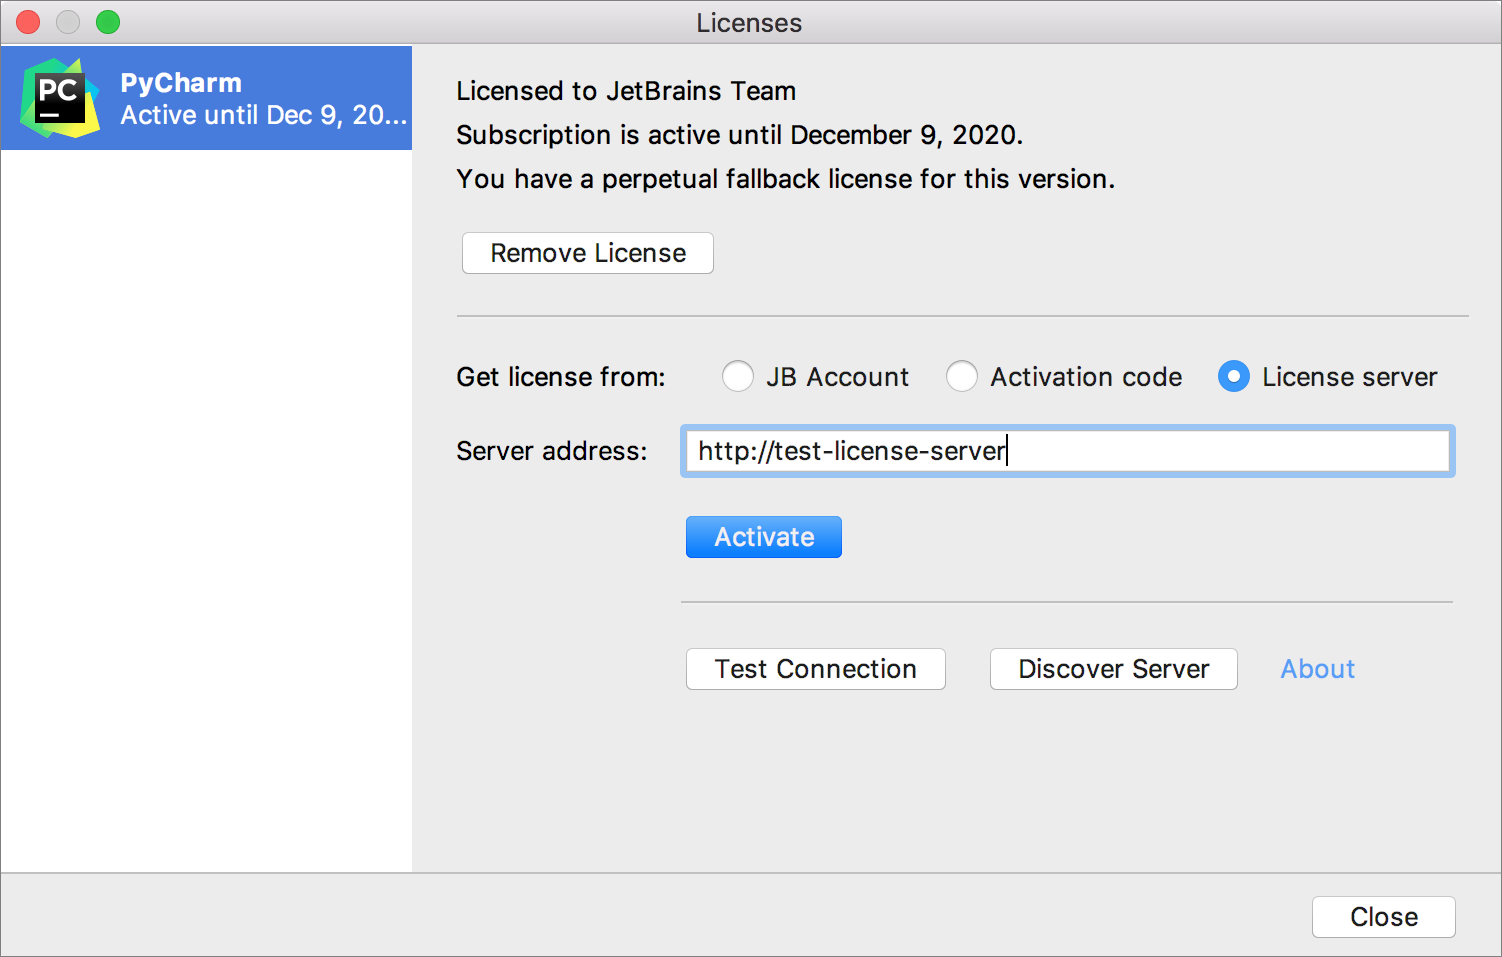
Do one of the following to open the Licenses dialog:
From the main menu, select Help | Register
On the Welcome screen, click Help | Manage License
Select how you want to register PyCharm or a plugin that requires a license:
Option
Description
JB Account
If you are using two-factor authentication for your JetBrains Account, specify the generated app password instead of the primary JetBrains Account password.
Activation code
Register using an activation code.
You can get an activation code when you purchase a license for the corresponding product.
When performing silent install or managing PyCharm installations on multiple machines, you can set the JETBRAINS_LICENSE_SERVER environment variable to point the installation to the Floating License Server URL.
Alternatively, you can set the Floating License Server URL by adding the -DJETBRAINS_LICENSE_SERVER JVM option.
PyCharm detects the system proxy URL during initial startup and uses it for connecting to the JetBrains Account and Floating License Server. To override the URL of the system proxy, add the -Djba.http.proxy JVM option. Specify the proxy URL as the host address and optional port number: proxy-host[:proxy-port] . For example: -Djba.http.proxy=http://my-proxy.com:4321 .
If you want to disable proxy detection entirely and always connect directly, set the property to -Djba.http.proxy=direct .
Early Access Program
Pre-release builds of PyCharm that are part of the Early Access Program are shipped with a 30-days license. Log in with your JetBrains Account to start using PyCharm EAP.
For authorization, you can use either your JetBrains Account directly or your Google, GitHub, GitLab, or BitBucket account. You can also create a new JetBrains Account if you don’t have one yet.
If you’re using ToolBox to install JetBrains products and already logged in to your JetBrains Account there, PyCharm will automatically log you into the same account.
Login options
Click Log in to JetBrains Account . You will be automatically redirected to the JetBrains Account website.
On the website, log in using your JetBrains Account credentials.
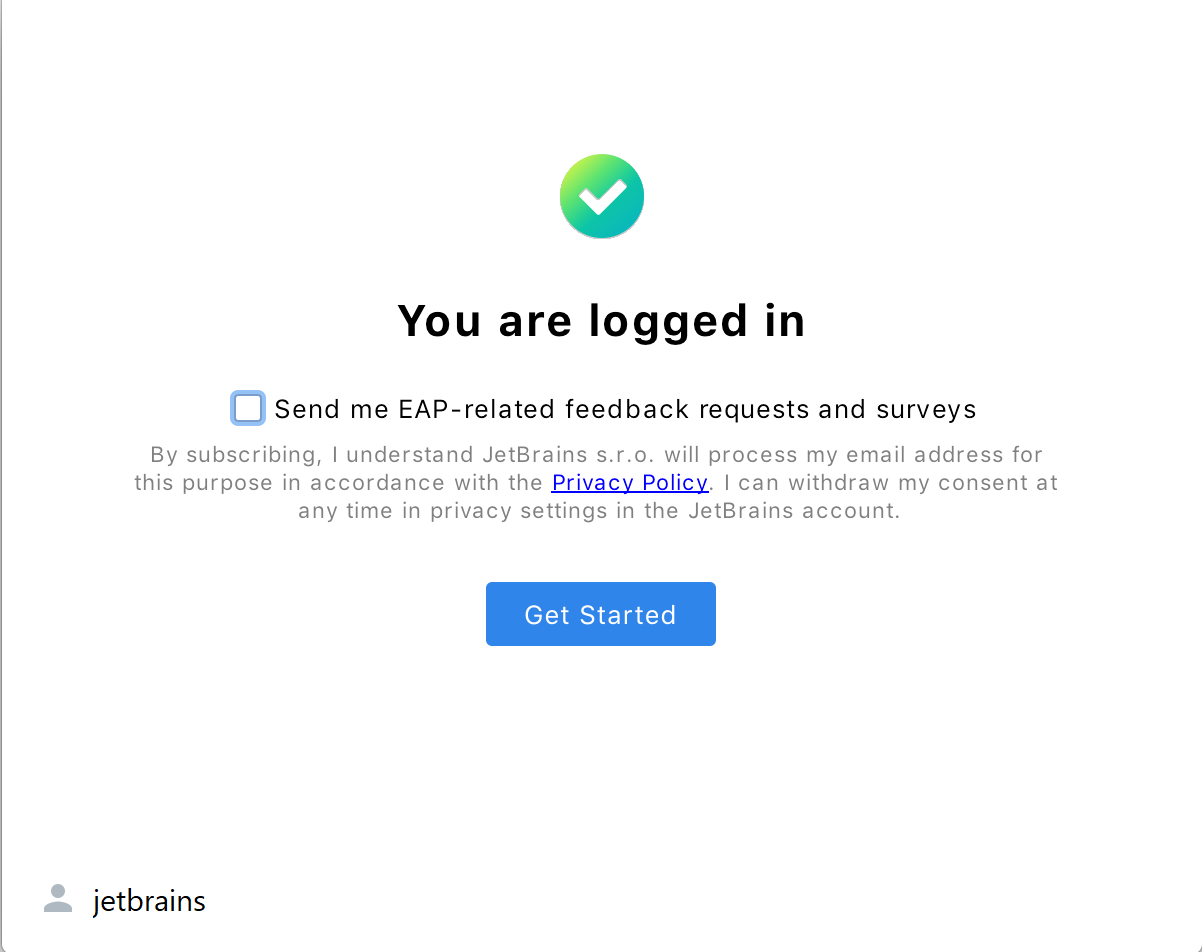
Once you’ve successfully logged in, you can start using PyCharm EAP by clicking Get Started .
If you want to participate in EAP-related activities and provide your feedback, make sure to select the Send me EAP-related feedback requests and surveys option.
Click the Create an account link. You will be automatically redirected to the JetBrains Account website. Follow the instructions on the website to register a new JetBrains Account.
Once you’ve successfully logged in, you can start using PyCharm EAP by clicking Get Started .
If you want to participate in EAP-related activities and provide your feedback, make sure to select the Send me EAP-related feedback requests and surveys option.
Click the icon of the service that you want to use for logging in. You will be redirected to the login page on the website of the selected service.
Once you’ve successfully logged in, you can start using PyCharm EAP by clicking Get Started .
If you want to participate in EAP-related activities and provide your feedback, make sure to select the Send me EAP-related feedback requests and surveys option.
Log in with an authorization token
An authorization token is a way to log in to your JetBrains Account if your system doesn’t allow for redirection from the IDE directly, for example, due to your company’s security policy. PyCharm recognizes when redirection to the JetBrains Account website is impossible. It enables you to copy a link to generate an authorization token manually.
Click Copy link and open the copied link in your browser.
Log in to your JetBrains Account to generate an authorization token. After that, copy the token, paste it to the IDE authorization token field and click Check token .
Once you’ve successfully logged in, you can start using PyCharm EAP by clicking Get Started .
If you want to participate in EAP-related activities and provide your feedback, make sure to select the Send me EAP-related feedback requests and surveys option.
Источник
Pycharm mac os license
1. Скачать архив по ссылке > 2. Распаковать архив 3. Закрыть все JetBrains программы 4. Откройте терминал 5. Напишите » chmod +x » без кавычек и перетащите в окно терминала файл reset_jetbrains_eval_mac_linux.sh и нажмите Enter 6. В окно терминала введите перетащите файл reset_jetbrains_eval_mac_linux.sh и нажмите Enter (он сбросит триальный период у ВСЕХ JetBrains IDE в вашей ОС) 7. По окончанию работы скрипта запустить нужную вам JetBrains IDE 8. Появится стартовое окно для активации, в нем выберите триальную версию на 30 дней 9. После сброса пробного периода с помощью скрипта нужно заблокировать доступ в интернет для программы, иначе через время пробный период сбросится на 0 дней.
Для блокировки IDE доступ в интернет, достаточно в файл hosts добавить эти строки:
Также вы можете воспользоваться альтернативным скриптом для сброса пробного периода с github >
P.S. Эти скрипты вы можете найти внутри архивов с плагином jetbrains-agent, но эти плагины больше не работают в новых версиях JetBrains IDEs
1. Откройте JetBrains IDE, в которой нужно сбросить триальный период 2. Установите плагин одним из способов
2.2.1 Скачать образ по ссылке > и смонтировать его 2.2.2 Распаковать архив «ide-eval-resetter-2.2.4-4959c6.zip» и достать из него .jar файл 2.2.3 Перейти в Preferences -> Plugins нужной вам JetBrains IDE 2.2.4 Нажать на иконку шестеренки и в выпадающем списке нажать на «Install Plugin from Disk. » 2.2.5 Выбрать файл ide-eval-resetter-2.2.4.jar 2.2.6 Перезапустить IDE
2.3.1 Скачать образ по ссылке > и смонтировать его 2.3.2 Архив «ide-eval-resetter-2.2.4-4959c6.zip» перетянуть в любое открытое окно IDE 2.3.3 Перезапустить IDE
3. Открыть существующий или создать новый проект 4. Перейти в меню Help и нажать на пункт «Eval Reset» 5. В появившейся снизу панели нажать кнопку «Reset» 6. После перезапуска IDE активировать Trial период на 30 дней
Активация на бесконечный период
1. Скачать архив по ссылке > 2. Распаковать архив 3. Сделать .jar файл javaagent’ом для выбранной IDE
3.4.1 Открыть любой проект в вашей IDE или создать новый 3.4.2 Открыть Help -> Custom VM Options. // Или перейдите в папку с вашей IDE, например в /Users/your_user/Library/Application Support/JetBrains/AppCode2020.3 и откройте там файл appcode.vmoptions. Если его нет, то лучше создайте с помощью Help -> Custom VM Options. 3.4.3 Если в тексте есть строчки, начинающиеся с «-javaagent», то нужно или удалить их или закомментировать, добавив знак решетки «#» в самом начале строки 3.4.4 В конце файла на новой строке вставить текст » -javaagent:
» указать полный или относительный путь к файлу JetbrainsIdesCrack_5_3_1_KeepMyLic.jar. // Путь к файлу можно легко скопировать, нажав на нем ПКМ и зажав клавишу Alt и в выпадающем меню вместо слова «Скопировать файл» появится «Скопировать путь до . «. Нажмите на этот пункт и путь скопируется в буфер обмена. 3.4.5 Сохранить .vmoptions файл 3.4.6 Перезапустить IDE
4. Откройте папку KeepLicense_keys из распакованного архива 5. Переместить соответствующий файл-ключ с расширением .key в папку с соответствующей IDE. Она находится в /Users/your_user/Library/Application Support/JetBrains/ 6. Перезапустить IDE 7. Откройте окно About и увидите, что в нем нет информации о дате окончания лицензии, значит все сработало правильно
P.S. Будьте осторожны, при такой активации, если откроете окно Help -> Register, то кнопка Close в нем будет отключена и вы сможете нажать только на кнопку Exit, что приведет к закрытию IDE. Лицензия не слетит, но вы потеряете несохраненные изменения.
1. Скачать архив по ссылке > 2. Распаковать архив 3. Сделать .jar файл javaagent’ом для выбранной IDE
3.4.1 Открыть любой проект в вашей IDE или создать новый 3.4.2 Открыть Help -> Custom VM Options. // Или перейдите в папку с вашей IDE, например в /Users/your_user/Library/Application Support/JetBrains/AppCode2020.3 и откройте там файл appcode.vmoptions. Если его нет, то лучше создайте с помощью Help -> Custom VM Options. 3.4.3 Если в тексте есть строчки, начинающиеся с «-javaagent», то нужно или удалить их или закомментировать, добавив знак решетки «#» в самом начале строки 3.4.4 В конце файла на новой строке вставить текст » -javaagent:
» указать полный или относительный путь к файлу JetbrainsIdesCrack_5_3_1_KeepMyLic.jar. // Путь к файлу можно легко скопировать, нажав на нем ПКМ и зажав клавишу Alt и в выпадающем меню вместо слова «Скопировать файл» появится «Скопировать путь до . «. Нажмите на этот пункт и путь скопируется в буфер обмена. 3.4.5 Сохранить .vmoptions файл 3.4.6 Перезапустить IDE
4. Откройте папку Codes из распакованного архива 5. Открыть пункт Help -> Register. В открывшемся окне открыть подпункт Activation Code, вставить любой из валидных кодов и нажать кнопку Activate 6. Перезапустить IDE 7. Откройте окно About и увидите, что в нем дата окончания действия лицензии уже истекла, тем не менее IDE запускается, не говорит что срок действия лицензии истек и не закрывается сама как при нерабочей лицензии
P.S. Будьте осторожны, при такой активации, если откроете окно Help -> Register, то кнопка Close в нем будет отключена и вы сможете нажать только на кнопку Exit, что приведет к закрытию IDE. Лицензия не слетит, но вы потеряете несохраненные изменения.
. ДАННЫЙ СПОСОБ НЕ РЕКОМЕНДУЕТСЯ .
Все чаще встречаются сообщения, что этот плагин является вирусом keylogger, который как минимум может передавать данные, которые вы печатаете. Даже если это не так, у некоторых пользователей этот плагин использует подозрительно много ОЗУ для своей работы.
1. Откройте JetBrains IDE, которую нужно активировать 2. Установите плагин одним из способов
2.1.1 Перейти в Preferences -> Plugins 2.1.2 Нажать на шестеренку и в выпадающем списке нажать на «Manage Plugin Repositories. » 2.1.3 Добавить в список адрес https://repo.idechajian.com и нажать ОК 2.1.4 Во вкладке Marketplace в поиске ввести «BetterIntelliJ» без кавычек и установить соответствующий плагин // Плагин установится в /Users/your_user/.BetterIntelliJ и скорее всего пропишет -javaagent в VM Options на себя 2.1.5 Перезапустить IDE
2.3.1 Скачать образ по ссылке > и смонтировать его 2.3.2 Перейти в Preferences -> Plugins нужной вам JetBrains IDE 2.3.3 Нажать на иконку шестеренки и в выпадающем списке нажать на «Install Plugin from Disk. » 2.3.4 Выбрать файл BetterIntelliJ с расширением .jar и нужной версии // Плагин установится в /Users/your_user/.BetterIntelliJ и скорее всего пропишет -javaagent в VM Options на себя 2.3.5 Если выбрали плагин версии 1.20 — BetterIntelliJ-1.20.jar, то нужно вашей IDE заблокировать доступ в интернет. Это можно сделать например добавив в файл hosts эти строки
3. Открыть пункт Help -> Register. В открывшемся окне открыть подпункт Activation Code, вставить код из файла code.txt и нажать кнопку Activate 4. Открыть окно About и убедиться, что активирована лицензия до 2100 года.
Нерабочие способы
Если вы будете самостоятельно искать и тестировать другие способы активации в интернете, то мы это уже сделали и некоторые из этих способов на данный момент не работают. Эти способы представлены здесь, чтобы если вы натыкались на них на других сайтах, то не думали, что они являются чем-то кардинально новым и не тратили время на эти способы.
Я протестировал способ активации с этим плагином версии 3.2.2 на всех ключевых версиях WebStorm начиная с версии 2018.3.6 и ни на одной из версий он не заработал. Возможно когда-то этот способ и был действующим, но на сентябрь 2021 года мне не удалось активировать с его помощью ни одну Jetbrains IDE.
Если вы все же хотите попытать удачу, jetbrains agent v3.2.2 можно скачать по ссылке >
Источник
PyCharm Community Edition and Professional Edition Explained: Licenses and More
We often get questions about the difference between PyCharm Community Edition and PyCharm Professional Edition. We receive further questions about the difference between an individual and a commercial subscription for PyCharm Professional Edition. So let’s try to address some of these questions here:
PyCharm Community Edition
The community edition of PyCharm is Apache 2 licensed: meaning it is free and open source and you can go to GitHub, and look at the source code . You’re free to use it whenever, and wherever you like, including at work. Additionally, you can fork and modify it. See the python subfolder README.md for details about PyCharm rather than IntelliJ IDEA.
What can I use PyCharm Community Edition for?
Let’s go to the LICENSE.txt in the root of the GitHub repo . JetBrains’ open source projects are generally licensed under the Apache 2.0 License. This means that you can use it anywhere you’d like to, and modify it freely. There are some restrictions, which we’ll look into below.
Can I use PyCharm Community Edition at work?
Yes, you can. You are allowed to use PyCharm Community Edition for commercial use.
Can I use PyCharm Community Edition at my university?
Yes, you can. However, you may be interested in learning about our free all product pack licenses for educational usage .
Could I fork PyCharm?
Yes, you can. The Apache 2.0 license doesn’t just permit using this code, but also allows modification. However, before you release YourNamePyCharm , you need to be aware that that the JetBrains and PyCharm trademarks are restricted. So if you do want to fork PyCharm, you will need to take out our branding. Furthermore, in your derived version, you will need to credit us. So you could make ‘YourNameIDE’, with a notice that it’s based on software made by JetBrains.
What can’t I do with PyCharm Community Edition?
There are some restrictions that apply when you fork PyCharm. The Apache 2.0 license requires:
You need to attribute us. So if you fork PyCharm, you’re not allowed to remove all notices that JetBrains made it
You need to include a full copy of the Apache 2 license
You need to include the NOTICES file
We’re not lawyers, so please be aware that this is not legal advice.
So why would I use PyCharm Professional Edition?
The professional edition of PyCharm gives you access to additional features that you don’t get in the community edition:
Support for Remote Development . PyCharm Pro can deploy and debug python code running on remote machines, virtual machines, and Docker containers.
Web Development. Django, Flask, and other python frameworks are better supported in PyCharm Pro. Furthermore, HTML, JavaScript, and CSS are only supported in the professional edition. PyCharm Professional edition bundles all features from WebStorm, JetBrains’ JavaScript IDE .
Database support . PyCharm Professional takes its database support from DataGrip, the SQL IDE by JetBrains . This means you can explore your database within the IDE, and get schema-aware code completion when writing an SQL statement in Python code.
Some further frameworks and technologies, see our edition comparison page for details .
Alright, so what about Individual v Commercial subscriptions?
Many people get confused when we tell them that they are allowed to use a personal license at work. We believe though, that it’s important that developers can use the tools that are right for the job, and therefore we offer low price options to individual developers.
The difference between personal and commercial licenses isn’t about who uses the software; it is about who owns the software.
The personal license is yours: you pay, and you own it. You can use it at work, and if you change jobs you can use it at your next job.
The commercial license is your employer’s: they pay, and they get to keep it if you leave. However, if you buy it and get reimbursed by your employer, you still need a commercial license: if the employer pays, it needs to be a commercial license.
Can I use my license on multiple machines?
Individual licenses: yes. Commercial licenses: yes, as long as your user name (login) is the same on all the machines that you’re running it on.
Can I still use PyCharm Professional Edition after my subscription expires?
If you’ve had a subscription for at least one year: yes. You have a perpetual fallback license for the version that was released one year before your subscription expired, and all its minor updates. See here for details .
Can I get PyCharm Professional Edition for free?
Are you a student or teacher? Apply for a free student license
Are you a core contributor or committer for an open source project, no matter the size? As long as you don’t make money from your project, you can likely get a free license to work on your project. Apply for an open source license
Would you like to have PyCharm on computers in your classrooms? Whether you’re an accredited institute or a commercial provider, we provide free classroom licenses here .
Do you run a Python user group, and would you like some licenses you can use as prizes in competitions or something similar? Apply for user group support here
We also offer discounts for startups, recent graduates, and users of commercial competitor products, find out more about discounts on our website .
Do you still have a question?
If you have a specific sales question, contact our sales team to learn more about licenses, prices, discounts, etc. If you have any other question, let us know in the comments below, or reach out to us on Twitter .