- 3 способа установить PyCharm в Linux Ubuntu
- Основные особенности
- Как установить на Ubuntu
- Способ №1
- Как удалить PyCharm
- Способ №2 — установка с помощью umake
- Удаление
- Способ №3 — установка в Ubuntu и Linux Mint с помощью PPA
- Удаление
- Как установить PyCharm на Manjaro 20
- Как установить PyCharm на Manjaro 20
- Установите PyCharm на Manjaro 20 Nibia
- Шаг 1. Перед тем, как запустить руководство, приведенное ниже, убедитесь, что наша система обновлена:
- Шаг 2. Включите snapd в системе Manjaro.
- Шаг 3. Установка PyCharm на Manjaro 20.
- Шаг 4. Доступ к PyCharm на Manjaro.
- КАК: Как установить PyCharm в Linux — 2021
- How To Install PyCharm In Ubuntu 18.04 + Create and Run First Python Project (Октябрь 2021).
- Table of Contents:
- Как установить PyCharm
- Как запустить PyCharm
- PyCharm — лучшая Linux Python IDE
- Как установить веб-сервер Apache в Linux
- Как установить и установить BASH на Windows 10
- Get started
- Choose the best PyCharm for you
- Supported languages
- Supported platforms
- Start with a project in PyCharm
- Open an existing project
- Check out an existing project from Version Control
- Create a new project
- Look around
- Code with smart assistance
- Create a Python file
- Code completion
- Intention actions
- Keep your code neat
- Generate some code
- Find your way through
- Basic search
- Search for usages
- Project navigation
- Navigate through the timeline
- Search Everywhere
- Run, debug and test
- Debug
- Keep your source code under Version Control
- Local history
- Process data
- Customize your environment
- Appearance
- Editor
- Code style
- Keymap
- That’s it! Go ahead and develop with pleasure!
3 способа установить PyCharm в Linux Ubuntu
PyCharm — это популярная IDE (интегрированная среда разработки) для языка Python. В ней есть графический отладчик, анализатор кода, встроенный тестировщик, а также интеграция с системами контроля версий. PyCharm поддерживает веб-разработку на Django. В нем есть кроссплатформенные функции для Linux, Windows и macOS.
Основные особенности
- Помощь в написании кода и анализ с автоматическим завершением кода, подсвечиванием синтаксиса и ошибок
- Навигация по всему проекту и коду
- Рефакторинг Python
- Поддержка веб-фреймворков
- Интеграция контроля версий
Как установить на Ubuntu
Способ №1
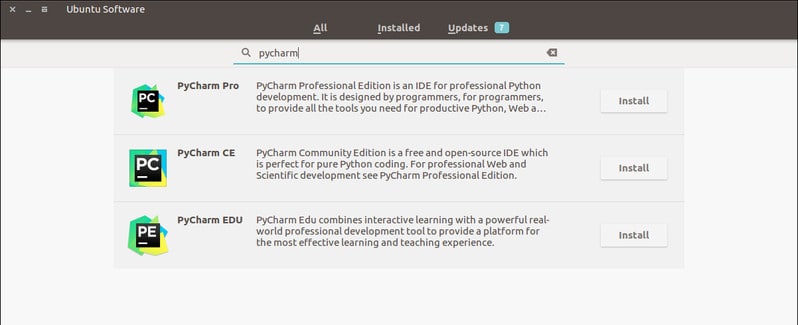
Можно воспользоваться центром приложений Ubuntu. Установка через него происходит в формате пакетов Snap.
Или использовать следующую команду в командной строек:
Для Pro-версии нужно просто заменить pycharm-community на pycharm-professional .
Как удалить PyCharm
Можно удалить приложение прямо из центра приложений Ubuntu или использовать следующую команду:
Способ №2 — установка с помощью umake
Umake — это отличный инструмент командной строки, который помогает разработчикам устанавливать важные IDE. IDE — один из встроенных инструментов разработки в umake. Для установки PyCharm с помощью umake нужно, чтобы он был установлен в системе. Обычно он доступен по умолчанию, но если его нет, используйте следующую команду для установки umake с помощью PPA:
После этого установите PyCharm Community Edition:
Для PyCharm Professioanl воспользуйтесь следующей командой:
Удаление
Способ №3 — установка в Ubuntu и Linux Mint с помощью PPA
Теперь о том, как установить PyCharm в Ubuntu или другие ОС, основанные на Linux, с помощью неофициальных PPA. Прежде всего нужно убедиться, что в системе есть Java.
Добавьте неофициальные PPA:
Установите Community Edition:
Или Professional Edition:
Удаление
Удалите Community Edition:
Или Professioanl Edition:
Удалите PPA из списка источников:
Примечание: упомянутые здесь функции не являются всеобъемлющими. Они основаны либо на инструкциях с официальных сайтов, либо на личном опыте.
Источник
Как установить PyCharm на Manjaro 20

Как установить PyCharm на Manjaro 20
В этом руководстве мы покажем вам, как установить PyCharm на Manjaro 20. Для тех из вас, кто не знал, PyCharm — это интеллектуальная и полнофункциональная IDE для Python, разработанная JetBrains. Он также обеспечивает поддержку Javascript, Typescript, CSS и т. Д. Вы также можете расширить возможности PyCharm с помощью плагинов. Используя плагины PyCharm, вы также можете получить поддержку таких фреймворков, как Django, Flask. Мы также можем использовать PyCharm для других языков программирования, таких как HTML, SQL, Javascript, CSS и других. PyCharm доступен в трех редакциях: Professional, Community и Edu. Редакции Community и Edu — это проекты с открытым исходным кодом, они бесплатны, но имеют меньше функций. PyCharm Edu предоставляет курсы и помогает научиться программировать на Python. Профессиональная версия является коммерческой и предоставляет отличный набор инструментов и функций.
В этой статье предполагается, что у вас есть хотя бы базовые знания Linux, вы знаете, как использовать оболочку, и, что наиболее важно, вы размещаете свой сайт на собственном VPS. Установка довольно проста и предполагает, что вы работаете с учетной записью root, в противном случае вам может потребоваться добавить ‘ sudo ‘ к командам для получения привилегий root. Я покажу вам пошаговую установку PyCharm CE на Manjaro 20 ( Nibia ).
Установите PyCharm на Manjaro 20 Nibia
Шаг 1. Перед тем, как запустить руководство, приведенное ниже, убедитесь, что наша система обновлена:
Шаг 2. Включите snapd в системе Manjaro.
Теперь выполните следующую команду, чтобы установить пакеты Snap:
Шаг 3. Установка PyCharm на Manjaro 20.
Чтобы установить PyCharm CE, просто используйте следующую команду:
Шаг 4. Доступ к PyCharm на Manjaro.
После успешной установки PyCharm в вашей системе Manjaro теперь вы можете перейти в меню приложения и найти там PyCharm. Вы должны увидеть значок кода PyCharm.
Поздравляю! Вы успешно установили PyCharm . Благодарим за использование этого руководства для установки последней версии PyCharm в системе Manjaro. Для получения дополнительной помощи или полезной информации мы рекомендуем вам посетить официальный сайт PyCharm .
Источник
КАК: Как установить PyCharm в Linux — 2021
How To Install PyCharm In Ubuntu 18.04 + Create and Run First Python Project (Октябрь 2021).
Table of Contents:
PyCharm — это кросс-платформенный редактор, разработанный JetBrains, который позволяет редактировать и отлаживать приложения Python в Linux. Ниже приведено пошаговое руководство по загрузке PyCharm на вашем компьютере, как его установить и как запустить интегрированную среду разработки (IDE).
Ознакомьтесь с полным обзором PyCharm, чтобы узнать о возможностях, которые вы можете найти. Он охватывает все: от создания проекта до описания пользовательского интерфейса, отладки и рефакторинга кода.
Совет: Если вы хотите узнать, как программировать на Python, стоит проверить учебные ресурсы, такие как Udemy и Pluralsight, для доступа к действительно хорошим курсам на Python.
Как установить PyCharm
Для установки PyCharm вам необходимо ввести несколько команд, которые необходимо ввести в окно терминала.
- Загрузите PyCharm.
- У вас есть выбор для загрузки профессиональной версии или публикации сообщества. Если вы просто занимаетесь программированием на Python, мы рекомендуем издание сообщества. Тем не менее, у профессиональной версии есть некоторые замечательные функции, которые нельзя игнорировать, если вы намерены профессионально программировать.
/ Загрузки с терминала, чтобы перейти к папке, в которой хранится файл GZ, а затем введите tar -xvzf pycharm-community-2018.2.3.tar.gz -C
.
Совет: Вы узнаете, когда команда завершится, когда вы снова увидите строку «Как запустить PyCharm
Ниже приведены несколько команд, которые необходимо выполнить для запуска PyCharm в Linux.
Перейдите в домашнюю папку:
Найдите имя папки для PyCharm с помощью команды ls:
Ls
Перейдите в папку «bin» PyCharm:
cd pycharm-community-2018.2.3 / bin
sh pycharm.sh &
Совет: Если вы используете настольную среду, такую как GNOME, KDE, Unity, Cinnamon или любой другой современный рабочий стол, вы также сможете использовать меню или тире для этой среды рабочего стола, чтобы найти PyCharm.
PyCharm — лучшая Linux Python IDE

PyCharm Integrated Desktop Environment — лучший инструмент для разработки кода Python. В этом руководстве представлен обзор функций PyCharms
Как установить веб-сервер Apache в Linux
Пошаговые инструкции по установке Apache на веб-сервере Linux. Это не так сложно, как вы думаете, установить в систему Linux из исходных файлов.
Как установить и установить BASH на Windows 10
Это руководство покажет вам, как установить bash в Windows 10, включая обновление Windows, включение функций разработчика и установку Ubuntu.
Источник
Get started
PyCharm is a dedicated Python Integrated Development Environment (IDE) providing a wide range of essential tools for Python developers, tightly integrated to create a convenient environment for productive Python, web, and data science development.
Choose the best PyCharm for you
PyCharm is available in three editions:
Community (free and open-sourced): for smart and intelligent Python development, including code assistance, refactorings, visual debugging, and version control integration.
Professional (paid) : for professional Python, web, and data science development, including code assistance, refactorings, visual debugging, version control integration, remote configurations, deployment, support for popular web frameworks, such as Django and Flask, database support, scientific tools (including Jupyter notebook support), big data tools.
Edu (free and open-sourced): for learning programming languages and related technologies with integrated educational tools.
Supported languages
To start developing in Python with PyCharm you need to download and install Python from python.org depending on your platform.
PyCharm supports the following versions of Python:
Python 2: version 2.7
Python 3: from the version 3.6 up to the version 3.10
Besides, in the Professional edition, one can develop Django, Flask, and Pyramid applications. Also, it fully supports HTML (including HTML5), CSS, JavaScript, and XML: these languages are bundled in the IDE via plugins and are switched on for you by default. Support for the other languages and frameworks can also be added via plugins (go to Settings | Plugins or PyCharm | Preferences | Plugins for macOS users, to find out more or set them up during the first IDE launch).
Supported platforms
PyCharm is a cross-platform IDE that works on Windows, macOS, and Linux. Check the system requirements:
Requirement Minimum Recommended RAM 4 GB of free RAM 8 GB of total system RAM CPU Any modern CPU Multi-core CPU. PyCharm supports multithreading for different operations and processes making it faster the more CPU cores it can use. Disk space 2.5 GB and another 1 GB for caches SSD drive with at least 5 GB of free space Monitor resolution 1024×768 1920×1080 Operating system Officially released 64-bit versions of the following:
Microsoft Windows 8 or later
macOS 10.13 or later
Any Linux distribution that supports Gnome, KDE, or Unity DE. PyCharm is not available for some Linux distributions, such as RHEL6 or CentOS6, that do not include GLIBC 2.14 or later.
Pre-release versions are not supported.
Latest 64-bit version of Windows, macOS, or Linux (for example, Debian, Ubuntu, or RHEL) You can install PyCharm using Toolbox or standalone installations. If you need assistance installing PyCharm, see the installation instructions: Install PyCharm
Start with a project in PyCharm
Everything you do in PyCharm, you do within the context of a project. It serves as a basis for coding assistance, bulk refactoring, coding style consistency, and so on. You have three options to start working on a project inside the IDE:
Open an existing project
Begin by opening one of your existing projects stored on your computer. You can select one in the list of the recent projects on the Welcome screen or click Open :
Otherwise, you can create a project for your existing source files. Select the command Open on the File menu, and specify the directory where the sources exist. PyCharm will then create a project from your sources for you. Refer to the section Importing Project from Existing Source Code for details.
Check out an existing project from Version Control
You can also download sources from a VCS storage or repository. Choose Git (GitHub), Mercurial, Subversion, Perforce (supported in Professional edition only), and then enter your credentials to access the storage.
Then, enter a path to the sources and clone the repository to the local host:
Refer to the section Version control for details.
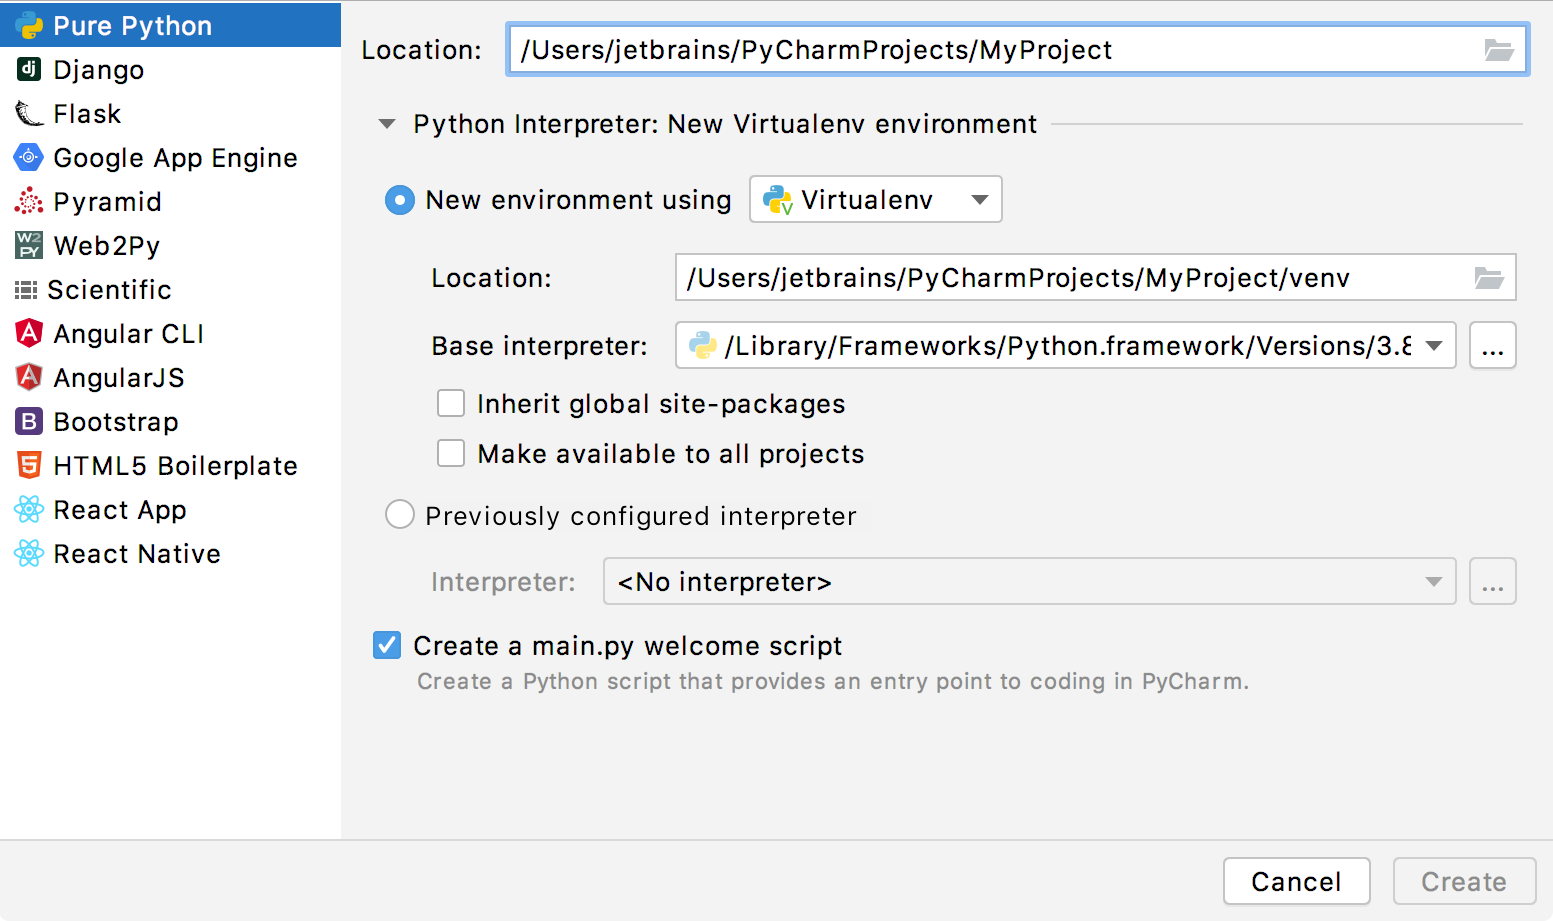
Create a new project
To create a project, do one of the following:
From the main menu, choose File | New Project
On the Welcome screen, click New Project
In PyCharm Community, you can create only Python projects, whereas, with PyCharm Professional, you have a variety of options to create a web framework project.
When creating a new project, you need to specify a Python interpreter to execute Python code in your project. You need at least one Python installation to be available on your machine.
For a new project, PyCharm creates an isolated virtual environment : venv, pipenv, or Conda. As you work, you can change it or create new interpreters. You can also quickly preview packages installed for your interpreters and add new packages in the Python Package tool window.
Look around
When you launch PyCharm for the very first time, or when there are no open projects, you see the Welcome screen. It gives you the main entry points into the IDE: creating or opening a project, checking out a project from version control, viewing documentation, and configuring the IDE.
When a project is opened, you see the main window divided into several logical areas. Let’s take a moment to see the key UI elements here:
Project tool window on the left side displays your project files.
Editor on the right side, where you actually write your code. It has tabs for easy navigation between open files.
Navigation bar above the editor additionally allows you to quickly run and debug your application as well as do the basic VCS actions.
Gutter , the vertical stripe next to the editor, shows the breakpoints you have, and provides a convenient way to navigate through the code hierarchy like going to definition/declaration. It also shows line numbers and per-line VCS history.
Scrollbar , on the right side of the editor. PyCharm constantly monitors the quality of your code and always shows the results of its code inspections in the gutter: errors, warnings, and so on. The indicator in the top right-hand corner shows the overall status of code inspections for the entire file.
Tool windows are specialized windows attached to the bottom and sides of the workspace and provide access to typical tasks such as project management, source code search and navigation, integration with version control systems, and so on.
The status bar indicates the status of your project and the entire IDE, and shows various warnings and information messages like file encoding, line separator, inspection profile, and so on. It also provides quick access to the Python interpreter settings.
Also, in the bottom-left corner of the PyCharm window, in the Status bar, you see the button or . This button toggles the showing of the tool window bars. If you hover your mouse pointer over this button, the list of the currently available tool windows show up.
See the pages Overview of the user interface and Tool windows to learn more about showing or hiding tool windows.
Code with smart assistance
When you have created a new project or opened an existing one, it is time to start coding.
Create a Python file
In the Project tool window, select the project root (typically, it is the root node in the project tree), right-click it, and select File | New . .
Select the option Python File from the context menu, and then type the new filename.
PyCharm creates a new Python file and opens it for editing.


PyCharm takes care of the routine so that you can focus on the important. Use the following coding capabilities to create error-free applications without wasting precious time.
Code completion
Code completion is a great time-saver, regardless of the type of file you’re working with.
Basic completion works as you type and completes any name instantly.
Smart type-matching completion analyzes the context you’re currently working in and offers more accurate suggestions based on that analysis.

Intention actions
PyCharm keeps an eye on what you are currently doing and makes smart suggestions, called intention actions, to save more of your time. Indicated with a lightbulb, intention actions let you apply automatic changes to code that is correct (in contrast to code inspections that provide quick-fixes for code that may be incorrect ). Did you forget to add some parameters and field initializers to the constructor? Not a problem with PyCharm. Click the lightbulb (or press Alt+Enter ) and select one of the suggested options:

The full list of available intention actions can be found in File | Settings | Editor | Intentions or PyCharm | Preferences | Editor | Intentions for macOS users.
Keep your code neat
PyCharm monitors your code and tries to keep it accurate and clean. It detects potential errors and problems and suggests quick-fixes for them.
Every time the IDE finds unused code, an endless loop, and many other things that likely require your attention, you’ll see a lightbulb. Click it, or press Alt+Enter , to apply a fix.
The complete list of available inspections can be found under Settings | Editor | Inspections (or PyCharm | Preferences | Editor | Inspections for macOS users). Disable some of them, or enable others, plus adjust the severity of each inspection. You decide whether it should be considered an error or just a warning.
Generate some code
Writing code can be a lot easier and quicker when you use the code generation options available in PyCharm. The Code | Generate menu Alt+Insert will help you with creating symbols from usage, as well as suggest overridin or implementing some functions:

Use live templates (choose Code | Insert Live Template or press Ctrl+J ) to produce the entire code constructs. You can explore the available ready-to-use live templates In the Settings/Preferences dialog Ctrl+Alt+S (Settings | Editor | Live templates or PyCharm | Preferences | Editor | Live Templates if you are a macOS user).
If you see that you are lacking something especially important for your development, extend this set of templates with your own. Also, consider quickly surrounding your code with complete constructs (choose Code | Surround With or press Ctrl+Alt+T . For example, with an if statement:

Find your way through
When your project is big, or when you have to work with someone else’s code, it’s vital to be able to quickly find what you are looking for and dig into the code. This is why PyCharm comes with a set of navigation and search features that help you find your way through any code no matter how tangled it is.
Basic search
With these search facilities, you can find and replace any fragment of code both in the currently opened file Ctrl+F , or in an entire project Ctrl+Shift+F .
Search for usages
To find where a particular symbol is used, PyCharm suggests full-scale search via Find Usages Alt+F7 :

Project navigation
You can tell a lot just looking at your File Structure, with its imports or call hierarchies:

Also, you can navigate to:
The icons in the left-hand gutter can also help you with navigation:

Navigate through the timeline
Remembering all your activity in the project, PyCharm can easily navigate you to the Recent Files Ctrl+E or Recently Changed Files Alt+Shift+C .
To go through the history of changes, try using Back/Forward navigation ( Ctrl+Alt+Left / Ctrl+Alt+Right ) and/or go to last edit location Ctrl+Shift+Backspace .
Search Everywhere
If you have a general idea of what you’re looking for, you can always locate the corresponding element using one of the existing navigation features. But what if you want to look for something in every nook and cranny? The answer is to use Search Everywhere!
To try it, click the magnifying glass button in the upper right-hand corner of the window, or invoke it with Double Shift (press Shift twice).

Run, debug and test
Now when you’ve played with the code and discovered what you can do with it, it’s time to run, debug and test your app.
The easiest way to run an application is to right-click in the editor, and then choose Run from the context menu:

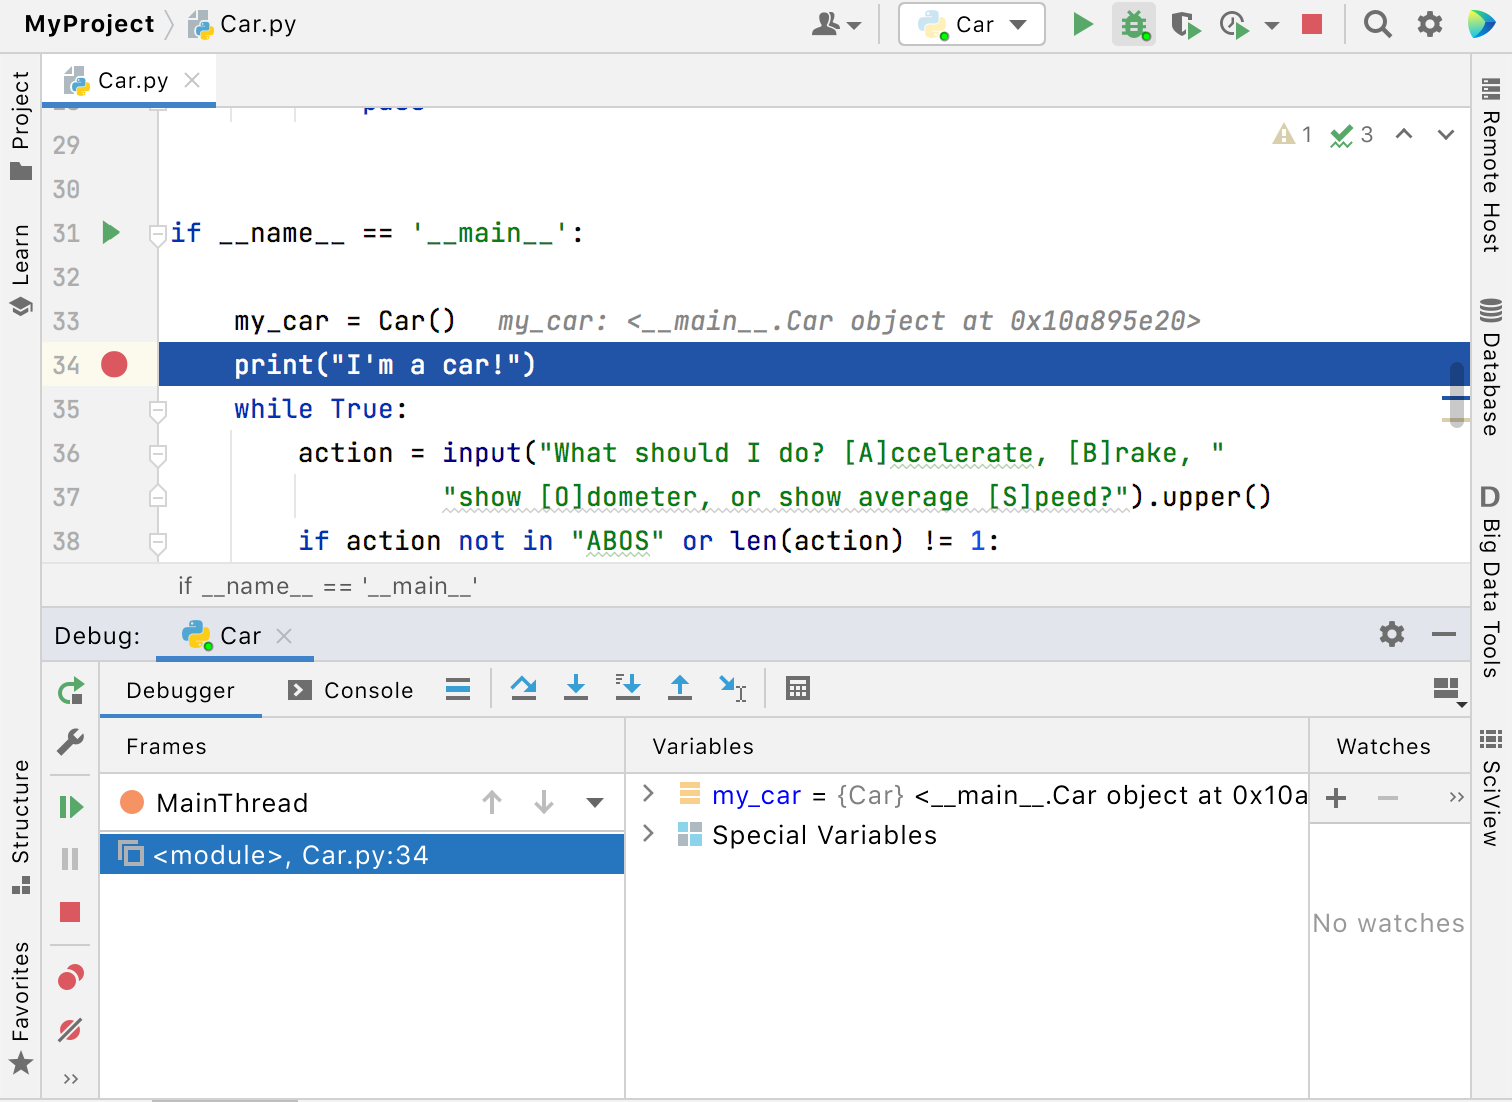
If your Python script contains the __main__ clause, then you can click the button in the gutter, and then choose the desired command.
You can see the your script execution in the Run tool window.

When you perform run, debug, or test operations with PyCharm, you always start a process based on one of the existing run/debug configurations , using its parameters.
When you run your application for the very first time, PyCharm automatically creates the temporary Run/Debug configuration. You can modify it to specify or alter the default parameters and save it as a permanent Run/Debug configuration.
See how to tune run/debug configurations in Run/debug configurations.
Debug
Does your application stumble on a runtime error? To find out what’s causing it, you will have to do some debugging. PyCharm supports the debugger on all platforms.
Debugging starts with placing breakpoints at which program execution will be suspended, so you can explore program data. Just click the gutter of the line where you want the breakpoint to appear.
To start debugging your application, press Shift+F9 . Then go through the program execution step by step (see the available options in the Run menu or the Debug tool window), evaluate any arbitrary expression, add watches, and manually set values for the variables.
Refer to the section Debugging for details.
It is a good idea to test your applications, and PyCharm helps doing it as simple as possible.
With PyCharm, you can:
Run and debug tests right from the IDE, using the testing run/debug configurations.
And, finally, the most important thing — you can explore test results in the test runner tab of the Run tool window: 
To learn about the numbers, read the Test Runner tab section.
PyCharm supports all the major Python testing frameworks:
For each of these frameworks, PyCharm provides its own run/debug configuration.
Refer to tutorial Step 3. Test your first Python application and to the Run tests section for details.
With PyCharm Professional you can run, debug, and test your Python code remotely. You can deploy your local applications to some remote server. To learn about deployment servers, refer to the section Configuring Synchronization with a Web Server. PyCharm Professional also helps compare local and remote folders, and synchronize the local copy with that deployed on the server.
Keep your source code under Version Control
If you are keeping your source code under version control, you will be glad to know that PyCharm integrates with many popular version control systems: Git (or GitHub), Mercurial, Perforce (supported in Professional edition only), Subversion. To specify credentials and any settings specific to a particular VCS, go to Settings | Version Control (or PyCharm | Preferences | Version Control if you are a macOS user).
The VCS menu gives you a clue about what commands are available. For example, you can see the changes you’ve made, commit them, create changelists and much more from the Local Changes view: VCS | Show Changes (or just press Alt+9 ). Also, find some VCS basic commands in the Navigation bar above the editor:

Refer to the section Version control for details.
Local history
In addition to traditional version control, you can use the local history. With Local History, PyCharm automatically tracks changes you make to the source code, the results of refactoring, and so on
Local history is always enabled. To view it for a file or a folder, bring up Local History by selecting VCS | Local History | Show History . Here you can review the changes, revert them, or create a patch.
Process data
PyCharm has an interactive Python console to perform smart operations over data with on-the-fly syntax check with inspections, braces and quotes matching, and of course, code completion. You can also benefit from the built-in support for Anaconda.
With PyCharm Professional , you can analyze and visualize various scientific and statistical data. Jupyter Notebook integration enables editing, executing, and debugging notebook source code and examining execution outputs, including stream data, images, and other media. 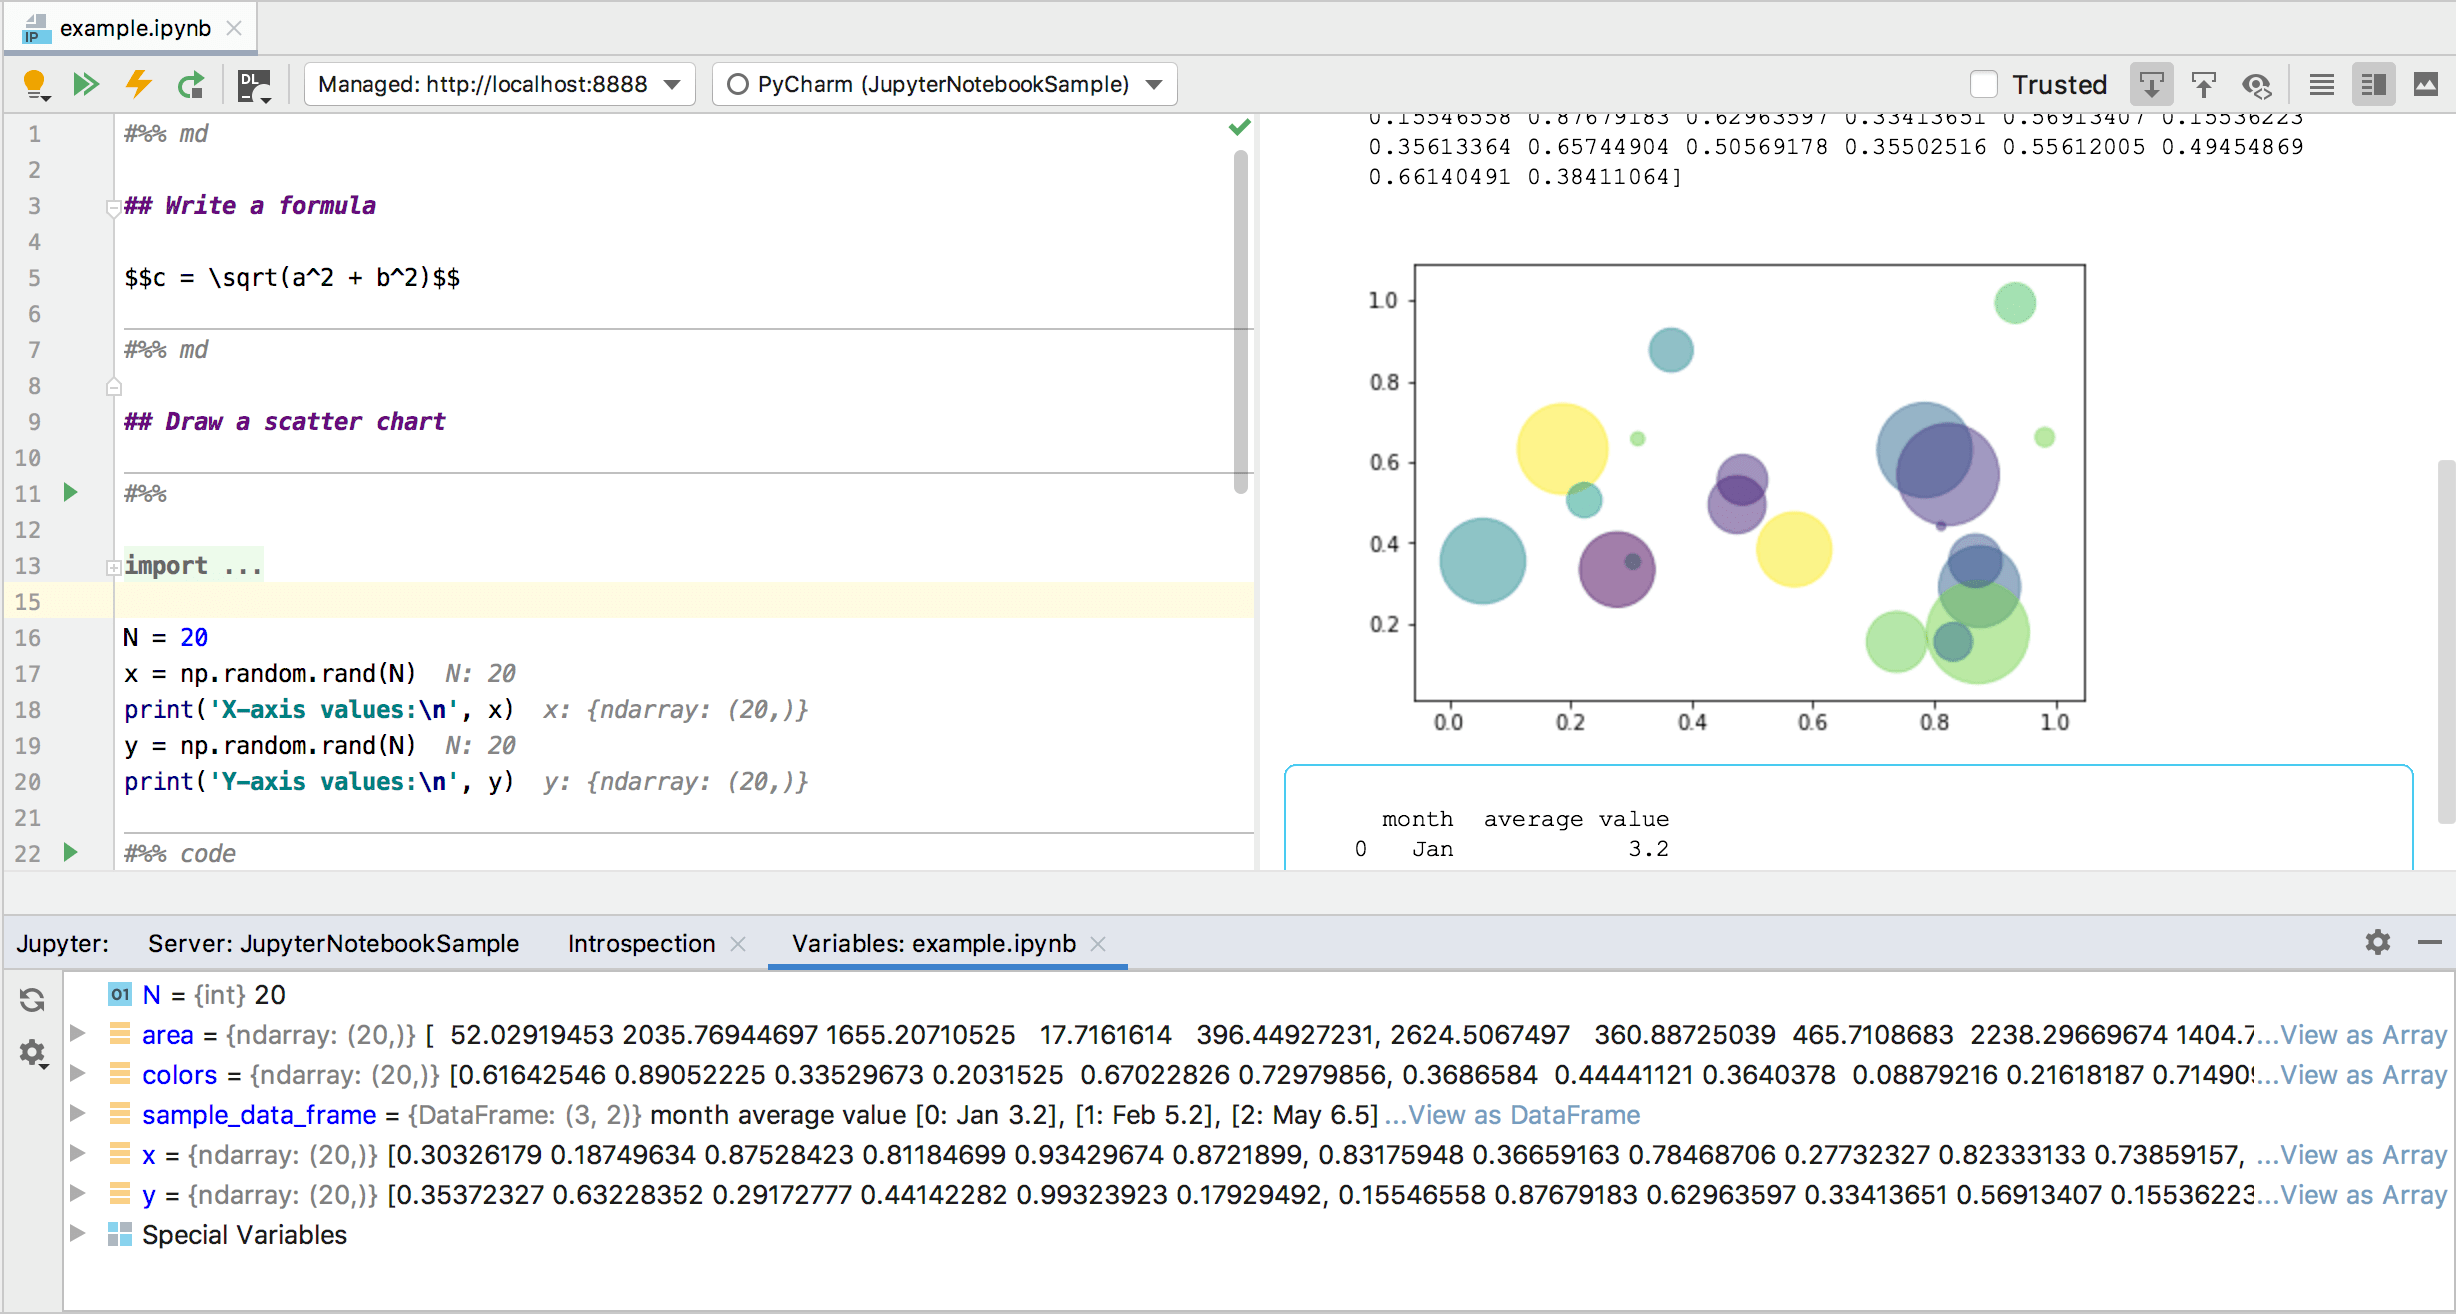
With the R plugin installed in PyCharm, you can perform various statistical computing using R language and use coding assistance, visual debugging, smart running and preview tools, and other popular IDE features. 
As you might have noticed already, creating projects of the various types (Django, for example) requires a data source. It is also quite possible that you inject SQL statements into your source code.
PyCharm Professional does not enable you to create databases, but provides facilities to manage and query them. Once you are granted access to a certain database, you can configure one or more data sources within PyCharm that reflect the structure of the database and store the database access credentials. Based on this information, PyCharm establishes a connection to the database and provides the ability to retrieve or change information contained therein.
Access to the databases is provided by the Database tool window ( View | Tool Windows | Database ). This tool window allows you to work with the databases. It lets you view and modify data structures in your databases, and perform other associated tasks.

Customize your environment
Feel free to tweak the IDE so it suits your needs perfectly and is as helpful and comfortable as it can be. Go to File | Settings ( PyCharm | Preferences for macOS users) to see the list of available customization options.
Appearance
The first thing to fine-tune is the general «look and feel.» Go to File | Settings | Appearance and Behavior | Appearance ( PyCharm | Preferences | Appearance and Behavior | Appearance for macOS users) to select the IDE theme: the light themes or Darcula if you prefer a darker setting.
Editor
The many pages available under File | Settings | Editor ( PyCharm | Preferences | Editor for macOS users) help you adjust every aspect of the editor’s behavior. A lot of options are available here, from general settings (like Drag’n’Drop enabling, scrolling configuration, and so on.), to color configuration for each available language and use case, to tabs and code folding settings, to code completion behavior and even postfix templates.
Refer to the section Configuring PyCharm settings for details.
Code style
Code style can be defined for each language under File | Settings | Editor | Code Style ( PyCharm | Preferences | Editor | Code Style for macOS users). You can also create and save your own coding style scheme.

Keymap
PyCharm uses the keyboard-centric approach, meaning that nearly all actions possible in the IDE are mapped to keyboard shortcuts.
The set of keyboard shortcuts you work with is one of your most intimate habits — your fingers «remember» certain combinations of keys, and changing this habit is easier said than done. PyCharm supplies you with a default keymap (choose Help | Keymap Reference from the main menu) making your coding really productive and convenient. However, you can always change it going to File | Settings | Keymap ( PyCharm | Preferences | Keymap for macOS users).
There are also some pre-defined keymaps (like Emacs, Visual Studio, Eclipse, NetBeans and so on), and you can also create your own keymap based on an existing one.
If you feel most productive with vi/Vim , an emulation mode will give you the best of both worlds. Enable the IdeaVim plugin in the IDE and select the vim keymap.
Refer to the section Configure keyboard shortcuts for details.
That’s it! Go ahead and develop with pleasure!
We hope this brief overview of essential PyCharm features will give you a quick start. There are many important features that make a developer’s life easier and more fun, and the source code neater and cleaner. Take these first few steps now, and then dig deeper when you feel the time is right:
Enjoy PyCharm! With any questions visit our Discussion Forum, twitter and blog, where you can find news, updates, and useful tips and tricks. Also, don’t hesitate to report any problems to our support team) or the PyCharm issue tracker.
Источник


