- Documentation – Until April 29, 2021, get PyCharm at 30% off. All money goes to the DSF!
- How to install Django on Windows
- Install Python
- About pip 
- Setting up a virtual environment
- Install Django
- Common pitfalls
- Установка Django на Windows
- Шаг 1. Установка Python
- Шаг 2. Установка Pip
- Шаг 3. Создание виртуального окружения
- Шаг 4. Установка Django в виртуальное окружение через pip
- Download
- Option 1: Get the latest official version
- Option 2: Get the latest development version
- After you get it
- Supported Versions
- Future Roadmap
- Unsupported previous releases
- Additional information
- Support Django!
- For the impatient:
- Which version is better?
- Как установить Django в Windows 
- Установка Python 
- О pip 
- Настройка виртуальной среды 
- Установка Django 
- Общие проблемы 
Documentation – Until April 29, 2021, get PyCharm at 30% off. All money goes to the DSF!
How to install Django on Windows
This document will guide you through installing Python 3.8 and Django on Windows. It also provides instructions for setting up a virtual environment, which makes it easier to work on Python projects. This is meant as a beginner’s guide for users working on Django projects and does not reflect how Django should be installed when developing patches for Django itself.
The steps in this guide have been tested with Windows 10. In other versions, the steps would be similar. You will need to be familiar with using the Windows command prompt.
Install Python
Django is a Python web framework, thus requiring Python to be installed on your machine. At the time of writing, Python 3.8 is the latest version.
To install Python on your machine go to https://python.org/downloads/. The website should offer you a download button for the latest Python version. Download the executable installer and run it. Check the boxes next to “Install launcher for all users (recommended)” then click “Install Now”.
After installation, open the command prompt and check that the Python version matches the version you installed by executing:
For more details, see Using Python on Windows documentation.
About pip 
pip is a package manager for Python and is included by default with the Python installer. It helps to install and uninstall Python packages (such as Django!). For the rest of the installation, we’ll use pip to install Python packages from the command line.
Setting up a virtual environment
It is best practice to provide a dedicated environment for each Django project you create. There are many options to manage environments and packages within the Python ecosystem, some of which are recommended in the Python documentation. Python itself comes with venv for managing environments which we will use for this guide.
To create a virtual environment for your project, open a new command prompt, navigate to the folder where you want to create your project and then enter the following:
This will create a folder called ‘project-name’ if it does not already exist and setup the virtual environment. To activate the environment, run:
The virtual environment will be activated and you’ll see “(project-name)” next to the command prompt to designate that. Each time you start a new command prompt, you’ll need to activate the environment again.
Install Django
Django can be installed easily using pip within your virtual environment.
In the command prompt, ensure your virtual environment is active, and execute the following command:
This will download and install the latest Django release.
After the installation has completed, you can verify your Django installation by executing django-admin —version in the command prompt.
See Get your database running for information on database installation with Django.
Common pitfalls
If django-admin only displays the help text no matter what arguments it is given, there is probably a problem with the file association in Windows. Check if there is more than one environment variable set for running Python scripts in PATH . This usually occurs when there is more than one Python version installed.
If you are connecting to the internet behind a proxy, there might be problems in running the command py -m pip install Django . Set the environment variables for proxy configuration in the command prompt as follows:
Установка Django на Windows
Перед тем как начать изучение фреймворка Django для разработки веб-приложений на языке программирования Python, нам необходимо его установить. Для помощи в установке Django на Windows мы подготовили для вас пошаговую инструкцию.
Шаг 1. Установка Python
Перед установкой Django, вам необходимо установить на ваш компьютер Python. О том как это сделать по ОС Windows мы уже писали ранее статью: УСТАНОВКА PYTHON 3 НА WINDOWS. Проследуйте инструкциям указанным в данной статье и возвращайтесь сюда, для установки Django.
Шаг 2. Установка Pip
Pip необходим для удобной установки пакетов, написанных на Python. Он нам понадобится для установки Django. Начиная с версии Python 3.4 установка Pip происходит автоматически. Но лучше убедиться, что Pip установлен, и если обнаружится, что нет, то установить его.
Для начала запустим командную строку Windows. Для этого нажмите Win+R и введите cmd.

В командной строке введем:
Если после выполнения данной операции вы увидите сообщение о версии pip, то всё нормально — можете переходить к следующему шагу.
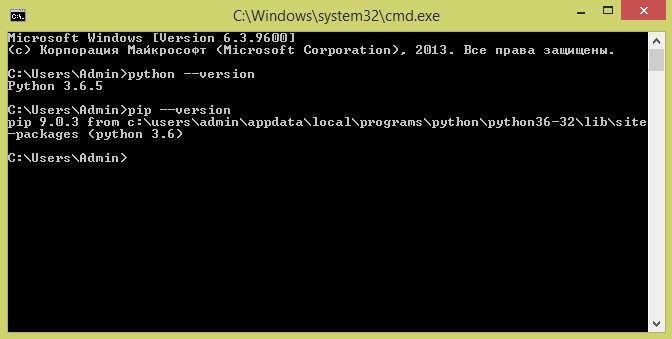
Если вместо сообщения о версии (картинка сверху) вы увидели сообщение об ошибке, то вам необходимо установить pip.
- Скачайте get-pip.py. Если ваш браузер сразу открывает код, то на странице нажмите правую кнопку мыши и выберете «Сохранить как…»
- Запустите скачанный файл с правами Администратора или через командную строку. Для установки pip через командную строку, перейдите в ней в папку с скаченным get-pip.py и выполните команду:
- Снова выполните проверку версии pip.
Шаг 3. Создание виртуального окружения
Виртуальное окружение (virtualenv) необходимо, чтобы изолировать фреймворк Django для каждого проекта. Это предотвратит возможное изменения в одном проекте при редактировании другого, а также позволит использовать разные версии Django для разных проектов.
Мы рекомендуем выполнять данный шаг, хотя его можно и пропустить. Но лучше уже при обучении всё делать правильно и «по уму».
Для установки виртуального окружения выполним несколько шагов:
- Откройте командную строку и перейдите в директорию, где хотите создать проект.
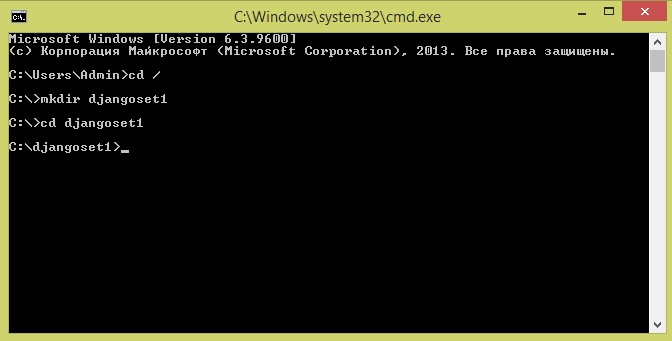
Здесь мы создали директорию djangoset1 и осуществили переход в неё.
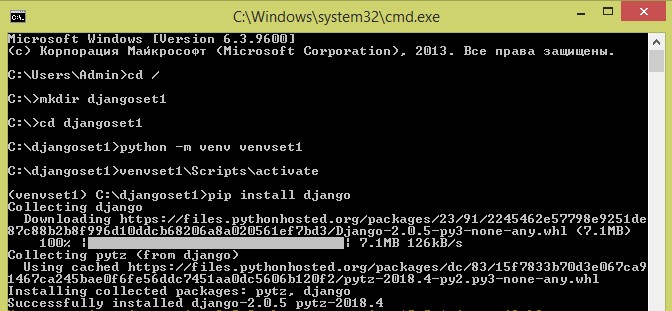
Создадим виртуальное окружение с именем venvset1 (имя можно выбрать любое):
При выполнении этой команды, создается новая директория с необходимыми файлами.
Запустим виртуальное окружение virtualenv, выполнив команду в командной строке Windows:

Если вы увидели строку, как на картинке выше, то всё у вас получилось.
Шаг 4. Установка Django в виртуальное окружение через pip
Подготовительные работы завершены. Теперь установим Django в созданное виртуальное окружение virtualenv через pip. Выполним в командной строке команду:
Если установка прошла успешно, вы увидите следующее:
На этом всё, теперь можно начинать изучать Django и написать своё первое приложение.
Download
Django is available open-source under the BSD license. We recommend using the latest version of Python 3. The last version to support Python 2.7 is Django 1.11 LTS. See the FAQ for the Python versions supported by each version of Django. Here’s how to get it:
Option 1: Get the latest official version
The latest official version is 3.2 (LTS). Read the 3.2 release notes, then install it with pip:
Option 2: Get the latest development version
The latest and greatest Django version is the one that’s in our Git repository (our revision-control system). This is only for experienced users who want to try incoming changes and help identify bugs before an official release. Get it using this shell command, which requires Git:
git clone https://github.com/django/django.git
You can also download a gzipped tarball of the development version. This archive is updated every time we commit code.
After you get it
See the installation guide for further instructions. Make sure you read the documentation that corresponds to the version of Django you’ve just installed.
And be sure to sign up for the django-users mailing list, where other Django users and the Django developers themselves all hang out to help each other.
Supported Versions
Feature releases (A.B, A.B+1, etc.) will happen roughly every eight months. These releases will contain new features, improvements to existing features, and such.
Patch releases (A.B.C, etc.) will be issued as needed, to fix bugs and/or security issues. These releases will be 100% compatible with the associated feature release, unless this is impossible for security reasons or to prevent data loss. So the answer to «should I upgrade to the latest patch release?” will always be «yes.»
Certain feature releases will be designated as long-term support (LTS) releases. These releases will get security and data loss fixes applied for a guaranteed period of time, typically three years.
See the supported versions policy for detailed guidelines about what fixes will be backported.
| Release Series | Latest Release | End of mainstream support 1 | End of extended support 2 |
|---|---|---|---|
| 3.2 LTS | 3.2 | December 2021 | April 2024 |
| 3.1 | 3.1.8 | April 6, 2021 | December 2021 |
| 2.2 LTS | 2.2.20 | December 2, 2019 | April 2022 |
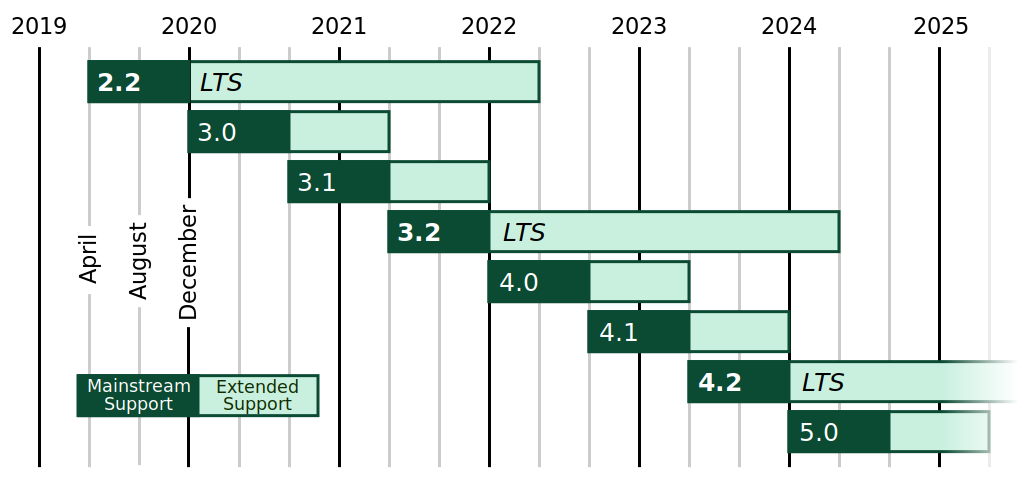
Future Roadmap
| Release Series | Release Date | End of mainstream support 1 | End of extended support 2 |
|---|---|---|---|
| 4.0 | December 2021 | August 2022 | April 2023 |
| 4.1 | August 2022 | April 2023 | December 2023 |
| 4.2 LTS | April 2023 | December 2023 | April 2026 |
Unsupported previous releases
These release series no longer receive security updates or bug fixes.
| Release Series | Latest Release | End of mainstream support 1 | End of extended support 2 |
|---|---|---|---|
| 3.0 | 3.0.14 | August 3, 2020 | April 6, 2021 |
| 2.1 | 2.1.15 | April 1, 2019 | December 2, 2019 |
| 2.0 | 2.0.13 | August 1, 2018 | April 1, 2019 |
| 1.11 LTS 3 | 1.11.29 | December 2, 2017 | April 1, 2020 |
| 1.10 | 1.10.8 | April 4, 2017 | December 2, 2017 |
| 1.9 | 1.9.13 | August 1, 2016 | April 4, 2017 |
| 1.8 LTS | 1.8.19 | December 1, 2015 | April 1, 2018 |
| 1.7 | 1.7.11 | April 1, 2015 | December 1, 2015 |
| 1.6 | 1.6.11 | September 2, 2014 | April 1, 2015 |
| 1.5 | 1.5.12 | November 6, 2013 | September 2, 2014 |
| 1.4 LTS | 1.4.22 | February 26, 2013 | October 1, 2015 |
| 1.3 | 1.3.7 | March 23, 2012 | February 26, 2013 |
[1] Security fixes, data loss bugs, crashing bugs, major functionality bugs in newly-introduced features, and regressions from older versions of Django.
[2] Security fixes and data loss bugs.
[3] Last version to support Python 2.7.
Additional information
Support Django!

For the impatient:
- Latest release: Django-3.2.tar.gz
Checksums: Django-3.2.checksum.txt
Release notes: Online documentation
Which version is better?
We improve Django almost every day and are pretty good about keeping the code stable. Thus, using the latest development code is a safe and easy way to get access to new features as they’re added. If you choose to follow the development version, keep in mind that there will occasionally be backwards-incompatible changes. You’ll want to pay close attention to the commits by watching Django on GitHub or subscribing to django-updates.
If you’re just looking for a stable deployment target and don’t mind waiting for the next release, you’ll want to stick with the latest official release (which will always include detailed notes on any changes you’ll need to make while upgrading).
Как установить Django в Windows 
Этот документ проведет вас через установку Python 3.8 и Django для Windows. Он также содержит инструкции по настройке виртуальной среды, упрощающей работу над проектами Python. Цель состоит в том, чтобы сделать его введением для пользователей, работающих над проектами Django, а не описать, как установить Django, чтобы вы могли разработать исправления для самого Django.
Действия, описанные в этом руководстве, были протестированы с Windows 10. Для других версий инструкции должны быть аналогичными. Вам должно быть удобно использовать командную строку Windows.
Установка Python 
Django — это веб-приложение для Python, поэтому в системе должен быть установлен Python. На момент написания этого руководства Python 3.8 — самая последняя версия.
Чтобы установить Python на свой компьютер, посетите https://python.org/downloads/ . Этот сайт должен предложить вам кнопку загрузки последней версии Python. Скачайте исполняемый файл установки и запустите его. Установите флажки «Установить программу запуска для всех пользователей (рекомендуется)» и нажмите «Установить сейчас».
После установки откройте командную строку и убедитесь, что версия Python соответствует той, которую вы установили, запустив:
О pip 
pip — это менеджер пакетов для Python, который по умолчанию включен в установщик Python. Он помогает устанавливать и удалять пакеты Python (например, Django!). В остальной части установки мы будем использовать pip для установки пакетов Python из командной строки.
Настройка виртуальной среды 
Общепризнанной хорошей практикой является определение специальной среды для каждого создаваемого вами проекта Django. В экосистеме Python есть много вариантов управления средами и пакетами, некоторые из которых рекомендованы в документации Python . Сам Python содержит venv для управления средами, и именно его мы будем использовать в этом руководстве.
Чтобы создать виртуальную среду для вашего проекта, откройте новую командную строку и перейдите в папку, в которой вы хотите создать проект, затем введите следующее
Это создаст папку с именем «имя-проекта», если она еще не существует, и настроит виртуальную среду. Чтобы активировать среду, запустите
Виртуальная среда будет активирована, и вы увидите «(имя-проекта)» рядом с командной строкой, чтобы убедить вас. Каждый раз, когда вы запускаете новую командную строку, вам нужно будет снова активировать среду.
Установка Django 
Django можно легко установить pip в вашей виртуальной среде.
В командной строке убедитесь, что виртуальная среда активна, и выполните следующую команду:
Это загрузит и установит последнюю версию Django.
В конце установки вы можете проверить, что все прошло успешно, запустив в командной строке. django-admin —version
См. « Начало работы с базой данных» для получения дополнительной информации об установке баз данных с помощью Django.
Общие проблемы 
Если django-admin отображается только текст справки независимо от указанных параметров, вероятно, проблема с ассоциациями файлов в Windows. Проверьте, определено ли несколько переменных среды для запуска скриптов Python в PATH . Обычно это происходит, когда установлено несколько версий Python.
Если вы используете прокси-сервер для подключения к Интернету, при выполнении команды могут возникнуть проблемы . Задайте переменные среды конфигурации прокси-сервера в командной строке, например: py -m pip install Django


