- How To Install Python IDE For Eclipse In Linux and Windows?
- Install Java or JRE
- Install Eclipse
- Windows
- Linux
- Install Python IDE For Eclipse
- Setup selenium using eclipse and python in windows
- Пишем на Python в Eclipse
- IT Novella
- How To Install Eclipse for Python On Windows
- Step 1 — Download Eclipse
- Step 2 — Install Eclipse
- Step 3 — Install PyDev Plugin
- Step 4 — Getting Started with Python — Hello World
- Summary
How To Install Python IDE For Eclipse In Linux and Windows?
Eclipse is a popular IDE that supports a lot of different operating systems and programming languages. Eclipse supports the Python programming language and development for operating systems Windows, Linux, Mac OS X, etc. In this tutorial, we will learn Python IDE installation for operating systems Windows, Linux with eclipse installer and repository.
Install Java or JRE
Eclipse IDE is devleoped with the Java programming language. This means in order to run Eclipse the Java or JRE should be already installed if not we will install the JRE or JDK for Linux and Windows like below.
Install Eclipse
After installing Java or JRE or JDK we will start the Eclipse IDE installation. Python IDE for Eclipse is not provided directly with Eclipse installation. So first we will install another IDE like Java for the Eclipse and then we will install Python IDE from the marketplace. Following instructions can be used for Linux and Windows very similar.
Windows
First, we will download the Eclipse IDE 2020-03 from the following link for the 64-bit version by default. The current operating system is Windows but we can select other operating systems like Mac OS X, Linux, etc.
 Eclipse Dowload Page
We will be redirected into the following web page which provides the installer named eclipse-inst-win64.exe .
For alternative operating systems like Linux and Windows use the following page which provides the same experience to download the Eclipse IDE.
Linux
Eclipse installation for Linux distributions like Ubuntu, Debian, Fedora, Mint, Kali, CentOS can be done in different ways. Repositories can be used to install Eclipse IDE but generally, the repositories provide older or outdated versions. The best way is to use the Eclipse Installer from eclipse.com.
We will be redirected to the followin web page where the Eclipse installer is provided as a tar.gz file. We will download the eclipse-ins-linux64.tar.gz file like below.
After the download is completed we have to extract the tar.gz file to run installation executables. We will use the file browser extractor to extract like below.
After extracting the installation files we will navigate into the folder eclipse-linux64 directory like below and click to the eclipse-inst script like below which will start eclipse installation process.
Below we will see a list of programming languages and development environments like Java, Java Enterprise, C/C++, Web and JavaScript, PHP etc. We will select the programming language we want to install for Eclipse. In this example we will select the Eclipse IDE for Java Developers
When we select the Java Programming Language we will see the following installation screen and some basic configuration. Java 1.8+ VM specifies the JVM path which should be higher then Java 1.8. Installation Folder is the path where Java IDE will be installed.
During the installation or at the end of the installation we may be asked to accept the given licences which will look like below. We will just select Remember accepted licenses and then click to the Accept button like below.
 Accept Eclipse License Agreements
When the Eclipse installation is completed we will see the following screen where we can launch the Eclipse IDE for Java by clicking to the Launch button.
Install Python IDE For Eclipse
First, we will open the newly installed Eclipse from the desktop shortcut or command line. For the first time, we will see the following screen where we will set the workspace for the eclipse project.
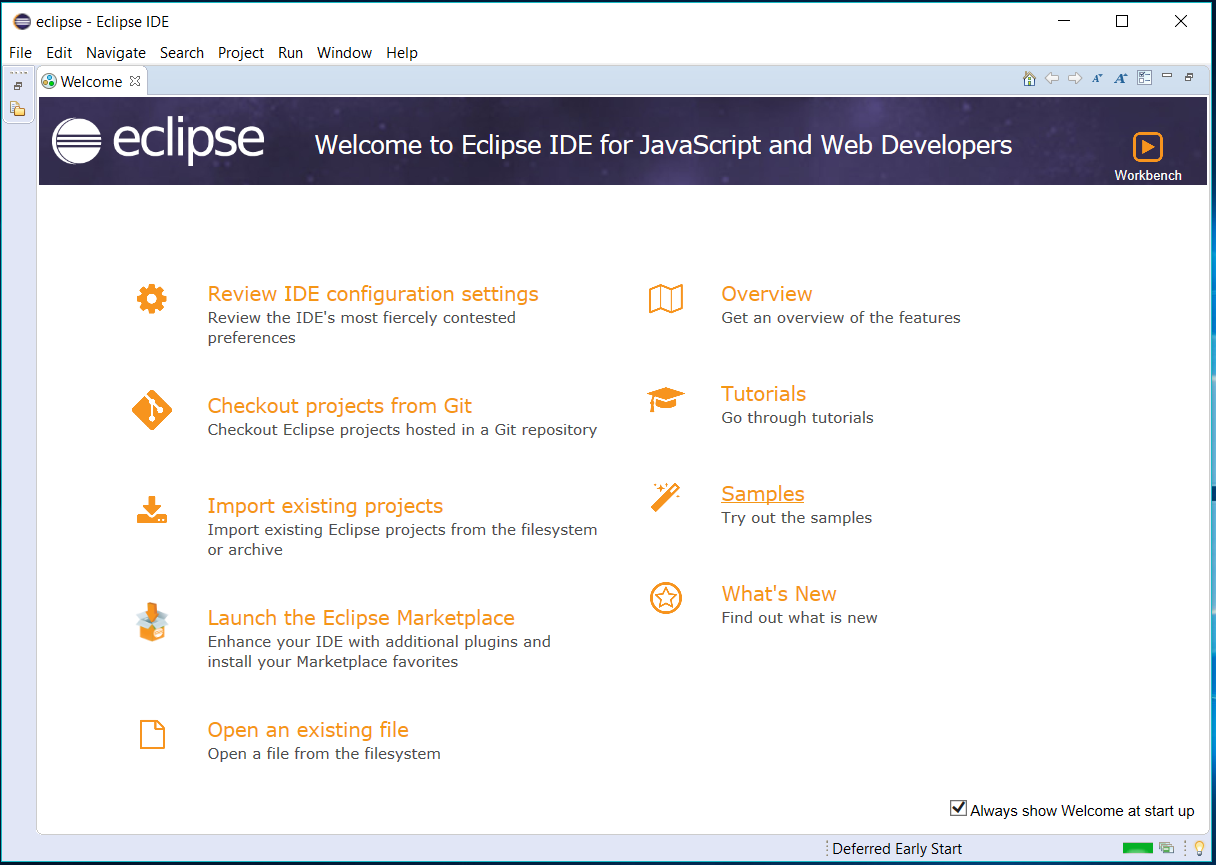
Then the eclipse will be opened like below. Python IDE is provided as a 3rd party extension with the name of the PyDev. We will open the Eclipse Marketplace from the Help menu like below.
We will see the Eclipse Market place screen like below. We will search for the python keyword from the Search tab which is default. The PyDev extension will be listed like below. We will click to the Install to start installation .
We will be asked for some selected features where we will leave the default and click to the Confirm like below.
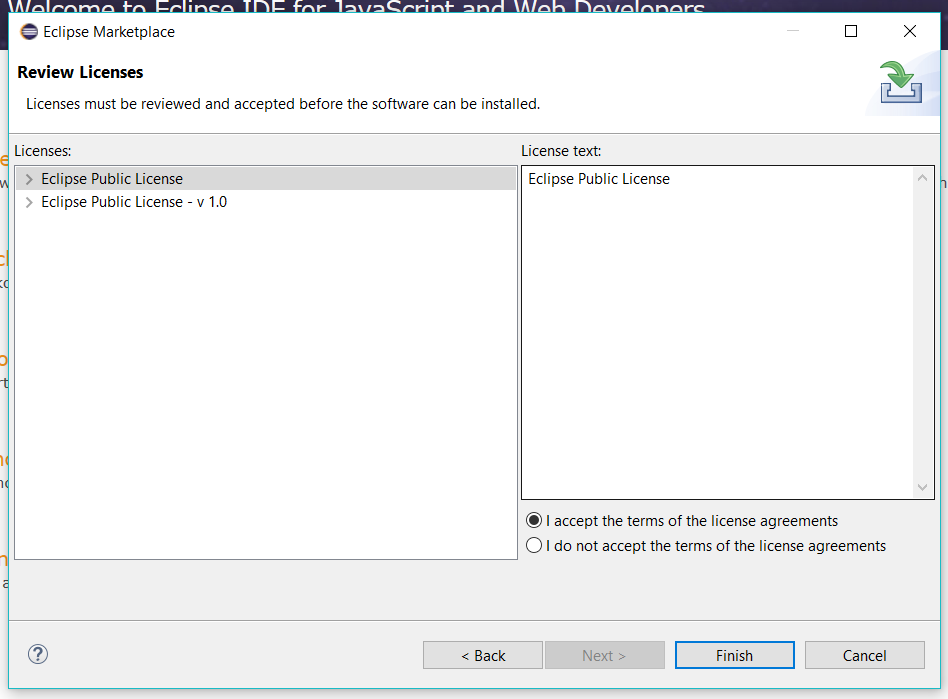
In the next step we will Accept the PyDev licences like below and lick to the Finish .
When the installation start the Market Place will be closed and the installation can be tracked from bottom right corner of the Eclipse main screen like below.
When the installation is completed we will see the following message where we need to restart the Eclipse in order to start PyDev Python development environment.
Setup selenium using eclipse and python in windows

Follow few steps to configure eclipse for selenium with python.
Step 1: Download python — https://www.python.org/downloads/
Step 2: Download chrome driver — https://chromedriver.chromium.org/
Step 3: Install pip — Set environment variables in your system for selenium, python and pip
a. Search for environment variables in search bar of your system

b. Goto to environment variables section at bottom right corner

c. Click on edit and add a path of your files of selenium, python and pip


6. Install and Configure PyDev in Eclipse by following below steps
a. Open eclipse and goto help

b. Goto help and then click Install new software
c. Search for “http://pydev.org/updates» in Work with and then Select all listed Items and click on Next twice
d. Accept the License Agreement and click Finish.

e. You may encounter Security Warning, Click on “Install Anyway”.

f. Now , in this step you will set preferences. With the help of preference option, you can use Python as per the project need.
Go to Window > Preferences > PyDev > Interpreter > Python Interpreter.

g. Click on apply and close. In this step, give the “interpreter name” and the “exe” file path of Python.
i. Click on ‘Browse’ and find python.exe where you installed python.
ii. Click ‘OK’ button.
iii. Select all the Folder and click on OK
iv. Click on “Apply and Close”.
v. Click ok and proceed further
h. Make a New Project in Python. In this step
i. Right click PyDev Package Explorer > New.
ii. Select option others

iii. Select “PyDev > PyDev Project”
iv. Press ‘Next’ button

vi. Name your Project
vii. Click Next and Finish

vii. You can see the new Python (PyDev) project is created
viii. Create a new Python package

ix. Name your package and click finish

x. Create a new PyDev module. Right click on package > New > PyDev module

xi. Name your module and click OK

xii. Click OK and start writing your python scripte. Below is the sample script I am attaching
Пишем на Python в Eclipse
Для поддержки языка программирования Python в Eclipse нужно установить PyDev. Для этого открываем Marketplace:
 Eclipse Marketplace
В строке поиска наберите “Python” и нажмите клавишу Enter. В списке кликаем “Install” у пункта “PyDev — Python IDE for Eclipse”:
 PyDev в Eclipse Marketplace
Дальше прокликиваем все остальные окошки, со всем соглашаемся. На странице с лицензионным соглашением ставим переключатель на “I accept the terms of the license agreements”. Перезапускаем Eclipse, как нам и предлагают.
При запуске у вас появится сообщение, что Python не настроен. Кликаем мышкой на “Manual config”:
 Python not configured
Открывается вот такое окно:
 Выбираем путь к интерпретатору Python в Eclipse
Теперь нам нужно установить интерпретатор Python. Как это делается под Linux я уже рассказывал вот в этой статье. Под Windows же нам нужно скачать установщик с официального сайта. После установки возвращаемся в Eclipse и выбираем установленный Python. У меня он по умолчанию установился по пути:
IT Novella

Python(x,y) — Это библиотека свободных и бесплатных программ, базирующаяся на языке программирования Python,
предназначенная для проведения численных расчетов, анализа и визуализации данных.
Включает библиотеку QT, IDE Spyder, Gnuplot, matplotlib и т.д. Доступны версии для ОС Linux, Windows.
Для установки Python(x,y) скачиваем дистрибутив с официального сайта и запускаем выполняемый файл.
Для установки Eclipse скачиваем дистрибутив с официального сайта http://eclipse.org.
Распаковываем архив и запускаем файл eclipse.exe.
Для программирования на Python с помощью Eclipse необходимо установить плагин PyDev.
Для этого:
- запускаем Eclipse;
- выбираем пункт меню Help — Install New Software;
- нажимаем кнопку Add. В появившемся окне в поле Name вводим PyDev,
а в поле Location — pydev.org/updates.
Затем нажимаем кнопку Ok;
Для создания и выполнения программ на python необходимо настроить Eclipse и PyDev: Для этого:
- запускаем Eclipse;
- по умолчанию в Eclipse включена перспектива Java. Нам необходимо переключиться на перспективу PyDev.
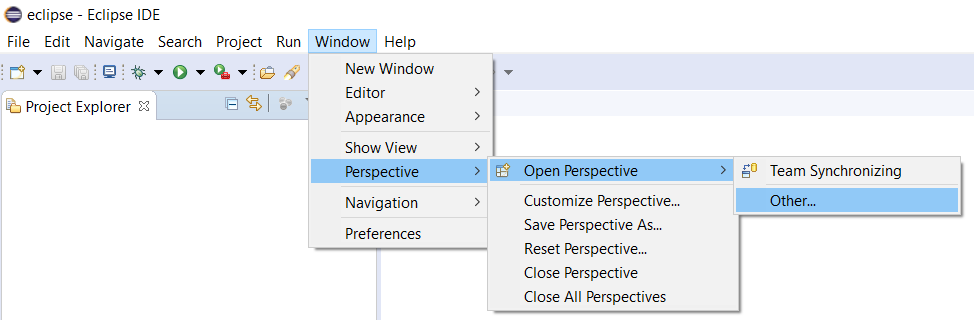
Для этого выбираем пункт меню Window — Open Perspective — Other.
В появившемся окне выбираем PyDev и нажимаем Ok; - выбираем пункт меню Window — Preferences — PyDev — Interpeter Python;
- нажимаем кнопку Auto Config, затем Ok и ещё раз Ok.
Можно программировать на Python с использованием Eclipse.
How To Install Eclipse for Python On Windows
It provides all the steps required to install Eclipse with PyDev for Python development on Windows 10 and getting started with Python development using the Hello World Project.
This tutorial provides all the steps required to install Eclipse for developing Python applications on Windows. It explains how to install Eclipse with PyDev to develop Python applications on Windows 10. The same setup can also be used to develop web-based applications using Django. All the steps should be similar for other versions of Windows.
PyDev is a plugin that enables Eclipse for Python development. It adds the features to Eclipse for Python language which includes Code Completion, Code Analysis, Debugger, Interactive Console, Refactoring, Tokens Browser, Django Integration, etc. The main advantage of installing PyDev plugin is that it can be installed on the pre-installed Eclipse that is already available on the system. We can also do a fresh install of Eclipse as shown in this tutorial.
It assumes that Java is already installed on the system. You may also be interested in How To Install Java 14 On Windows, How To Install OpenJDK 14 On Windows and How To Install Java 11 On Windows. It also assumes that Python is already installed on the system. You may also be interested in How To Install Python 3.8 On Windows and How To Install Python On Windows.
You might also be interested in Python Cheatsheet to learn or brush up the basics of Python.
Step 1 — Download Eclipse
Open the Eclipse packages Download Page and scroll down to Eclipse IDE for Web and JavaScript Developers as highlighted in Fig 1.
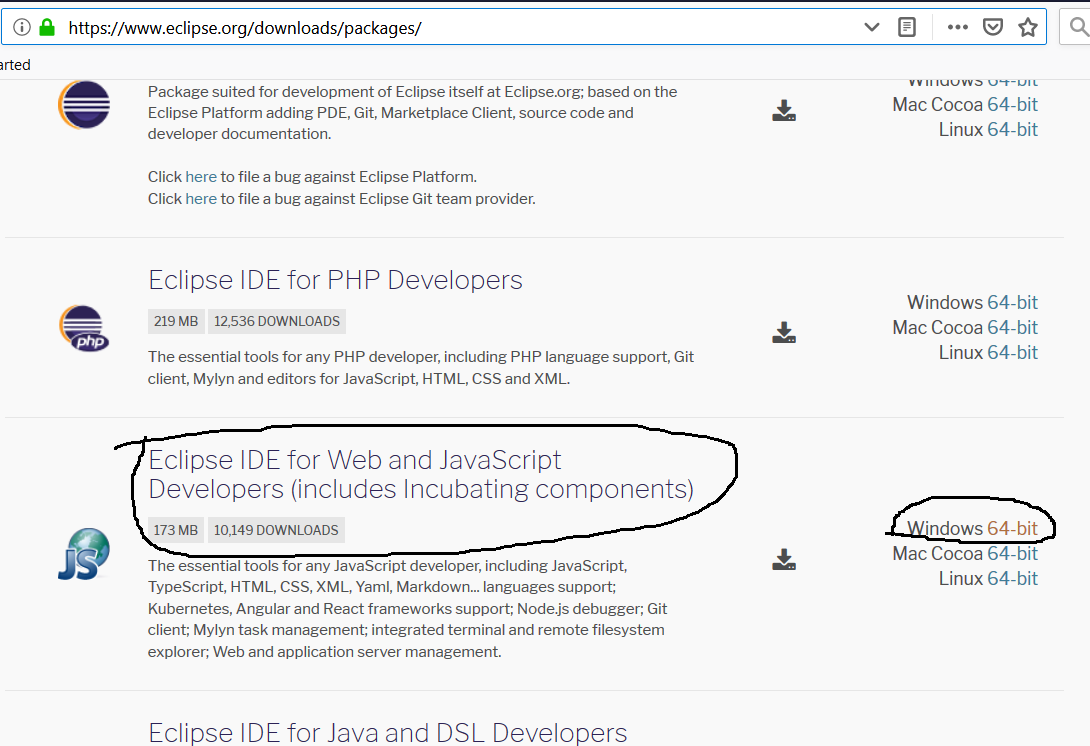
Click on the Windows 64-bit link as highlighted in Fig 1. It will navigate to the download page as shown in Fig 2.
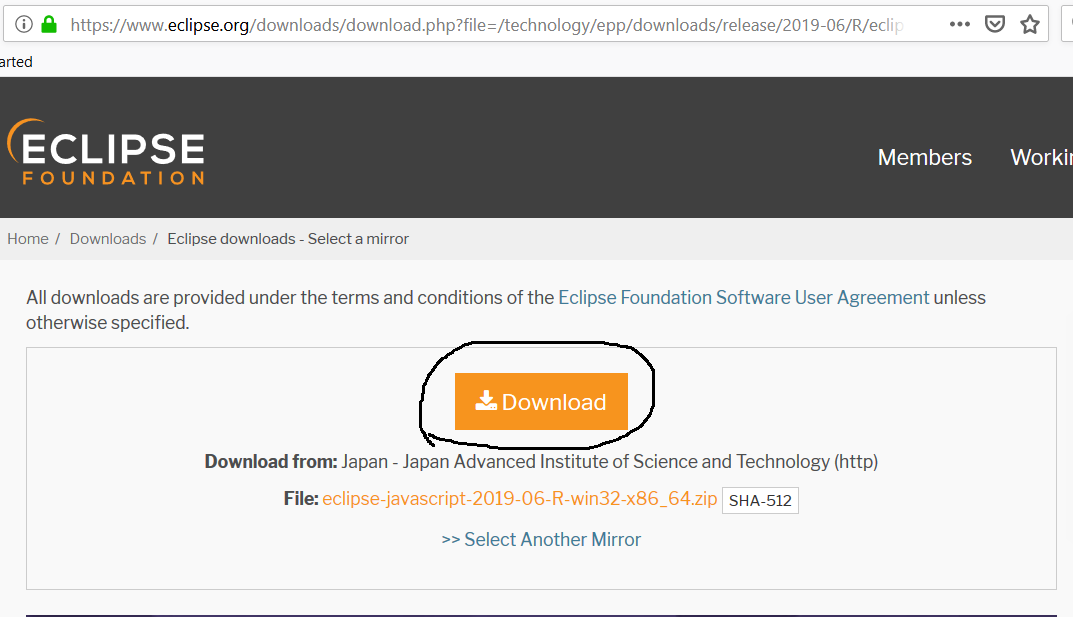
Click on the Download Button to start the download.
Step 2 — Install Eclipse
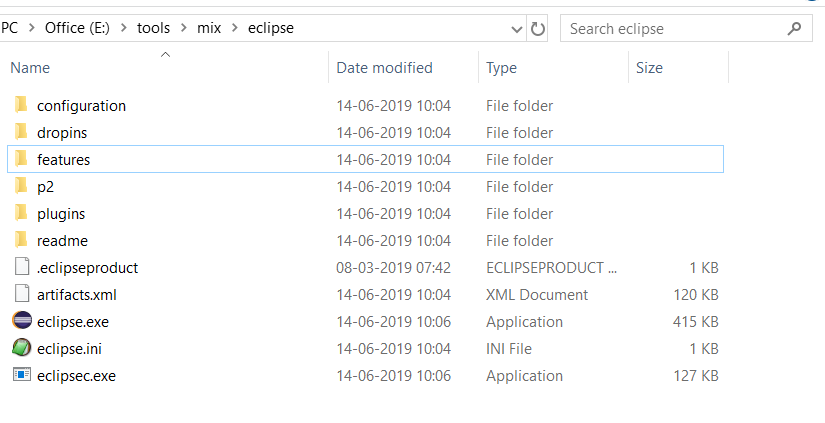
We can simply extract the zip file downloaded in the previous step to complete the installation. The files that ships with the zip are as shown in Fig 3.
You can also create a desktop shortcut icon to launch the Eclipse from the desktop. Launch the Eclipse by double-clicking on either the executable file or desktop shortcut added by you. It will show the option to configure the current workspace as shown in Fig 4.
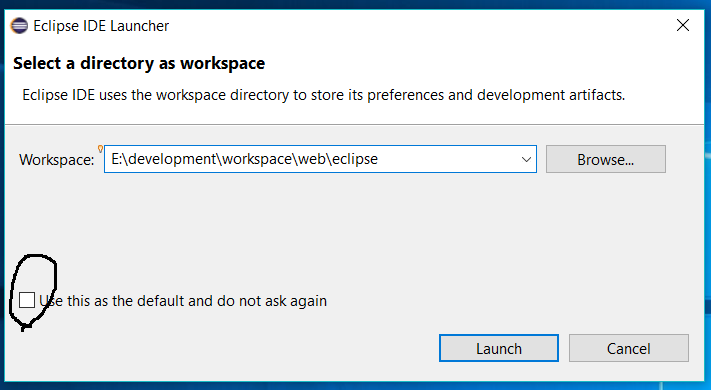
Keep the checkbox unchecked as highlighted in Fig 4. It will show the workspace selection every time we launch the Eclipse IDE to choose the current workspace. After providing an appropriate workspace location, click on the Launch Button to start Eclipse. It will show the Welcome Screen as shown in Fig 5.
Step 3 — Install PyDev Plugin
Click on Help -> Eclipse Marketplace to open the Eclipse Marketplace wizard. Search for PyDev on the marketplace. It will show the search results as shown in Fig 6.
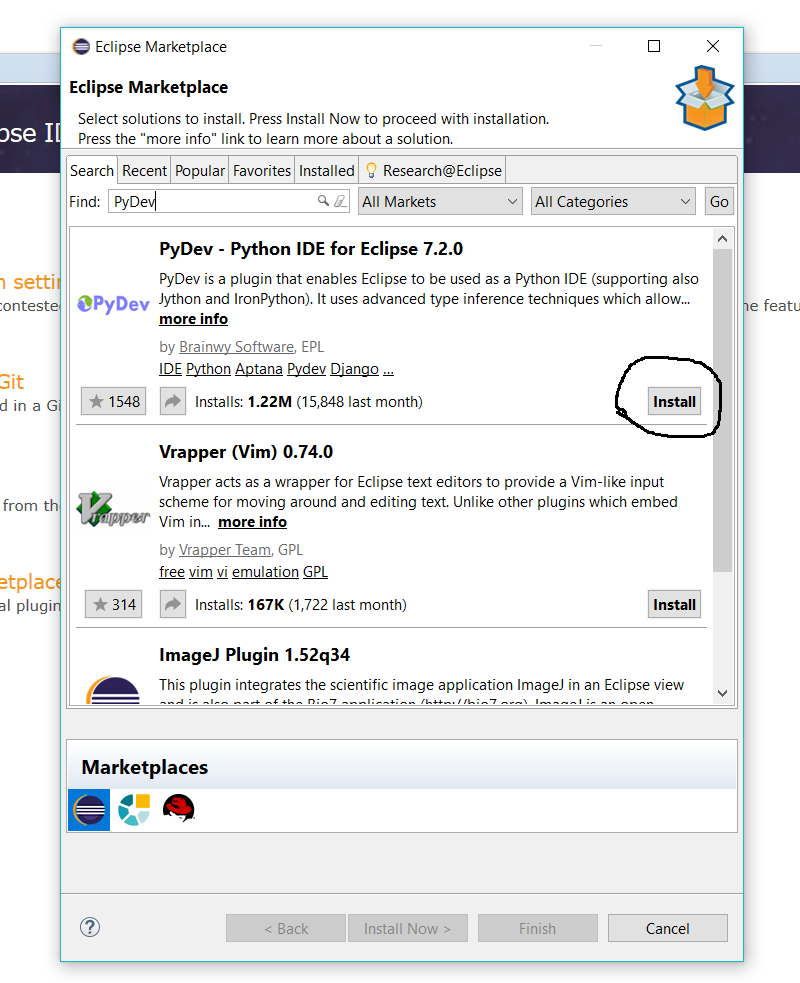
Click the Install Button to start installing the PyDev plugin for Eclipse. It will fetch the details of the plugin from the marketplace and shows the available options as shown in Fig 7.
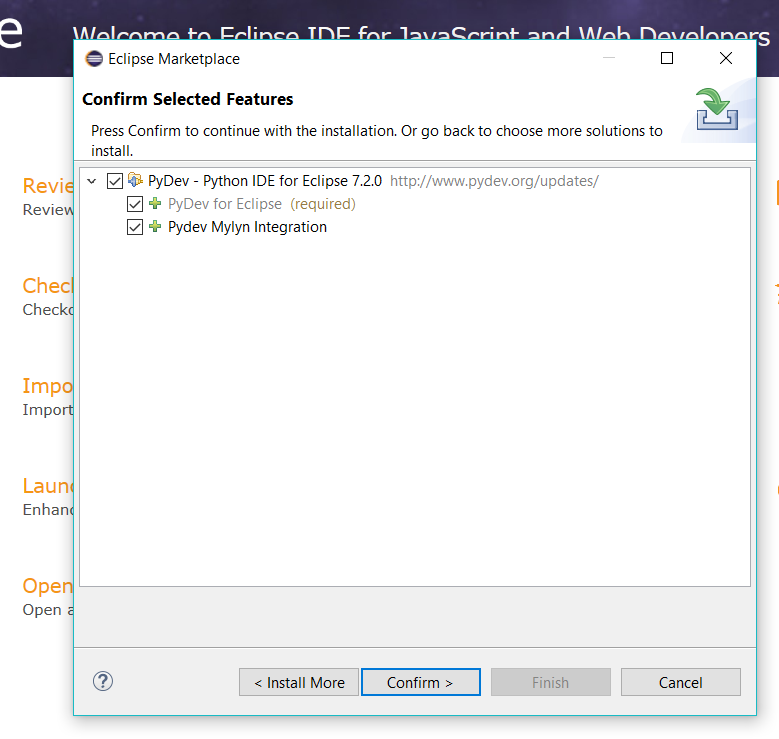
Click the Confirm Button to confirm the plugin installation. On the next window, it will ask to accept the License Agreement as shown in Fig 8.
Click the Finish Button to complete the installation of the PyDev plugin for Eclipse. In the end, it will also ask to restart the IDE.
Step 4 — Getting Started with Python — Hello World
In this step, we will create our first Python Project using eclipse and create the first program to print Hello World on the console.
Click on Windows -> Perspective -> Open Perspective -> Other to open the PyDev perspective for Python development as shown in Fig 9.
Choose the PyDev perspective and click the Open Button to open the perspective. With the PyDev perspective open, we will create the first Python project. Click on File -> New -> PyDev Project as shown in Fig 10 to start creating the project.

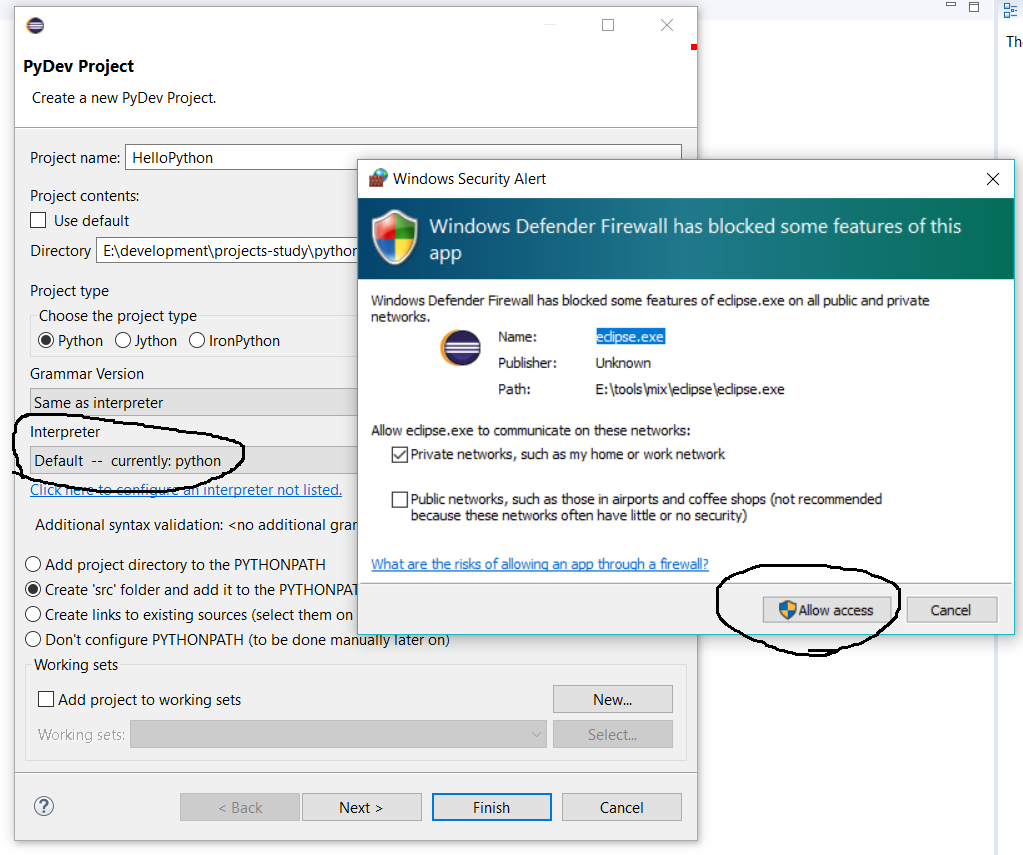
The next wizard shows the options to configure the Project as shown in Fig 11.
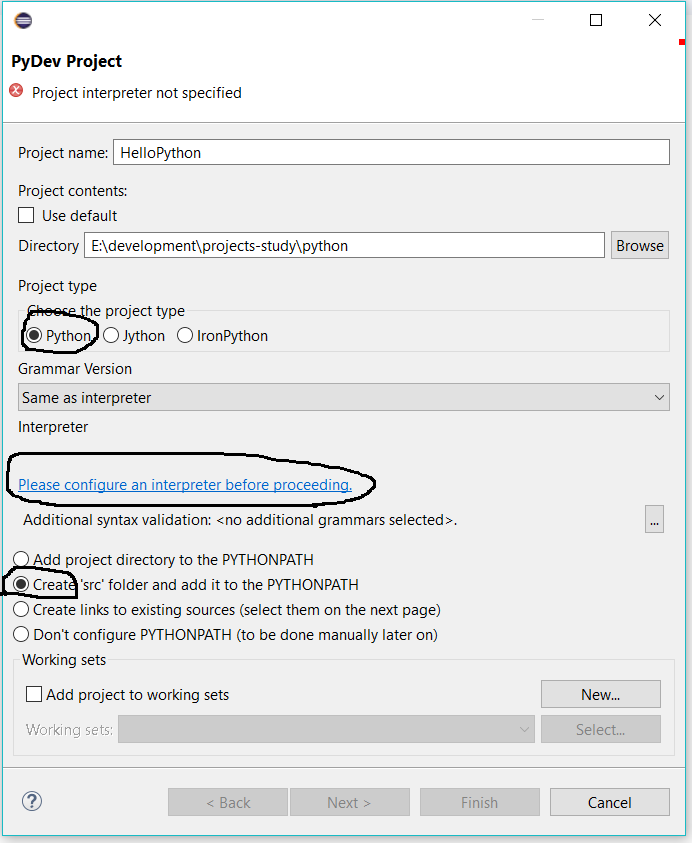
We can see that the project configuration wizard shows a link to configure the Python interpreter. Now click the highlighted link to start configuring the interpreter. It will show the available options as shown in Fig 12.

Click the Choose From List Button. It will show the available interpreters as shown in Fig 13.
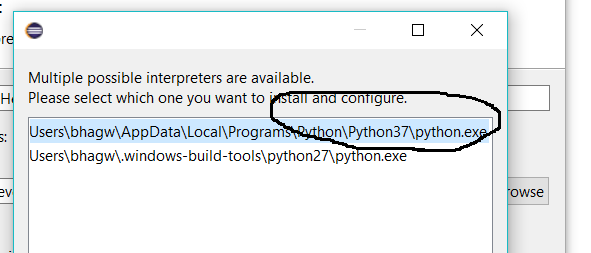
Choose the main interpreter as highlighted in Fig 13 and click the Ok Button. It will also ask to configure the python path as shown in Fig 14.
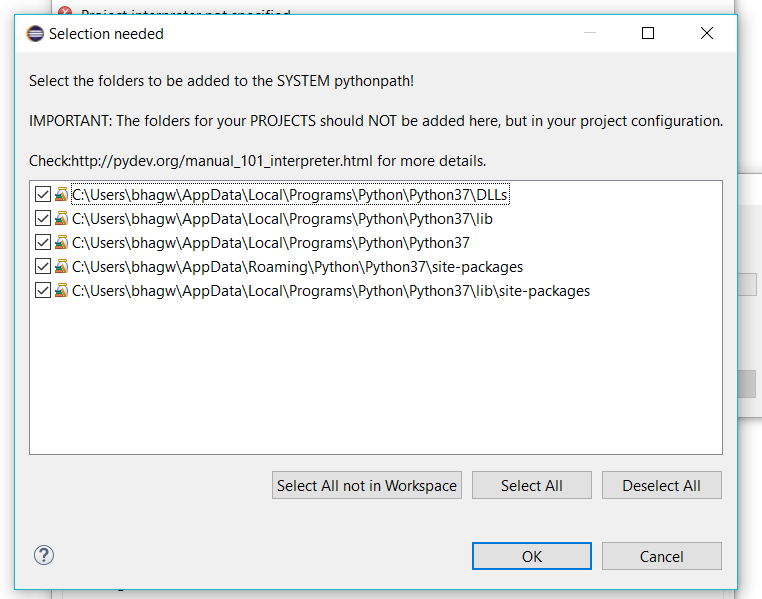
Keep the paths selected on click on the OK Button . It will configure the interpreter and shows the Default interpreter selected for the project as shown in 15. It will also ask for system permission to allow Eclipse to make required changes as shown in Fig 15.
Notes: We only need to configure the interpreter for the first project. It will show the list of available interpreters from the second project onwards and we can update the interpreter configuration if required.
Click the Finish Button to complete the project configuration and create the project. It will add the project on the projects list as shown in Fig 16.

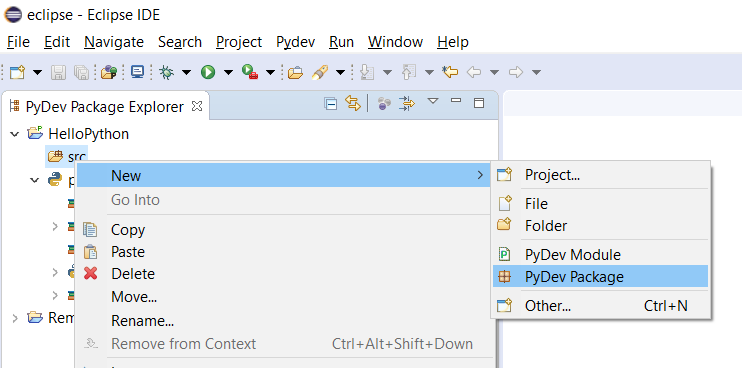
Now right-click on Src and click New -> PyDev Package as shown in Fig 17.
Provide an appropriate package name and click the OK Button to create the package. It will ask to confirm PyDev preferences as shown in Fig 18.
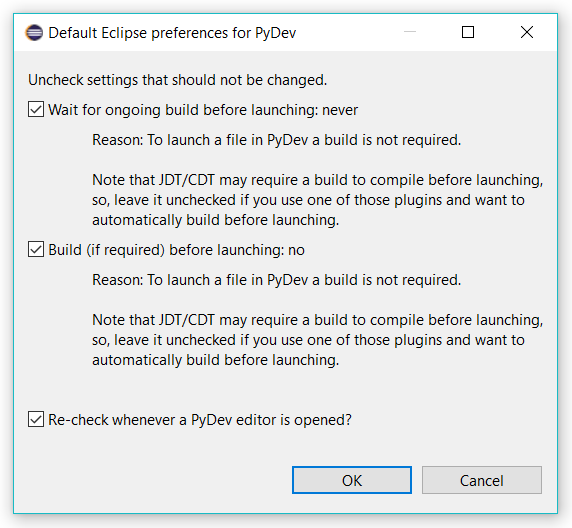
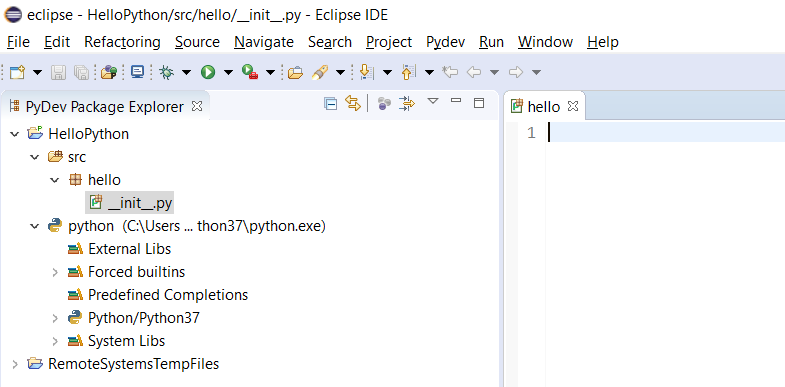
Click the Ok Button to confirm the preferences. We can change them later if required. It will create the Regular Package and also creates the corresponding __init__.py as shown in Fig 19.
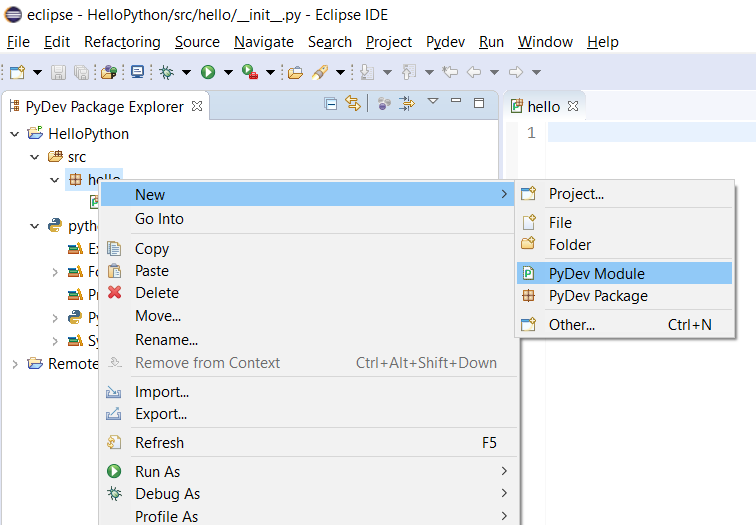
Now we will create our first Python Module to print Hello World on the console. Keep the package selected and right-click -> New -> PyDev Module to start creating the Module as shown in Fig 20.
It will show the wizard to configure the Module name. Now provide the appropriate Module name and click the Finish Button to create the module. It will also ask to choose the module template as shown in Fig 21.
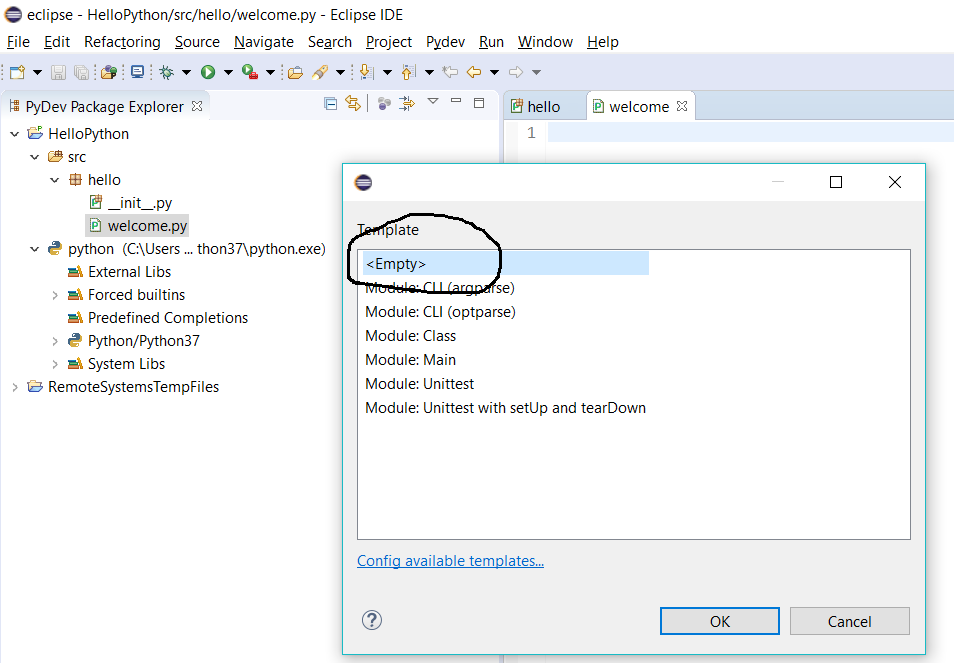
I have selected the Empty Template for this tutorial to keep it simple. Click the OK Button to configure the module template.
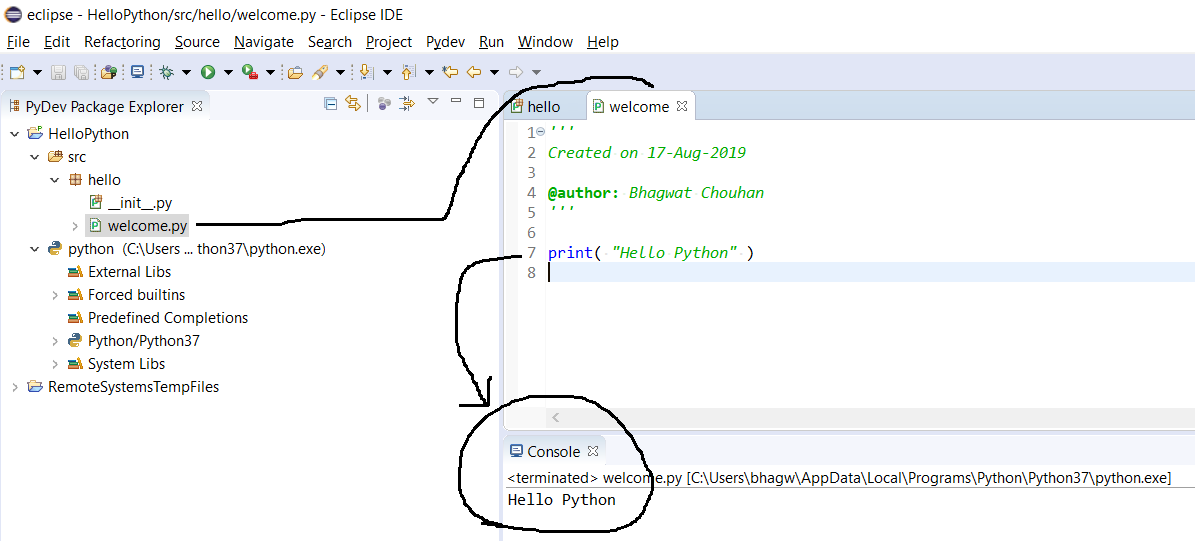
Now update the module to print Hello World as shown in Fig 22.

Finally, we will execute the module to print the output on the console. Click on Run -> Run As -> Python Run to execute the program as shown in Fig 23.

It will execute the program and shows the output on the console as shown in Fig 24.
Summary
This tutorial provided all the steps to download, install and configure Eclipse with PyDev on Windows 10. We have also created the first project, the first module, and the first package to print Hello Python on the console. This is all about beginning Python programming using Eclipse with PyDev. You may join the discussion on installing Eclipse with PyDev on Windows using the comment box.


