- Python Execute Unix / Linux Command Examples
- os.system example (deprecated)
- Say hello to subprocess
- Related media
- How to Run Linux Commands With Python on the Raspberry Pi
- Introduction
- Using the OS Module
- Sample Code using system()
- Using the Subprocess Module
- Writing a simple command using subprocess
- Writing a command with switches
- Storing the command output to a variable
- Python | Выполнять и анализировать команды Linux
- Подпроцесс —
- Начиная процесс —
- Список каталогов —
- Команда пинга —
- Изменение разрешений —
Python Execute Unix / Linux Command Examples
H ow do I execute standard Unix or Linux shell commands using Python? Is there a command to invoke Unix commands using Python programs?
| Tutorial details | |
|---|---|
| Difficulty level | Easy |
| Root privileges | No |
| Requirements | Python |
| Est. reading time | N/A |
You can execute the command in a subshell using os.system() . This will call the Standard C function system(). This function will return the exit status of the process or command. This method is considered as old and not recommended, but presented here for historical reasons only. The subprocess module is recommended and it provides more powerful facilities for running command and retrieving their results.
os.system example (deprecated)
In this example, execute the date command:
In this example, execute the date command using os.popen() and store its output to the variable called now:
Say hello to subprocess
The os.system has many problems and subprocess is a much better way to executing unix command. The syntax is:
In this example, execute the date command:
You can pass the argument using the following syntax i.e run ls -l /etc/resolv.conf command:
Another example (passing command line args):
In this example, run ping command and display back its output:
The only problem with above code is that output, err = p.communicate() will block next statement till ping is completed i.e. you will not get real time output from the ping command. So you can use the following code to get real time output:
Related media
A quick video demo of above python code:
References:
🐧 Get the latest tutorials on Linux, Open Source & DevOps via
| Category | List of Unix and Linux commands |
|---|---|
| Documentation | help • mandb • man • pinfo |
| Disk space analyzers | df • duf • ncdu • pydf |
| File Management | cat • cp • less • mkdir • more • tree |
| Firewall | Alpine Awall • CentOS 8 • OpenSUSE • RHEL 8 • Ubuntu 16.04 • Ubuntu 18.04 • Ubuntu 20.04 |
| Linux Desktop Apps | Skype • Spotify • VLC 3 |
| Modern utilities | bat • exa |
| Network Utilities | NetHogs • dig • host • ip • nmap |
| OpenVPN | CentOS 7 • CentOS 8 • Debian 10 • Debian 8/9 • Ubuntu 18.04 • Ubuntu 20.04 |
| Package Manager | apk • apt |
| Processes Management | bg • chroot • cron • disown • fg • glances • gtop • jobs • killall • kill • pidof • pstree • pwdx • time • vtop |
| Searching | ag • grep • whereis • which |
| Shell builtins | compgen • echo • printf |
| Text processing | cut • rev |
| User Information | groups • id • lastcomm • last • lid/libuser-lid • logname • members • users • whoami • who • w |
| WireGuard VPN | Alpine • CentOS 8 • Debian 10 • Firewall • Ubuntu 20.04 |
Comments on this entry are closed.
307 ms?
That’s a long interval 😉
Hi, please more small and usefull examples with python like it! more code snippets!
A very comprehensive explanation, being useful to beginners to python.
where to find the command of linux
these commands are very helpfull us….please give more example like this.
What exactly does Shell=True does?
please tell the exact usage of the shell argumet.
First off, enjoy all your posts and youtube videos. Recently viewed your tutorial on installing freebsd. So thank you for sharing your knowledge.
I have a query regarding launching an external bash script file (.sh) in freebsd.
For linux I used:
os.system(‘sh ‘ + filepath)
For Mac:
os.system(‘open ‘ + filepath)
And for windows:
os.startfile(filepath)
I am unable to get any of these to work for freebsd. I know startfile is only for windows, however was wondering if there was an equivalent for freebsd without using subprocess. Or if not possible at all how to use subprocess to call a external script.
Also, in freebsd, what would be the equivalent of say:
sudo chown -R user:user file.bundle
as both sudo and chown are not installed by default.
Any help would be appreciated.
What if I want to create a variable in Python, then pass that variable to a bash command line?
Something like this:
….
celsius = sensor.read_temperature()
import subprocess
subprocess.call([“myscript.sh”, “-v”, “-t $celsius”])
Is that possible?
Of course you can. In python’s new formatting it would look like this:
subprocess.call([«myscript.sh», «-v», «-t <>«.format(celsius)])
I use split so I dont have to write literal arrays. Works most of the time.
Источник
How to Run Linux Commands With Python on the Raspberry Pi
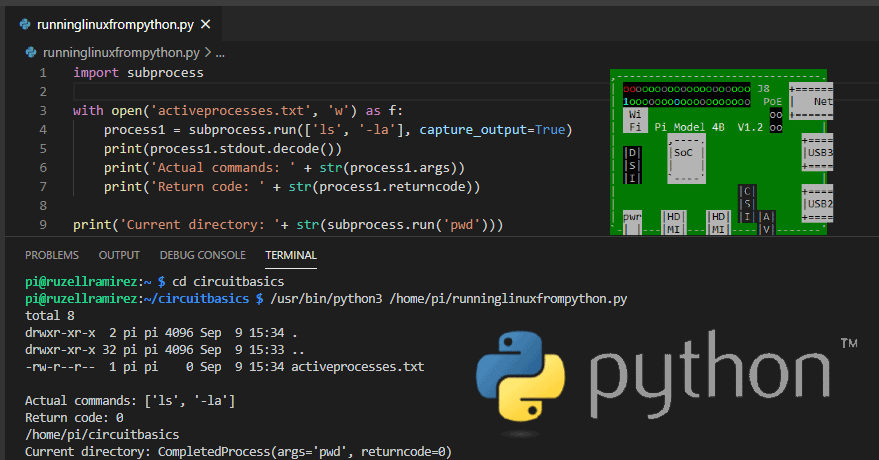
Python is the language of choice for shell scripting and task automation. It is popular in system administration because it can execute shell commands using only its default libraries. In this tutorial, you will learn how to run Linux shell commands with Python using the os and subprocess modules.

Introduction
Nowadays, automation is a buzzword as hot as a processor running at 100% in a room with no AC. Home management, data extraction, the omniscient talking boxes in the kitchen, and even self-driving cars—they are all products of automation. Well, it makes sense since we’re living in the fourth industrial revolution. Heard of it? It is where humans and machines try to work as one, and it is happening now.
Using a Raspberry Pi even opens more doors in automation. With its GPIO, you can interface the credit-card sized computer into almost anything that throws or receives digital data. And since it is a fully-fledged Linux computer, you can automate your computer tasks as well. What’s more, Python makes it unimaginably easier! There are two ways to run Linux commands with Python: using the os module and using the subprocess module.
Using the OS Module
First is the os module. According to official documentation, the os module provides a portable way of using operating system dependent functionality. Ain’t that convenient? With short python codes, you can already perform standard operating system tasks without having to interact with the Desktop interface. The system method allows you to do exactly this. To use it to run a Linux command, your code should look like below.
Sample Code using system()
This 4-liner checks your current directory, change location to your home directory, and lists all the contents in detail. It’s a pretty straightforward implementation, but there’s a downside. With system() , you are not allowed to store the resulting output as a variable.
Instead, you can use the popen() method, which is still under the os module. It opens a pipe from or to the command line. A pipe connects a command’s output to another command’s input. This makes it accessible within Python. To use popen() to store as a variable, see the example code below.
Sample code using popen()
If you print the stream variable, you will see its return data. This consists of the actual commands executed, the mode, and the address. Furthermore, if you want to get the whole output as one string, change readlines() to read() .
Using the Subprocess Module
The second way to run Linux commands with Python is by using the newer subprocess module. This module allows you to spawn new processes, connect to their input/output/error pipes, and obtain their return codes. It was created to replace both os.system() and os.popen() functions.
The only method that matters in the subprocess is run() . With it, you can do everything we’ve done above and more using different arguments. Use the following codes as reference:
Writing a simple command using subprocess
Using the method like this will execute the command ls in your terminal. Unlike os.system() , it doesn’t work when you add a switch and enter it fully like subprocess.run(‘ls -la’) . This feature allows the method to take care of quoting and escaping problems hence preventing errors with formatting. To execute ls -la , you must pass the command as a list: subprocess.run([‘ls’,’-la’) . Alternatively, you can make the shell argument True to pass the whole thing as a string. Just take note that this can pose a security risk if you’re using an untrusted input source.
Writing a command with switches
Next, to store the command output inside a variable, simply do it just like any other data. The result won’t be what you’re expecting, however. Since the main purpose of ‘run’ is to execute the shell command within python, the result won’t be like the output you see in the terminal. It will be the return data just like in os.open . You can check it using the code below.
Storing the command output to a variable
This sketch dissects the return data of your command using the method’s arguments. Here are some of the frequently used ones:
- args – returns the actual commands executed
- returncode – returns the return code of the output; 0 means no error
- stdout – captured stdout from the child process
- stderr – captured stderr stream from the child process
Since we did not capture the previous code’s output, we will get ‘none’ with both stdout and stderr arguments. To enable the capture output argument, refer to the following code:
If you print x, you will get the list of items in your current directory of type bytes. Convert it to a string by writing x.stdout.decode() . Alternatively, you can pass the argument text=True with the main function. The output should now look exactly the same as what you have in the terminal.
Lastly, we will run Linux commands with Python and save the output you see in the terminal into a text file—a simple task with subprocess. You just need to redirect the stdout stream to your text file using the argument stdout .
Источник
Python | Выполнять и анализировать команды Linux
Linux является одной из самых популярных операционных систем и распространенным выбором для разработчиков. Он популярен, потому что это открытый исходный код, он бесплатный и настраиваемый, он очень надежный и адаптируемый.
Операционная система в основном состоит из двух частей: ядра и оболочки. Ядро в основном управляет связью между программным обеспечением и оборудованием. Оболочка принимает входные данные или команды от пользователя и выдает выходные данные. В настоящее время в большинстве дистрибутивов Linux используется оболочка BASH (оболочка Bourne again). Команды и сценарии оболочки очень мощные и часто используются разработчиками.
В этой статье мы рассмотрим выполнение и анализ команд Linux с использованием python.
Подпроцесс —
Подпроцесс — это модуль в Python, который позволяет нам запускать новые приложения или процессы в Python. Этот модуль предназначен для замены нескольких старых модулей в Python. Мы можем использовать этот модуль для запуска других программ или выполнения команд Linux.
Начиная процесс —
Новый процесс может быть запущен с помощью функции Popen, определенной в модуле подпроцесса. Это конструктор для класса Popen, который принимает аргументы для настройки нового процесса. Основной процесс создания и управления в этом модуле обрабатывается классом Popen.
Аргументы:
- The first parameter is a list that contains the commands and their options if any.
ex: [‘ls’, ‘-l’]
the above example is equivalent to typing ‘ls -l’ in the terminal- The second parameter is the stdout value. it specifies the standard output.
ex: stdout = subprocess.PIPE
This indicates that a new pipe or redirection should be created. The default value is
“None”, which means that no redirection will occur.
Мы можем получить выходные данные команды, используя функцию связи . Он читает данные из stdout и stderr, пока не достигнет конца файла, и ожидает завершения процесса. Он возвращает кортеж, который содержит выходные данные и ошибку, если таковые имеются.
Синтаксис:
Выход выполненной команды сохраняется в данных. Используя эти функции, мы можем выполнять команды Linux и получать их вывод.
Список каталогов —
Мы можем использовать команду «ls» с такими параметрами, как «-l», «-al» и т. Д., Чтобы вывести список всех файлов в текущем каталоге. Затем мы можем проанализировать этот вывод и распечатать его в презентабельном формате. Функция get_permissions() анализирует выходные данные команды list и извлекает только имена файлов и их соответствующие разрешения.
# функция для перечисления файлов в
# текущий каталог и
# разбирать вывод.
def list_command(args = ‘-l’ ):
# используя функцию Popen для выполнения
# команда и сохранить результат в темп.
# возвращает кортеж, содержащий
# данные и ошибка, если есть.
temp = subprocess.Popen([cmd, args], stdout = subprocess.PIPE)
# мы используем функцию связи
# чтобы получить вывод
output = str (temp.communicate())
# разделить вывод так, чтобы
# мы можем разобрать их построчно
output = output.split( «\n» )
output = output[ 0 ].split( ‘\\’ )
# переменная для хранения вывода
for line in output:
for i in range ( 1 , len (res) — 1 ):
# анализировать вывод ls
# команда и получить разрешения
# файлов и хранить их в
# текстовый файл.
res = list_command( ‘-l’ )
# перебрать все строки
# и получить имя файла
# и его разрешение.
for i in range ( 1 , len (res) — 1 ):
folder_name = line[ len (line) — 1 ]
permission_value = line[ 0 ]
# создать каталог с именем
# выходы для хранения выходных файлов
# открыть выходной файл
out = open ( ‘permissions.txt’ , ‘w’ )
out.write( ‘Folder Name Permissions\n\n’ )
# запись в выходной файл
for folder in permissions:
out.write(folder + ‘ : ‘ + permissions[folder] + ‘\n’ )
if __name__ = = ‘__main__’ :
Выход : 
Команда пинга —
Команда ping расшифровывается как Packet Internet Groper. Чаще всего он используется для проверки связи между двумя системами или узлами. Используя команду ping, мы можем проверить работоспособность соединения между одним узлом или другим. Он обменивается пакетами данных между двумя узлами, а также рассчитывает время прохождения туда-обратно.
# функция для проверки связи с данным хостом
# команда это понг
# отправить два пакета данных на хост
# это указано ‘-c 2’ в
temp = subprocess.Popen([cmd, ‘-c 2’ , host], stdout = subprocess.PIPE)
# получить вывод команды ping
output = str (temp.communicate())
output = output.split( «\n» )
output = output[ 0 ].split( ‘\\’ )
# переменная для хранения результата
for line in output:
print ( ‘ping results: ‘ )
print ( ‘\n’ .join(res[ len (res) — 3 : len (res) — 1 ]))
if __name__ = = ‘__main__’ :
Выход : 
Изменение разрешений —
Команда chmod может использоваться для изменения прав доступа к файлу. Это сокращение от режима изменения. Более подробную информацию можно найти здесь
# функция для изменения разрешений
# данного файла
def change_permissions(args, filename):
# файл перед chmod
data = subprocess.Popen([ls, ‘-l’ , filename], stdout = subprocess.PIPE)
output = str (data.communicate())
print ( ‘file permissions before chmod % s: ‘ % (args))
# выполнение chmod для указанного файла
temp = subprocess.Popen([cmd, args, filename], stdout = subprocess.PIPE)
# файл после chmod
data = subprocess.Popen([ls, ‘-l’ , filename], stdout = subprocess.PIPE)
output = str (data.communicate())
# печать разрешений после chmod
print ( ‘file permissions after chmod % s: ‘ % (args))
if __name__ = = ‘__main__’ :
# изменение разрешений ‘sample.txt’
change_permissions( ‘755’ , ‘sample.txt’ )
Выход : 
Источник


