- Applications for Python
- Web and Internet Development
- Scientific and Numeric
- Education
- Desktop GUIs
- Software Development
- Business Applications
- The PSF
- Python GUI: создаём простое приложение с PyQt и Qt Designer
- Что нам потребуется
- Дизайн
- Основы
- Макеты
- Последние штрихи
- Превращаем дизайн в код
- Пишем код
- Используем дизайн
- Добавляем функциональность в наше Python GUI приложение
- Get started using Python on Windows for beginners
- Set up your development environment
- Install Python
- Install Visual Studio Code
- Install Git (optional)
- Hello World tutorial for some Python basics
- Hello World tutorial for using Python with VS Code
- Create a simple game with Pygame
- Resources for continued learning
- Online courses for learning Python
- Working with Python in VS Code
Applications for Python
Python is used in many application domains. Here’s a sampling.
- The Python Package Index lists thousands of third party modules for Python.
Web and Internet Development
Python offers many choices for web development:
- Frameworks such as Django and Pyramid.
- Micro-frameworks such as Flask and Bottle.
- Advanced content management systems such as Plone and django CMS.
Python’s standard library supports many Internet protocols:
And the Package Index has yet more libraries:
- Requests, a powerful HTTP client library.
- Beautiful Soup, an HTML parser that can handle all sorts of oddball HTML.
- Feedparser for parsing RSS/Atom feeds.
- Paramiko, implementing the SSH2 protocol.
- Twisted Python, a framework for asynchronous network programming.
Scientific and Numeric
Python is widely used in scientific and numeric computing:
- SciPy is a collection of packages for mathematics, science, and engineering.
- Pandas is a data analysis and modeling library.
- IPython is a powerful interactive shell that features easy editing and recording of a work session, and supports visualizations and parallel computing.
- The Software Carpentry Course teaches basic skills for scientific computing, running bootcamps and providing open-access teaching materials.
Education
Python is a superb language for teaching programming, both at the introductory level and in more advanced courses.
Desktop GUIs
The Tk GUI library is included with most binary distributions of Python.
Some toolkits that are usable on several platforms are available separately:
Platform-specific toolkits are also available:
Software Development
Python is often used as a support language for software developers, for build control and management, testing, and in many other ways.
- SCons for build control.
- Buildbot and Apache Gump for automated continuous compilation and testing.
- Roundup or Trac for bug tracking and project management.
Business Applications
Python is also used to build ERP and e-commerce systems:
- Odoo is an all-in-one management software that offers a range of business applications that form a complete suite of enterprise management applications.
- Tryton is a three-tier high-level general purpose application platform.
The PSF
The Python Software Foundation is the organization behind Python. Become a member of the PSF and help advance the software and our mission.
Python GUI: создаём простое приложение с PyQt и Qt Designer
Эта статья предназначена для тех, кто только начинает своё знакомство с созданием приложений с графическим интерфейсом (GUI) на Python. В ней мы рассмотрим основы использования PyQt в связке с Qt Designer. Шаг за шагом мы создадим простое Python GUI приложение, которое будет отображать содержимое выбранной директории.
Что нам потребуется
Нам понадобятся PyQt и Qt Designer, ну и Python, само собой.
В этой статье используется PyQt5 с Python 3, но особых различий между PyQt и PySide или их версиями для Python 2 нет.
Windows: PyQt можно скачать здесь. В комплекте с ним идёт Qt Designer.
macOS: Вы можете установить PyQt с помощью Homebrew:
$ brew install pyqt5
Скачать пакет с большинством компонентов и инструментов Qt, который содержит Qt Designer, можно по этой ссылке.
Linux: Всё нужное, вероятно, есть в репозиториях вашего дистрибутива. Qt Designer можно установить из Центра Приложений, но PyQt придётся устанавливать через терминал. Установить всё, что нам понадобится, одной командой можно, например, так:
После того как вы закончили с приготовлениями, откройте командную строку/терминал и убедитесь, что вы можете использовать команду pyuic5 . Вы должны увидеть следующее:
Если вы видите сообщение, что такой команды нет или что-то в таком роде, попробуйте загуглить решение проблемы для вашей операционной системы и версии PyQt.
Если вы используете Windows, то, скорее всего, путь C:\Python36\Scripts (измените 36 на вашу версию Python) не прописан в вашем PATH . Загляните в этот тред на Stack Overflow, чтобы узнать, как решить проблему.
Дизайн
Основы
Теперь, когда у нас всё готово к работе, давайте начнём с простого дизайна.
Ростелеком информационные технологии , Москва , По итогам собеседования
Откройте Qt Designer, где вы увидите диалог новой формы, выберите Main Window и нажмите Create.
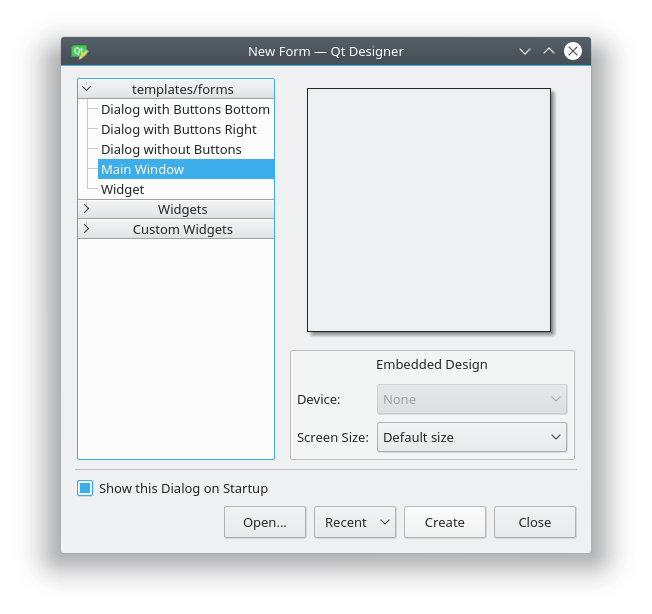
После этого у вас должна появиться форма — шаблон для окна, размер которого можно менять и куда можно вставлять объекты из окна виджетов и т.д. Ознакомьтесь с интерфейсом, он довольно простой.
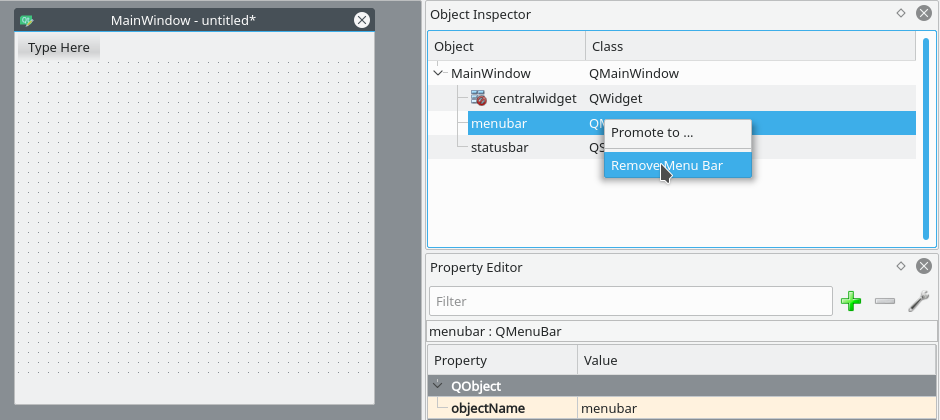
Теперь давайте немного изменим размер нашего главного окна, т.к. нам не нужно, чтобы оно было таким большим. А ещё давайте уберём автоматически добавленное меню и строку состояния, поскольку в нашем приложении они не пригодятся.
Все элементы формы и их иерархия по умолчанию отображаются в правой части окна Qt Designer под названием Object Inspector. Вы с лёгкостью можете удалять объекты, кликая по ним правой кнопкой мыши в этом окне. Или же вы можете выбрать их в основной форме и нажать клавишу DEL на клавиатуре.
В итоге мы имеем почти пустую форму. Единственный оставшийся объект — centralwidget , но он нам понадобится, поэтому с ним мы ничего не будем делать.
Теперь перетащите куда-нибудь в основную форму List Widget (не List View) и Push Button из Widget Box.
Макеты
Вместо использования фиксированных позиций и размеров элементов в приложении лучше использовать макеты. Фиксированные позиции и размеры у вас будут выглядеть хорошо (пока вы не измените размер окна), но вы никогда не можете быть уверены, что всё будет точно так же на других машинах и/или операционных системах.
Макеты представляют собой контейнеры для виджетов, которые будут удерживать их на определённой позиции относительно других элементов. Поэтому при изменении размера окна размер виджетов тоже будет меняться.
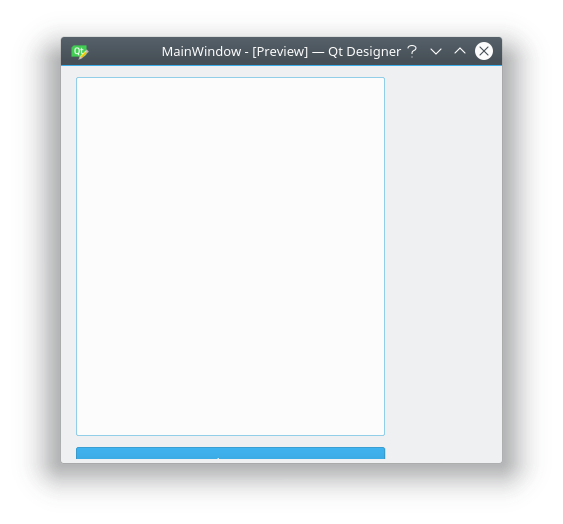
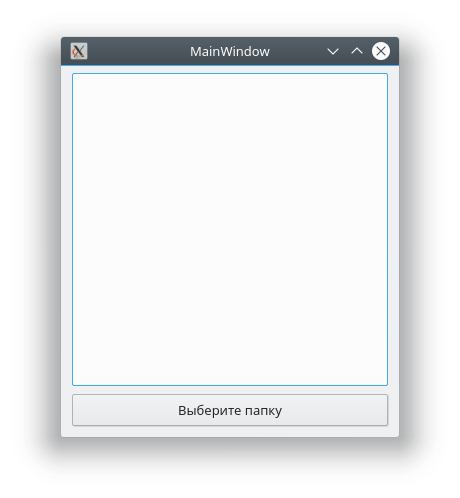
Давайте создадим нашу первую форму без использования макетов. Перетащите список и кнопку в форме и измените их размер, чтобы вышло вот так:
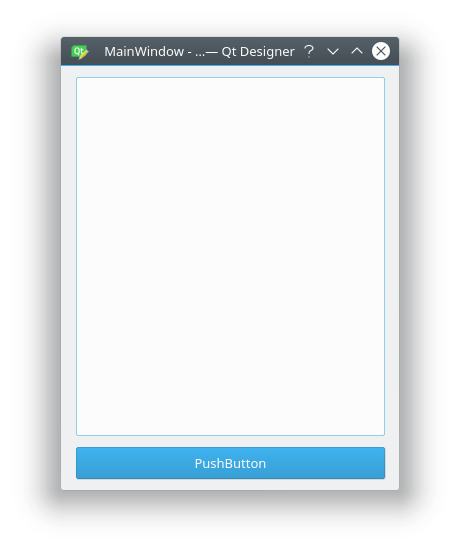
Теперь в меню Qt Designer нажмите Form, затем выберите Preview и увидите что-то похожее на скриншот выше. Выглядит хорошо, не так ли? Но вот что случится, когда мы изменим размер окна:
Наши объекты остались на тех же местах и сохранили свои размеры, несмотря на то что размер основного окна изменился и кнопку почти не видно. Вот поэтому в большинстве случаев стоит использовать макеты. Конечно, бывают случаи, когда вам, например, нужна фиксированная или минимальная/максимальная ширина объекта. Но вообще при разработке приложения лучше использовать макеты.
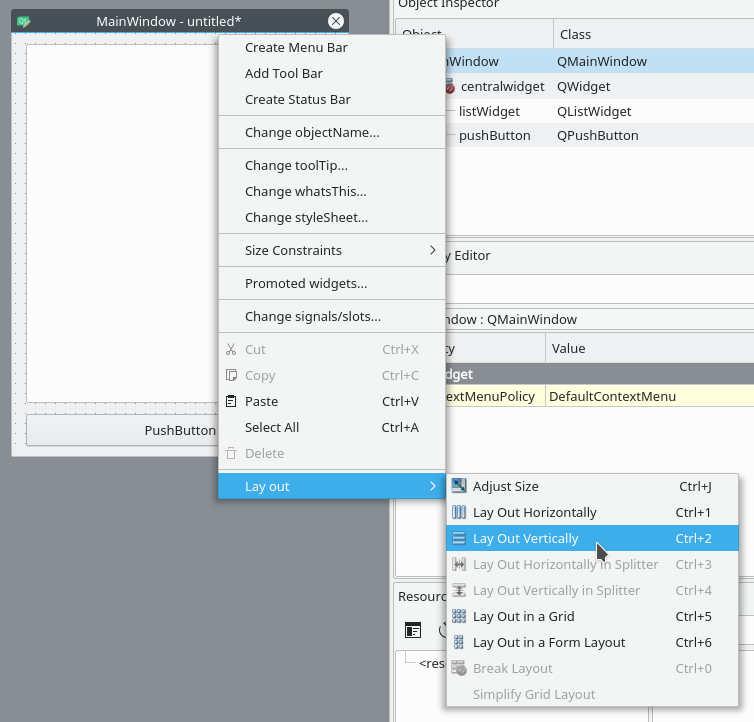
Основное окно уже поддерживает макеты, поэтому нам ничего не нужно добавлять в нашу форму. Просто кликните правой кнопкой мыши по Main Window в Object Inspector и выберите Lay out → Lay out vertically. Также вы можете кликнуть правой кнопкой по пустой области в форме и выбрать те же опции:
Ваши элементы должны быть в том же порядке, что и до внесённых изменений, но если это не так, то просто перетащите их на нужное место.
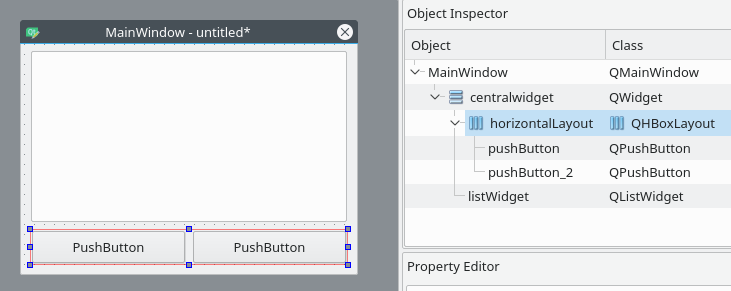
Так как мы использовали вертикальное размещение, все элементы, которые мы добавим, будут располагаться вертикально. Можно комбинировать размещения для получения желаемого результата. Например, горизонтальное размещение двух кнопок в вертикальном будет выглядеть так:
Если у вас не получается переместить элемент в главном окне, вы можете сделать это в окне Object Inspector.
Последние штрихи
Теперь, благодаря вертикальному размещению, наши элементы выровнены правильно. Единственное, что осталось сделать (но не обязательно), — изменить имя элементов и их текст.
В простом приложении вроде этого с одним лишь списком и кнопкой изменение имён не обязательно, так как им в любом случае просто пользоваться. Тем не менее правильное именование элементов — то, к чему стоит привыкать с самого начала.
Свойства элементов можно изменить в разделе Property Editor.
Подсказка: вы можете менять размер, передвигать или добавлять часто используемые элементы в интерфейс Qt Designer для ускорения рабочего процесса. Вы можете добавлять скрытые/закрытые части интерфейса через пункт меню View.
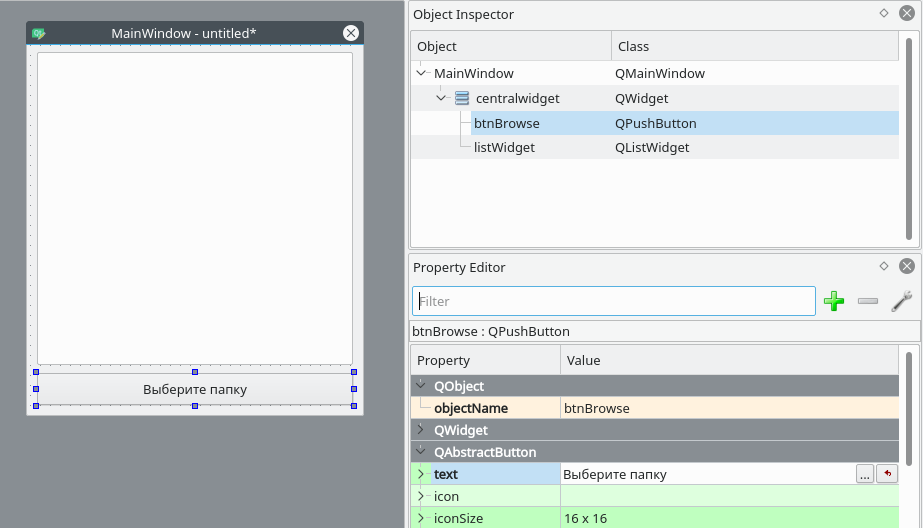
Нажмите на кнопку, которую вы добавили в форму. Теперь в Property Editor вы должны видеть все свойства этого элемента. В данный момент нас интересуют objectName и text в разделе QAbstractButton . Вы можете сворачивать разделы в Property Editor нажатием по названию раздела.
Измените значение objectName на btnBrowse и text на Выберите папку.
Должно получиться так:
Именем объекта списка является listWidget , что вполне подходит в данном случае.
Сохраните дизайн как design.ui в папке проекта.
Превращаем дизайн в код
Конечно, можно использовать .ui -файлы напрямую из Python-кода, однако есть и другой путь, который может показаться легче. Можно конвертировать код .ui -файла в Python-файл, который мы потом сможем импортировать и использовать. Для этого мы используем команду pyuic5 из терминала/командной строки.
Чтобы конвертировать .ui -файл в Python-файл с названием design.py , используйте следующую команду:
Пишем код
Теперь у нас есть файл design.py с нужной частью дизайна нашего приложения и мы начинать работу над созданием его логики.
Создайте файл main.py в папке, где находится design.py .
Используем дизайн
Для Python GUI приложения понадобятся следующие модули:
Также нам нужен код дизайна, который мы создали ранее, поэтому его мы тоже импортируем:
Так как файл с дизайном будет полностью перезаписываться каждый раз при изменении дизайна, мы не будем изменять его. Вместо этого мы создадим новый класс ExampleApp , который объединим с кодом дизайна для использования всех его функций:
В этом классе мы будем взаимодействовать с элементами интерфейса, добавлять соединения и всё остальное, что нам потребуется. Но для начала нам нужно инициализировать класс при запуске кода. С этим мы разберёмся в функции main() :
И чтобы выполнить эту функцию, мы воспользуемся привычной конструкцией:
В итоге main.py выглядит таким образом:
Если запустить этот код: $ python3 main.py , то наше приложение запустится!
Но нажатие на кнопку ничего не даёт, поэтому нам придётся с этим разобраться.
Добавляем функциональность в наше Python GUI приложение
Примечание Весь дальнейший код пишется внутри класса ExampleApp .
Начнём с кнопки Выберите папку. Привязать к функции событие вроде нажатия на кнопку можно следующим образом:
Добавьте эту строку в метод __init__ класса ExampleApp , чтобы выполнить привязку при запуске приложения. А теперь взглянем на неё поближе:
- self.btnBrowse : здесь btnBrowse — имя объекта, который мы определили в Qt Designer. self говорит само за себя и означает принадлежность к текущему классу;
- clicked — событие, которое мы хотим привязать. У разных элементов разные события, например, у виджетов списка есть itemSelectionChanged и т.д.;
- connect() — метод, который привязывает событие к вызову переданной функции;
- self.browse_folder — просто функция (метод), которую мы описали в классе ExampleApp .
Для открытия диалога выбора папки мы можем использовать встроенный метод QtWidgets.QFileDialog.getExistingDirectory :
Если пользователь выберет директорию, переменной directory присвоится абсолютный путь к выбранной директории, в противном случае она будет равна None . Чтобы не выполнять код дальше, если пользователь закроет диалог, мы используем команду if directory: .
Для отображения содержимого директории нам нужно импортировать os :
И получить список содержимого следующим образом:
Для добавления элементов в listWidget мы используем метод addItem() , а для удаления всех элементов у нас есть self.listWidget.clear() .
В итоге функция browse_folder должна выглядеть так:
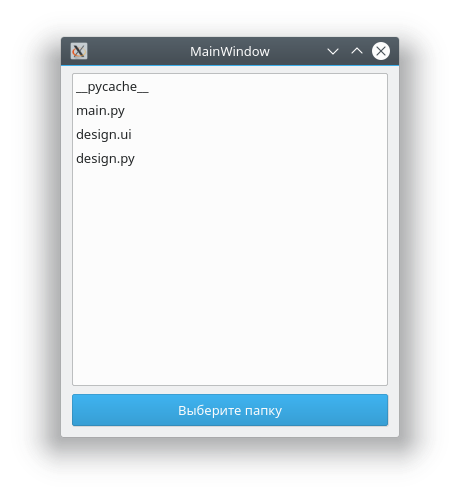
Теперь, если запустить приложение, нажать на кнопку и выбрать директорию, мы увидим:
Так выглядит весь код нашего Python GUI приложения:
Это были основы использования Qt Designer и PyQt для разработки Python GUI приложения. Теперь вы можете спокойно изменять дизайн приложения и использовать команду pyuic5 без страха потерять написанный код.
Get started using Python on Windows for beginners
The following is a step-by-step guide for beginners interested in learning Python using Windows 10.
Set up your development environment
For beginners who are new to Python, we recommend you install Python from the Microsoft Store. Installing via the Microsoft Store uses the basic Python3 interpreter, but handles set up of your PATH settings for the current user (avoiding the need for admin access), in addition to providing automatic updates. This is especially helpful if you are in an educational environment or a part of an organization that restricts permissions or administrative access on your machine.
If you are using Python on Windows for web development, we recommend a different set up for your development environment. Rather than installing directly on Windows, we recommend installing and using Python via the Windows Subsystem for Linux. For help, see: Get started using Python for web development on Windows. If you’re interested in automating common tasks on your operating system, see our guide: Get started using Python on Windows for scripting and automation. For some advanced scenarios (like needing to access/modify Python’s installed files, make copies of binaries, or use Python DLLs directly), you may want to consider downloading a specific Python release directly from python.org or consider installing an alternative, such as Anaconda, Jython, PyPy, WinPython, IronPython, etc. We only recommend this if you are a more advanced Python programmer with a specific reason for choosing an alternative implementation.
Install Python
To install Python using the Microsoft Store:
Go to your Start menu (lower left Windows icon), type «Microsoft Store», select the link to open the store.
Once the store is open, select Search from the upper-right menu and enter «Python». Open «Python 3.9» from the results under Apps. Select Get.
Once Python has completed the downloading and installation process, open Windows PowerShell using the Start menu (lower left Windows icon). Once PowerShell is open, enter Python —version to confirm that Python3 has installed on your machine.
The Microsoft Store installation of Python includes pip, the standard package manager. Pip allows you to install and manage additional packages that are not part of the Python standard library. To confirm that you also have pip available to install and manage packages, enter pip —version .
Install Visual Studio Code
By using VS Code as your text editor / integrated development environment (IDE), you can take advantage of IntelliSense (a code completion aid), Linting (helps avoid making errors in your code), Debug support (helps you find errors in your code after you run it), Code snippets (templates for small reusable code blocks), and Unit testing (testing your code’s interface with different types of input).
VS Code also contains a built-in terminal that enables you to open a Python command line with Windows Command prompt, PowerShell, or whatever you prefer, establishing a seamless workflow between your code editor and command line.
To install VS Code, download VS Code for Windows: https://code.visualstudio.com.
Once VS Code has been installed, you must also install the Python extension. To install the Python extension, you can select the VS Code Marketplace link or open VS Code and search for Python in the extensions menu (Ctrl+Shift+X).
Python is an interpreted language, and in order to run Python code, you must tell VS Code which interpreter to use. We recommend sticking with Python 3.7 unless you have a specific reason for choosing something different. Once you’ve installed the Python extension, select a Python 3 interpreter by opening the Command Palette (Ctrl+Shift+P), start typing the command Python: Select Interpreter to search, then select the command. You can also use the Select Python Environment option on the bottom Status Bar if available (it may already show a selected interpreter). The command presents a list of available interpreters that VS Code can find automatically, including virtual environments. If you don’t see the desired interpreter, see Configuring Python environments.
To open the terminal in VS Code, select View > Terminal, or alternatively use the shortcut Ctrl+` (using the backtick character). The default terminal is PowerShell.
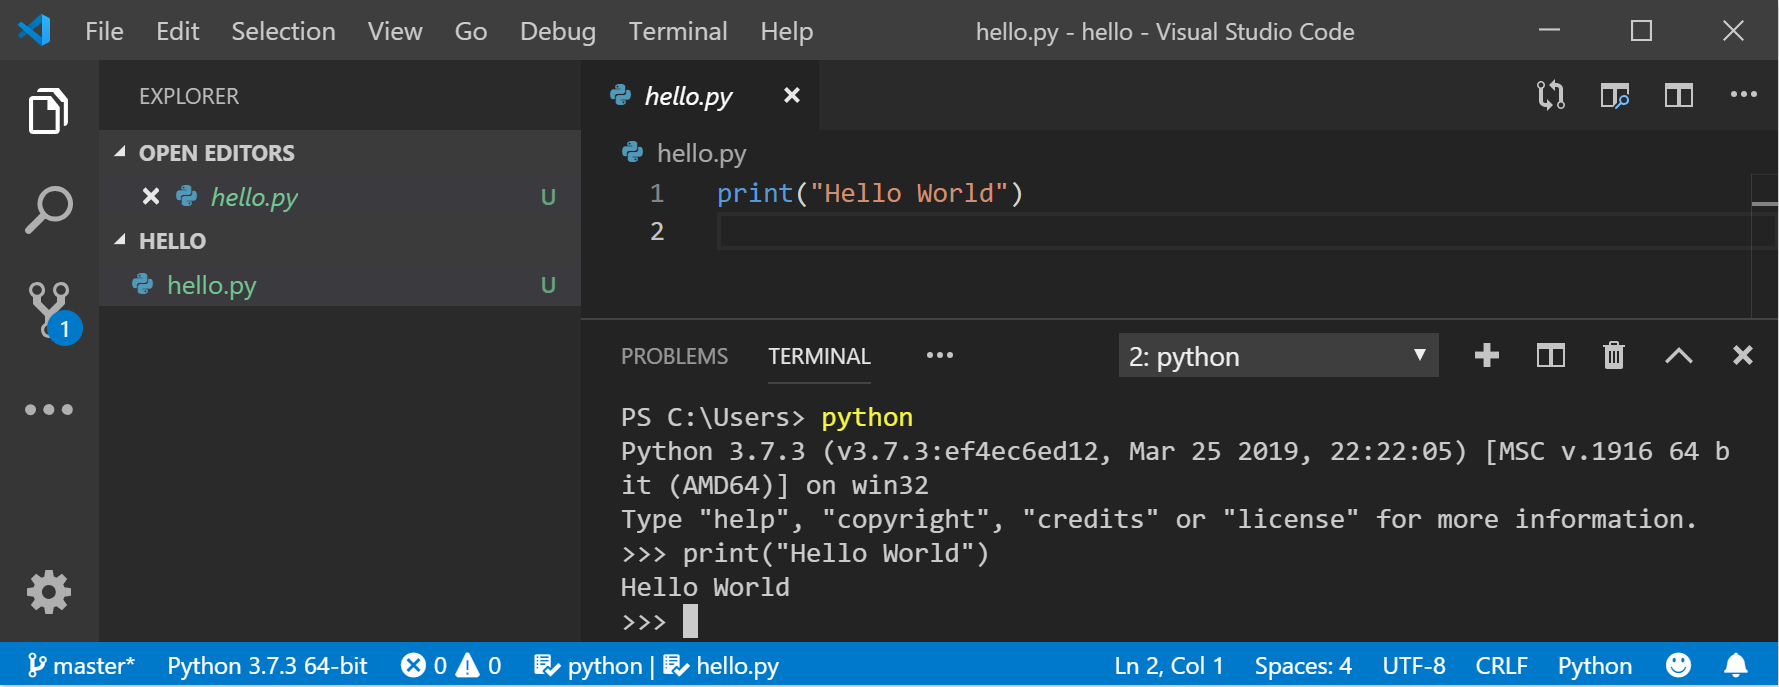
Inside your VS Code terminal, open Python by simply entering the command: python
Try the Python interpreter out by entering: print(«Hello World») . Python will return your statement «Hello World».
Install Git (optional)
If you plan to collaborate with others on your Python code, or host your project on an open-source site (like GitHub), VS Code supports version control with Git. The Source Control tab in VS Code tracks all of your changes and has common Git commands (add, commit, push, pull) built right into the UI. You first need to install Git to power the Source Control panel.
Download and install Git for Windows from the git-scm website.
An Install Wizard is included that will ask you a series of questions about settings for your Git installation. We recommend using all of the default settings, unless you have a specific reason for changing something.
If you’ve never worked with Git before, GitHub Guides can help you get started.
Hello World tutorial for some Python basics
Python, according to its creator Guido van Rossum, is a “high-level programming language, and its core design philosophy is all about code readability and a syntax which allows programmers to express concepts in a few lines of code.”
Python is an interpreted language. In contrast to compiled languages, in which the code you write needs to be translated into machine code in order to be run by your computer’s processor, Python code is passed straight to an interpreter and run directly. You just type in your code and run it. Let’s try it!
With your PowerShell command line open, enter python to run the Python 3 interpreter. (Some instructions prefer to use the command py or python3 , these should also work). You will know that you’re successful because a >>> prompt with three greater-than symbols will display.
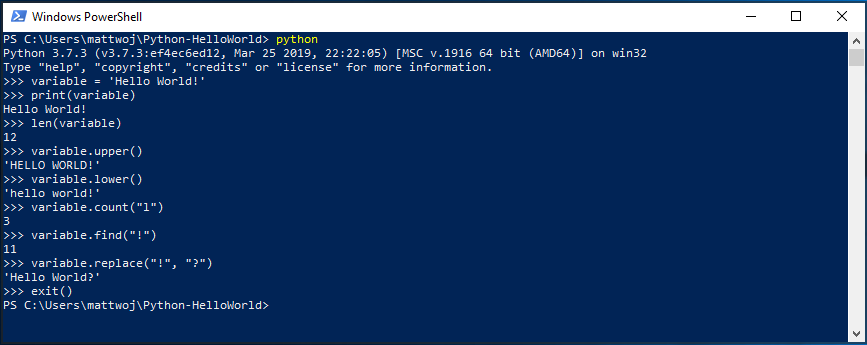
There are several built-in methods that allow you to make modifications to strings in Python. Create a variable, with: variable = ‘Hello World!’ . Press Enter for a new line.
Print your variable with: print(variable) . This will display the text «Hello World!».
Find out the length, how many characters are used, of your string variable with: len(variable) . This will display that there are 12 characters used. (Note that the blank space it counted as a character in the total length.)
Convert your string variable to upper-case letters: variable.upper() . Now convert your string variable to lower-case letters: variable.lower() .
Count how many times the letter «l» is used in your string variable: variable.count(«l») .
Search for a specific character in your string variable, let’s find the exclamation point, with: variable.find(«!») . This will display that the exclamation point is found in the 11th position character of the string.
Replace the exclamation point with a question mark: variable.replace(«!», «?») .
To exit Python, you can enter exit() , quit() , or select Ctrl-Z.
Hope you had fun using some of Python’s built-in string modification methods. Now try creating a Python program file and running it with VS Code.
Hello World tutorial for using Python with VS Code
The VS Code team has put together a great Getting Started with Python tutorial walking through how to create a Hello World program with Python, run the program file, configure and run the debugger, and install packages like matplotlib and numpy to create a graphical plot inside a virtual environment.
Open PowerShell and create an empty folder called «hello», navigate into this folder, and open it in VS Code:
Once VS Code opens, displaying your new hello folder in the left-side Explorer window, open a command line window in the bottom panel of VS Code by pressing Ctrl+` (using the backtick character) or selecting View > Terminal. By starting VS Code in a folder, that folder becomes your «workspace». VS Code stores settings that are specific to that workspace in .vscode/settings.json, which are separate from user settings that are stored globally.
Continue the tutorial in the VS Code docs: Create a Python Hello World source code file.
Create a simple game with Pygame
Pygame is a popular Python package for writing games — encouraging students to learn programming while creating something fun. Pygame displays graphics in a new window, and so it will not work under the command-line-only approach of WSL. However, if you installed Python via the Microsoft Store as detailed in this tutorial, it will work fine.
Once you have Python installed, install pygame from the command line (or the terminal from within VS Code) by typing python -m pip install -U pygame —user .
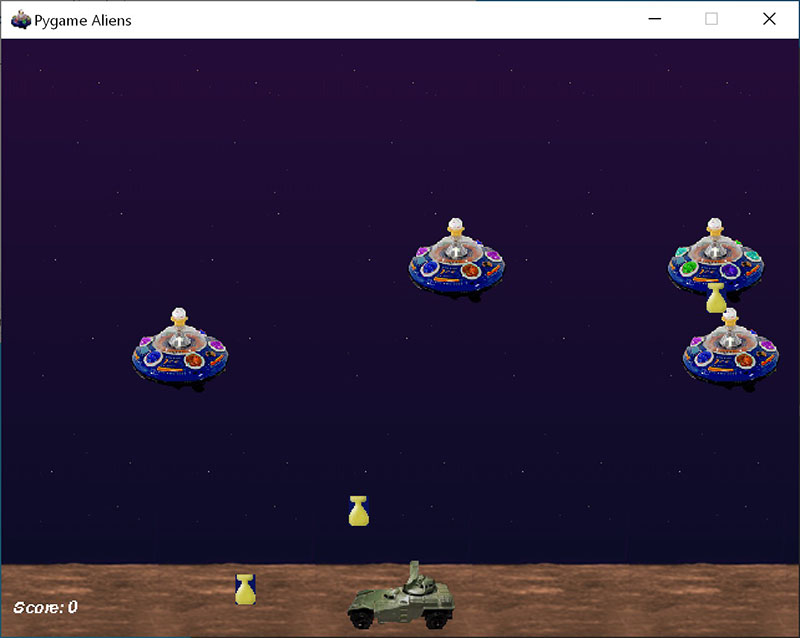
Test the installation by running a sample game : python -m pygame.examples.aliens
All being well, the game will open a window. Close the window when you are done playing.
Here’s how to start writing your own game.
Open PowerShell (or Windows Command Prompt) and create an empty folder called «bounce». Navigate to this folder and create a file named «bounce.py». Open the folder in VS Code:
Using VS Code, enter the following Python code (or copy and paste it):
Save it as: bounce.py .
From the PowerShell terminal, run it by entering: python bounce.py .
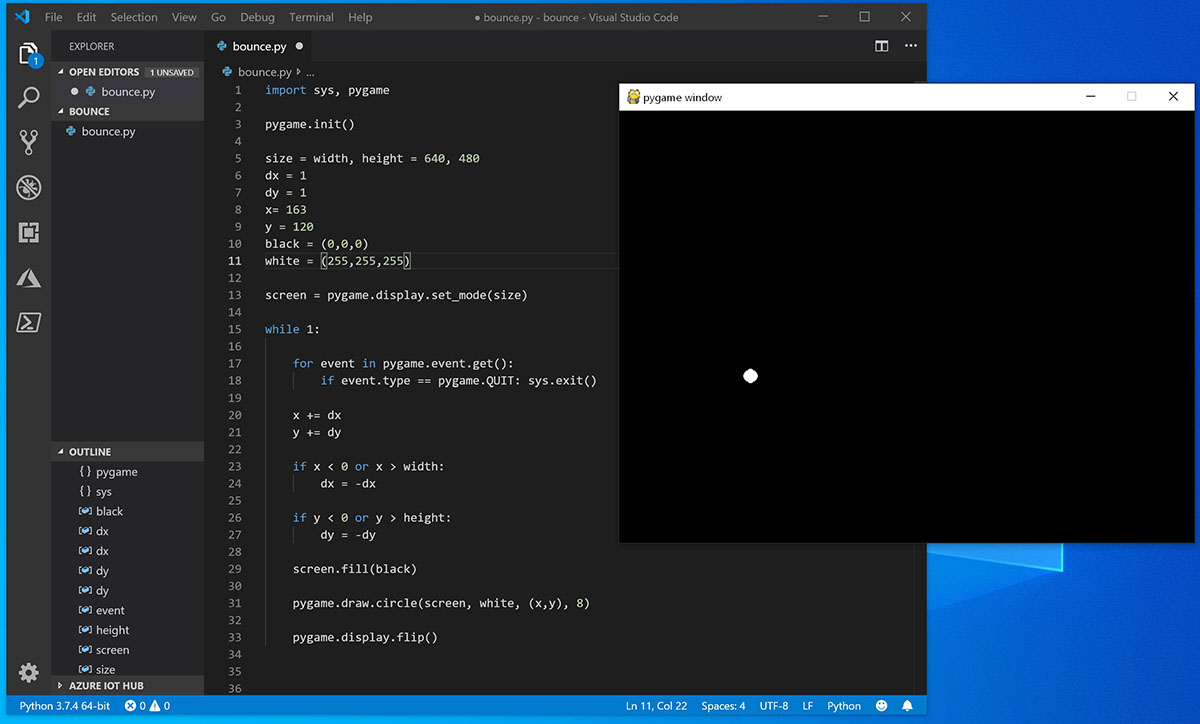
Try adjusting some of the numbers to see what effect they have on your bouncing ball.
Read more about writing games with pygame at pygame.org.
Resources for continued learning
We recommend the following resources to support you in continuing to learn about Python development on Windows.
Online courses for learning Python
Introduction to Python on Microsoft Learn: Try the interactive Microsoft Learn platform and earn experience points for completing this module covering the basics on how to write basic Python code, declare variables, and work with console input and output. The interactive sandbox environment makes this a great place to start for folks who don’t have their Python development environment set up yet.
Python on Pluralsight: 8 Courses, 29 Hours: The Python learning path on Pluralsight offers online courses covering a variety of topics related to Python, including a tool to measure your skill and find your gaps.
LearnPython.org Tutorials: Get started on learning Python without needing to install or set anything up with these free interactive Python tutorials from the folks at DataCamp.
The Python.org Tutorials: Introduces the reader informally to the basic concepts and features of the Python language and system.
Learning Python on Lynda.com: A basic introduction to Python.
Working with Python in VS Code
Editing Python in VS Code: Learn more about how to take advantage of VS Code’s autocomplete and IntelliSense support for Python, including how to customize their behavior. or just turn them off.
Linting Python: Linting is the process of running a program that will analyse code for potential errors. Learn about the different forms of linting support VS Code provides for Python and how to set it up.
Debugging Python: Debugging is the process of identifying and removing errors from a computer program. This article covers how to initialize and configure debugging for Python with VS Code, how to set and validate breakpoints, attach a local script, perform debugging for different app types or on a remote computer, and some basic troubleshooting.
Unit testing Python: Covers some background explaining what unit testing means, an example walkthrough, enabling a test framework, creating and running your tests, debugging tests, and test configuration settings.


