- Installing packages using pip and virtual environments
- Installing pip
- Installing virtualenv
- Creating a virtual environment
- Activating a virtual environment
- Python/Virtual environment
- Contents
- Overview
- Installation
- Packages
- Usage
- Creation
- virtualenv
- Activation
- Python versions
- virtualenvwrapper
- Installation
- Basic usage
- Pipenv
- Installation
- Basic usage
- Виртуальное окружение Python (venv)
- Настройка виртуального окружения
- Создание
- Активация
- Автоматическая активация
- Деактивация
- Альтернативы venv
- Python venv: how to create, activate, and delete
- Creating a Python venv
- Python 3.4 and above
- All other Python versions
- Python venv activation
- Linux and MacOS venv activation
- Windows venv activation
- How a Python venv works
- Deactivate the Python venv
- Deleting a Python venv
- Delete a venv created with Virtualenv or python -m venv
- Delete a venv with Pipenv
- Delete a venv with Poetry
- Keep learning
- About the author
- Erik van Baaren
Installing packages using pip and virtual environments
This guide discusses how to install packages using pip and a virtual environment manager: either venv for Python 3 or virtualenv for Python 2. These are the lowest-level tools for managing Python packages and are recommended if higher-level tools do not suit your needs.
This doc uses the term package to refer to a Distribution Package which is different from an Import Package that which is used to import modules in your Python source code.
Installing pip
pip is the reference Python package manager. It’s used to install and update packages. You’ll need to make sure you have the latest version of pip installed.
Debian and most other distributions include a python-pip package; if you want to use the Linux distribution-provided versions of pip, see Installing pip/setuptools/wheel with Linux Package Managers .
You can also install pip yourself to ensure you have the latest version. It’s recommended to use the system pip to bootstrap a user installation of pip:
Afterwards, you should have the latest version of pip installed in your user site:
The Python installers for Windows include pip. You can make sure that pip is up-to-date by running:
Afterwards, you should have the latest version of pip:
Installing virtualenv
If you are using Python 3.3 or newer, the venv module is the preferred way to create and manage virtual environments. venv is included in the Python standard library and requires no additional installation. If you are using venv, you may skip this section.
virtualenv is used to manage Python packages for different projects. Using virtualenv allows you to avoid installing Python packages globally which could break system tools or other projects. You can install virtualenv using pip.
Creating a virtual environment
venv (for Python 3) and virtualenv (for Python 2) allow you to manage separate package installations for different projects. They essentially allow you to create a “virtual” isolated Python installation and install packages into that virtual installation. When you switch projects, you can simply create a new virtual environment and not have to worry about breaking the packages installed in the other environments. It is always recommended to use a virtual environment while developing Python applications.
To create a virtual environment, go to your project’s directory and run venv. If you are using Python 2, replace venv with virtualenv in the below commands.
The second argument is the location to create the virtual environment. Generally, you can just create this in your project and call it env .
venv will create a virtual Python installation in the env folder.
You should exclude your virtual environment directory from your version control system using .gitignore or similar.
Activating a virtual environment
Before you can start installing or using packages in your virtual environment you’ll need to activate it. Activating a virtual environment will put the virtual environment-specific python and pip executables into your shell’s PATH .
You can confirm you’re in the virtual environment by checking the location of your Python interpreter:
Источник
Python/Virtual environment
virtualenv is a tool used to create an isolated workspace for a Python application. It has various advantages such as the ability to install modules locally, export a working environment, and execute a Python program in that environment.
Contents
Overview
A virtual environment is a directory into which some binaries and shell scripts are installed. The binaries include python for executing scripts and pip for installing other modules within the environment. There are also shell scripts (one for bash, csh, and fish) to activate the environment. Essentially, a virtual environment mimics a full system install of Python and all of the desired modules without interfering with any system on which the application might run.
In 2017, Pipenv was published which manages all the above tools — managing virtual environments of python interpreters, package dependencies, their activation and reproducible locking of versions in Pipfiles.
Installation
Python 3.3+ comes with a module called venv. For applications that require an older version of Python, virtualenv must be used.
Packages
Install one of these packages from the official repositories to use a Python virtual environment.
Usage
All three tools use a similar workflow.
Creation
Use venv or virtualenv to create the virtual environment within your project directory. Be sure to exclude the venv directory from version control—a copy of pip freeze will be enough to rebuild it.
This tool is provided by python (3.3+):
virtualenv
Use virtualenv for Python 3, available in python-virtualenv .
And virtualenv2 for Python 2, available in python2-virtualenv .
Activation
Use one of the provided shell scripts to activate and deactivate the environment. This example assumes bash is used.
Once inside the virtual environment, modules can be installed with pip and scripts can be run as normal.
To exit the virtual environment, run the function provided by bin/activate :
Python versions
The binary versions depend on which virtual environment tool was used. For instance, the python command used in the Python 2 example points to bin/python2.7 , while the one in the venv example points to bin/python3.7 .
One major difference between venv and virtualenv is that the former uses the system’s Python binary by default:
The virtualenv tool uses a separate Python binary in the environment directory:
virtualenvwrapper
virtualenvwrapper allows more natural command line interaction with your virtual environments by exposing several useful commands to create, activate and remove virtual environments. This package is a wrapper for both python-virtualenv and python2-virtualenv .
Installation
Now add the following lines to your
The line source /usr/bin/virtualenvwrapper.sh can cause some slowdown when starting a new shell. To fix this try using source /usr/bin/virtualenvwrapper_lazy.sh , which will load virtualenvwrapper the first time a virtualenvwrapper function is called.
Re-open your console and create the WORKON_HOME folder:
Basic usage
The main information source on virtualenvwrapper usage (and extension capability) is Doug Hellmann’s page.
Create the virtual environment:
Activate the virtual environment:
Install some package inside the virtual environment (say, Django):
After you have done your things, leave the virtual environment:
Pipenv
pipenv allows better managed CLI interactions by providing a single program that does all the functions of the above tools.
Installation
Basic usage
All commands can be executed in the project folder, and pipenv will recognize the specific situation — whether a virtualenv exists in the directory, locating it, and running on the specific virtual interpreter when pipenv is executed.
Источник
Виртуальное окружение Python (venv)
В се сторонние пакеты устанавливаются менеджером PIP глобально. Проверить это можно просто командой pip show
# pip3 show pytest Name: pytest Version: 5.3.2 Summary: pytest: simple powerful testing with Python Home-page: https://docs.pytest.org/en/latest/ Author: Holger Krekel, Bruno Oliveira, Ronny Pfannschmidt, . License: MIT license Location: /usr/local/lib/python3.8/site-packages Requires: more-itertools, pluggy, py, wcwidth, attrs, packaging Required-by:
Location – путь до ваших глобальных пакетов.
В большинстве случаев, устанавливать пакеты глобально – плохая идея 🙅♂️ Почему? Рассмотрим простой пример:
Допустим у нас есть два проекта: » Project A» и » Project B» . Оба проекта зависят от библиотеки Simplejson . Проблема возникает, когда для «Project A» нужна версия Simplejson 3.0.0, а для проекта «Project B» – 3.17.0. Python не может различить версии в глобальном каталоге site-packages – в нем останется только та версия пакета, которая была установлена последней.
Решение данной проблемы – создание виртуального окружения (virtual environment)
Основная цель виртуального окружения Python – создание изолированной среды для python-проектов.
Это означает, что каждый проект может иметь свои собственные зависимости, независимо от других проектов.
Настройка виртуального окружения
Один из самых популярных инструментов для создания виртуального окружения – virtualenv . Однако в данной статье мы будем рассматривать более свежий инструмент venv .
Устанавливать venv не нужно – он входит в стандартную библиотеку Python
Создание
Для создания виртуального окружения, перейдите в директорию своего проекта и выполните:
python -m venv venv
Флаг -m указывает Python-у запустить venv как исполняемый модуль. venv/ — название виртуального окружения (где будут храниться ваши библиотеки)
В результате будет создан каталог venv/ содержащий копию интерпретатора Python, стандартную библиотеку и другие вспомогательные файлы.
Новые пакеты будут устанавливаться в venv/lib/python3.x/site-packages/
Активация
Чтобы начать пользоваться виртуальным окружением, необходимо его активировать:
- venv\Scripts\activate.bat — для Windows;
- source venv/bin/activate — для Linux и MacOS:
source выполняет bash-скрипт без запуска дополнительного bash-процесса.
Проверить успешность активации можно по приглашению оболочки. Она будет выглядеть так:
Также новый путь до библиотек можно увидеть выполнив команду:
python -c «import site; print(site.getsitepackages())»
Интересный факт: в виртуальном окружении вместо команды python3 и pip3, можно использовать python и pip
Автоматическая активация
В некоторых случаях, процесс активации виртуального окружения может показаться неудобным (про него можно банально забыть 🤷♀️ )
На практике, для автоматической активации перед запуском скрипта, создают скрипт-обертку на bash
Теперь можно установить права на исполнение и запустить нашу обертку:
chmod +x myapp/run.sh ./myapp/run.sh
Деактивация
Закончив работу в виртуальной среде, вы можете отключить ее, выполнив консольную команду:
Альтернативы venv
На данный момент существует несколько альтернатив для venv:
- pipenv — это pipfile, pip и virtualenv в одном флаконе;
- pyenv — простой контроль версий Питона;
- poetry — новый менеджер для управления зависимостями;
- autoenv — среды на основе каталогов;
- pew — инструмент для управления несколькими виртуальными средами, написанными на чистом Python;
- rez — интегрированная система конфигурирования, сборки и развертывания пакетов для программного обеспечения.
Стоит ли использовать виртуальное окружение в своей работе – однозначно да. Это мощный и удобный инструмент изоляции проектов друг от друга и от системы. С помощью виртуального окружения можно использовать даже разные версии Python!
Однако рекомендуем присмотреться к более продвинутым вариантам, например к pipenv или poetry .
Источник
Python venv: how to create, activate, and delete
Last updated on October 9, 2021
Let’s look at how to use the Python venv, short for Python virtual environment or virtualenv. You will learn how to create a venv, activate and deactivate it, delete it, and how a venv works internally. If you want to know why a venv is so useful, please read our introduction page on virtual environments first.
Table of contents
Creating a Python venv
There are several ways to create a Python virtual environment, depending on the Python version you are running.
Before you read on, I want you to point you to another tool, called pipenv. It combines the functionality of tools that you are about to learn; virtualenv and pip. Further on in this chapter, I will describe pipenv in detail.
Python 3.4 and above
If you are running Python 3.4+, you can use the venv module baked into Python:
This command will create a venv in the specified directory and copy pip and easy_install into it too.
All other Python versions
The alternative that works for any Python version is using the virtualenv package. You may need to install it first, system-wide, with:
Once installed, you can create a virtual environment with:
Python venv activation
Linux and MacOS venv activation
On Linux and MacOS, we activate our virtual environment with the source command. If you created your venv in the myvenv directory, the command would be:
Windows venv activation
To activate your venv on Windows, you need to run a script that gets installed by venv, like so:
That’s it! We’re ready to rock! You can now install packages with pip, but I advise you to keep reading to understand the venv better first. Hang tight, as we’ll get to pip very soon.
How a Python venv works
When you activate a virtual environment, your PATH variable is changed. On Linux and MacOS, you can see it for yourself by printing the path with echo $PATH . On Windows, use echo %PATH% . In my case, on Windows, it looks like this:
As you can see, the bin directory of my venv is put in front of everything else, effectively overriding all the system-wide Python software. This works because when you enter a command that can’t be found in the current working directory, your OS starts looking at all the paths in the PATH variable. If your venv is there first, the OS will look there first before looking at system-wide directories like /usr/bin .
If you take a look inside the directory of your venv (in this case: myvenv ), you’ll see something like this:
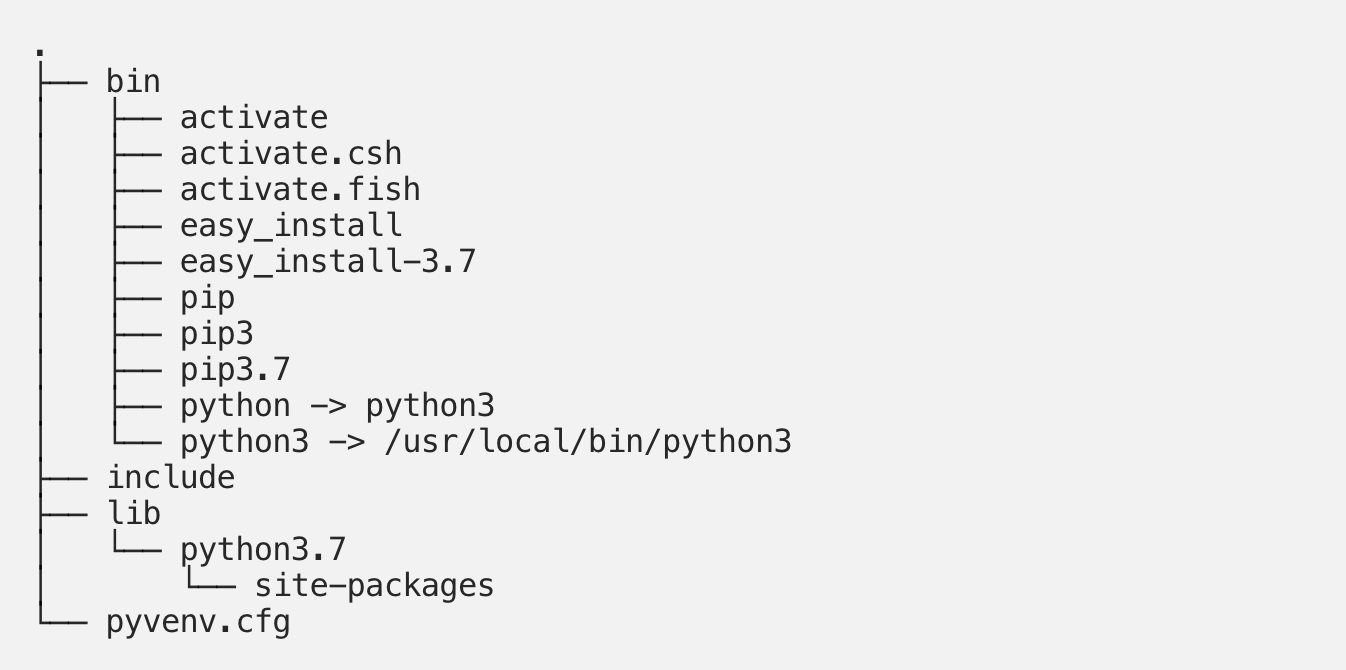 Virtualenv directory tree
You can see that:
- The Python command is made available both as python and python3 , and the version is pinned to the version with which you created the venv by creating a symlink to it.
- All packages you install end up in the site-packages directory.
- We have activation scripts for multiple shell types (bash, csh, fish)
- Pip is available under the names pip and pip3
Deactivate the Python venv
Once you finished working on your project, it’s a good habit to deactivate its venv. Without deactivating it, all other Python code you execute will also run inside of it.
Luckily, deactivating your virtual environment couldn’t be simpler. Just enter this: deactivate . It works the same on all operating systems.
Deleting a Python venv
You can completely remove a virtual environment, but how you do that depends on what you used to create the venv. Let’s look at the most common options.
Delete a venv created with Virtualenv or python -m venv
There’s no special command to delete a virtual environment if you used virtualenv or python -m venv to create your virtual environment, as is demonstrated in this article. When creating the virtualenv, you gave it a directory to create this environment in.
If you want to delete this virtualenv, deactivate it first and then remove the directory with all its content. On Unix-like systems and in Windows Powershell, you would do something like:
Delete a venv with Pipenv
If you used Pipenv, you can use the following command to delete the current venv:
Make sure you are inside the project directory. In other words, the directory where the Pipenv and Pipenv.lock files reside. This way, pipenv knows which virtual environment it has to delete.
If this doesn’t work, you can get a little nastier and manually remove the venv. First ask pipenv where the actual virtualenv is located, with the following command:
It will output the path to the virtual environment and all of its files, and it will look similar to the example above. The next step is to rm -rf that entire directory and you’re done.
Delete a venv with Poetry
If you created the virtualenv with Poetry, you can list the available venv’s with the following command:
You’ll get a list like this:
You can remove the environment you want with the poetry env remove command. You need to specify the exact name from the output above, for example:
Keep learning
- Learn how to install packages with pip inside your venv
- Pipenv is a better way of managing your venv and packages. However, I recommend first reading about Pip!
- Official venv documentation: If you want to know all the details and command-line options
About the author
Erik van Baaren
Erik is the owner of Python Land and the author of many of the articles and tutorials on this website. He’s been working as a professional software developer for 25 years, and he holds a Master of Science degree in computer science. His favorite language of choice: Python!
Источник


