- Python 101: easy_install or how to create eggs
- Using easy_install to Install Packages
- Creating an egg
- Wrapping Up
- How to create Python egg file
- 3 Answers 3
- Python pip install fails: invalid command egg_info
- 15 Answers 15
- How can I install a .egg Python package on Windows (attempt using easy_install not working)
- Установка Python и pip на Windows
- 64-разрядный Python против 32-разрядного
- Запускаем установщик Python
- Подтверждаем, что Python был установлен правильно
Python 101: easy_install or how to create eggs
Today we’re going to take a look at the controversial easy_install method of installing Python modules and packages. We will also learn how to create our own *.egg files. You will need to go get the SetupTools package to follow along. This package doesn’t support Python 3.x so if you need that, see pip or distribute. There will be articles on each of those projects in the future. For now, we’ll be starting with SetupTools and easy_install.
Why is it controversial? I’m not completely certain, but people were not happy with the way it would partially install packages because it doesn’t wait for the download to finish. Also I’ve heard that the author wasn’t very interested in updating it but wouldn’t allow anyone else to update it either. See the Ziade article at the end of this post.
SetupTools is the original mainstream method of downloading and installing Python packages from PyPI and other sources via the command line, kind of like apt-get for Python. When you install SetupTools, it installs a script or exe called easy_install that you can invoke on the command line to install or upgrade packages. It also provides a way to create Python eggs. Let’s spend a little time getting to know this utility.
Using easy_install to Install Packages
Once you have SetupTools installed, you should have easy_install on your path. What this means is that you could be able to open a terminal (Linux) or command line (Windows) and simply run easy_install. Here’s a sample invocation:
This will go out to PyPI and try to download the latest SQLAlchemy from there or from whatever location that the PyPI package page points to. The easy_install script will also install it. One semi-common problem that easy_install is faulted for is that it will attempt to start the install before it has finished downloading the package, which can cause a bad install to occur. The cool thing about easy_install is that if you set up your setup.py file correctly, it can also download dependencies and install those too. So if you install something complex, like TurboGears, you’ll see it install lots of packages. This is one reason why you may want to use virtualenv in that you can make sure you like the new packages and that they work correctly. If they don’t, you just delete the virtualenv folder. Otherwise you’ll have to go into your Python folder and dig around and try to “uninstall” (i.e. delete the folders) it yourself. The other thing that easy_install does when installing the egg is that it adds the egg to an easy-install.pth file in site-packages, so when you uninstall it, you’ll need to edit that too. Fortunately you can use pip to uninstall it for you if you don’t like to do all that fiddling yourself. There is an -uninstall (-u) command, but I’ve heard mixed reports on how well it works.
You can install a package by passing a url directly to easy_install. Another fun feature is that you can tell easy_install which version you want and it will try to install it. Finally, easy_install can install from source archives or from eggs. For a full list of commands, you should read the documentation
Creating an egg
An egg file is a distribution format for Python packages. It’s just an alternative to a source distribution or Windows executable, but it should be noted that for pure Python, the egg file is completely cross-platform. We will take a look at how to create our own egg using the package we created in a previous tutorial. Create a new folder and put the mymath folder inside it. Then create a setup.py file in the parent directory to mymath with the following contents:
Note that instead of using Python’s distutils’ setup function, we’re using setuptools’ setup. We’re also using setuptools’ find_packages function which will automatically look for any packages in the current directory and add them to the egg. To create said egg, you’ll need to do the following from the command line:
This will generate a lot of output, but when it’s done you’ll see that you have three new folders: build, dist, and mymath.egg-info. The only one we care about is the dist folder in which you fill find your egg file, mymath-0.1-py2.6.egg. Note that on my machine, it picked up my default Python, which was 2.6 and created the egg against that version of Python. The egg file itself is basically a zip file. If you change the extension to “zip”, you can look inside it and see that it has two folders: mymath and EGG-INFO. At this point, you should be able to point easy_install at your egg on your file system and have it install your package.
If you want to, you also use easy_install to upload your egg or source directly to the Python Package Index (PyPI) by using the following commands (copied from docs):
Wrapping Up
At this point, you should be able to use easy_install or know enough to try one of the alternatives. Personally, I’ve had few issues with it and don’t mind using it. However, we will be taking a look at pip and distribute soon so you’ll be able to learn how to use those too in an upcoming article or two. In the meantime, give easy_install a whirl and see what you think or tell your horror stories in the comments!
How to create Python egg file
I have questions about egg files in Python.
I have much Python code organized by package and I’m trying to create egg files. I’m following instructions, but they are very common.
According to that, it seems I need to have a setup.py file.
- Would you please tell me what I need to put into setup.py file and where it should reside?
- I suppose it’s enough to create setup.py and then start «setup.py bdist_egg» for getting egg file. Could you please confirm?
- Is it possible to include only .pyc files into egg file?
- Having .egg file how I can just start the code from it without unpacking like java -jar does?
3 Answers 3
Creating setup.py is covered in the distutils documentation in Python’s standard library documentation here. The main difference (for python eggs) is you import setup from setuptools , not distutils .
Yep. That should be right.
I don’t think so. pyc files can be version and platform dependent. You might be able to open the egg (they should just be zip files) and delete .py files leaving .pyc files, but it wouldn’t be recommended.
I’m not sure. That might be “Development Mode”. Or are you looking for some “py2exe” or “py2app” mode?
For #4, the closest thing to starting java with a jar file for your app is a new feature in Python 2.6, executable zip files and directories.
Where myapp.zip is a zip containing a __main__.py file which is executed as the script file to be executed. Your package dependencies can also be included in the file:
You can also execute an egg, but the incantation is not as nice:
This puts the myapp.egg on the Python path and uses the -m argument to run a module. Your myapp.egg will likely look something like:
And python will run __init__.py (you should check that __file__==’__main__’ in your app for command line use).
Egg files are just zip files so you might be able to add __main__.py to your egg with a zip tool and make it executable in python 2.6 and run it like python myapp.egg instead of the above incantation where the PYTHONPATH environment variable is set.
More information on executable zip files including how to make them directly executable with a shebang can be found on Michael Foord’s blog post on the subject.
Python pip install fails: invalid command egg_info
I find that recently often when I try to install a Python package using pip, I get the error(s) below.
I found a reference online that one has to use «python2 setup.py install» from the download directory, and indeed find that this will then work if I manually find and download the package (from pypi).
But, I don’t know where pip is downloading packages to, and/or why it is failing in this manner.
I tried to do a pip upgrade, but it also failed in a similar manner, with a bunch of «Unknown distribution option» errors (entry_points, zip_safe, test_suite, tests_require)!
Trying to use ActiveState’s pypm fails, because they have a smaller library base, and it doesn’t include these packages.

15 Answers 15
Install distribute, which comes with egg_info .
Should be as simple as pip install Distribute .
Distribute has been merged into Setuptools as of version 0.7. If you are using a version pip install —upgrade setuptools or easy_install -U setuptools .
As distribute has been merged back into setuptools, it is now recommended to install/upgrade setuptools instead:
Bear in mind you may have to do pip install —upgrade Distribute if you have it installed already and your pip may be called pip2 for Python2 on some systems (it is on mine).

I had this issue, as well as some other issues with Brewed Python on OS X v10.9 (Mavericks).
didn’t work for me, and I think my setuptools/distribute setup was botched.
I finally got it to work by running
None of the above worked for me on Ubuntu 12.04 LTS (Precise Pangolin), and here’s how I fixed it in the end:
Download ez_setup.py from download setuptools (see «Installation Instructions» section) then:
I hope it saves someone some time.

This error can occur when you trying to install pycurl .
In this case you should do

On CentOS 6.5, the short answer from a clean install is:
yum -y install python-pip pip install -U pip pip install -U setuptools pip install -U setuptools
You are not seeing double, you must run the setuptools upgrade twice. The long answer is below:
Installing the python-pip package using yum brings python-setuptools along as a dependency. It’s a pretty old version and hence it’s actually installing distribute (0.6.10) . After installing a package manager we generally want to update it, so we do pip install -U pip . Current version of pip for me is 1.5.6.
Now we go to update setuptools and this version of pip is smart enough to know it should remove the old version of distribute first. It does this, but then instead of installing the latest version of setuptools it installs setuptools (0.6c11) .
At this point all kinds of things are broken due to this extremely old version of setuptools, but we’re actually halfway there. If we now run the exact same command a second time, pip install -U setuptools , the old version of setuptools is removed, and version 5.5.1 is installed. I don’t know why pip doesn’t take us straight to the new version in one shot, but this is what’s happening and hopefully it will help others to see this and know you’re not going crazy.
How can I install a .egg Python package on Windows (attempt using easy_install not working)
I am trying to install a package named QSTK for a course that I am doing. The course points to an installation package for the 32 bit version, but I have 64 Python installed. I have found a .egg file listed on the Python packages index.
It seems to have an exe for 32 bit, but just the .egg for 64 bit. I downloaded the QSTK-0.2.6-py2.7.egg version and have been trying to install this unsucessfully so far.
Here is what I have tried:
Using easy install (from the C:\Python27\Lib\site-packages directory):
this has created a QSTK-0.2.6-py2.7.egg directory in my site-packages directory which I can open and find files in. However, I have tried to import QSTK from the python shell and get the usual «No module named. » import error.
I looked for a setup.py file as I have used these to install packages before, but could not find one.
I have also looked at this thread which gives details of installing a .egg file without using easy install, but cannot figure out what changes I would need to make to the script provided as this is to install a specific package that I already have.
If anyone can help by explaining either how I can install this .egg file correctly or by providing a link to the QSTK modules for python 2.7 64 bit in another format this would be greatly appreciated.
I have managed to install the packages that QSTK is dependant on okay (numpy, scipy, matplotlib, pandas, python-dateutil and scikit-learn).
Установка Python и pip на Windows
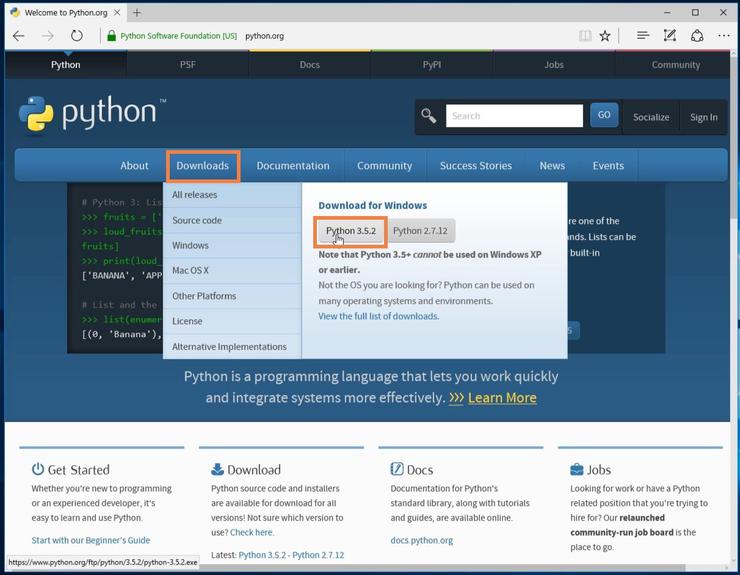
В данном разделе мы научимся устанавливать Python и менеджер пакетов pip на Windows 10 с нуля. Лучший способ установить Python на Windows — это скачать официальный установщик с сайта python.org. Чтобы сделать это, откройте браузер и перейдите по ссылке https://python.org/. После завершения загрузки установщика, откройте «Загрузки». Сайт обнаружит, что вы посетили его с Windows, и предложит скачать последнюю версию Python 3 или Python 2. Если вы не знаете, какую версию использовать, то я рекомендую Python 3. Если вам нужно работать с унаследованным кодом Python 2, тогда вам необходим Python 2. Под вкладками Downloads → Download for Windows нажмите кнопку “Python 3.X.X” (или “Python 2.X.X”), чтобы скачать установочный файл.

64-разрядный Python против 32-разрядного
Если вы гадаете, какую версию Python нужно использовать 64-разрядную или 32-разрядную, вам, скорее всего, понадобится 32-разрядная. Иногда достаточно тяжело найти бинарники для 64-разрядной версии, а это значит, что некоторые сторонние модули могут установиться неправильно на 64-разрядной версии Python. Мое мнение – использовать ту версию, которую конкретно рекомендуют на официальном сайте. Если вы кликните кнопку Python 3 или Python 2 под “Download for Windows”, вы получите именно ту версию, которую выбрали. Помните, Если вы в итоге сделаете неправильный выбор, и захотите перейти на другую версию Python, вы можете просто удалить существующую версию и переустановить его, скачав другой установщик с официального сайта.
Запускаем установщик Python
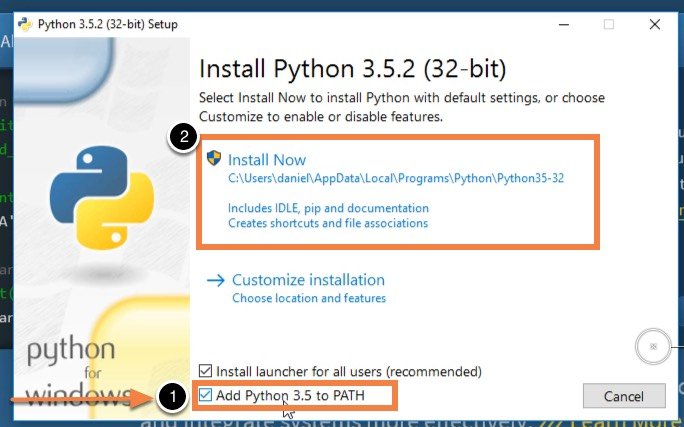
По окончанию загрузки установщика, запустите его двойным щелчком мыши, чтобы начать установку Python. Обязательно установите флажок на «Add Python X.Y to PATH» в мастере настройке. Убедитесь, что флажок “Add Python X.Y to PATH” поставлен в установщике, в противном случае у вас будут проблемы с доступом инсталлятора Python к командной стоке. Нажмите «Установить» для начала установки. Установка должна пройти быстро, после чего Python будет готов к запуску на вашей системе. К следующему шагу нужно убедиться, что все было выполнено надлежащим образом.
Подтверждаем, что Python был установлен правильно
По окончанию установки, Python должен быть установлен на вашем компьютере. Давайте убедимся в том, что все было выполнено правильно, протестировав, имеет ли Python доступ к командной строке (cmd) Windows:
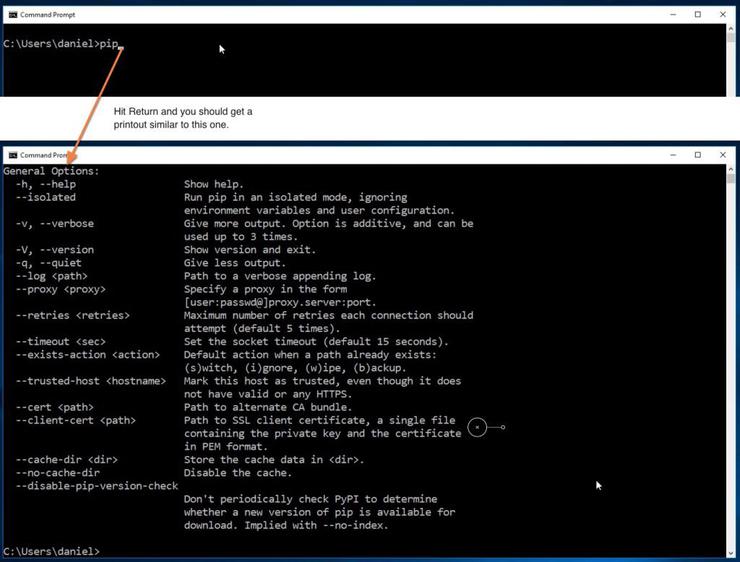
- Откройте командную строку Windows, запустив cmd.exe
- Введите pip и нажмите «Enter»
- Вы увидите справочный текст менеджера пакетов Python под названием “pip”. Если вы получите уведомление об ошибке, повторите этапы установки Python, и убедитесь в том, что вы обладаете рабочей версией Python. Большая часть проблем, с которыми вы можете столкнуться, будут иметь то или иное отношение к неправильной настройке PATH. Переустановка и подтверждение того, что опция “Add Python to PATH” была активирована, должны исправить эту проблему.
Есть вопросы по Python?
На нашем форуме вы можете задать любой вопрос и получить ответ от всего нашего сообщества!


