Python environment variables linux

Python — Environment Setup

Python is available on a wide variety of platforms including Linux and Mac OS X. Let’s understand how to set up our Python environment.

Local Environment Setup

Open a terminal window and type «python» to find out if it is already installed and which version is installed.

  • Unix (Solaris, Linux, FreeBSD, AIX, HP/UX, SunOS, IRIX, etc.)
  • Win 9x/NT/2000
  • Macintosh (Intel, PPC, 68K)
  • OS/2
  • DOS (multiple versions)
  • PalmOS
  • Nokia mobile phones
  • Windows CE
  • Acorn/RISC OS
  • BeOS
  • Amiga
  • VMS/OpenVMS
  • QNX
  • VxWorks
  • Psion
  • Python has also been ported to the Java and .NET virtual machines

Getting Python

The most up-to-date and current source code, binaries, documentation, news, etc., is available on the official website of Python https://www.python.org/

You can download Python documentation from https://www.python.org/doc/. The documentation is available in HTML, PDF, and PostScript formats.

Installing Python

Python distribution is available for a wide variety of platforms. You need to download only the binary code applicable for your platform and install Python.

If the binary code for your platform is not available, you need a C compiler to compile the source code manually. Compiling the source code offers more flexibility in terms of choice of features that you require in your installation.

Here is a quick overview of installing Python on various platforms −

Unix and Linux Installation

Here are the simple steps to install Python on Unix/Linux machine.

Follow the link to download zipped source code available for Unix/Linux.

Download and extract files.

Editing the Modules/Setup file if you want to customize some options.

run ./configure script

This installs Python at standard location /usr/local/bin and its libraries at /usr/local/lib/pythonXX where XX is the version of Python.

Windows Installation

Here are the steps to install Python on Windows machine.

Follow the link for the Windows installer python-XYZ.msi file where XYZ is the version you need to install.

To use this installer python-XYZ.msi, the Windows system must support Microsoft Installer 2.0. Save the installer file to your local machine and then run it to find out if your machine supports MSI.

Run the downloaded file. This brings up the Python install wizard, which is really easy to use. Just accept the default settings, wait until the install is finished, and you are done.

Macintosh Installation

Recent Macs come with Python installed, but it may be several years out of date. See http://www.python.org/download/mac/ for instructions on getting the current version along with extra tools to support development on the Mac. For older Mac OS’s before Mac OS X 10.3 (released in 2003), MacPython is available.

Jack Jansen maintains it and you can have full access to the entire documentation at his website − http://www.cwi.nl/

Читайте также:  Эмулятор dvd для mac os

jack/macpython.html. You can find complete installation details for Mac OS installation.

Setting up PATH

Programs and other executable files can be in many directories, so operating systems provide a search path that lists the directories that the OS searches for executables.

The path is stored in an environment variable, which is a named string maintained by the operating system. This variable contains information available to the command shell and other programs.

The path variable is named as PATH in Unix or Path in Windows (Unix is case sensitive; Windows is not).

In Mac OS, the installer handles the path details. To invoke the Python interpreter from any particular directory, you must add the Python directory to your path.

Setting path at Unix/Linux

To add the Python directory to the path for a particular session in Unix −

In the csh shell − type setenv PATH «$PATH:/usr/local/bin/python» and press Enter.

In the bash shell (Linux) − type export PATH=»$PATH:/usr/local/bin/python» and press Enter.

In the sh or ksh shell − type PATH=»$PATH:/usr/local/bin/python» and press Enter.

Note − /usr/local/bin/python is the path of the Python directory

Setting path at Windows

To add the Python directory to the path for a particular session in Windows −

At the command prompt − type path %path%;C:\Python and press Enter.

Note − C:\Python is the path of the Python directory

Python Environment Variables

Here are important environment variables, which can be recognized by Python −

It has a role similar to PATH. This variable tells the Python interpreter where to locate the module files imported into a program. It should include the Python source library directory and the directories containing Python source code. PYTHONPATH is sometimes preset by the Python installer.

It contains the path of an initialization file containing Python source code. It is executed every time you start the interpreter. It is named as .pythonrc.py in Unix and it contains commands that load utilities or modify PYTHONPATH.

It is used in Windows to instruct Python to find the first case-insensitive match in an import statement. Set this variable to any value to activate it.

It is an alternative module search path. It is usually embedded in the PYTHONSTARTUP or PYTHONPATH directories to make switching module libraries easy.

Running Python

There are three different ways to start Python −

Interactive Interpreter

You can start Python from Unix, DOS, or any other system that provides you a command-line interpreter or shell window.

Enter python the command line.

Start coding right away in the interactive interpreter.

Here is the list of all the available command line options −

Sr.No. Variable & Description
1

It provides debug output.

It generates optimized bytecode (resulting in .pyo files).

Do not run import site to look for Python paths on startup.

verbose output (detailed trace on import statements).

disable class-based built-in exceptions (just use strings); obsolete starting with version 1.6.

run Python script sent in as cmd string

run Python script from given file

Script from the Command-line

A Python script can be executed at command line by invoking the interpreter on your application, as in the following −

Note − Be sure the file permission mode allows execution.

Integrated Development Environment

You can run Python from a Graphical User Interface (GUI) environment as well, if you have a GUI application on your system that supports Python.

Unix − IDLE is the very first Unix IDE for Python.

Windows − PythonWin is the first Windows interface for Python and is an IDE with a GUI.

Macintosh − The Macintosh version of Python along with the IDLE IDE is available from the main website, downloadable as either MacBinary or BinHex’d files.

If you are not able to set up the environment properly, then you can take help from your system admin. Make sure the Python environment is properly set up and working perfectly fine.

Note − All the examples given in subsequent chapters are executed with Python 2.4.3 version available on CentOS flavor of Linux.

We already have set up Python Programming environment online, so that you can execute all the available examples online at the same time when you are learning theory. Feel free to modify any example and execute it online.

Источник

Чтение и запись переменных окружения в Python

Переменные окружения используются для изменения конфигурации системы. Результат работы многих приложений на Python зависит от значений определённых переменных окружения. Когда эти переменные изменяются, для получения прежнего результата скрипт Python требует корректировок, а это нежелательно. Эту проблему можно решить, считывая и изменяя значения нужных нам переменных в самом скрипте.

Это избавит нас от необходимости исправлять переменные среды вручную и сделает код безопаснее: будут спрятаны конфиденциальные данные, которые требуется присвоить переменной окружения (например, токен API).

В этом уроке мы рассмотрим способы установки и получения таких переменных средствами языка Python.

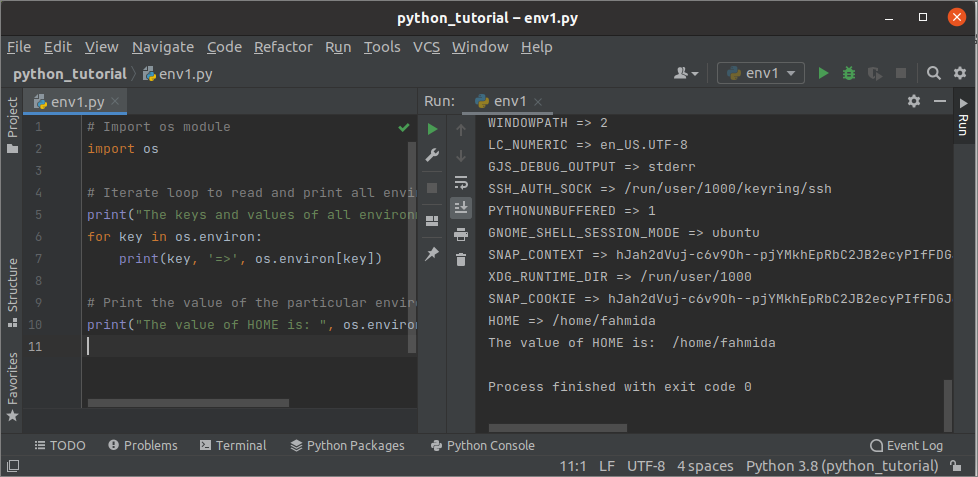
Чтение переменных окружения на Python

Для начала потребуется импортировать модуль os, чтобы считывать переменные. Для доступа к переменным среды в Python используется объект os.environ . С его помощью программист может получить и изменить значения всех переменных среды. Далее мы рассмотрим различные способы чтения, проверки и присвоения значения переменной среды.

Считываем одну или все переменные окружения

Следующий код позволяет прочитать и вывести все переменные окружения, а также определенную переменную. Для вывода имен и значений всех переменных используется цикл for . Затем выводится значение переменной HOME .

Результат:

После выполнения скрипта мы увидим следующий результат. Сперва был выведен список всех переменных окружения, а затем – значение переменной HOME .

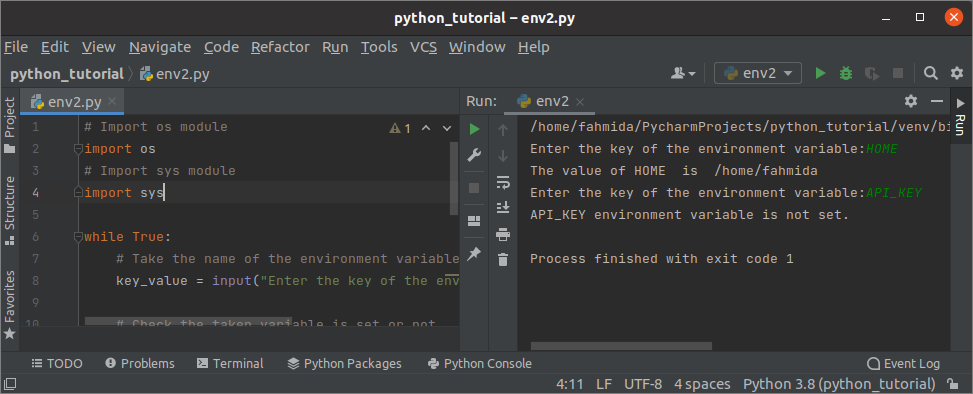
Проверяем, присвоено ли значение переменной окружения

Давайте создадим Python-файл со следующим скриптом для проверки переменных. Для чтения значений переменных мы используем модуль os, а модуль sys — для прекращения работы приложения.

Бесконечный цикл while непрерывно принимает от пользователя имена переменных и проверяет их значения до тех пор, пока пользователь не введёт имя переменной, которой не присвоено значение.

Если пользователь вводит имя переменной окружения, которой присвоено значение, это значение выводится, если же нет — выводится соответствующее сообщение и процесс останавливается.

Результат:

На скрине вы видите результат работы скрипта. Первый раз было введено имя переменной, имеющей значение, а во второй раз — имя переменной, для которой значение не установлено. Согласно выводу, переменная HOME была инициализирована, и её значение вывелось в консоли. Переменной API_KEY не было задано значение, потому скрипт после вывода сообщения завершил работу.

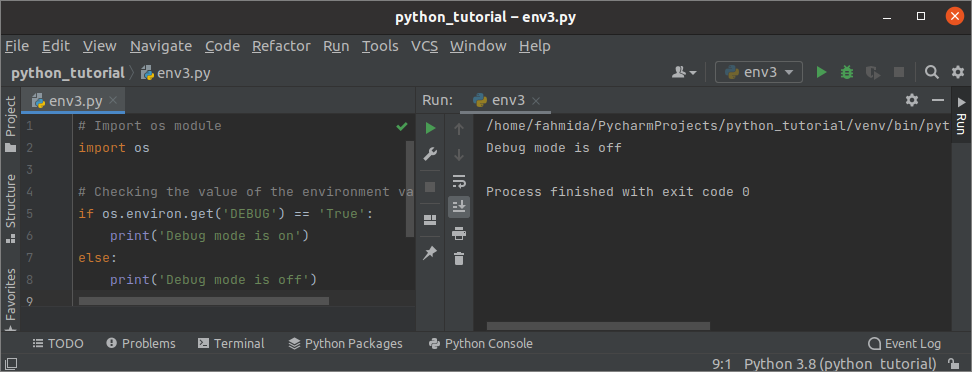
Проверяем переменную на истинность

Создаём Python-файл со следующим кодом. Для проверки переменной DEBUG на истинность здесь используется функция get() . Программа выводит разные сообщения в зависимости от значения переменной.

Результат:

На скрине показан результат работы кода, если значение переменной DEBUG – False. Значение переменной можно изменить с помощью функции setdefault() , которую мы разберём в следующем разделе.

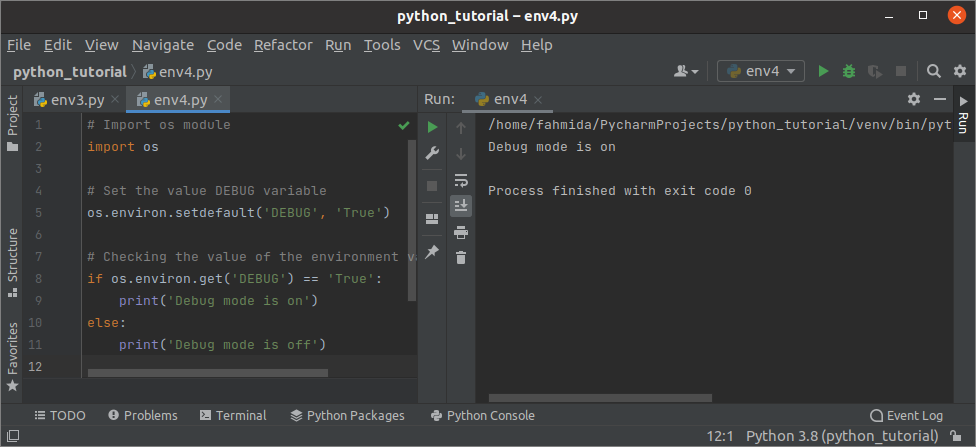
Присваиваем значение переменной окружения

Для присвоения значения любой переменной среды используется функция setdefault() .

Давайте напишем код, чтобы с помощью функции setdefault() изменить значение переменной DEBUG на True (по умолчанию установлено False). После установки значения мы проверим его функцией get() .

Если мы сделали всё правильно, выведется сообщение «Режим отладки включен», в противном случае – «Режим отладки выключен».

Результат:

Результат представлен ниже. Переменной DEBUG было присвоено значение True, и, соответственно, будет выведено сообщение «Режим отладки включен».

Заключение

Значения переменных окружения можно считывать и изменять при помощи объекта environ[] модуля os либо путем использования функций setdefault() и get() .

В качестве ключа, по которому можно обратиться и получить либо присвоить значение переменной, в environ[] используется имя переменной окружения.

Функция get() используется для получения значения определённой переменной, а setdefault() – для инициализации.

Источник

Переменные окружения для Python проектов

Переменные окружения для Python проектов

При разработки web-приложения или бота мы часто имеем дело с какой-либо секретной информацией, различными токенами и паролями (API-ключами, секретами веб-форм). «Хардкодить» эту информацию, а тем более сохранять в публично доступной системе контроля версий это очень плохая идея.

Конфигурационные файлы

Самый простой путь решения данной проблемы, это создание отдельного конфигурационного файла со всей чувствительной информацией и добавление его в .gitignore . Минус такого подхода в том, что в гит нужно держать ещё и шаблон конфигурационного файла и не забывать его периодически обновлять.

Переменные окружения

Более продвинутый подход, это использование переменных окружения. Переменные окружения это именованные переменные, содержащие текстовую информацию, которую могут использовать запускаемые программы. Например, чтобы запустить flask-приложение, вначале нужно указать в переменной окружения FLASK_APP имя нашего приложения:

С помощью переменных окружения можно получать различные параметры приложение и секретные ключи:

Библиотека python-dotenv

Чтобы не задавать каждый раз вручную переменные окружения при новом запуске терминала, можно воспользоваться пакетом python-dotenv. Он позволяет загружать переменные окружения из файла .env в корневом каталоге приложения.
Устанавливаем пакет:

Теперь можно создать файл .env со всеми переменными среды, которые необходимы вашему приложению. Важно, добавьте .env -файл в .gitignore , не храните его в системе контроля версий.

Этот .env-файл можно использовать для всех переменных конфигурации, но его нельзя использовать для переменных среды FLASK_APP и FLASK_DEBUG , так как они необходимы уже в процессе начальной загрузки приложения.

Утилита direnv

Переменные среды могут быть автоматически загружены при входе в папку с проектом, это особенно удобно при работе с несколькими проектами одновременно. Сделать это позволяет утилита direnv. Direnv — это менеджер переменных среды для терминала, поддерживает bash, zsh, tcsh и др. оболочки. Позволяет автоматически загружать и выгружать переменные среды в зависимости от вашего текущего каталога. Это позволяет иметь переменные среды, специфичные для каждого проекта. Перед каждым приглашением проверяется наличие файла .envrc в текущем и родительском каталогах. Если файл существует, он загружается в подшаблон bash, и все экспортированные переменные затем захватываются direnv, а затем становятся доступными для оболочки.

Далее необходимо внести изменения для настройки нашей оболочки, для bash необходимо в конец файла

/.bashrc добавить следующее и перезапустить консоль:

Источник

Читайте также:  Компьютер не распознает принтер через usb windows
Оцените статью
Sr.No. Option & Description
1