- Установка Python и pip на Windows
- 64-разрядный Python против 32-разрядного
- Запускаем установщик Python
- Подтверждаем, что Python был установлен правильно
- Как установить библиотеку в Python: руководство для новичка
- Ручная установка
- 1. Установите setuptools.
- 2. Откройте сессию терминала
- 3. Запустите команду:
- 4. Внимание!
- Установка с помощью easy install
- Установка pip
- Заключение
- Python-разработчик
- Installation
- Warnings
- Python Support
- Windows Installation
- macOS Installation
- Linux Installation
- FreeBSD Installation
- Building From Source
- External Libraries
- Build Options
Установка Python и pip на Windows
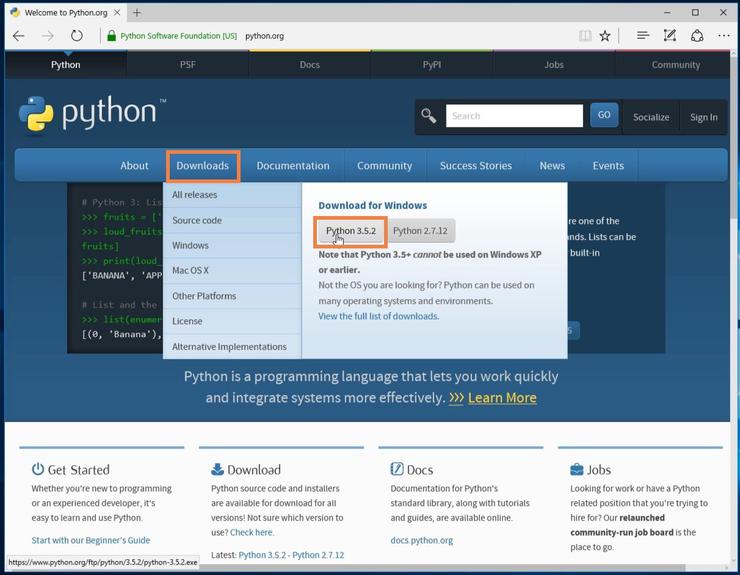
В данном разделе мы научимся устанавливать Python и менеджер пакетов pip на Windows 10 с нуля. Лучший способ установить Python на Windows — это скачать официальный установщик с сайта python.org. Чтобы сделать это, откройте браузер и перейдите по ссылке https://python.org/. После завершения загрузки установщика, откройте «Загрузки». Сайт обнаружит, что вы посетили его с Windows, и предложит скачать последнюю версию Python 3 или Python 2. Если вы не знаете, какую версию использовать, то я рекомендую Python 3. Если вам нужно работать с унаследованным кодом Python 2, тогда вам необходим Python 2. Под вкладками Downloads → Download for Windows нажмите кнопку “Python 3.X.X” (или “Python 2.X.X”), чтобы скачать установочный файл.

64-разрядный Python против 32-разрядного
Если вы гадаете, какую версию Python нужно использовать 64-разрядную или 32-разрядную, вам, скорее всего, понадобится 32-разрядная. Иногда достаточно тяжело найти бинарники для 64-разрядной версии, а это значит, что некоторые сторонние модули могут установиться неправильно на 64-разрядной версии Python. Мое мнение – использовать ту версию, которую конкретно рекомендуют на официальном сайте. Если вы кликните кнопку Python 3 или Python 2 под “Download for Windows”, вы получите именно ту версию, которую выбрали. Помните, Если вы в итоге сделаете неправильный выбор, и захотите перейти на другую версию Python, вы можете просто удалить существующую версию и переустановить его, скачав другой установщик с официального сайта.
Запускаем установщик Python
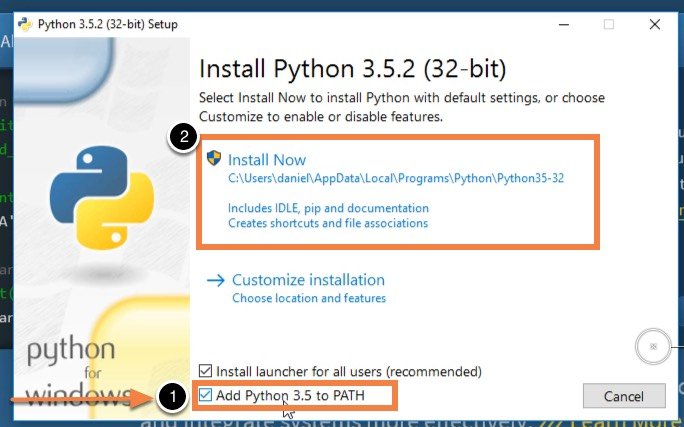
По окончанию загрузки установщика, запустите его двойным щелчком мыши, чтобы начать установку Python. Обязательно установите флажок на «Add Python X.Y to PATH» в мастере настройке. Убедитесь, что флажок “Add Python X.Y to PATH” поставлен в установщике, в противном случае у вас будут проблемы с доступом инсталлятора Python к командной стоке. Нажмите «Установить» для начала установки. Установка должна пройти быстро, после чего Python будет готов к запуску на вашей системе. К следующему шагу нужно убедиться, что все было выполнено надлежащим образом.
Подтверждаем, что Python был установлен правильно
По окончанию установки, Python должен быть установлен на вашем компьютере. Давайте убедимся в том, что все было выполнено правильно, протестировав, имеет ли Python доступ к командной строке (cmd) Windows:
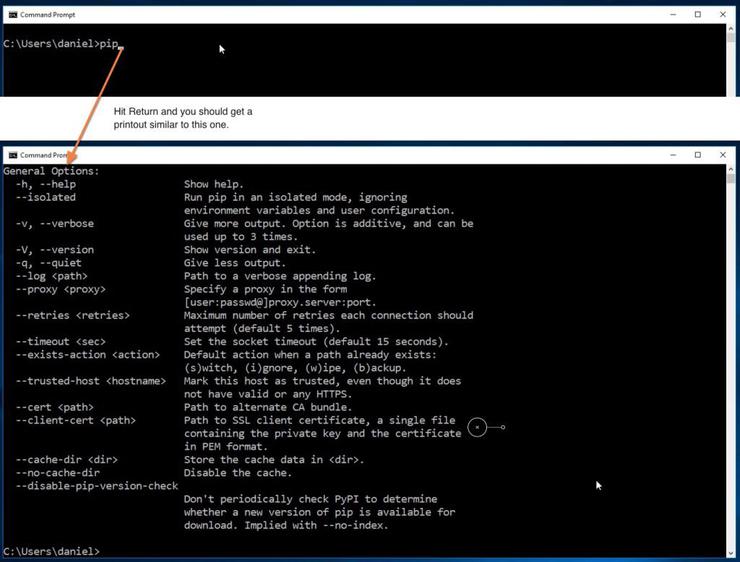
- Откройте командную строку Windows, запустив cmd.exe
- Введите pip и нажмите «Enter»
- Вы увидите справочный текст менеджера пакетов Python под названием “pip”. Если вы получите уведомление об ошибке, повторите этапы установки Python, и убедитесь в том, что вы обладаете рабочей версией Python. Большая часть проблем, с которыми вы можете столкнуться, будут иметь то или иное отношение к неправильной настройке PATH. Переустановка и подтверждение того, что опция “Add Python to PATH” была активирована, должны исправить эту проблему.
Есть вопросы по Python?
На нашем форуме вы можете задать любой вопрос и получить ответ от всего нашего сообщества!
Как установить библиотеку в Python: руководство для новичка
Знания расширяют сознание, а библиотеки — возможности языков программирования. Расскажем, как подключить их в Python.
Мы уже рассказывали, как установить Python на различные операционные системы. Если хотите расширить возможности языка, используйте менеджер пакетов — именно с ним подключают библиотеки и модули. А если стоит вопрос, как научиться программировать на Python и получить работу, записывайтесь на курс «Python-разработчик».
Ручная установка
В этом способе не нужен традиционный установщик пакетов pip — модуль подключается прямо из источника. Это удобно, когда у вас несколько версий Python и нужно импортировать модуль в разные. Рекомендуем научиться делать это сразу.

Автор в сфере IT, digital, экономики и финансов. Ведет некоммерческий проект для начинающих писателей «ЛитЦех».
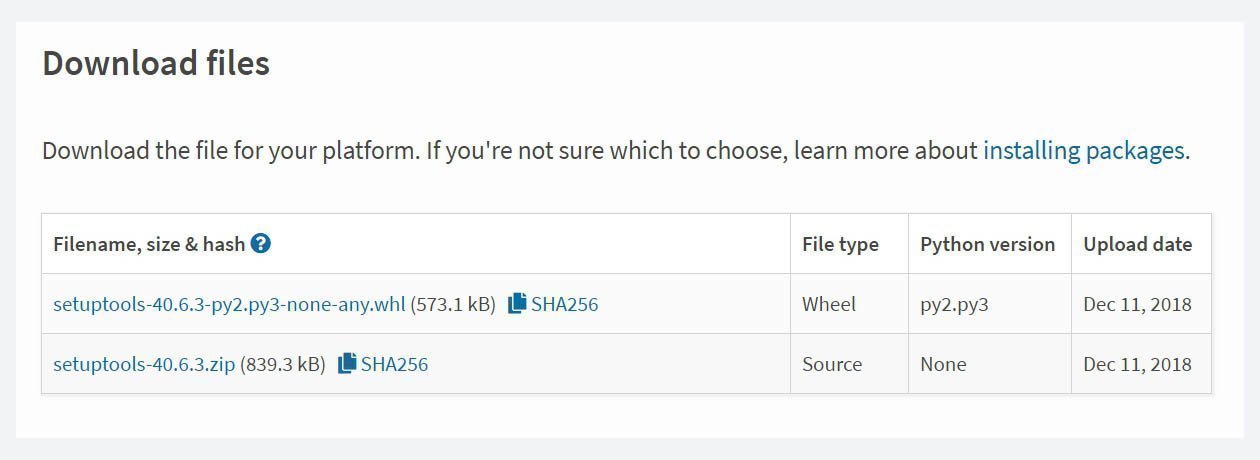
1. Установите setuptools.
Для этого скачайте файл с PyPI и извлеките его в системе.
2. Откройте сессию терминала
Поменяйте каталог на папку с файлом setup.
3. Запустите команду:
4. Внимание!
Если Python расположен вне пути вашей системы, она выдаст ошибку, что команда не найдена. Тогда укажите путь вручную. Для Windows это выглядит так:
Установка с помощью easy install
Название говорит само за себя — способ легкий, буквально в два клика. Если устанавливали вручную, то на компьютере уже стоит setuptools, и вы сможете использовать easy install, что лежит в папке со скриптами Python.

Если добавить папку со скриптами в путь операционной системы, вы сможете вызвать easy install через командную строку без указания полного адреса.
Теперь выполните следующее:
И автоматически установите любой необходимый пакет. Однако есть ограничения:
- Он может попробовать запустить пакет, который еще не загрузился до конца.
- С помощью easy install нельзя провести деинсталляцию.
Из-за этих и других причин в сообществе языка Python придумали и реализовали программу pip.
Установка pip
Она появилась в Python 3.4 и скачивается вместе с самим языком, но если у вас более ранняя версия, то установите pip вручную:
- Зайдите в PyPI и скачайте скрипт get-pip.py.
- Затем выполните команду:
Установятся setuptools, если ранее его не было на компьютере, и сам pip. С его помощью подключают любые библиотеки и файлы — всё, что только может установить easy install. Но теперь для этого будет использоваться иная команда:
А для обновления пакета применяйте:
Заключение
Мы рассказали, как подключить библиотеку в «Питоне» несколькими способами. Как видите, ничего сложного нет, если вооружиться правильными гайдами. А если нужна помощь или мотивация для изучения языка, то попробуйте курс «Python-разработчик», где за короткий период вы вооружитесь всеми необходимыми знаниями и навыками.
Python-разработчик
Практический четырёхмесячный курс для тех, кто хочет научиться основам программирования на универсальном, понятном и лаконичном языке с индивидуальным наставником, а также создать свою первую программу на Python и получить реальный опыт разработки.
Installation
Warnings
Pillow and PIL cannot co-exist in the same environment. Before installing Pillow, please uninstall PIL.
Pillow >= 1.0 no longer supports “import Image”. Please use “from PIL import Image” instead.
Pillow >= 2.1.0 no longer supports “import _imaging”. Please use “from PIL.Image import core as _imaging” instead.
Python Support
Pillow supports these Python versions.
Python
3.9
3.8
3.7
3.6
3.5
3.4
3.3
3.2
2.7
2.6
2.5
2.4
Pillow 6.2.1 — 6.2.2
Pillow External Libraries for a full list of external libraries supported.
Install Pillow with pip:
Windows Installation
We provide Pillow binaries for Windows compiled for the matrix of supported Pythons in both 32 and 64-bit versions in the wheel format. These binaries include support for all optional libraries except libimagequant and libxcb. Raqm support requires FriBiDi to be installed separately:
macOS Installation
We provide binaries for macOS for each of the supported Python versions in the wheel format. These include support for all optional libraries except libimagequant. Raqm support requires FriBiDi to be installed separately:
Linux Installation
We provide binaries for Linux for each of the supported Python versions in the manylinux wheel format. These include support for all optional libraries except libimagequant. Raqm support requires FriBiDi to be installed separately:
Most major Linux distributions, including Fedora, Ubuntu and ArchLinux also include Pillow in packages that previously contained PIL e.g. python-imaging . Debian splits it into two packages, python3-pil and python3-pil.imagetk .
FreeBSD Installation
Pillow can be installed on FreeBSD via the official Ports or Packages systems:
Ports:
Packages:
The Pillow FreeBSD port and packages are tested by the ports team with all supported FreeBSD versions.
Building From Source
External Libraries
You do not need to install all supported external libraries to use Pillow’s basic features. Zlib and libjpeg are required by default.
There are Dockerfiles in our Docker images repo to install the dependencies for some operating systems.
Many of Pillow’s features require external libraries:
libjpeg provides JPEG functionality.
Pillow has been tested with libjpeg versions 6b, 8, 9-9d and libjpeg-turbo version 8.
Starting with Pillow 3.0.0, libjpeg is required by default, but may be disabled with the —disable-jpeg flag.
zlib provides access to compressed PNGs
Starting with Pillow 3.0.0, zlib is required by default, but may be disabled with the —disable-zlib flag.
libtiff provides compressed TIFF functionality
Pillow has been tested with libtiff versions 3.x and 4.0-4.1
libfreetype provides type related services
littlecms provides color management
Pillow version 2.2.1 and below uses liblcms1, Pillow 2.3.0 and above uses liblcms2. Tested with 1.19 and 2.7-2.12.
libwebp provides the WebP format.
Pillow has been tested with version 0.1.3, which does not read transparent WebP files. Versions 0.3.0 and above support transparency.
tcl/tk provides support for tkinter bitmap and photo images.
openjpeg provides JPEG 2000 functionality.
Pillow has been tested with openjpeg 2.0.0, 2.1.0, 2.3.1 and 2.4.0.
Pillow does not support the earlier 1.5 series which ships with Debian Jessie.
libimagequant provides improved color quantization
Pillow has been tested with libimagequant 2.6-2.14.1
Libimagequant is licensed GPLv3, which is more restrictive than the Pillow license, therefore we will not be distributing binaries with libimagequant support enabled.
libraqm provides complex text layout support.
libraqm provides bidirectional text support (using FriBiDi), shaping (using HarfBuzz), and proper script itemization. As a result, Raqm can support most writing systems covered by Unicode.
libraqm depends on the following libraries: FreeType, HarfBuzz, FriBiDi, make sure that you install them before installing libraqm if not available as package in your system.
Setting text direction or font features is not supported without libraqm.
Pillow wheels since version 8.2.0 include a modified version of libraqm that loads libfribidi at runtime if it is installed. On Windows this requires compiling FriBiDi and installing fribidi.dll into a directory listed in the Dynamic-Link Library Search Order (Microsoft Docs) ( fribidi-0.dll or libfribidi-0.dll are also detected). See Build Options to see how to build this version.
Previous versions of Pillow (5.0.0 to 8.1.2) linked libraqm dynamically at runtime.
libxcb provides X11 screengrab support.
Once you have installed the prerequisites, run:
If the prerequisites are installed in the standard library locations for your machine (e.g. /usr or /usr/local ), no additional configuration should be required. If they are installed in a non-standard location, you may need to configure setuptools to use those locations by editing setup.py or setup.cfg , or by adding environment variables on the command line:
If Pillow has been previously built without the required prerequisites, it may be necessary to manually clear the pip cache or build without cache using the —no-cache-dir option to force a build with newly installed external libraries.
Build Options
Environment variable: MAX_CONCURRENCY=n . Pillow can use multiprocessing to build the extension. Setting MAX_CONCURRENCY sets the number of CPUs to use, or can disable parallel building by using a setting of 1. By default, it uses 4 CPUs, or if 4 are not available, as many as are present.
Build flags: —disable-zlib , —disable-jpeg , —disable-tiff , —disable-freetype , —disable-lcms , —disable-webp , —disable-webpmux , —disable-jpeg2000 , —disable-imagequant , —disable-xcb . Disable building the corresponding feature even if the development libraries are present on the building machine.
Build flags: —enable-zlib , —enable-jpeg , —enable-tiff , —enable-freetype , —enable-lcms , —enable-webp , —enable-webpmux , —enable-jpeg2000 , —enable-imagequant , —enable-xcb . Require that the corresponding feature is built. The build will raise an exception if the libraries are not found. Webpmux (WebP metadata) relies on WebP support. Tcl and Tk also must be used together.
Build flags: —vendor-raqm —vendor-fribidi These flags are used to compile a modified version of libraqm and a shim that dynamically loads libfribidi at runtime. These are used to compile the standard Pillow wheels. Compiling libraqm requires a C99-compliant compiler.
Build flag: —disable-platform-guessing . Skips all of the platform dependent guessing of include and library directories for automated build systems that configure the proper paths in the environment variables (e.g. Buildroot).
Build flag: —debug . Adds a debugging flag to the include and library search process to dump all paths searched for and found to stdout.


