- Функция system() модуля os в Python.
- Запустить/выполнить внешнюю команду в оболочке.
- Синтаксис:
- Параметры:
- Возвращаемое значение:
- Описание:
- Системные команды с помощью Python (os.system())
- Выполнение команд оболочки в Python
- 1. Использование метода os.system()
- 2. Использование модуля подпроцесса
- 2.1. Метод call()
- 2.2. Метод check_output()
- Вывод
- Ссылки
- Get started using Python on Windows for scripting and automation
- Set up your development environment
- Install Python
- Install Visual Studio Code
- Install the Microsoft Python extension
- Open the integrated PowerShell terminal in VS Code
- Install Git (optional)
- Example script to display the structure of your file system directory
- Example script to modify all files in a directory
Функция system() модуля os в Python.
Запустить/выполнить внешнюю команду в оболочке.
Синтаксис:
Параметры:
Возвращаемое значение:
Описание:
Функция system() модуля os выполняет команду command в подоболочке ( subshell ). Это реализуется путем вызова стандартной функции языка Си system() и имеет те же ограничения. Изменения в sys.stdin и т. д. не отражаются в среде выполняемой команды. Если команда генерирует какой-либо вывод, он будет отправлен в стандартный поток вывода интерпретатора.
В Unix возвращаемое значение является состоянием выхода процесса, закодированного в формате, указанном как для функции os.wait() . Обратите внимание, что POSIX не определяет значение возвращаемого значения функции Си system() , поэтому возвращаемое значение функции Python зависит от системы.
В Windows возвращаемое значение возвращается системной оболочкой после выполнения команды. Оболочка задается переменной среды Windows COMSPEC: обычно это cmd.exe , который возвращает состояние завершения выполнения команды. В системах, использующих не нативную оболочку, смотрите документацию по вашей оболочке.
Используйте эту функцию, если надо тупо запустить что-то из кода Python и не ждать результатов выполнения, по принципу — запустил и забыл.
Другими словами, запуская команду функцией os.system(cmd) НЕ получиться получить/перенаправить вывод, который дает команда/программа cmd . Для извлечения данных из стандартного потока вывода воспользуйтесь модулем subprocess или по крайней мере функцией os.popen() :
Модуль subprocess предоставляет более мощные средства для порождения новых процессов и получения их результатов. Использование модуля subprocess предпочтительнее, чем использование этой функции.
Системные команды с помощью Python (os.system())
Возможно, нам потребуется интегрировать функции для выполнения некоторых задач системного администрирования в Python. К ним относятся поиск файлов, выполнение некоторых команд оболочки, выполнение некоторой расширенной обработки файлов и т. д. И для этого нам нужен какой-то способ взаимодействия между системой и интерпретатором Python.
Выполнение командных строк с помощью Python можно легко выполнить с помощью некоторых системных методов из os module .
Но с появлением модуля subprocess (с намерением заменить некоторые старые модули) доступ к командной строке стал намного проще в использовании. А также для управления выводом и избежания некоторых ограничений традиционных методов.

Выполнение команд оболочки в Python
Теперь, когда мы узнали о системных командах в Python. Давайте посмотрим, как мы можем реализовать то же самое.
1. Использование метода os.system()
Как указывалось ранее, выполнение команд оболочки в Python можно легко выполнить с помощью некоторых методов модуля os . Здесь мы собираемся использовать широко используемый os.system() .
Эта функция реализована с использованием функции C system() и, следовательно, имеет те же ограничения.
Метод принимает системную команду как строку на входе и возвращает код вывода.
В приведенном ниже примере мы пытаемся проверить версию Python в нашей системе с помощью командной строки.
Здесь res сохраняет возвращенное значение (код выхода = 0 для успеха). Из выходных данных видно, что команда выполнена успешно, и мы получили нашу версию Python, как и ожидалось.
2. Использование модуля подпроцесса
Модуль subprocess поставляется с различными полезными методами или функциями для создания новых процессов, подключения к их каналам ввода / вывода / ошибок и получения их кодов возврата.
В этом руководстве мы рассматриваем методы call() и check_output() поскольку они просты в использовании и надежны. Но для получения дополнительной информации вы всегда можете обратиться к официальной документации.
2.1. Метод call()
Теперь перейдем к методу subprocess.call() .
Метод call() принимает аргументы командной строки, переданные в виде списка строк или с аргументом оболочки, установленным в True . И возвращает нам код выхода или статус.
В приведенном ниже фрагменте кода мы пытаемся установить pandas с помощью PIP из оболочки.
Как видим, команда выполнена успешно с zero возвращаемым значением.
2.2. Метод check_output()
Вышеупомянутые методы выполняют успешно переданную команду оболочки, но не дают пользователю свободы манипулировать способом получения вывода. Для этого на check_output() должен check_output() метод подпроцесса check_output() .
Метод выполняет переданную команду, но вместо возврата статуса выхода на этот раз возвращает bytes объект.
Присмотритесь к приведенному ниже примеру, где мы снова пытаемся установить модуль pymysql (уже установленный).
Здесь, как и в предыдущих случаях, res хранит объект, возвращаемый методом check_output() . Мы видим, что type(res) подтверждает, что объект имеет bytes тип.
После этого печатаем декодированную строку и видим, что команда успешно выполнена.
Вывод
Итак, сегодня мы узнали, как мы можем выполнять системные команды с помощью системной команды Python (os.system()) и модуля подпроцесса. Мы рассмотрели здесь еще несколько команд, связанных с Python, но стоит отметить, что методы этим не ограничиваются.
Мы рекомендуем попробовать другие команды, используя описанные выше методы, чтобы лучше понять.
Если у вас возникнут дополнительные вопросы, оставляйте комментарии ниже.
Ссылки
- Документация подпроцесса Python
- Документация по ОС Python,
- Системная команда Python — os.system(), subprocess.call() — статья о Journal Dev
-
Генерация случайных целых чисел с помощью Python randint()
Учебник Python MySQL — Полное руководство
Генерация случайных целых чисел с помощью Python randint()
Get started using Python on Windows for scripting and automation
The following is a step-by-step guide for setting up your developer environment and getting you started using Python for scripting and automating file system operations on Windows.
This article will cover setting up your environment to use some of the helpful libraries in Python that can automate tasks across platforms, like searching your file system, accessing the internet, parsing file types, etc., from a Windows-centered approach. For Windows-specific operations, check out ctypes, a C-compatible foreign function library for Python, winreg, functions exposing the Windows registry API to Python, and Python/WinRT, enabling access Windows Runtime APIs from Python.
Set up your development environment
When using Python to write scripts that perform file system operations, we recommend you install Python from the Microsoft Store. Installing via the Microsoft Store uses the basic Python3 interpreter, but handles set up of your PATH settings for the current user (avoiding the need for admin access), in addition to providing automatic updates.
If you are using Python for web development on Windows, we recommend a different setup using the Windows Subsystem for Linux. Find a walkthrough in our guide: Get started using Python for web development on Windows. If you’re brand new to Python, try our guide: Get started using Python on Windows for beginners. For some advanced scenarios (like needing to access/modify Python’s installed files, make copies of binaries, or use Python DLLs directly), you may want to consider downloading a specific Python release directly from python.org or consider installing an alternative, such as Anaconda, Jython, PyPy, WinPython, IronPython, etc. We only recommend this if you are a more advanced Python programmer with a specific reason for choosing an alternative implementation.
Install Python
To install Python using the Microsoft Store:
Go to your Start menu (lower left Windows icon), type «Microsoft Store», select the link to open the store.
Once the store is open, select Search from the upper-right menu and enter «Python». Open «Python 3.7» from the results under Apps. Select Get.
Once Python has completed the downloading and installation process, open Windows PowerShell using the Start menu (lower left Windows icon). Once PowerShell is open, enter Python —version to confirm that Python3 has been installed on your machine.
The Microsoft Store installation of Python includes pip, the standard package manager. Pip allows you to install and manage additional packages that are not part of the Python standard library. To confirm that you also have pip available to install and manage packages, enter pip —version .
Install Visual Studio Code
By using VS Code as your text editor / integrated development environment (IDE), you can take advantage of IntelliSense (a code completion aid), Linting (helps avoid making errors in your code), Debug support (helps you find errors in your code after you run it), Code snippets (templates for small reusable code blocks), and Unit testing (testing your code’s interface with different types of input).
Download VS Code for Windows and follow the installation instructions: https://code.visualstudio.com.
Install the Microsoft Python extension
You will need to install the Microsoft Python extension in order to take advantage of the VS Code support features. Learn more.
Open the VS Code Extensions window by entering Ctrl+Shift+X (or use the menu to navigate to View > Extensions).
In the top Search Extensions in Marketplace box, enter: Python.
Find the Python (ms-python.python) by Microsoft extension and select the green Install button.
Open the integrated PowerShell terminal in VS Code
VS Code contains a built-in terminal that enables you to open a Python command line with PowerShell, establishing a seamless workflow between your code editor and command line.
Open the terminal in VS Code, select View > Terminal, or alternatively use the shortcut Ctrl+` (using the backtick character).
The default terminal should be PowerShell, but if you need to change it, use Ctrl+Shift+P to enter the command pallette. Enter Terminal: Select Default Shell and a list of terminal options will display containing PowerShell, Command Prompt, WSL, etc. Select the one you’d like to use and enter Ctrl+Shift+` (using the backtick) to create a new terminal.
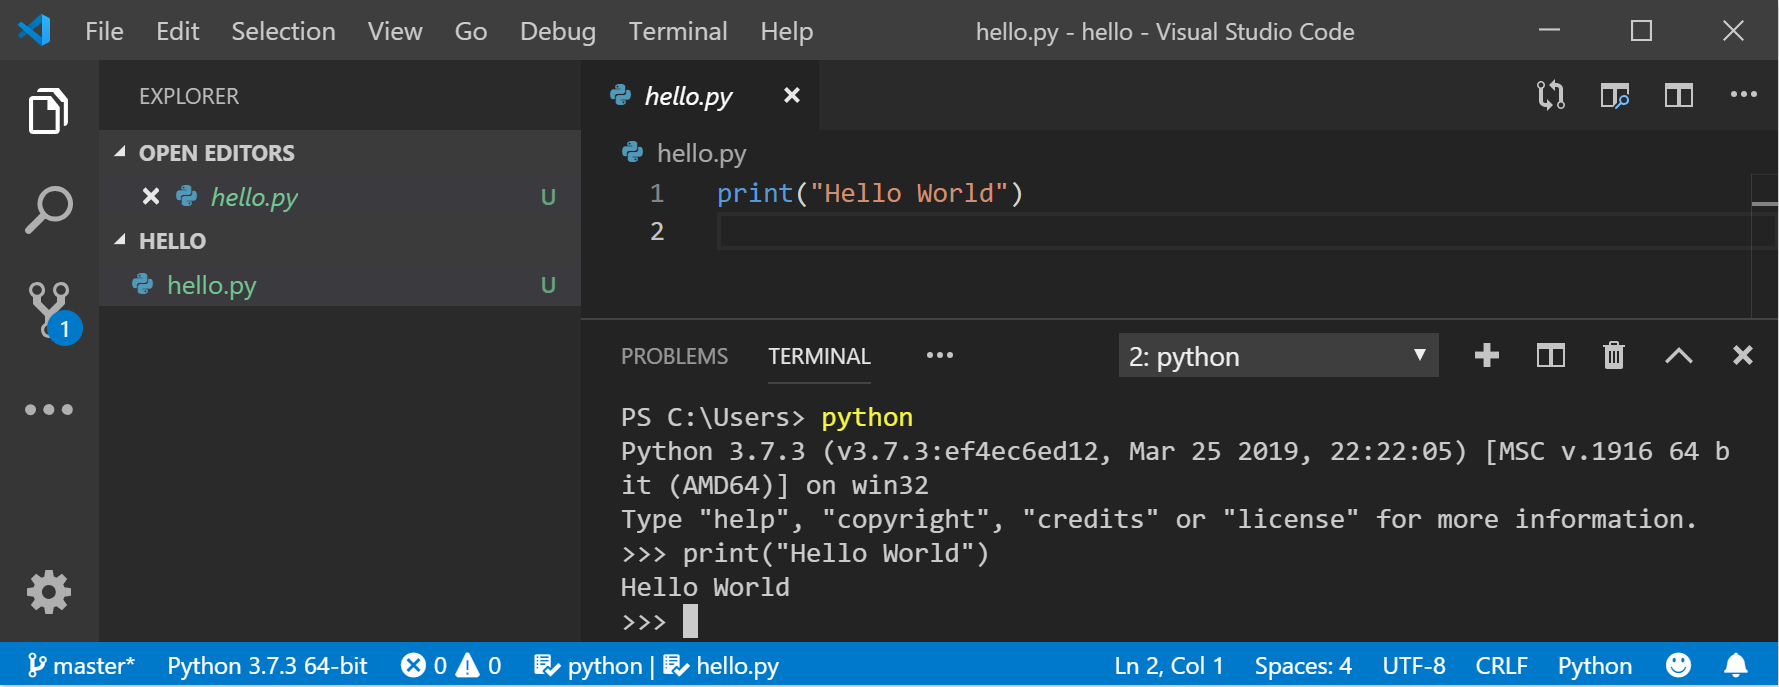
Inside your VS Code terminal, open Python by entering: python
Try the Python interpreter out by entering: print(«Hello World») . Python will return your statement «Hello World».

To exit Python, you can enter exit() , quit() , or select Ctrl-Z.
Install Git (optional)
If you plan to collaborate with others on your Python code, or host your project on an open-source site (like GitHub), VS Code supports version control with Git. The Source Control tab in VS Code tracks all of your changes and has common Git commands (add, commit, push, pull) built right into the UI. You first need to install Git to power the Source Control panel.
Download and install Git for Windows from the git-scm website.
An Install Wizard is included that will ask you a series of questions about settings for your Git installation. We recommend using all of the default settings, unless you have a specific reason for changing something.
If you’ve never worked with Git before, GitHub Guides can help you get started.
Example script to display the structure of your file system directory
Common system administration tasks can take a huge amount of time, but with a Python script, you can automate these tasks so that they take no time at all. For example, Python can read the contents of your computer’s file system and perform operations like printing an outline of your files and directories, moving folders from one directory to another, or renaming hundreds of files. Normally, tasks like these could take up a ton of time if you were to perform them manually. Use a Python script instead!
Let’s begin with a simple script that walks a directory tree and displays the directory structure.
Open PowerShell using the Start menu (lower left Windows icon).
Create a directory for your project: mkdir python-scripts , then open that directory: cd python-scripts .
Create a few directories to use with our example script:
Create a few files within those directories to use with our script:
Create a new python file in your python-scripts directory:
Open your project in VS Code by entering: code .
Open the VS Code File Explorer window by entering Ctrl+Shift+E (or use the menu to navigate to View > Explorer) and select the list-directory-contents.py file that you just created. The Microsoft Python extension will automatically load a Python interpreter. You can see which interpreter was loaded on the bottom of your VS Code window.
Python is an interpreted language, meaning that it acts as a virtual machine, emulating a physical computer. There are different types of Python interpreters that you can use: Python 2, Python 3, Anaconda, PyPy, etc. In order to run Python code and get Python IntelliSense, you must tell VS Code which interpreter to use. We recommend sticking with the interpreter that VS Code chooses by default (Python 3 in our case) unless you have a specific reason for choosing something different. To change the Python interpreter, select the interpreter currently displayed in blue bar on the bottom of your VS Code window or open the Command Palette (Ctrl+Shift+P) and enter the command Python: Select Interpreter. This will display a list of the Python interpreters that you currently have installed. Learn more about configuring Python environments.
Paste the following code into your list-directory-contents.py file and then select save:
Open the VS Code integrated terminal (Ctrl+`, using the backtick character) and enter the src directory where you just saved your Python script:
Run the script in PowerShell with:
You should see output that looks like this:
Use Python to print that file system directory output to it’s own text file by entering this command directly in your PowerShell terminal: python3 list-directory-contents.py > food-directory.txt
Congratulations! You’ve just written an automated systems administration script that reads the directory and files you created and uses Python to display, and then print, the directory structure to it’s own text file.
If you’re unable to install Python 3 from the Microsoft Store, see this issue for an example of how to handle the pathing for this sample script.
Example script to modify all files in a directory
This example uses the files and directories you just created, renaming each of the files by adding the file’s last modified date to the beginning of the filename.
Inside the src folder in your python-scripts directory, create a new Python file for your script:
Open the update-filenames.py file, paste the following code into the file, and save it:
os.getmtime returns a timestamp in ticks, which is not easily readable. It must be converted to a standard datetime string first.
Test your update-filenames.py script by running it: python3 update-filenames.py and then running your list-directory-contents.py script again: python3 list-directory-contents.py
You should see output that looks like this:
Use Python to print the new file system directory names with the last-modified timestamp prepended to it’s own text file by entering this command directly in your PowerShell terminal: python3 list-directory-contents.py > food-directory-last-modified.txt
Hope you learned a few fun things about using Python scripts for automating basic systems administration tasks. There is, of course, a ton more to know, but we hope this got you started on the right foot. We’ve shared a few additional resources to continue learning below.