- Download QEMU
- Source code
- Build instructions
- Linux
- macOS
- Windows
- Version numbering
- Qemu ��� ���������� linux
- Running Qemu/KVM
- Graphics
- Upgrading the machine type
- QEMU usage for microvms
- How to install Qemu/KVM and Virt-Manager GUI on Ubuntu 20.04 LTS
- Install KVM and Virt Virtual Machine Manager GUI on Ubuntu 20.04 LTS
- 1. Open a command terminal
- 2. Install QEMU/KVM on Ubuntu 20.04 Server
- 3. Install Virt-Manager GUI for KVM on Linux
- 4. Create a New Virtual Machine
- 5. Browse the ISO file
- 6. Choose Memory and CPU settings
- 7. Create a disk image for the KVM virtual machine
- 8. Select Network
- 9. Virtual Machine Interface on QEMU/KVM
Download QEMU
Source code
Grab the source code for the latest releases and compile it yourself! Detailed compilation instructions can be found in the wiki for Linux, Win32 and macOS.
- 6.1.0 Aug 24st 2021
signature — changes - 6.0.0 Apr 29th 2021
signature — changes - 5.2.0 Dec 8th 2020
signature — changes
or stay on the bleeding edge with the git repository!
Build instructions
To download and build QEMU 6.1.0:
To download and build QEMU from git:
The latest development happens on the master branch. The stable trees are located in branches named stable-X.YY branch, where X.YY is the release version.
Linux
QEMU is packaged by most Linux distributions:
Arch: pacman -S qemu
Debian/Ubuntu: apt-get install qemu
Fedora: dnf install @virtualization
Gentoo: emerge —ask app-emulation/qemu
RHEL/CentOS: yum install qemu-kvm
SUSE: zypper install qemu
macOS
QEMU can be installed from Homebrew:
QEMU can be installed from MacPorts:
QEMU requires Mac OS X 10.5 or later, but it is recommended to use Mac OS X 10.7 or later.
Windows
Stefan Weil provides binaries and installers for both 32-bit and 64-bit Windows.
Version numbering
Since version 3.0.0, QEMU uses a time based version numbering scheme:
major incremented by 1 for the first release of the year minor reset to 0 with every major increment, otherwise incremented by 1 for each release from git master micro always 0 for releases from git master, incremented by 1 for each stable branch release
The implication of this is that changes in major version number do not have any bearing on the scope of changes included in the release. Non-backward compatible changes may be made in any master branch release, provided they have followed the deprecation policy which calls for warnings to be emitted for a minimum of two releases prior to the change.
Источник
Qemu ��� ���������� linux
Qemu is a machine emulator that can run operating systems and programs for one machine on a different machine. Mostly it is not used as emulator but as virtualizer in collaboration with KVM kernel components. In that case it utilizes the virtualization technology of the hardware to virtualize guests.
While qemu has a command line interface and a monitor to interact with running guests those is rarely used that way for other means than development purposes. Libvirt provides an abstraction from specific versions and hypervisors and encapsulates some workarounds and best practices.
Running Qemu/KVM
While there are much more user friendly and comfortable ways, using the command below is probably the quickest way to see some called Ubuntu moving on screen is directly running it from the netboot iso.
Warning: this is just for illustration — not generally recommended without verifying the checksums; Multipass and UVTool are much better ways to get actual guests easily.
sudo qemu-system-x86_64 -enable-kvm -cdrom http://archive.ubuntu.com/ubuntu/dists/bionic-updates/main/installer-amd64/current/images/netboot/mini.iso
You could download the ISO for faster access at runtime and e.g. add a disk to the same by:
- creating the disk
qemu-img create -f qcow2 disk.qcow 5G
Those tools can do much more, as you’ll find in their respective (long) man pages. There also is a vast assortment of auxiliary tools to make them more consumable for specific use-cases and needs — for example virt-manager for UI driven use through libvirt. But in general — even the tools eventually use that — it comes down to:
So take a look at the man page of qemu, qemu-img and the documentation of qemu and see which options are the right one for your needs.
Graphics
Graphics for qemu/kvm always comes in two pieces.
- A front end — controlled via the -vga argument — which is provided to the guest. Usually one of cirrus , std , qxl , virtio . The default these days is qxl which strikes a good balance between guest compatibility and performance. The guest needs a driver for what is selected, which is the most common reason to switch from the default to either cirrus (e.g. very old Windows versions)
- A back end — controlled via the -display argument — which is what the host uses to actually display the graphical content. That can be an application window via gtk or a vnc .
- In addition one can enable the -spice back-end (can be done in addition to vnc ) which can be faster and provides more authentication methods than vnc.
- if you want no graphical output at all you can save some memory and cpu cycles by setting -nographic
If you run with spice or vnc you can use native vnc tools or virtualization focused tools like virt-viewer . More about these in the libvirt section.
All those options above are considered basic usage of graphics. There are advanced options for further needs. Those cases usually differ in their ease-of-use and capability are:
- Need some 3D acceleration: -vga virtio with a local display having a GL context -display gtk,gl=on ; That will use virgil3d on the host and needs guest drivers for [virt3d] which are common in Linux since Kernels >=4.4 but hard to get by for other cases. While not as fast as the next two options, the big benefit is that it can be used without additional hardware and without a proper IOMMU setup for device passthrough.
- Need native performance: use PCI passthrough of additional GPUs in the system. You’ll need an IOMMU setup and unbind the cards from the host before you can pass it through like -device vfio-pci,host=05:00.0,bus=1,addr=00.0,multifunction=on,x-vga=on -device vfio-pci,host=05:00.1,bus=1,addr=00.1
- Need native performance, but multiple guests per card: Like PCI Passthrough, but using mediated devices to shard a card on the Host into multiple devices and pass those like -display gtk,gl=on -device vfio-pci,sysfsdev=/sys/bus/pci/devices/0000:00:02.0/4dd511f6-ec08-11e8-b839-2f163ddee3b3,display=on,rombar=0 . More at kraxel on vgpu and Ubuntu GPU mdev evaluation. The sharding of the cards is driver specific and therefore will differ per manufacturer like Intel or Nvidia.
Especially the advanced cases can get pretty complex, therefore it is recommended to use qemu through libvirt for those cases. Libvirt will take care of all but the host kernel/bios tasks of such configurations.
Upgrading the machine type
If you are unsure what this is, you might consider this as buying (virtual) Hardware of the same spec but a newer release date. You are encouraged in general and might want to update your machine type of an existing defined guests in particular to:
- to pick up latest security fixes and features
- continue using a guest created on a now unsupported release
In general it is recommended to update machine types when upgrading qemu/kvm to a new major version. But this can likely never be an automated task as this change is guest visible. The guest devices might change in appearance, new features will be announced to the guest and so on. Linux is usually very good at tolerating such changes, but it depends so much on the setup and workload of the guest that this has to be evaluated by the owner/admin of the system. Other operating systems where known to often have severe impacts by changing the hardware. Consider a machine type change similar to replacing all devices and firmware of a physical machine to the latest revision — all considerations that apply there apply to evaluating a machine type upgrade as well.
As usual with major configuration changes it is wise to back up your guest definition and disk state to be able to do a rollback just in case. There is no integrated single command to update the machine type via virsh or similar tools. It is a normal part of your machine definition. And therefore updated the same way as most others.
First shutdown your machine and wait until it has reached that state.
Then edit the machine definition and find the type in the type tag at the machine attribute.
Change this to the value you want. If you need to check what types are available via “-M ?” Note that while providing upstream types as convenience only Ubuntu types are supported. There you can also see what the current default would be. In general it is strongly recommended that you change to newer types if possible to exploit newer features, but also to benefit of bugfixes that only apply to the newer device virtualization.
After this you can start your guest again. You can check the current machine type from guest and host depending on your needs.
If you keep non-live definitions around — like xml files — remember to update those as well.
This also is documented along some more constraints and considerations at the Ubuntu Wiki
QEMU usage for microvms
QEMU became another use case being used in a container-like style providing an enhanced isolation compared to containers but being focused on initialization speed.
To achieve that several components have been added:
- the microvm machine type
- alternative simple FW that can boot linux called qboot
- qemu build with reduced features matching these use cases called qemu-system-x86-microvm
For example if you happen to already have a stripped down workload that has all it would execute in an initrd you would run it maybe like the following:
$ sudo qemu-system-x86_64 -M ubuntu-q35 -cpu host -m 1024 -enable-kvm -serial mon:stdio -nographic -display curses -append ‘console=ttyS0,115200,8n1’ -kernel vmlinuz-5.4.0-21 -initrd /boot/initrd.img-5.4.0-21-workload
To run the same with microvm , qboot and the minimized qemu you would do the following
run it with with type microvm, so change -M to
-M microvm
use the qboot bios, add
-bios /usr/share/qemu/bios-microvm.bin
install the feature-minimized qemu-system package, do
$ sudo apt install qemu-system-x86-microvm
An invocation will now look like:
$ sudo qemu-system-x86_64 -M microvm -bios /usr/share/qemu/bios-microvm.bin -cpu host -m 1024 -enable-kvm -serial mon:stdio -nographic -display curses -append ‘console=ttyS0,115200,8n1’ -kernel vmlinuz-5.4.0-21 -initrd /boot/initrd.img-5.4.0-21-workload
That will have cut down the qemu, bios and virtual-hw initialization time down a lot.
You will now — more than you already have before — spend the majority inside the guest which implies that further tuning probably has to go into that kernel and userspace initialization time.
** Note **
For now microvm, the qboot bios and other components of this are rather new upstream and not as verified as many other parts of the virtualization stack. Therefore none of the above is the default. Further being the default would also mean many upgraders would regress finding a qemu that doesn’t have most features they are used to use. Due to that the qemu-system-x86-microvm package is intentionally a strong opt-in conflicting with the normal qemu-system-x86 package.
Источник
How to install Qemu/KVM and Virt-Manager GUI on Ubuntu 20.04 LTS
When it comes to running virtual machines on home Linux systems or for personal use most of us either go for VirtualBox or Vmware workstation player, however, there is more best option i.e KVM/Qemu. Qemu and KVM both are open source platforms for performing virtualization on Linux platforms. KVM stands for Kernel Virtual Machine, where QEMU is an emulator that can also be used as a virtualizer with the help of KVM to provide a native speed by accessing Intel VT-x or AMD V technology of modern processors.
KVM is a virtualization module that can easily be installed in any Linux kernel to allow it to function as a type 1 hypervisor.
Thus, the installation of KVM becomes a lot easier, we only need a Linux-based system such as Ubuntu and a processor with intel-v / VT-x or AMD-v support. All new processors have this instruction set extension. Only the small processors, such as the Atom from Intel, or very old processors may lack this feature.
However, by default to manage KVM virtual machines we need to use the command line, unlike VirtualBox or VMware it will not have a graphical user interface out of the box. Still, we can use various Graphical user interface Virtual Machine Manager applications such as Virt-Manager (Virtual Machine Manager), Gnome Boxes, and more… Here is the list of all such open-source platforms: 8 Best Open-source Virtual machine manager for Linux
Here we will see the installation of the popular Virt-Manager that makes KVM machines easy to operate just like VirtualBox. The special feature of VMM is that it forms a kind of intermediate layer, so that the management of the virtual machines is uniform, regardless of which virtualization solution is used, which reduces the administrative effort. The configuration is stored in XML files so that it can be corrected manually if necessary. We can also use VVM to manage the Virtual machines running on remote servers’ KVM using an encrypted connection.
Install KVM and Virt Virtual Machine Manager GUI on Ubuntu 20.04 LTS
The given steps are also applicable for Ubuntu 18.04, Debian, Linux Mint, MX Linux, Elementary OS, Kali Linux, and other similar Linux distros.
1. Open a command terminal
If you are installing KVM on some Ubuntu server then you already on the command line, whereas GUI desktop users can access the terminal from the All applications area or using the keyboard shortcut Ctrl +ALT +T.
The first thing we perform is the running of the system update command:
2. Install QEMU/KVM on Ubuntu 20.04 Server
Well, you can install KVM on both Desktop and Server editions of Ubuntu, it is your choice. However, the command for doing it will be the same for both. Nevertheless, for a small office or running multiple virtual machines, it is recommended to use a command-line server that will consume fewer system resources so that your VMs will have more power to work. So, here is the command to setup KVM along with other tools for its proper management and functioning.
3. Install Virt-Manager GUI for KVM on Linux
Our KVM is already installed, now it’s time to install a Graphical user interface to create, start, stop or delete virtual machines using Virt-Manager.
Once the installation is completed go to Applications and search for Virtual Machine Manager, as its icon appears click to run it.
Note: If your KVM is installed on some CLI server, then install Virt-Manager on some other Linux PC or laptop with GUI. You can also use Virt-Viewer to remotely view VMs on Windows platforms, however, that would not allow you to create a new VM.

4. Create a New Virtual Machine
To create a new VM, click on the PC icon and then select the source of the operating system you want to install. However, most of the time, it will be the ISO image, thus select the default “Local install media ISO image or CDROM”.

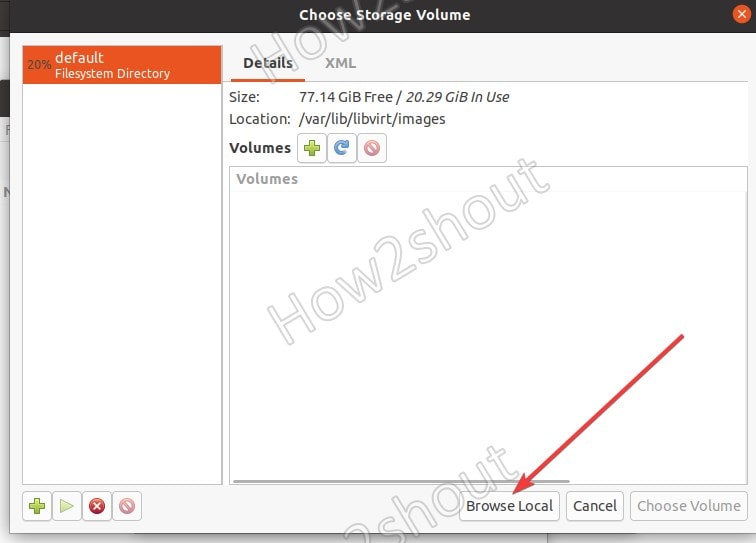
5. Browse the ISO file
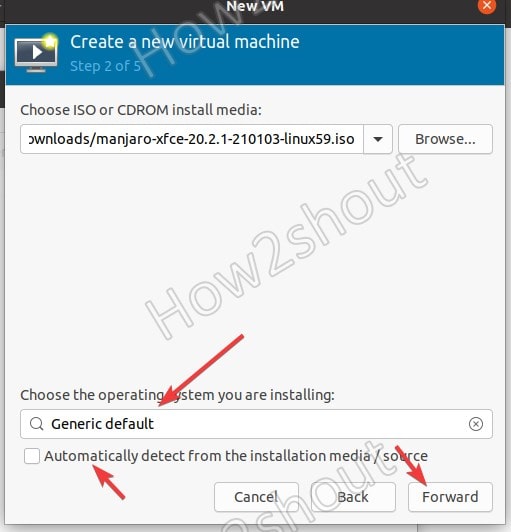
Now, click on the Browse Local button and select the ISO of the Linux or Windows operating system you want to set up for VM.
After the ISO selection, uncheck “Automatically detect from the installation media /source” because in some cases it won’t identify what type of OS we are about to install. Thus, uncheck it and search to select that manually.
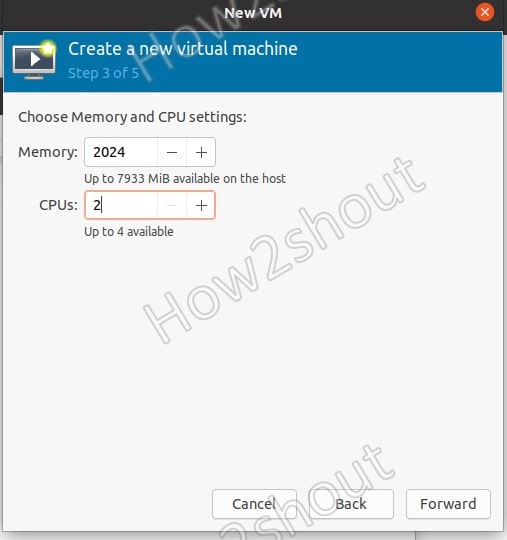
6. Choose Memory and CPU settings
Here in this step, we select the amount of RAM and number of CPU cores we want to assign for our virtual machine on KVM.
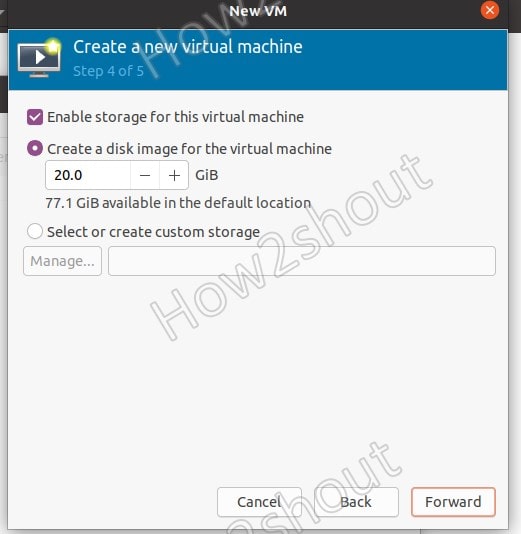
7. Create a disk image for the KVM virtual machine
To store data of VM, create a disk image or virtual hard disk. By default, it would be 20 GB, but we can increase it as per the requirement of the operating system we are about to install.
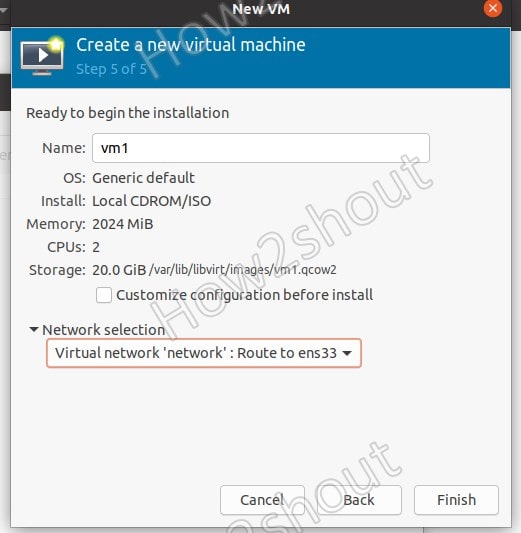
8. Select Network
The default virtual network for KVM’s VM will be in bridge mode. Thus, leave it as it is unless you want something particular in terms of routing network data.
9. Virtual Machine Interface on QEMU/KVM
Once all the above steps are done, the VM will start and you have the access to its interface for further installation of OS.
Источник


