- QEMU/Networking
- Contents
- User mode networking [ edit | edit source ]
- Redirecting ports [ edit | edit source ]
- TAP interfaces [ edit | edit source ]
- TAP/TUN device [ edit | edit source ]
- qemu-ifup [ edit | edit source ]
- qemu-ifdown [ edit | edit source ]
- Allowing users to call the scripts [ edit | edit source ]
- Starting QEMU with a TAP interface [ edit | edit source ]
- Windows Vista and later – Network Location [ edit | edit source ]
- Sockets [ edit | edit source ]
- SMB server [ edit | edit source ]
- Работа с сетью в qemu
- Основы.
- Так как же всё таки настроить работающую сеть?
- Сетевое соединение между виртуальными машинами
- Использование tun/tap интерфейсов для связи машин
- Documentation/Networking
- Contents
- Network Basics
- Network Backends
- How to create a network backend?
- Network backend types
- User Networking (SLIRP)
- Enabling ping in the guest, on Linux hosts
- Advanced user networking options
- Socket
- Virtual Network Devices
- How to create a virtual network device?
- The -nic option
- Network Monitoring
- Network HOWTOs
- How to get SSH access to a guest
- How to use tap with a wireless adapter on the host
- How to disable network completely
- Setting up taps on Linux
- TODO LIST
- The legacy -net option
- Guest Hints
- Linux
- Mac OS 9
- Mac OS 10.2
- Mac OS 10.4
- Windows NT 4.0
- Windows 2000, Windows XP, Windows 7
QEMU/Networking
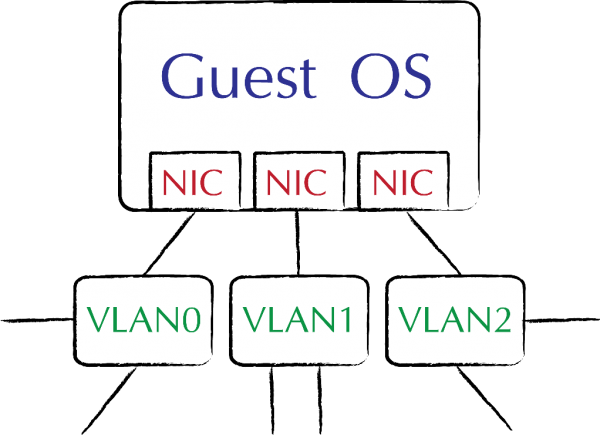
QEMU supports networking by emulating some popular network cards (NICs), and establishing virtual LANs (VLAN). There are four ways how QEMU guests can be connected then: user mode, socket redirection, Tap and VDE networking.
Contents
User mode networking [ edit | edit source ]
If no network options are specified, QEMU will default to emulating a single Intel e1000 PCI card with a user-mode network stack that bridges to the host’s network. The following three command lines are equivalent:
To use this network setup with the Linux kernel, you must set the configuration option CONFIG_E1000=y when compiling.
The -net option is superseded by -netdev in newer QEMU versions. [1]
The guest OS will see an E1000 NIC with a virtual DHCP server on 10.0.2.2 and will be allocated an address starting from 10.0.2.15. A virtual DNS server will be accessible on 10.0.2.3, and a virtual SAMBA file server (if present) will be accessible on 10.0.2.4 allowing you to access files on the host via SAMBA file shares.
User mode networking is great for allowing access to network resources, including the Internet. In particular, it allows ssh from the guest to the host. By default, however, it acts as a firewall and does not permit any incoming traffic. It also doesn’t support protocols other than TCP and UDP — so, for example, ping and other ICMP utilities won’t work.
Redirecting ports [ edit | edit source ]
To allow network connections to the guest OS under user mode networking, you can redirect a port on the host OS to a port on the guest OS. This is useful for supporting file sharing, web servers and SSH servers from the guest OS.
Here is how to set up QEMU with a Windows XP guest sharing files and web pages under user mode networking. TCP port 5555 on the host is redirected to the guest’s port 80 (the web server) and TCP port 5556 on the host is redirected to the guest’s port 445 (Windows networking):
NB: When sharing folders from guest to host via Windows networking, you must specify a password for the user that mount will use to login; if you try to use no password, mount will fail with an I/O error.
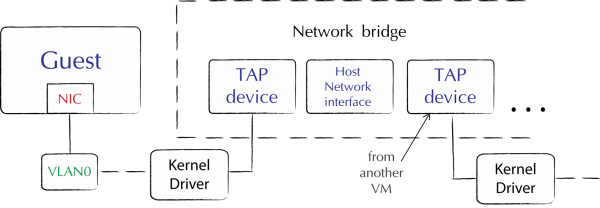
TAP interfaces [ edit | edit source ]
QEMU can use TAP interfaces to provide full networking capability for the guest OS. This can be useful when the guest OS is running several network services and must be connected to via standard ports; where protocols other than TCP and UDP are required; and where multiple instances of QEMU need to connect to each other (although this can also be achieved in user mode networking via port redirects, or via sockets).
In QEMU 1.1 and newer the network bridge helper can set tun/tap up for you without the need for additional scripting.
For older versions, setting up a TAP interface is a bit more complicated than user mode networking. It requires installing virtual private networking (VPN) on the host OS, and then establishing a bridge between the host’s networking and the virtual network.
Here’s how to do it on Fedora 8 with static IP address assignment. The procedure should be very similar on other Linux distros, and probably not too different on other *nix systems.
TAP/TUN device [ edit | edit source ]
According to tuntap.txt, we create the TAP/TUN device first:
qemu-ifup [ edit | edit source ]
First, set up a script to create the bridge and bring up the TAP interface. We’ll call this script /etc/qemu-ifup .
qemu-ifdown [ edit | edit source ]
You will also need a script to reset your networking after QEMU exits. To be consistent, we’ll call it /etc/qemu-ifdown .
Allowing users to call the scripts [ edit | edit source ]
In qemu 1.1 and above just use the helper program, which doesn’t require any scripts and can be setuid root.
For older versions, the two scripts above need to be run as the superuser, so that they can modify the network settings of the system. The most convenient way to achieve that is to permit users of QEMU to call the scripts using the sudo command. To set this up, add the following to the file /etc/sudoers :
Starting QEMU with a TAP interface [ edit | edit source ]
Now create a script to start QEMU with a VLAN, and clean up after itself when it exits. This one uses tap0. Specifying script=no tells QEMU to just use the tap device without calling the scripts — we do this so that QEMU can be run as a regular user, not root.
Run that script, and it will create a TAP interface, bridge it to eth0, run QEMU, and drop the bridge and TAP interface again on exit.
Windows Vista and later – Network Location [ edit | edit source ]
Windows Vista and later classify network connections as either public or private. The classification determines the firewall rules that will be applied to that connection. Windows maintains a list of known connections and if it finds a network connection which is not in that list it will prompt the user to indicate whether this is a «Home», «Work» or «Public» network. The network is identified by the MAC address of its default gateway, which QEMU seems to allocate randomly each time it starts. The result is that every time a Windows session is started with QEMU it pops up a window asking you to indicate the «network location». This is not normally a serious problem, but it can be annoying.
The solution is to force the netdev interface to always use the same MAC address. QEMU does not appear to provide an option to set this, but it can be set in the ifup script. Using Iproute2, which has superceded ifconfig, the command:
will change the MAC address of the host-side interface to that given, which could be any legal MAC address that is unique within the local network.
Sockets [ edit | edit source ]
QEMU can connect multiple QEMU guest systems on a VLAN using TCP or UDP sockets.

To do:
complete this section
SMB server [ edit | edit source ]
If the host system has a SMB server installed (SAMBA/CIFS on *nix), QEMU can emulate a virtual SMB server for the guest system using the -smb option. Specify the folder to be shared, and it will be available to the guest as \\10.0.2.4\qemu (or you can put 10.0.2.4 into the hosts or lmhosts file as smbserver and map to \\smbserver\qemu).
This isn’t strictly necessary, because guests in QEMU can typically access SMB servers in the host environment. It can be quite useful, however, for setting up independent workspaces for each QEMU guest without needing to configure SMB shares for each one.
Работа с сетью в qemu
Работа с сетью в qemu достаточна проста, но зачастую вызывает множество вопросов у начинающих. Несмотря на то, что в сети существует ряд полезных руководств, в процессе решения прикладных задач возникают мелкие, но неприятные проблемы. В данной статье, я постараюсь постепенно собирать ряд рецептов и рекомендаций по настройке сети в qemu. Со стороны читателей приветствуются замечания и дополнения.
Все примеры в статье проверены на Fedora 14, qemu 0.13.0, kvm включен.
Основы.
С самого начала надо пояснить, как создать сетевой адаптер в гостевой системе. Для этого служит опция -net с параметром nic (Network Interface Card)
При указании данной опции в гостевой системе появится сетевой интерефейс заданной модели, с указанным mac адресом. При отсутствии параметра model будет эмулироваться адаптер realtek. Узнать какие адаптеры поддерживаются qemu для вашей архитектуры можно при помощи следующей команды
После указания адаптера самое время подумать, как он будет взаимодействовать с внешним миром. Qemu предоставляет несколько различных способов сетевого поключения для гостевой системы, но прежде чем перейти к описанию некоторых из них, необходимо познакомиться с понятием vlan. Сразу хочу отметить,что к Virtual Local Area Network этот термин не имеет отношения. В терминологии qemu vlan — это виртуальный коммутатор который создается процессом qemu, на один процесс их может быть несколько штук, и различаются они по номеру. Подключить сетевой адаптер к нужному vlan можно указав номер в качестве параметра, например
Все что поступает на vlan передаётся другим подключенным туда интерфейсам, а весь секрет взаимодействия с хост системой и внешней сетью заключается в том, что помимо адаптера гостевой системы к vlan можно подлючить много чего ещё.
Так как же всё таки настроить работающую сеть?
Самый простой способ подключения сети в гостевой системе — использование встроенной в qemu системы сетевого обмена с хостом (user mod). Она не требует дополнительной конфигурации — если на хост-системе настроена сеть, то qemu сам позаботиться о том, чтобы запросы автоматически перенаправлялись на нужный сетевой интерфейс.
В данном случае к vlan 0 подключается с одной стороны сетевой адаптер гостевой системы, с другой стороны к этому же vlan подключается встроеннsq в qemu маршрутизатор. Гостевая система при этом получает IP адрес по DHCP (по умолчанию в диапазоне 10.0.2.0/8).
Необходимо подчернуть, что user режим работы сети включается по умолчнию, даже если не прописывать параметры конфигурации в командной строке qemu. Кроме того user режим имеет несколько полезных настроек — как всегда их можно подсмотреть в man`e.
Несмотря на свою простоту данный способ настройки сети для гостевой системы обладает рядом недостатков:
- Медленная скорость сетевого соединения
- Нет связи с другими виртульными машиными запущенными на данном хосте
- Гостевая система недоступна с хост системы и с дригих машин в сети хоста.
К счастью существуют способы, позволяющие устранить эти проблемы.
Сетевое соединение между виртуальными машинами
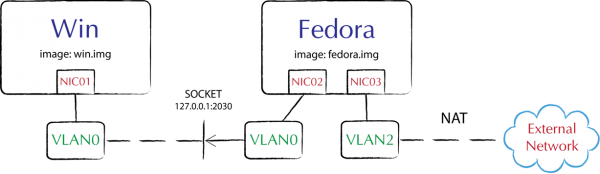
Нижеописанный способ соединения позволяет установить связь между двумя виртуальными машинами qemu, через сетевой сокет на хост-системе. Для этого будет использоваться параметр -net socket
Сначала запустим первую машину, которая будет слушать порт 2030 по адресу 127.0.0.1
Вторая запущенная виртуальная машина поключается к этому сокету (подразумевается, что машины запущены на одной хост-системе)
Во второй системе создается два интерфейса, один из которых подключается к первой виртуальной машине через сокет, а второй работает в user режиме (NAT встроенный в qemu и описанный выше) — благодаря этому вторая машина получает и доступ во внешнюю сеть и кроме того может обмениваться информацией с первой виртуальной машиной 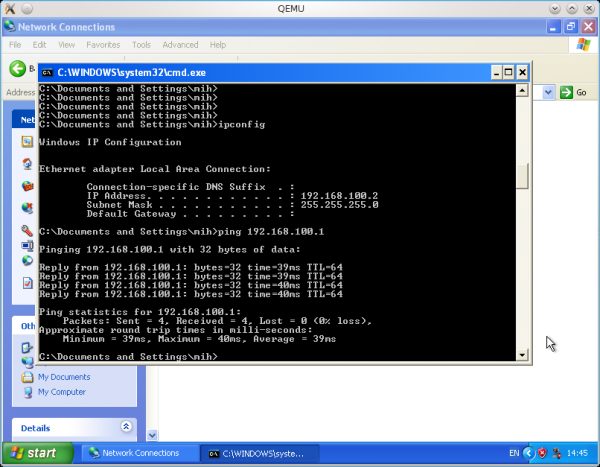
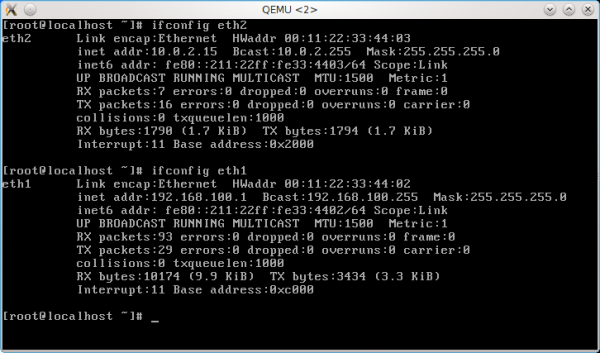
Необходимо отметить, что при использовании socket механизма, сетевые настройки конечно же не раздаются автоматически. На скриншотах сетевые интерфейсы машин соединенных при помощи сокета на хост системе имеют адреса 192.168.200.1 и 192.168.200.2 (назначены руками) для Linux и Windows соответсвенно. На Linux системе также заметен и второй интерфейс eth2, который предоставляет доступ к внешней сети при помощи NAT.
Схему данной сети можно представить в следующем виде
Кроме того для связи нескольких машин друг с другом может использоваться схема UDP мультикаст сокетов, при этом сами виртуальные машины могут быть запущены на разных хостах. На этой схеме я подробно останавливаться не буду, так как сам её не использовал, а переписывать краткий мануал было бы бессмысленно.
Использование tun/tap интерфейсов для связи машин
Одним из самых распространенных способов работы с сетью для qemu является использование tap интерефейса. При запуске qemu c опцией -net tap в хост системе появляется дополнительный сетевой интерфейс tap#, который подключен к указанному vlan для запущенной виртуальной машины. Существенным недостатком данного метода является то, что для создания tap адаптера требуются права суперпользователя.
Теперь для соединения между хостом и гостевой системой достаточно назначить адреса для tap интерефейса и сетевого адаптера на гостевой системе. 
Однако самый удобный и популярный способ работы c tap интерфейсами заключается в использовании сетевых мостов. Внимательный читатели наверно обратили внимание на параметры script и downscript в предыдущем примере. С помощью этих опций можно задать скрипты, которые будут выполняться после создания и перед удалением tap интерфейса. По умолчанию qemu использует файлы /etc/qemu-ifup и /etc/qemu-ifdown. Как правило в этих скриптах прописаны команды добавления и удаления интерфейса из сетевого моста.
Например, на хост-системе создан мост virtnet0, тогда для добавления в этот мост tap интерфейса привязанного к виртуальной машине /etc/qemu-ifup может выглядеть так
Первый параметр передаваемый скрипту — это имя tap адаптера, он переводится в promisc mode и добавляется в сетевой мост.
Таким образом, если запустить несколько виртаульных машин, то для каждой из них будет назначен tap интерфейс и добавлен в мост virtnet0. При этом машины могут общаться друг с другом и с хост системой (в этом случае мосту в хост системе назнаяается IP адрес).
Кроме того, можно изначально добавить в сетевой мост один из сетевых интерфейсов хост системы — тогда виртуальные машины получаею доступ во внешнюю сеть наравне с хост системой.
В сети можно найти множество различных руководств по настройке подобной конфигурации, поэтому здесь хочется отметить только несколько моментов. Если вы хотите использовать PXE загрузку (например для автоматической установки систем), то крайне рекомендую установить forward delay для моста равным 0
Кроме того, если вы используете NetworkManager для настройки сети, то могли заметить, что он пока что не работает сетевыми мостами (Я не нашел адекватного и быстрого способа). Для решения этой проблемы можно создавать мост непосредственно в скрипте /etc/qemu-ifup
Documentation/Networking
Contents
Network Basics
There are two parts to networking within QEMU:
- the virtual network device that is provided to the guest (e.g. a PCI network card).
- the network backend that interacts with the emulated NIC (e.g. puts packets onto the host’s network).
There are a range of options for each part. By default QEMU will create a SLiRP user network backend and an appropriate virtual network device for the guest (eg an E1000 PCI card for most x86 PC guests), as if you had typed -net nic -net user on your command line.
Note — if you specify any networking options on the command line (via -net or -netdev) then QEMU will require you to provide options sufficient to define and connect up both parts. (Forgetting to specify the backend or the network device will give a warning message such as «Warning: netdev mynet0 has no peer», «Warning: hub 0 is not connected to host network» or «Warning: hub 0 with no nics»; the VM will then boot but will not have functioning networking.)
Note — if you are using the (default) SLiRP user networking, then ping (ICMP) will not work, though TCP and UDP will. Don’t try to use ping to test your QEMU network configuration!
Note — As this page is probably very brief or even incomplete you might find these pages rather useful:
- QEMU Networking on wikibooks.org, mainly dealing with Linux hosts
- QEMU Networking on bsdwiki, showing used networking principles and dealing with BSD hosts
Network Backends
How to create a network backend?
There are a number of network backends to choose from depending on your environment. Create a network backend like this:
The id option gives the name by which the virtual network device and the network backend are associated with each other. If you want multiple virtual network devices inside the guest they each need their own network backend. The name is used to distinguish backends from each other and must be used even when only one backend is specified.
Network backend types
In most cases, if you don’t have any specific networking requirements other than to be able to access to a web page from your guest, user networking (slirp) is a good choice. However, if you are looking to run any kind of network service or have your guest participate in a network in any meaningful way, tap is usually the best choice.
User Networking (SLIRP)
This is the default networking backend and generally is the easiest to use. It does not require root / Administrator privileges. It has the following limitations:
- there is a lot of overhead so the performance is poor
- in general, ICMP traffic does not work (so you cannot use ping within a guest)
- on Linux hosts, ping does work from within the guest, but it needs initial setup by root (once per host) — see the steps below
- the guest is not directly accessible from the host or the external network
User Networking is implemented using «slirp», which provides a full TCP/IP stack within QEMU and uses that stack to implement a virtual NAT’d network.
A typical (default) network is shown below.
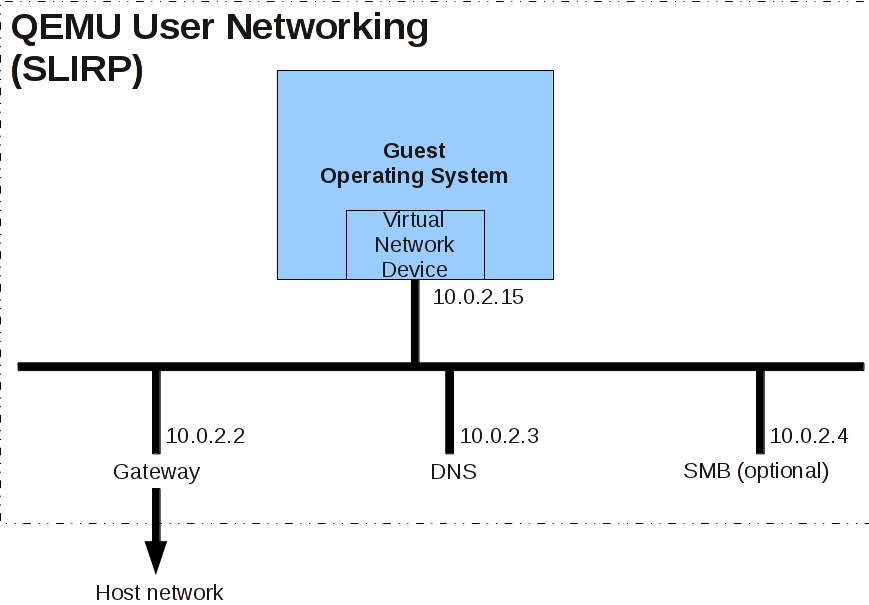
Note that from inside the guest, connecting to a port on the «gateway» IP address will connect to that port on the host; so for instance «ssh 10.0.2.2» will ssh from the guest to the host.
You can configure User Networking using the -netdev user command line option.
Adding the following to the qemu command line will change the network configuration to use 192.168.76.0/24 instead of the default (10.0.2.0/24) and will start guest DHCP allocation from 9 (instead of 15):
You can isolate the guest from the host (and broader network) using the restrict option. For example -netdev user,id=mynet0,restrict=y or -netdev type=user,id=mynet0,restrict=yes will restrict networking to just the guest and any virtual devices. This can be used to prevent software running inside the guest from phoning home while still providing a network inside the guest. You can selectively override this using hostfwd and guestfwd options.
Enabling ping in the guest, on Linux hosts
- Determine the main group ID (or one supplementary group ID) of the user that will run QEMU with slirp.
- In /etc/sysctl.conf (or whatever is appropriate for your host distro), make sure that the whitespace-separated, inclusive group ID range in the net.ipv4.ping_group_range sysctl includes the above group ID.
For example, as root,
- add a new group called unpriv_ping:
- set this group for a number of users as another supplementary group (note, they will have to re-login):
- then set both sides of the inclusive range in the above sysctl to the numeric ID of the new group:
Advanced user networking options
The -netdev user parameter has some more useful options:
- The DHCP address and name for the guest can be set with -netdev user,id=n0,host=addr,hostname=name
- You can specify the guest-visible virtual DNS server address with -netdev user,id=n0,dns=addr
- QEMU can simulate a TFTP server with -netdev user,id=n0,tftp=xxx,bootfile=yyy
- To share files between your guest and host, you can use -netdev user,id=n0,smb=dir,smbserver=addr
- To forward host ports to your guest, use -netdev user,id=n0,hostfwd=hostip:hostport-guestip:guestport
For details, please see the QEMU documentation.
The tap networking backend makes use of a tap networking device in the host. It offers very good performance and can be configured to create virtually any type of network topology. Unfortunately, it requires configuration of that network topology in the host which tends to be different depending on the operating system you are using. Generally speaking, it also requires that you have root privileges.
The VDE networking backend uses the Virtual Distributed Ethernet infrastructure to network guests. Unless you specifically know that you want to use VDE, it is probably not the right backend to use.
Socket
The socket networking backend allows you to create a network of guests that can see each other. It’s primarily useful in extending the network created by the SLIRP backend to multiple virtual machines. In general, if you want to have multiple guests communicate, the tap backend is a better choice unless you do not have root access to the host environment.
Virtual Network Devices
How to create a virtual network device?
The virtual network device that you choose depends on your needs and the guest environment (i.e. the hardware that you are emulating). For example, if you are emulating a particular embedded board, then you should use the virtual network device that comes with embedded board’s configuration. Such on-board NICs can be configured with the -nic option of QEMU. See the corresponding section below for details.
On machines that have a PCI bus (or any other pluggable bus system), there are a wider range of options. For example, the e1000 is the default network adapter on some machines in QEMU. Other older guests might require the rtl8139 network adapter. For modern guests, the virtio-net (para-virtualised) network adapter should be used instead since it has the best performance, but it requires special guest driver support which might not be available on very old operating systems.
Use the -device option to add a particular virtual network device to your virtual machine:
The netdev is the name of a previously defined -netdev. The virtual network device will be associated with this network backend.
Note that there are other device options to select alternative devices, or to change some aspect of the device. For example, you want something like: -device DEVNAME,netdev=NET-ID,mac=MACADDR,DEV-OPTS, where DEVNAME is the device (e.g. i82559c for an Intel i82559C Ethernet device), NET_ID is the network identifier to attach the device to (see discussion of -netdev below), MACADDR is the MAC address for the device, and DEV-OPTS are any additional device options that you may wish to pass (e.g. bus=PCI-BUS,addr=DEVFN to control the PCI device address), if supported by the device.
Use -device help to get a list of the devices (including network devices) you can add using the -device option for a particular guest.
The -nic option
In case you don’t care about configuring every detail of a NIC, you can also create a NIC together with a host backend by using the -nic parameter. For example, you can replace
Use -nic model=help to get a list of the supported NIC models.
If you don’t care about the NIC model, you can also omit that option. So the shortest way to get a tap device is for example simply:
The NIC option should also be use to configure NICs on embedded systems (which can not be used via -device). For example, to connect such an on-board NIC to the tap backend and change its MAC-address, you can use the -nic option like this:
Network Monitoring
You can monitor the network configuration using info network and info usernet commands.
You can capture network traffic from within QEMU using the filter-dump object, like this:
Once you’ve shut down QEMU, you can examine the dump.dat file with tools like Wireshark. Please note that network traffic dumping can only work if QEMU has a chance to see the network packets, i.e. this does not work if you use virtio-net with vhost acceleration in the kernel.
Network HOWTOs
How to get SSH access to a guest
A simplest way is to forward a specific host port to guest port 22. It can be done via:
The first line creates a virtual e1000 network device, while the second line created one user typed backend, forwarding local port 5555 to guest port 22. Then we can do:
to have SSH access to guest after its network setup (don’t forget to turn off firewalls if there is any in the guest or host).
How to use tap with a wireless adapter on the host
How to disable network completely
If you don’t specify any network configuration options, then QEMU will create a SLiRP user network backend and an appropriate virtual network device for the guest (eg an E1000 PCI card for most x86 PC guests). If you don’t want any networking at all you can suppress this default with:
The more general option -nodefaults also suppresses the default networking configuration, as well as the creation of several other default devices.
Setting up taps on Linux
For Linux with iproute2 and tap/tun support, this can be configured as below, and assumes the reader has experience using iproute2 (at least ip-addr and ip-link). Take note of the host’s physical devices’ configuration, as the bridge created will become the new endpoint for the physical device. Note that this WILL cause the host’s networking on that physical device to go out, possibly requiring a reboot for remote systems!
At this point, the bridge works, but is not usable as it does not have an IP address. For reassigning the physical device’s addresses for the bridge to be usable:
This can be automated with a shell script to setup tap networking on remote hosts; as mentioned above, connection will be lost upon setting the physical device’s master to a bridge.
Please note that the newly-created tap device’s link may need to be set to UP via ip-link after a virtual machine has been started. Furthermore, as a bridge device basically acts as the new endpoint for a physical device, most normal networking commands, such as a DHCP client or packet sniffer, must be ran on the bridge instead of the physical device. Creating multiple bridges per interface is known (anecdotally) to be problematic; instead, create a tap for each virtual machine using a single bridge for each physical device to be used.
TODO LIST
- Use tap to let guests be visible on the host network for non-Linux.
- Pass QEMU a physical card rather than emulation/simulation.
The legacy -net option
QEMU previously used the -net nic option instead of -device DEVNAME and -net TYPE instead of -netdev TYPE. This is considered obsolete since QEMU 0.12, although it continues to work. The legacy syntax to create virtual network devices is:
You can use -net nic,model=? to get a list of valid network devices that you can pass to the -net nic option. Note that these model names might be different from the -device ? names and are therefore only useful if you are using the -net nic,model=MODEL syntax.
The obsolete -net syntax automatically created an emulated hub with ID 0 (used to be called a «VLAN» in older versions of QEMU, for virtual LAN) that forwards traffic from any device connected to it to every other device on the «VLAN». If you need more than one hub in recent versions of QEMU, you can do this with the «hubport» backend, e.g. by using -nic hubport,hubid=1.
Guest Hints
Linux
Should work using default network settings.
Mac OS 9
If having problems, open the TCP/IP control panel. Under «Connect via:» select Ethernet. Under «Configure» select «Using DHCP Server». Close the control panel. Wait a few seconds then try opening it again. The fields in the window should have been auto-populated.
Mac OS 10.2
Starting with QEMU 2.11, the SunGEM NIC can be used. Open the System Preferences, go to the Network pane. You should see a dialog box telling you it has found a new network interface card. Click the Ok button. Click the ‘Apply Now’ Button at the bottom of the window. The fields in the TCP/IP tab should populate.
Mac OS 10.4
Open System Preferences and go to the Network pane. Select the Ethernet Adapter from the «Show» drop down menu. From the TCP/IP tab, push the Apply Now button at the bottom. This will make the nic work.
Windows NT 4.0
Windows 2000, Windows XP, Windows 7
Windows will automatically detect and use the NIC.


