- Qemu Ubuntu Tutorial: Know how to install & setup virtual machines
- Qemu Ubuntu Tutorial: How to install via the command terminal
- Create VirtualMachine
- Virt Manager for Qemu
- Download QEMU
- Linux
- macOS
- Windows
- Source code
- Build instructions
- Version numbering
- Ubuntu Documentation
- What is QEMU ?
- Why use an emulator?
- Preparation of the QEMU virtual environment
- Installation of an operating system from ISO to the QEMU environment
- Installing QEMU in Windows
- Usage
Qemu Ubuntu Tutorial: Know how to install & setup virtual machines
In simple words, the Qemu is a software program which is free and open source; used to create virtual machines over the top of other Linux operating systems just like VirtualBox and VMware workstation player. Not only, the Linux but one can also install this software on Windows and MacOS to test different Linux distros. However, most of the Linux users prefer to use the VirtualBox because of its easy-to-use interface and a wide range of hardware compatibility. Although the VMware Workstation Player is available too for Linux, limited in terms of features as compared to VirtualBox. In such circumstances, there are a couple of well known opensource hardware virtualization software available with their own Linux operating system environment those can convert any bare metal machine into a full virtualization platform. We talk about such platforms in some other article.
Here in this Qemu Ubuntu tutorial article, we will see how to install and setup this open source machine emulator and virtualizer tool on Ubuntu.
We can run OSes and programs by executing the guest code directly on the host CPU using this software. It supports virtualization using the KVM kernel module in Linux. When using KVM, one can virtualize x86, server and embedded PowerPC, 64-bit POWER, S390, 32-bit and 64-bit ARM, and MIPS guests.
Qemu Ubuntu Tutorial: How to install via the command terminal
To install Qemu on Ubuntu run the following commands given below.
Note: We used Ubuntu 18.04 to install and create a Kernel based virtual machine but the commands given here are the same for the older versions such as Ubuntu 17.04, Ubuntu 16.04, Ubuntu 15.04… While the writing this tutorial the latest version of Qemu was 3.1.0.
- Go to Ubuntu
- Open the Command line terminal tool on Ubuntu. The shortcut is CTRL+ ALT+T.
- On the terminal run the below command:
- Install KVM package, the command is
- To check Qemu version use the below command
- For KVM version check
Sample output
Create VirtualMachine
After installing the Qemu on Ubuntu host system, its time to create virtual machines.
Create Virtual hard disk
The command to create virtual hard disk is
Note: In the above command the Puppy.vdi is the name of our virtual hard drive. You can name it as per your choice. The extension.VDI will create a Virtual DISK image format if you want you can replace it with .img (raw image format) .vhd, and .vmdk formats you do that too.
We can also use the Qemu default virtual hard disk formats which are .qcow2, .qed, .qcow and .cow.
So, if the same hard drive which we created above; need to be created in Qemu disk format then the command will be
10 G is the amount of space we want to allocate to the Virtual hard drive. Here we are installing Puppy Linux which doesn’t require a high amount of space at all, so we used 10 G (G stands for Giga Byte GB). However, in this tutorial, we are using the VDI disk format.
Boot from ISO image
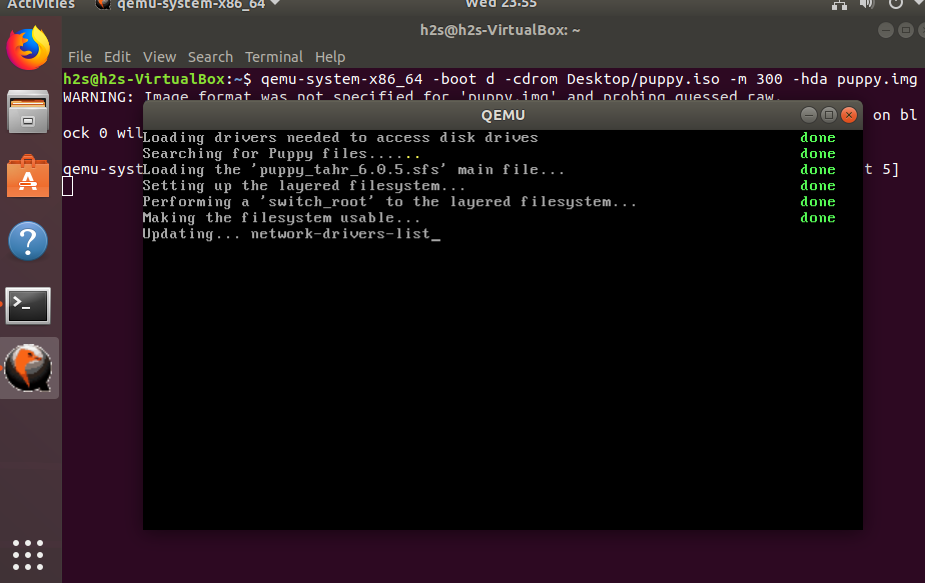
After creating the Virtual hard disk, let’s boot the ISO in Live environement. We are using OS type Linux i.e the Puppy Linux ISO image resided on the desktop of our Ubuntu.
In the above command, we used the ISO image that is on our desktop folder. In the same way, you have to mention the path of your ISO file in the command; rest of the command will remain the same. The -m indicated the amount of RAM assigned to guest OS from the host system, here it is 512 MB.
Running Qemu to install OS on Virtual hard drive
As soon as you run the above command, the guest Linux OS will start booting and can be tested in the live environment but for its installation, we need to attach virtual hard disk. So, for example, you also want to install the guest OS like Windows or any other Linux; then we have to tell the Qemu, hey! here is the drive. Just type the name of the Virtual disk you have created above
qemu-system-x86_64 -boot d -cdrom Desktop/puppy.iso -m 512 -hda Puppy.vdi
Boot Directly from CD ROM
Besides the ISO files, the user can also boot the OS directly from CD ROM:
qemu-system-x86_64 -boot d -cdrom /dev/cdrom -m 512
In the above command line, the Qemu will fetch the booting files from the CD-ROM disk drive.
Enable KVM or intel acceleration modules
To accelerate QEMU virtual machines, we can enable the KVM or Intel HAXM. So, to run VM faster use the instructions -accel kvm or -enable-kvm for KVM and -accel hax or -enable-hax for Intel HAXM.
For example:
qemu-system-x86_64 -boot d -cdrom /dev/cdrom -m 512 -enable-kvm
qemu-system-x86_64 -boot d -cdrom /dev/cdrom -m 512 -enable-hax
Boot from Virtual Hard drive
After the installation of the guest operating system, now if we want to boot our Virtual hard disk for further use or already have some VDI or VHD hard disk image then simply use it with the below command.
qemu-system-x86_64 -hda (path of the Virtual hard disk)
Qemu img convert
This command based virtualization tool not only can create VMs but also enables the users to convert the image formats. Here is the command for that
For example, we want to convert the ISO or qcow2 to IMG raw format the above command will use like this
Note: We have to give the complete path where the image resides and also where we want to save the converted one.
Virt Manager for Qemu
After going through the above command and the procedure for installing a virtual machine on QEMU; you might want to give up because of its complexity. But wait there is a simple and easy to use create VM method on this Virtualization Tool. It is by giving it a graphical user interface just like the Virtual Box. Hence, if you are a new user and want to save your self from writing the lengthy commands then run the below command to install the Virt Manager on Ubuntu.
Sample output for the above command:
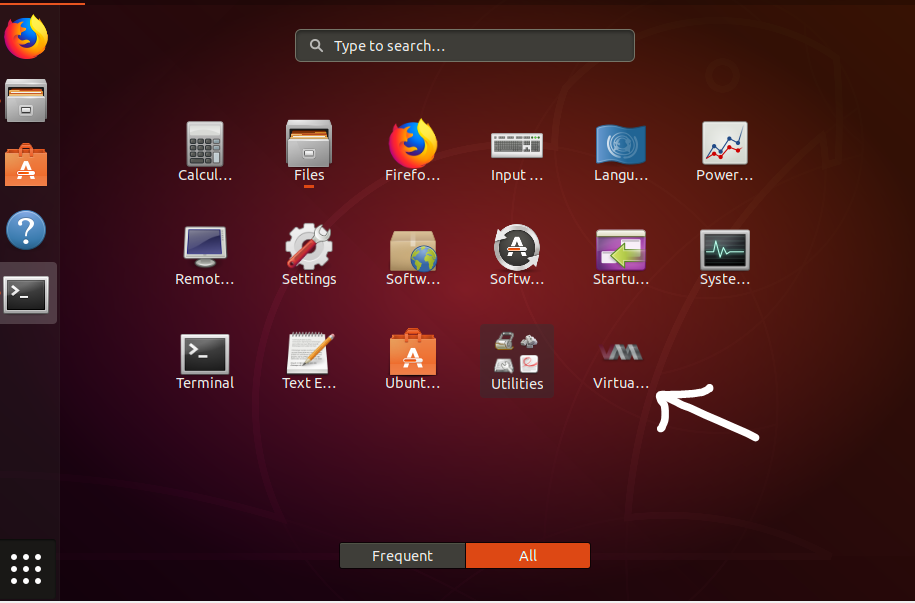
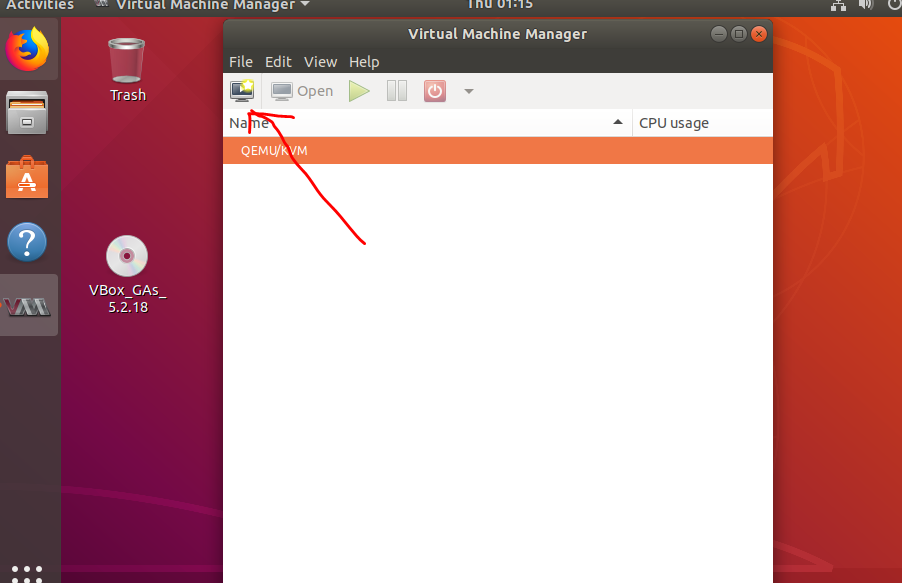
After running the above command you will see a Virtual Machine Manager tool called Virt on your Ubuntu system. To access the Virt Manager virtual machines, go to all applications and click on the Virt icon.
When the Virt Manager opened, Click on the first option from the left side given in the top menu. This option will give you a guided GUI for creating and setting up Virtual Machines. The process is the same as the VirtualBox.
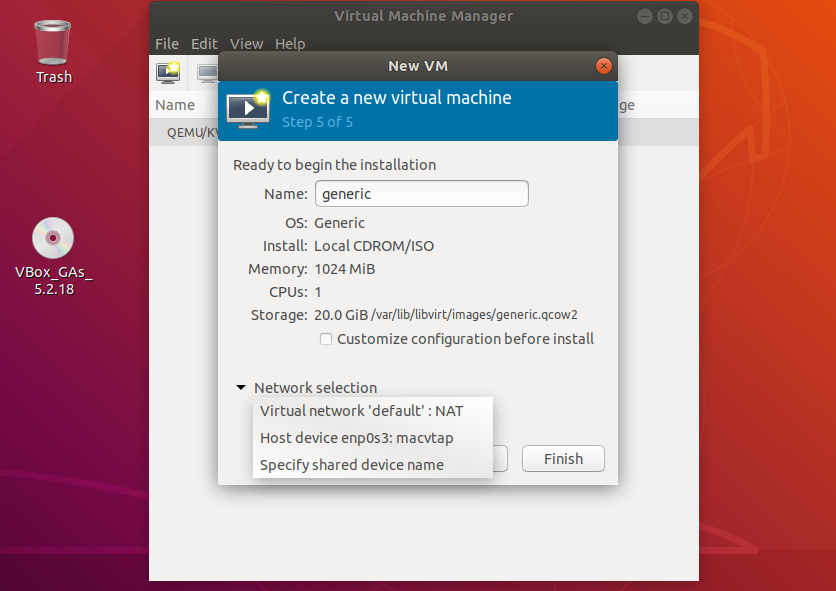
Then select the booting of medium to ISO image and then assign the RAM, number of CPUs, and virtual hard disk.

While creating the VMs on the Virt Virtual Manager for Qemu you will get a network selection option too from where we can select the Virtual Networks for our machines. By default, the Virtual network ‘default’ NAT is selected, leave it is as it is if you don’t have multiple connections. It is in the NAT that uses the host IP address range to share the internet connection.
So, in this way, we can use this Virtualbox alternative software not only on Ubuntu but also for other different Linux OSes for creating Virtual Machines. This Virtualization software has its own benefits over the VirtualBox such as faster speed as it directly uses the kernel module. Moreover, if you make your self acquainted with its commands then setting up VMs on the headless servers become a piece of cake. However, it supports almost every kind of operating system emulation but as compared to Linux for Windows guest OS it is a little bit slow. In such situations please enable the KVM or Intel HAXM accelerator modules. Also, the point to be noted, in the latest version KVM support has been dropped but the open source HAXM will still continue.
If you faced any problem with following this tutorial, please let us know the comment section is all yours!
Download QEMU
Linux
QEMU is packaged by most Linux distributions:
Arch: pacman -S qemu
Debian/Ubuntu: apt-get install qemu
Fedora: dnf install @virtualization
Gentoo: emerge —ask app-emulation/qemu
RHEL/CentOS: yum install qemu-kvm
SUSE: zypper install qemu
macOS
QEMU can be installed from Homebrew:
QEMU can be installed from MacPorts:
QEMU requires Mac OS X 10.5 or later, but it is recommended to use Mac OS X 10.7 or later.
Windows
Stefan Weil provides binaries and installers for both 32-bit and 64-bit Windows.
Source code
Grab the source code for the latest releases and compile it yourself! Detailed compilation instructions can be found in the wiki for Linux, Win32 and macOS.
- 6.0.0-rc3 Apr 14th 2021
signature — changes - 5.2.0 Dec 8th 2020
signature — changes - 5.1.0 Aug 11th 2020
signature — changes - 5.0.1 Sep 15th 2020
signature — changes
or stay on the bleeding edge with the git repository!
Build instructions
To download and build QEMU 6.0.0-rc3:
To download and build QEMU from git:
The latest development happens on the master branch. The stable trees are located in branches named stable-X.YY branch, where X.YY is the release version.
Version numbering
Since version 3.0.0, QEMU uses a time based version numbering scheme:
major incremented by 1 for the first release of the year minor reset to 0 with every major increment, otherwise incremented by 1 for each release from git master micro always 0 for releases from git master, incremented by 1 for each stable branch release
The implication of this is that changes in major version number do not have any bearing on the scope of changes included in the release. Non-backward compatible changes may be made in any master branch release, provided they have followed the deprecation policy which calls for warnings to be emitted for a minimum of two releases prior to the change.
Ubuntu Documentation
QEMU creates a virtual machine, similar to VMWare, Virtualbox, KVM, and Xen. It allows you to run one operating system from within another operating system. The operating systems can be the same ones, or different. Your memory resources will be divided between your native (host) OS and your virtual machine (guest) OS. You will therefore notice a decrease in performance of activities in both the host OS and the guest OS.
Therefore, if you plan to use QEMU only to create a Windows virtual environment in order to run Windows programs, consider using one of several free Linux SoftwareEquivalents instead. If you need to run only a single Windows program, also consider using Wine instead of QEMU. Running a virtual machine environment such as QEMU will slow down your computer noticeably.
Also consider trying a QEMU interface, such as Qemulator, or the package qemu-launcher.
Another QEMU GUI is virt-manager. It manages virtual machines not only for QEMU, but also for kvm and xen, in a consistent fashion (through libvirt).
What is QEMU ?
QEMU is a fast processor emulator. The package currently supports arm, powerpc, sparc and x86 emulation. By using dynamic translation it achieves reasonable speed, while being easy to port to new host CPUs. QEMU has two operating modes:
- User mode emulation: QEMU can launch individual Linux processes compiled for one CPU on another CPU.
- Full system emulation: QEMU can emulate a full system, including the processor and peripherals. This enables testing and debugging of system code in a contained (and quarantined) virtual system. It can even be used to host several virtual machines simultaneously on a single server (given enough host processor power and RAM).
As QEMU requires no host kernel patches to run, it is safe and easy to use.
Why use an emulator?
QEMU emulates everything, including the CPU, so it is slower than the host system. Hardware acceleration will not be as effective for a software OS emulator. Nevertheless, it is a pretty good way of testing a distribution, without having to repartition your drive or set up new hardware.
Preparation of the QEMU virtual environment
QEMU is available as a standard package in the Universe repository. (There are on how to install packages elsewhere in this guide. Unlike some other virtualization systems (like VMWare), separate kernel modules are not needed.
Download the Ubuntu ISO file you wish to install into a virtual QEMU environment.
Recent QEMU versions support networking out of the box. There is a «linux-test» add-on at QEMU’s site, a one-line script. Alternatively, run this command before starting the emulator: sudo /sbin/ip addr add 172.20.0.1/12 dev eth0
qemu-img create ubuntu-test 3G
The ‘qemu-img command (included in the QEMU package) creates a 3Gb image named ‘ubuntu-test’. (qemu-img also supports other compressed and VMWare compatible disk-image formats.)
Another way of creating such images is using the standard dd utility:
dd of=ubuntu-test bs=1024 seek=4194304 count=0
This will create a 4GB file named ubuntu-test to use as a disk. bs is the blocksize, seek is the number of bytes to skip from start of the file being created (a multiple of 1048576 (or 1024K) ). In this case the image would be 4GB. If you wish to get a number to create another size, multiply the number of GB desired by 1024^2 or 1048576. So , 10GB would be 10×1048576 = 10485760.
Installation of an operating system from ISO to the QEMU environment
We are ready to install the guest OS. Download, for example, the latest development version of Ubuntu. Assuming your ISO image is named ubuntu-6.10-desktop-i386.iso for example:
qemu -hda ubuntu-test -cdrom ubuntu-6.10-desktop-i386.iso -m 192 -boot d
- This command instructs QEMU to use hda as the empty disk file. It uses Ubuntu ISO file as if installing from the CDROM, and sets the amount of memory to use in the virtual machine to be 192Mb. It then instructs to boot from the CDROM.
A word of caution: giving too much memory to the virtual system will make your native host machine start swapping to disk, which will slow things down a lot. On the other hand, giving it too little memory will make the virtual machine start swapping, which will slow things down as well. Clearly, the more RAM you have, the better.
As the installer boots and goes through options, choose the defaults at each step. The installer should detect the virtual network properly and install without diificulties.
- At the end, it will try to reboot the machine, but this will fail.
- Exit the emulator (type «quit» in the emulator console), then rerun:
qemu -hda ubuntu-test -cdrom ubuntu-6.10-desktop-i386.iso -m 192
Note that the boot parameter is removed this time, so that it will boot ubuntu from the new virtual hard drive, not from the «cd».
- Follow the directions from the installer and create a user. The installer will then fetch updates and add additional packages. This may take between one and two hours, depending on your system configuration and options chosen.
- At one point, it will register all documentation for the help system.
- Graphics display and adapter setup is very easy; the only question is what video modes to support. Leave this at the defaults; the virtual video hardware may not support higher resolutions than those already set.
Installing QEMU in Windows
The reason to install QEMU in Windows is so that you can run an Ubuntu Server in a virtual machine. Such a virtual machine can be copied and moved.
At this time, it is best to download the source and then compile QEMU in Windows using these instructions. Once QEMU is running in Windows, usage is the same as in Linux.
Usage
First of all, running an OS on emulated hardware is not screamingly, insanely fast. Don’t expect to run anything demanding on this system, other than for testing purposes. That said, even on fairly underpowered hardware, it is certainly fast enough to test a distribution, perhaps install some packages, see how it all fits together.
This is also a good tool for increased security system management. QEMU can have a read-only disk image with a separate write-back file, so one use would be to test the installation of an intrusive packages (or test your own packages to make sure they don’t break the system) without actually touching your real system. If it turns out it breaks the system, just remove the write-back file and it never happened.
If you have a very fast network connection, you may want to remove the -cdrom parameter for future invocations of QEMU and comment out the line starting with deb cdrom: (insert a # sign at the beginning) from the command line:
sudo nano /etc/apt/sources.list
Installation/QemuEmulator (последним исправлял пользователь jengelh 2011-05-16 15:29:45)
The material on this wiki is available under a free license, see Copyright / License for details
You can contribute to this wiki, see Wiki Guide for details


