- Qt Documentation
- Contents
- Supported Configurations
- Requirements for Development Host
- Debian/Ubuntu (apt-get)
- Fedora/RHEL/CentOS (yum)
- openSUSE (zypper)
- Building Qt 5 from Source
- Deployment and Other Issues
- Where to Go from Here
- Offline Qt Downloads
- Qt6 Source Packages
- Qt 6.2.0 Source Packages:
- Older Qt Versions
- Qt 5.15.x Source Packages
- 5.12.x Offline Installers
- Qt Creator
- Pre-releases
- How to set up Qt Creator to cross compile for embedded Linux
- Contents
- Introduction
- Qt Licensing Information
- Install Qt Creator
- Qt For Device Creation
- Build and Deploy the Target Image
- Build the SDK for development
- Configure Qt Creator
- Build with OpenEmbedded Layers
- Build and Deploy the Target Image
- Build and Install the SDK for development
- Configure Qt Creator
- Boot to Qt for Embedded Linux
- Build and Deploy the Target Image
- Qt 4.8
- Install Qt Creator
- Build and Deploy the Target Image
- Build the SDK for development
- Install the SDK
- Configure Qt Creator
- Add the Target Device
- Add Kit
Qt Documentation
Contents
Qt’s support for different Linux platforms is extensive and mature.
To download and install Qt for Linux, follow the instructions on the Getting Started with Qt page.
Supported Configurations
The following configurations are supported.
| Distribution | Architecture | Compiler | Notes |
|---|---|---|---|
| openSUSE 15.1 | x86_64 | GCC 5 or later, GCC 7, ICC 19.1 | |
| SUSE Linux Enterprise Server | x86_64 | GCC 5 or later, GCC 10 | |
| Red Hat Enterprise Linux 7.6 | x86_64 | GCC 5.3.1 via devtoolset-4 | |
| Ubuntu 18.04 | x86_64 | GCC 5 or later, GCC 9 | |
| Generic Linux | x86 and x86_64 | GCC (5 or later), ICC 18.x |
Requirements for Development Host
The Qt installers for Linux assume that a C++ compiler, debugger, make, and other development tools are provided by the host operating system. In addition, building graphical Qt applications requires OpenGL libraries and headers installed. Most Linux distributions do not install all of these by default, but setting up a development environment is still straightforward.
Use the following commands to install the basic requirements for building Qt applications:
Debian/Ubuntu (apt-get)
Fedora/RHEL/CentOS (yum)
openSUSE (zypper)
Building Qt 5 from Source
You can also build Qt 5 from the source package and configure it according to your target platform. The source packages are obtained from http://www.qt.io/download/.
Below, you will find more information about building Qt from source.
Deployment and Other Issues
The pages below covers specific issues and recommendations for creating Linux/X11 applications.
Where to Go from Here
We invite you to explore the rest of Qt. We prepared overviews which help you decide which APIs to use and our examples demonstrate how to use our API.
- Qt Overviews — list of topics about application development
- Examples and Tutorials — code samples and tutorials
- Qt Reference Pages — a listing of C++ and QML APIs
- Qt X11 Extras — provides additional APIs for X11
Qt’s vibrant and active community site, http://qt.io houses a wiki, a forum, and additional learning guides and presentations.
В© 2021 The Qt Company Ltd. Documentation contributions included herein are the copyrights of their respective owners. The documentation provided herein is licensed under the terms of the GNU Free Documentation License version 1.3 as published by the Free Software Foundation. Qt and respective logos are trademarks of The Qt Company Ltd. in Finland and/or other countries worldwide. All other trademarks are property of their respective owners.
Источник
Offline Qt Downloads
We recommend you use the Qt Online Installer for first time installations and the Qt Maintenance Tool for changes to a current install.
- Qt6 source packages
- 5.15.x source packages
- 5.12.x Offline Installers
- Qt Creator
- Other downloads
- Pre-releases
Qt6 Source Packages
Qt 6.2.0 Source Packages:
The source code is available:
- For Windows users as a single zip file (1.0 G) ( Info )
- For Linux/macOS users as a tar.xz file (636 MB) ( Info )
You can get split source packages from here. Or visit the repository at code.qt.io.
Older Qt Versions
All older versions of Qt are available in the archive .
Qt 5.15.x Source Packages
The source code is available:
- For Windows users as a single zip file (962 MB) ( Info )
- For Linux/macOS users as a tar.xz file (560 MB) ( Info )
You can get split source packages from here. Or visit the repository at code.qt.io.
5.12.x Offline Installers
Qt offline installer is a stand-alone binary package including Qt libraries and Qt Creator.
Source packages & Other releases
The source code is available:
- For Windows users as a single zip file (831 MB) ( Info )
- For Linux/macOS users as a tar.xz file (486 MB) ( Info )
You can get split source packages from here. Or visit the repository at code.qt.io.
Qt Creator
Qt Creator 5.0.2 is released and it is available via Qt online installer. If you need a standalone installer, please select the file according to your operating system from the list below to get the latest Qt Creator for your computer.
The source code is available as a zip (69 MB) ( Info ) or a tar.gz (55 MB) ( Info ). Or visit the repository at code.qt.io.
Be sure to check if Qt is supported on your platform and read the installation notes that are located in the Qt Documentation .
Please check the individual downloads for licensing information.
Pre-releases
Looking for Qt 6.2.0 RC? Source packages are here.
Источник
How to set up Qt Creator to cross compile for embedded Linux
Contents
Introduction
This article describes how to build and configure a Qt Creator development environment on Linux to cross compile Qt applications for OpenEmbedded based root file systems. Qt Creator itself can be taken from your distributions repository, or its installer downloaded at Qt website under open-source or commercial licenses.
If you starting with Qt, this article may not provide the best user experience, though it is a comprehensive source of information. For a developer-friendly experience you can either follow:
- Partner Demo Image — Qt for Device Creation — using a pre-built evaluation image provided by The Qt Company and available on the Toradex Easy Installer online feeds.
- Qt Debian Container for Torizon — consider using Torizon for a simplified user-experience.
Qt Licensing Information
Qt is a large framework with different licenses. Licenses also depend on which Qt version is used. Our partner, the Qt Company, can help you find the right license, therefore if you have questions consult the Qt Licensing page for details.
Note: Install the Partner Demo Image — Qt for Device Creation (Boot to Qt) for selected target modules using the Toradex Easy Installer.
Install Qt Creator
Qt Creator provides a complete Integrated Development Environment for application developers to create applications for multiple targets such as embedded systems, mobile devices, desktops. One can install Qt Creator from its installer or from your distribution repository. Choose your option from the tabs below:
To install Qt Creator from its installer, download it according to the chosen license. Make sure that you always have the latest release installed.
Run the installer:
Note: It might be necessary to change the installer file mode to executable.
The commercial license enables Qt For Device Creation which provides a set of ready-to-use tools for developing in Qt Creator IDE for embedded systems such as Yocto based Boot to Qt pre-built images and cross-compilation toolchains for a series of target devices (Apalis iMX8 and iMX6, Colibri iMX6 and iMX7). These components must be installed during Qt Creator installation.
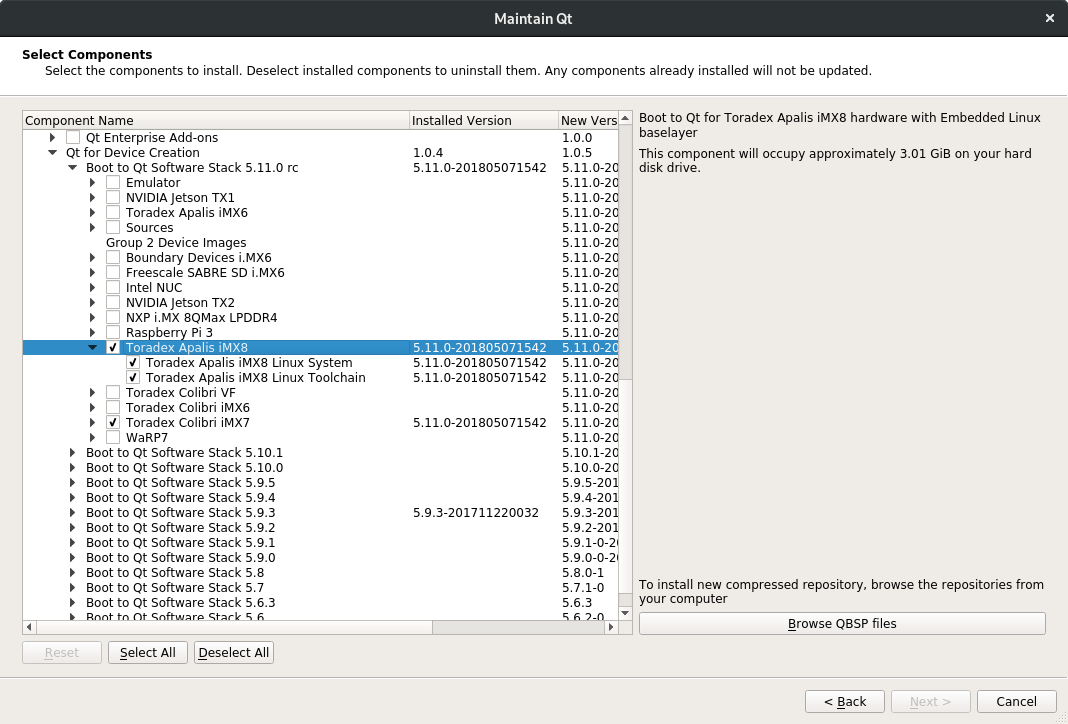
Installing Qt for Device Creation (click to enlarge)
For further information about Qt for Device Creation, refer to Partner Demo Image — Qt for Device Creation.
Ubuntu 18.04 provides Qt Creator 4.5.2, which is sufficiently recent for this how-to.
Attention: it is preferred that you always use the latest Qt Creator version, available in the tab Qt Creator Installer. Customers using Ubuntu 16.04 LTS have reported issues due to the old version of Qt Creator available from the distribution repository.
Visit the Qt Creator Manual for further information about the IDE and its features according to the given license.
Once Qt Creator is installed in the host machine, it is necessary to have a Qt-enabled target device image as well as a built Software Development Kit (SDK). At last, this SDK must be configured in Qt Creator in order to build and deploy applications in your target module.
In order to have a Qt enabled target device image and SDK, it is possible to go with one of the following options:
- Qt For Device Creation: a commercial offering that provides the Qt development framework for multiple embedded platforms.
- Build with OpenEmbedded Layers: build a customized image and toolchain based in OpenEmbedded layers and Toradex Linux BSP.
- Boot to Qt for Embedded Linux: build a customized image and toolchain based in Qt layers and Toradex Linux BSP.
Each one of the options has its steps described in the tabs below:
Qt For Device Creation
Build and Deploy the Target Image
For Qt 5, one can install a Boot to Qt pre-compiled evaluation image directly from Toradex Easy Installer. With the commercial license of Qt For Device Creation, you will also get access to the QBSP — the SDK ready-to-use with Qt Creator.
In case Toradex Easy Installer is not available for your module, get your image into an SD card in a couple of clicks going to the Qt Creator top bar option Tools → Flash Boot to Qt device.
Build the SDK for development
We need to have a full Qt toolchain, which provides besides cross GCC and GDB also the Qt headers to include and libraries to link against. With the commercial Qt For Device Creation, you can use the pre-compiled QBSP for evaluation.
Either if you are going to install the pre-compiled QBSP for evaluation, or if you already need to build your own custom QBSP with specific dependencies for your application, please refer to the Boot to Qt installation guides. The article Building Your Own Embedded Linux Image may be particularly useful, especially after the evaluation phase when you must build your own QBSP.
Configure Qt Creator
The QBSP makes it very easy to configure Qt Creator. Read the Qt for Device Creation Installation Guides. For setting-up the pre-compiled QBSP there are two options:
- If you have a Boot to Qt reference target device, you just need to tick a box on the Qt Creator installation (or using the Maintenance Tool), as explained on the Toradex Apalis iMX6 Guide.
- If you have other embedded target hardware, you can download a QBSP from your account on https://account.qt.io/downloads and then use the Maintenance Tool to install it, as explained in the Toradex Colibri iMX6, iMX6ULL and iMX7 Guide.
Build with OpenEmbedded Layers
Build and Deploy the Target Image
For BSP 5, our Reference Images for Yocto Project, more specifically the Multimedia Reference Image, comes with all the Qt5 packages included in packagegroup-tdx-qt5.bb. You can tweak this image to add or remove packages, including Qt5 packages.
For evaluation, you can install the pre-built image from our Toradex Easy Installer feeds. But do notice that we don’t provide a pre-built QBSP/SDK for this image, you have to build it by yourself.
Refer to the article Build a Reference Image with Yocto Project to learn how to build and customize the Multimedia Reference Image, and generate an SDK for it.
For BSP 2.8 and newer (at least until BSP 5), meta-qt5 is already included by deafult:
One can build the following image target that contains all Qt5 Packages for BSP 2.8:
- angstrom-qt5-x11-image: for Qt 5 X11 image without desktop
Starting with V2.6 meta-qt5 is part of the layers that get set up and the manual cloning and change to bblayers.conf are no longer needed.
Add the layer to «/oe-core/build/conf/bblayers.conf».
Add Qt5 packages to other image targets
For BSP 5, please use the Multimedia Reference Image as the base for customization, as explained the previous section.
To build a Qt 5.9 enabled image using BSP V2.8, it is required to add minimal set packages to your
The qtbase package has important PACKAGECONFIG options. As an example, if you desire to add QSQLITE driver to your image, it is required to configure this PACKAGECONFIG option accordingly in your local.conf:
Also, you can search Qt 5 packages using the OpenEmbedded recipes index or by searching the layers directory of your build environment. An example is provided to search for the QtSerialPort package:
Add it along with the other Qt packages in your local.conf
To include all Qt 5.9 packages using BSP V2.8:
For images starting with BSP V2.7 Qt 5.7, add the following packages Note: If you need fonts make sure fonts are installed and qtbase is compiled with PACKAGECONFIG fontconfig so they get found.
For earlier BSP versions, add the following packages:
Other Qt 5 enabled image configurations
For using framebuffer with EGLFS (only supported on iMX6) and building an image without the X11 and LXDE desktop environment, use the console-tdx-image target and add the following to the «build/conf/local.conf» in addition to the above:
Attention: Every time one changes the DISTRO_FEATURES, one has to remove all build output and sstate cache, in our setup remove the directories build/out* build/sstate-cache or build/tmp* build/sstate-cache deploy, if present from any previous build.
After changing your local.conf you may now build either of the following image targets for respective feature set:
- angstrom-lxde-image: for Qt 5 X11 included in our regular Angstrom LXDE desktop environment image
- console-tdx-image: for Qt 5 with framebuffer EGLFS without X11 included in our regular console image
This can take several hours. When the build finishes, the image files will be located at «/oe-core/deploy/images/».
Note: For more information concerning how to install your newly built image onto the target have a look at one of the following articles.
Build and Install the SDK for development
You may find it useful to read the Toradex article Build a Reference Image with Yocto Project and The Qt Company article Building Your Own Embedded Linux Image.
Configure Qt Creator
It is recommended that you build a QBSP and and install it as described in the Qt For Device Creation section from this article. If you only build a regular SDK with OpenEmbedded/Yocto, then you may find some tips the legacy information below, though it is not guaranteed to work:
Before starting Qt Creator, we have to export some build environment variables. Qt uses special configuration files to describe the built environment called mkspecs (they specify which compiler, linker, or other tools to use). However, this configuration files still need to know where the compiler (or cross-compiler in our case) is located. The SDK created a script that does all the hard work.
Using the SDK built with OpenEmbedded layers, source the script to export the environment variables as follows:
Warning: It is required to source the script to export the environment variables every time in the same terminal session you run Qt Creator.
The environment variable OE_QMAKE_CXX should then show something along this line:
Now, start Qt Creator in the shell where you sourced the script.
Using Qt Creator installed directly from the repository:
For Qt Creator installed from its installer, go to the installation path and run the qtcreator.sh script:
Note: It is recommended to source the script that exports the environment variables in qtcreator.sh script.
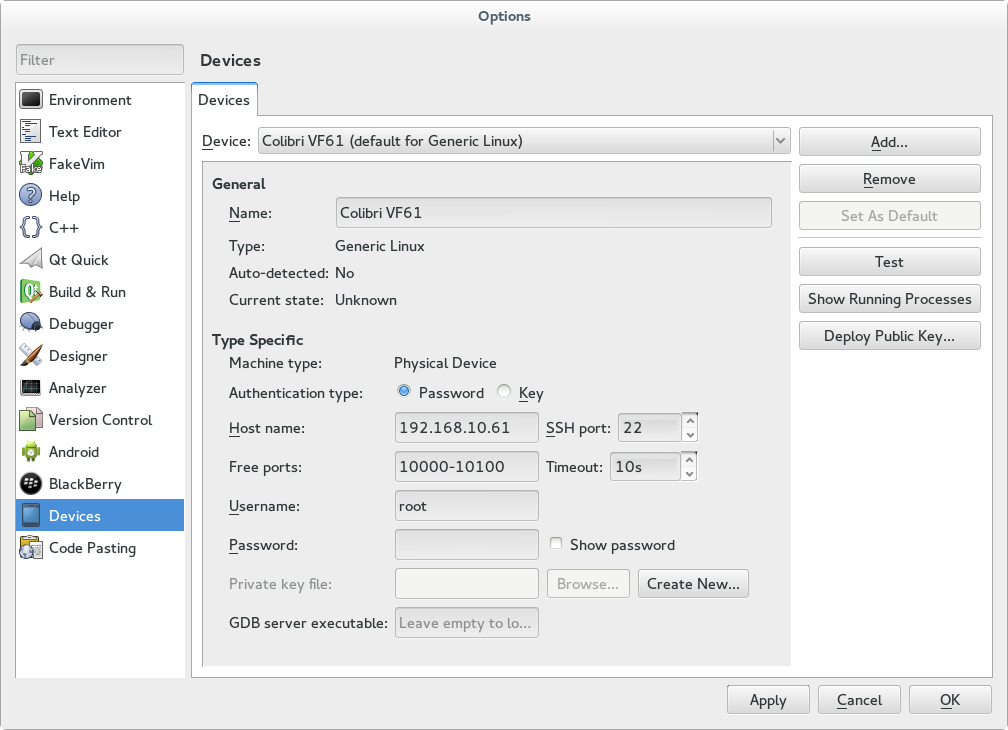
Add the Target Device
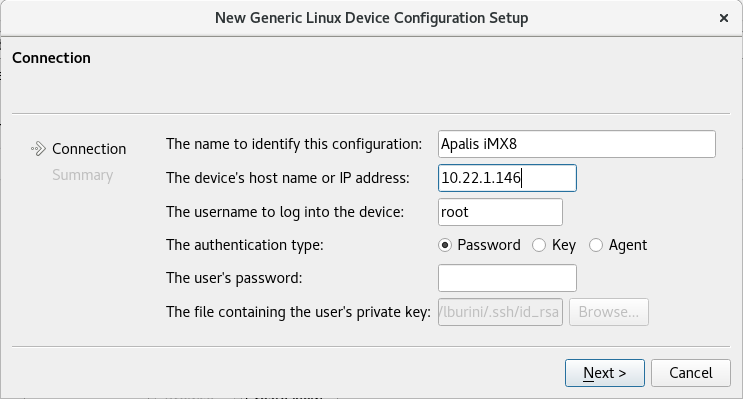
Go to Tools → Options. In the left panel, click on Devices and add a new device representing the target Apalis Module:
- Press Add and choose Generic Linux Device
- Specifiy a name (e.g. Apalis iMX8)
- Fill in the device’s IP address
- Authentication on our modules by default: Password, User »root», empty password

Qt Creator — Devices
Add Kit
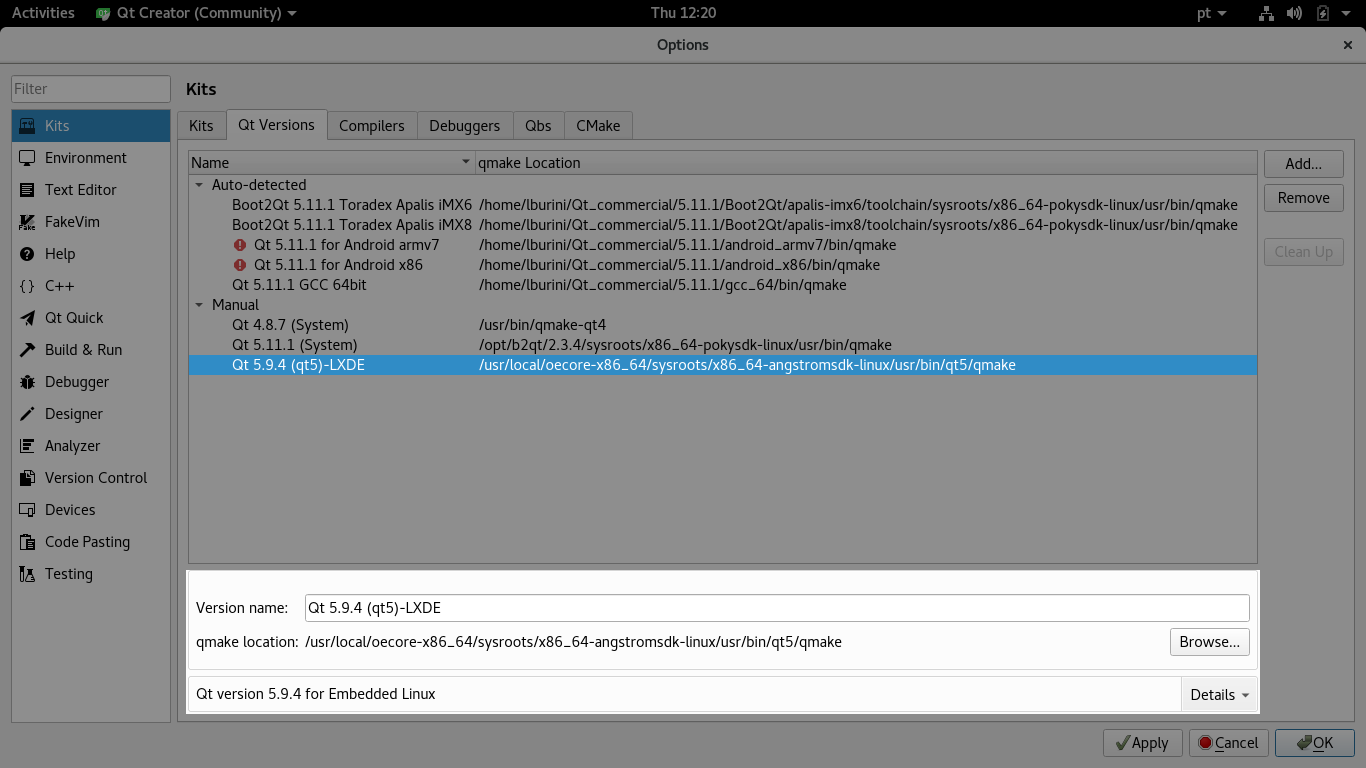
In the left panel, click on Kits and configure in the following tabs:
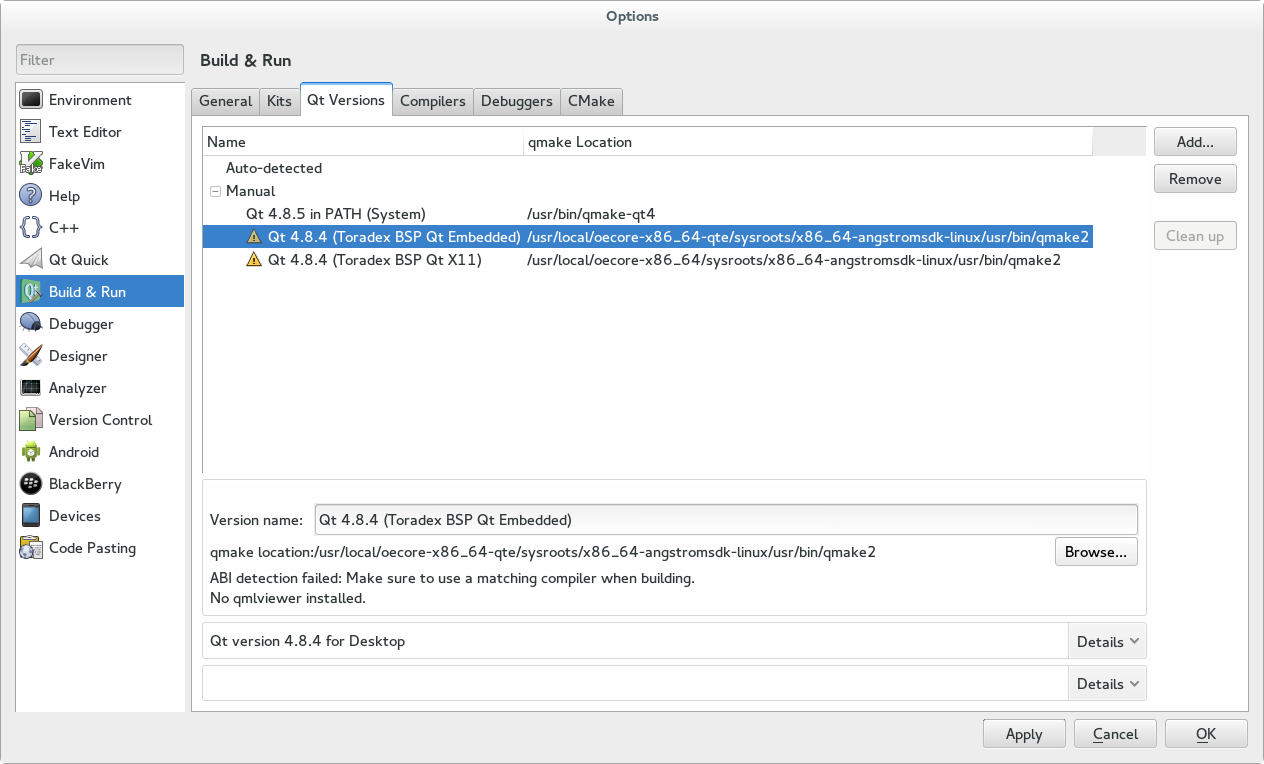
- Qt Versions:
- Press Add
- Choose /usr/local/oecore-x86_64/sysroots/x86_64-angstromsdk-linux/usr/bin/qt5/qmake
- Fill in a name
-
Qt Creator — Qt Versions
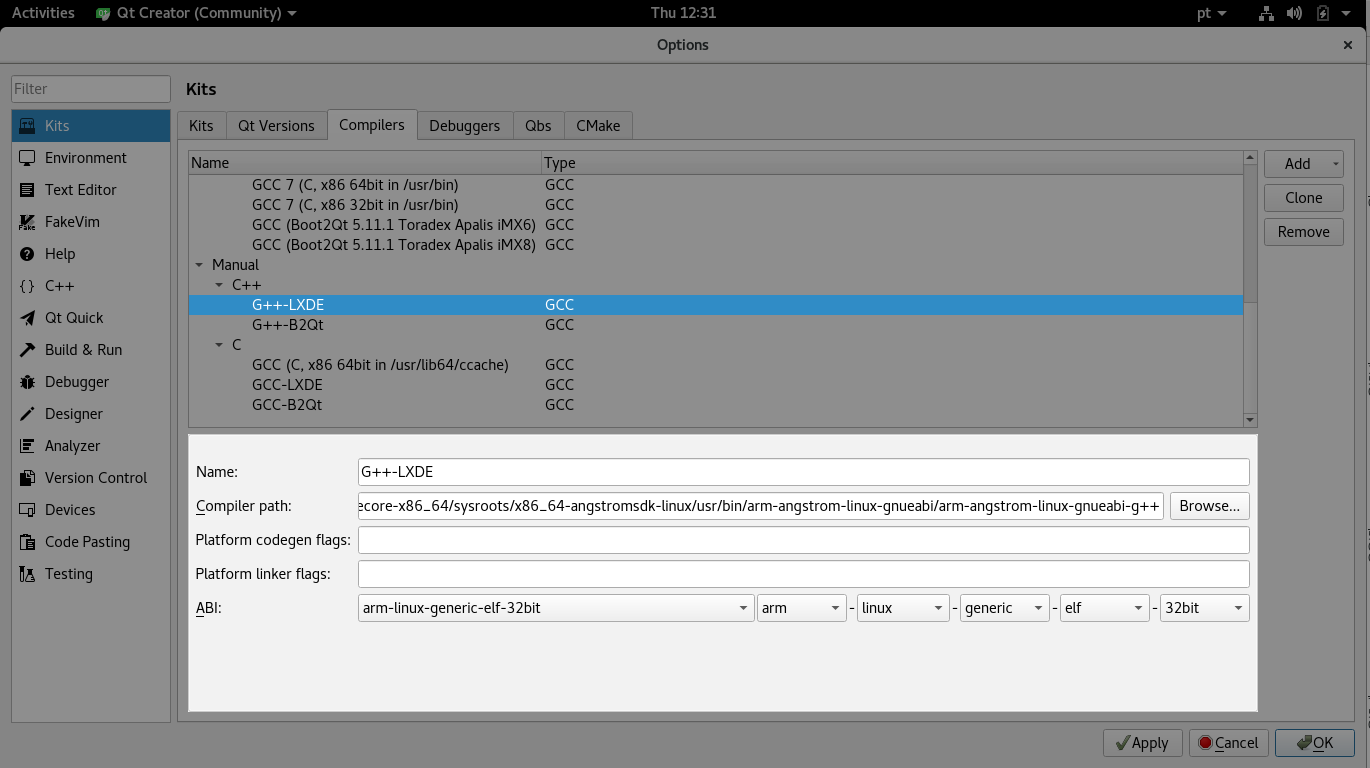
- Compilers:
- Press Add → Gcc→C++
- Name: G++-LXDE
- Compiler path: /usr/local/oecore-x86_64/sysroots/x86_64-angstromsdk-linux/usr/bin/arm-angstrom-linux-gnueabi/arm-angstrom-linux-gnueabi-g++
- ABI (should be detected automatically): arm-linux-generic-elf-32bit
-
Qt Creator — Compilers
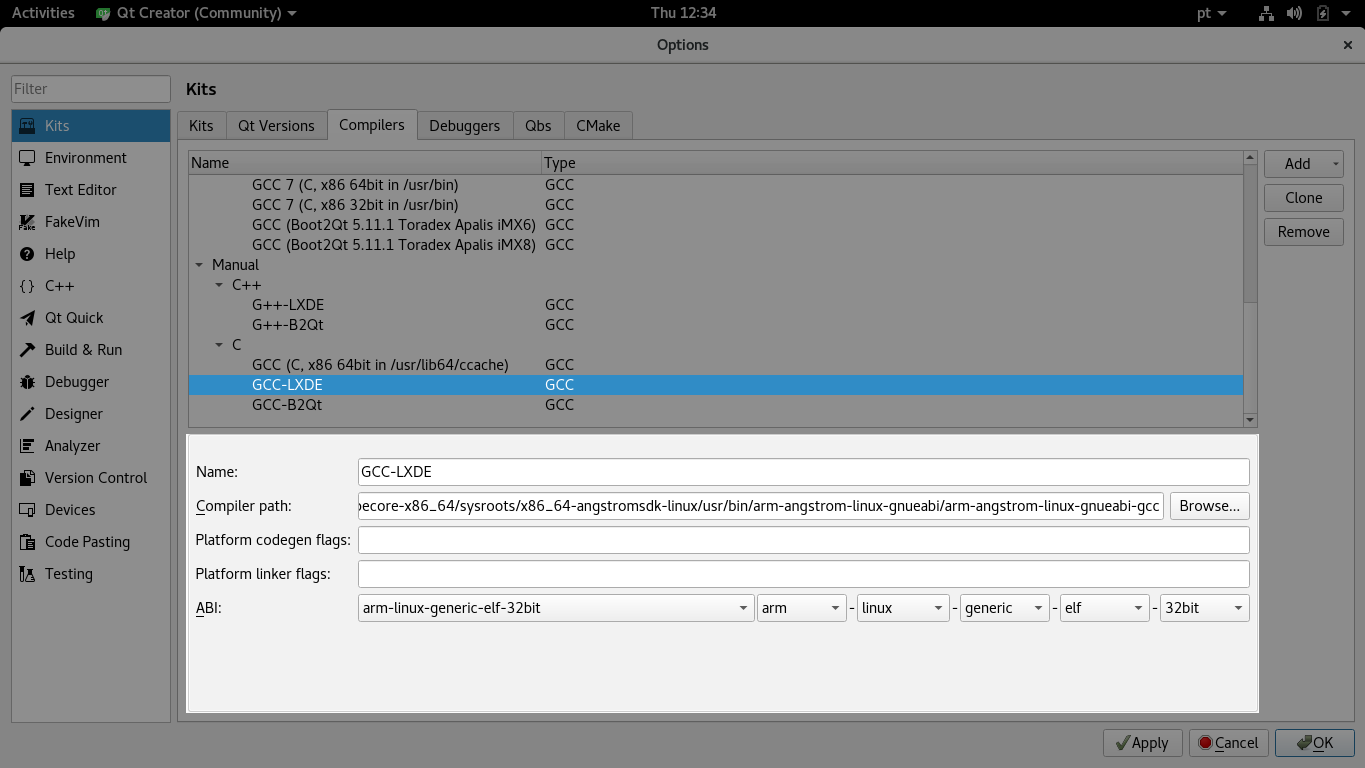
- Press Add → Gcc→C
- Name: GCC-LXDE
- Compiler path: /usr/local/oecore-x86_64/sysroots/x86_64-angstromsdk-linux/usr/bin/arm-angstrom-linux-gnueabi/arm-angstrom-linux-gnueabi-gcc
- ABI (should be detected automatically): arm-linux-generic-elf-32bit
-
Qt Creator — Compilers
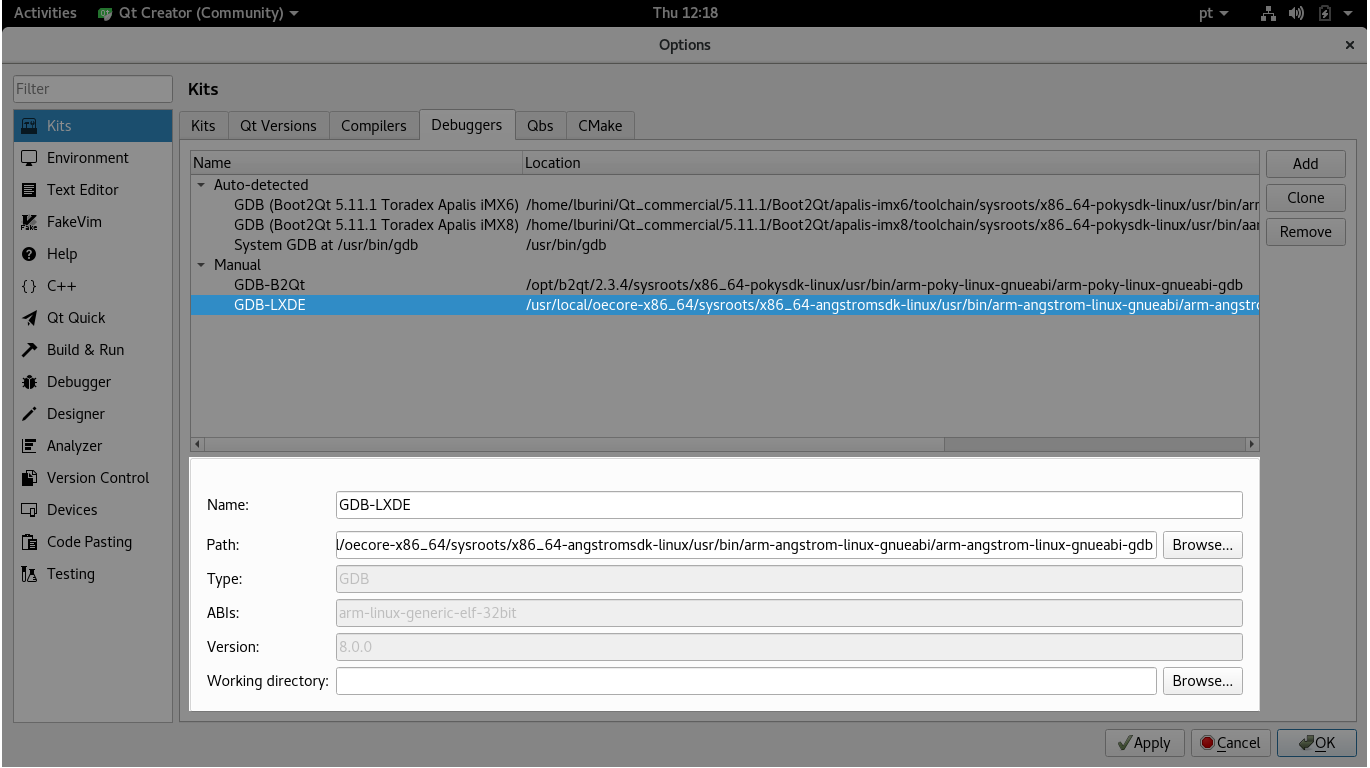
- Debuggers:
- Press Add
- Name: GDB-LXDE
- Path: /usr/local/oecore-x86_64/sysroots/x86_64-angstromsdk-linux/usr/bin/arm-angstrom-linux-gnueabi/arm-angstrom-linux-gnueabi-gdb
-
Qt Creator — Debugger
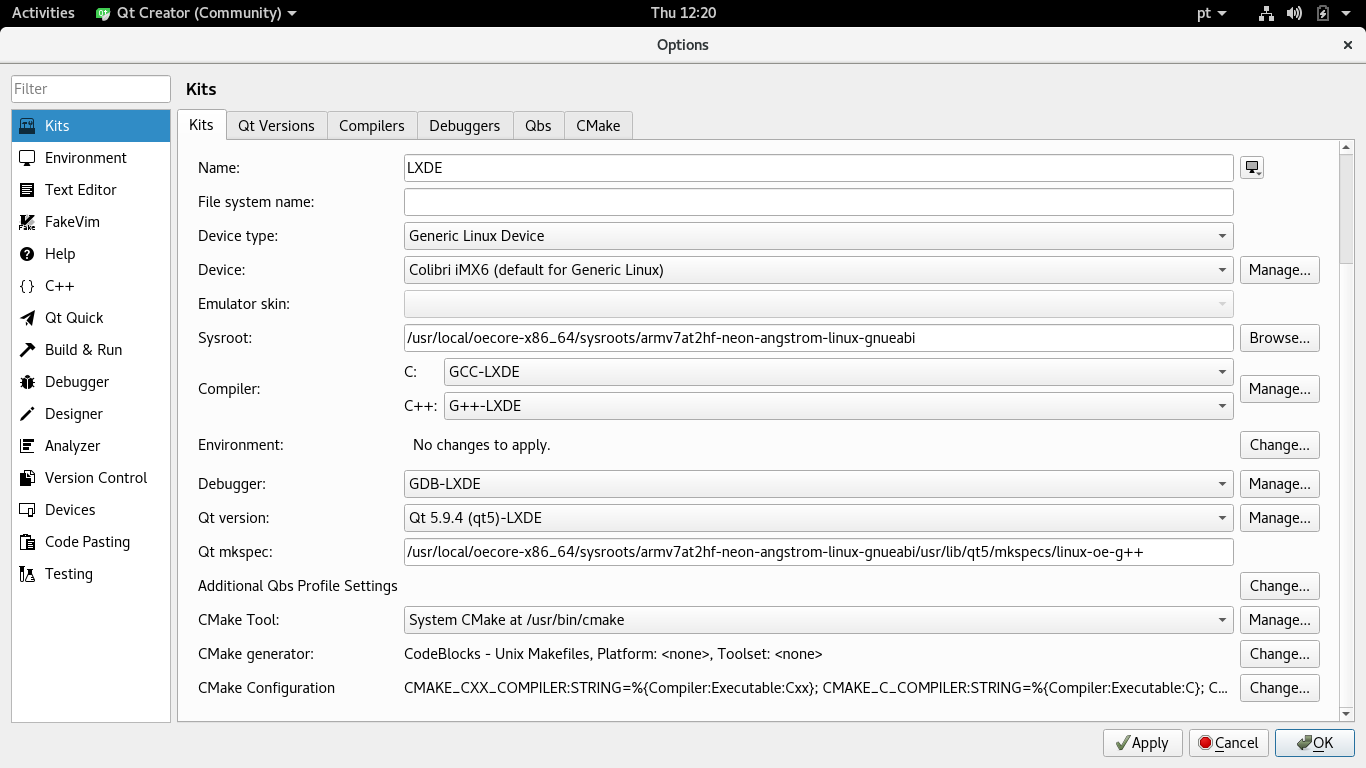
- Kit
- Press Add
- Name: Toradex Qt Embedded
- Device: Apalis iMX8
- Sysroot: /usr/local/oecore-x86_64/sysroots/armv7at2hf-neon-angstrom-linux-gnueabi/
- Compiler: G++-LXDE
- Compiler: GCC-LXDE
- Debugger: GDB-LXDE
- Qt version: Qt 5.9.4 (LXDE)
- Qt mkspec: /usr/local/oecore-x86_64/sysroots/armv7at2hf-neon-angstrom-linux-gnueabi/usr/lib/qt5/mkspecs/linux-oe-g++
-
Qt Creator — Kit
Now one can create a new project using the new Kit. Qt Creator automatically configures build configurations for the cross compiling Kit.
To make sure that the binaries get deployed to the root home folder, add the following to your .pro file:
If you have an existing project, you can configure Build & Run Configurations under the Project tab on the left side. Go to Add Kit, we can now use the newly created Kit LXDE.
Boot to Qt for Embedded Linux
Warning: Boot to Qt for Embedded Linux is not maintained nor supported by Toradex. You can post your question in the Qt Forum, or contact The Qt Company support if using a commercial license.
Build and Deploy the Target Image
For Qt 5, one can install a Boot to Qt evaluation image directly from Toradex Easy Installer. Read the article Partner Demo Image — Qt for Device Creation (Boot to Qt) to learn more.
To build a custom Boot to Qt image, it is necessary to setup an environment on your host PC to build images with the Yocto Project-based on Toradex BSP and Boot to Qt for embedded Linux.
Please refer to Build Your Own Embedded Linux Image article to solve the dependencies associated to the environment and complete this setup according to your host operating system.
Qt 4.8
Note: this section is limited up to the BSP 2.8. Qt 4 is not integrated with BSP 3 onwards, nor instructions on how to do it are provided.
Install Qt Creator
Using Ubuntu
Current long-term release (Ubuntu 18.04) provides Qt Creator 4.5.2, which is sufficient recent for this how-to.
Using Fedora
Build and Deploy the Target Image
On the target module, you will need the Qt runtime environment installed. Therefore a new image with the Qt run-time libraries to allow executing Qt applications on the target is required. This step is mandatory!
To build a Qt 4.8 enabled image, it is necessary to set up an environment on your host PC to build images with Yocto Project based on the OpenEmbedded layers and Toradex BSP. Please refer to the OpenEmbedded (core) article to solve the dependencies associated with the environment and complete this setup according to your host operating system.
There are two target images with Qt 4.8 packages available — angstrom-qt-x11-image : for Qt X11 image (recommended for Tegra and i.MX6 based modules) — qt4e-demo-image: for Qt Embedded image (recommended for VFxx)
To build them, run
Build the SDK for development
Note: See also Linux SDKs
In order to compile the required libraries, a full OpenEmbedded build environment need to be in place at first (see the Build and Deploy the Target Image for Qt).
We need to have a full Qt toolchain, which provides beside cross GCC and GDB also the Qt headers to include and libraries to link against.
The Qt 4.8 Embedded is still useful for devices without any graphical acceleration or with drivers providing this also to users relying on the frame buffer device. With the modules based on T20/T30 the drivers for hardware-accelerated 3D and video decoding are only available for an X11 system, so you probably want to use Qt on X11.
Install the SDK
Install the Qt toolchain on your development computer (replace x86_64 with i686 if you use a 32-bit machine):
Configure Qt Creator
Before starting Qt Creator, we have to export some build environment variables. Qt uses special configuration files to describe the built environment called mkspecs (they specify which compiler, linker, or other tools to use). However, this configuration files still need to know where the compiler (or cross-compiler in our case) is located. The SDK created a script that does all the hard work.
Using the SDK built with OpenEmbedded layers, source the script as follows:
Warning: It is required to source the script to export the environment variables every time in the same terminal session you run Qt Creator
The environment variable OE_QMAKE_CXX should then show something along this line:
Now, start Qt Creator in the shell where you sourced the script.
Add the Target Device
Go to Tools → Options. In the left panel, click on Devices and add a new device representing the target Colibri Module:
- Press Add and choose Generic Linux Device
- Specifiy a name (e.g. Colibri VF61)
- Fill in the device’s IP address
- Authentication on our modules by default: Password, User »root», empty password
-
Qt Creator — Devices
Add Kit
In the left panel, click on Build & Run and configure in the following tabs:
- Qt Versions:
- Press Add
- Choose /usr/local/oecore-x86_64/sysroots/x86_64-angstromsdk-linux/usr/bin/qmake2
- Fill in a name
-
Qt Creator — Qt Versions
- Compilers:
- Press Add =>Gcc
- Name: GCC (Qt Embedded)
- Compiler path: /usr/local/oecore-x86_64/sysroots/x86_64-angstromsdk-linux/usr/bin/arm-angstrom-linux-gnueabi/arm-angstrom-linux-gnueabi-g++
- ABI (should be detected automatically): arm-linux-generic-elf-32bit
-
Qt Creator — Compilers
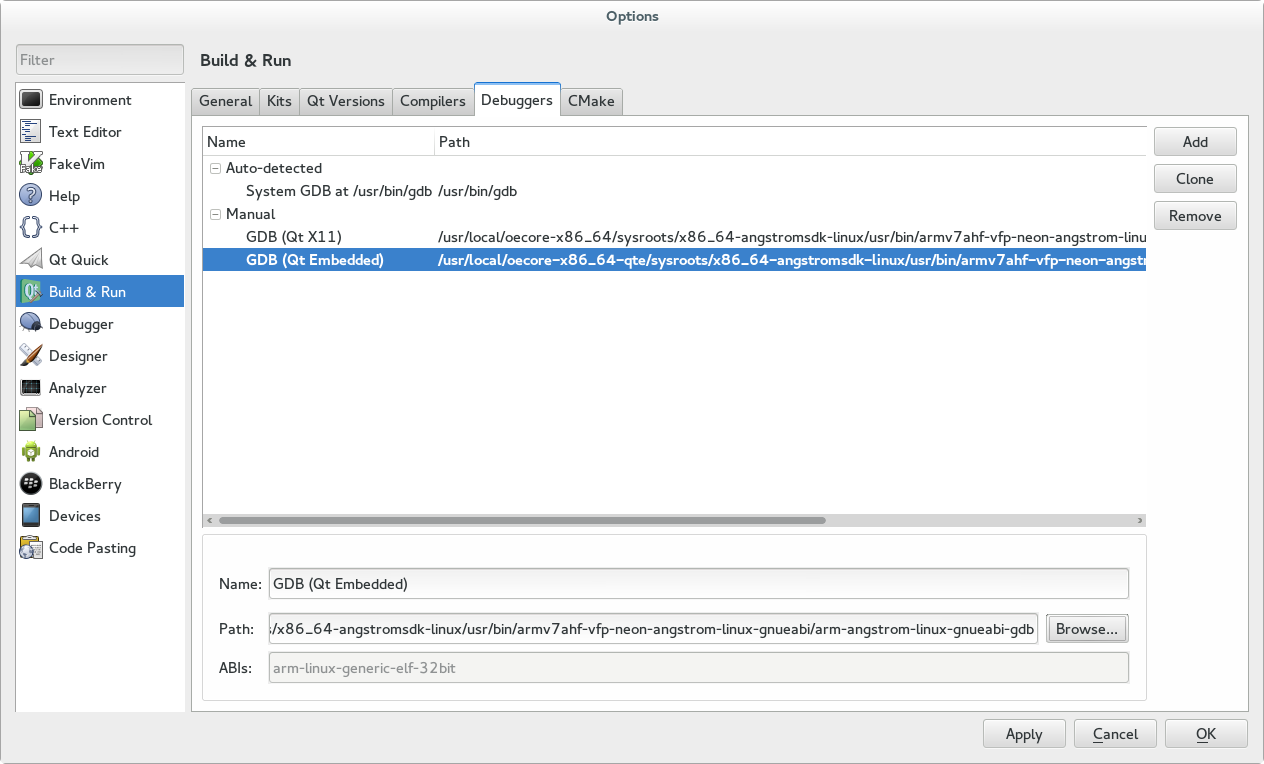
- Debuggers:
- Press Add
- Name: GDB (Qt Embedded)
- Path: /usr/local/oecore-x86_64/sysroots/x86_64-angstromsdk-linux/usr/bin/arm-angstrom-linux-gnueabi/arm-angstrom-linux-gnueabi-gdb
-
Qt Creator — Debuggers
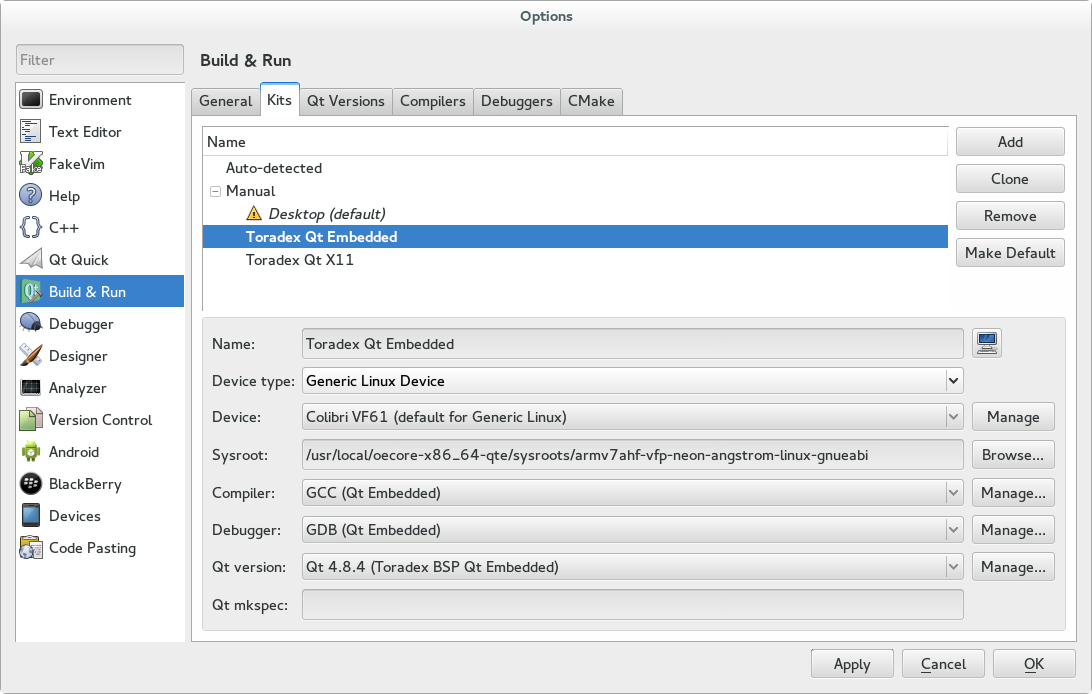
- Kit
- Press Add
- Name: Toradex Qt Embedded
- Device: Colibri VF61
- Sysroot: /usr/local/oecore-x86_64/sysroots/armv7at2hf-vfp-neon-angstrom-linux-gnueabi
- Compiler: GCC (Qt Embedded)
- Debugger: GDB (Qt Embedded)
- Qt version: Qt 4.8.6 (Toradex BSP Qt Embedded)
- Qt mkspec: leave empty
-
Qt Creator — Kits
Now one can create a new project using the new Kit. Qt Creator automatically configures build configurations for the cross-compiling Kit.
To make sure that the binaries get deployed to the root home folder, add the following to your .pro file:
If you have an existing project, you can configure Build & Run Configurations under the Project tab on the left side. Go to Add Kit, we can now use the newly created Kit Toradex Qt Embedded.
Note: When using Qt Embedded, you may want to switch to the «Run» configuration and add the argument «-qws» to the binary as standalone (instead of using the Qt for Embedded Linux server).
Источник
- Qt Versions:
- Press Add and choose Generic Linux Device
- Qt Versions: