- Download and Install Qualcomm HS-USB QDLoader 9008
- Latest Version of Qualcomm HS-USB QDLoader 9008 Driver
- How to install automatically install HS-USB QDLoader 9008?
- How to install manually install HS-USB QDLoader 9008 driver?
- Скачиваем и устанавливаем драйвер Qualcomm HS-USB QDLoader 9008
- Как загрузить драйвер Qualcomm
- Установка драйвера Qualcomm HS-USB QDLoader 9008 с помощью инсталлятора
- Ручная установка драйвера Qualcomm HS-USB
- Заключение
- Драйверы QualcommDrv и пошаговая инструкция по их установке
- Qualcomm USB Driver
- Qualcomm USB Driver Features
- Download Qualcomm Driver
- Manually Install Qualcomm Android USB Driver on Windows
- How to Update Qualcomm Driver
Download and Install Qualcomm HS-USB QDLoader 9008
One of the most important driver when flashing or restoring MIUI ROM is Qualcomm HS-USB QDLoader 9008. In post we’ll try to cover the installation process as detailed as possible as well as we will include all required download links.
Latest Version of Qualcomm HS-USB QDLoader 9008 Driver
As you already know the installed Qualcomm driver on your PC is required for identifying and then flashing your smartphone device. For example if you connect your Xiaomi device to PC and it isn’t identified, that basically means that your PC is missing the required driver.
The driver is available for different Windows OS versions including 7 & Windows 10.
There are two ways on how to install the Qualcomm HS-USB driver. First and easy way is to use the automatic installer and the second way is to install drivers manually. Let’s check both methods.
How to install automatically install HS-USB QDLoader 9008?
- Download archive with latest version of Qualcomm HS-USB QDLoader 9008 and unpack on your PC.
- QDLoaderHS_USB_Driver_64bit_Setup.exe
- QDLoaderHS_USB_Driver_32bit_Setup.exe
- You’ll find two different installers, one for 32bits and 64bits OS.
- Run the setup.
- If you’re using 32Bit OS, during setup select «Free Bld».
- Wait until installation is fully completed.
How to install manually install HS-USB QDLoader 9008 driver?
- Download the archive with required drivers.
- Download and install ADB & Fastboot drivers.
- Confirm on open. Press “Next” and wait until installation is completed.
- Enable USB debugging on your Android device.
- Open “Settings” > “Developer Settings” > “USB Debugging”.
- Connect your device via USB cable to PC.
- Now you need to boot your phone in EDL (Download mode).
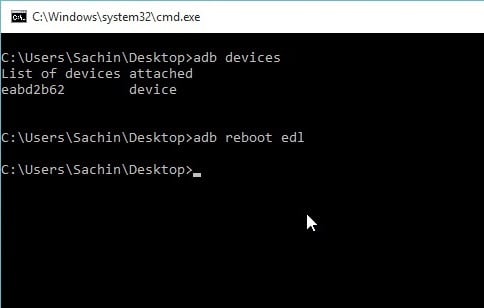
- Open terminal window as Administrator.
- And type the following commands one by one:
- adb devices
- adb reboot edl
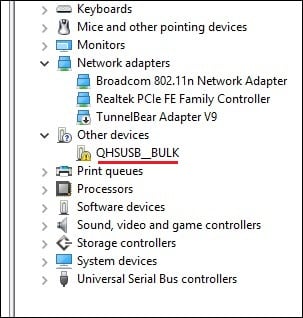
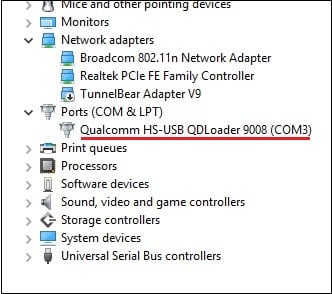
- Open “Device Manager” on your PC and look for “QHSUSB_BULK” unknown device.
- Right mouse click and select “Update Driver”.
- Select “Locate Drivers on this Device”.
- Now find the previously downloaded Qualcomm QDLoader driver package and select it.
- Confirm driver installation.
- If everything was done correctly you’ll see your device correctly identified in device manager.
After drivers are successfully installed you can proceed with further manipulations with your phone.
Скачиваем и устанавливаем драйвер Qualcomm HS-USB QDLoader 9008
Важным условием прошивки MIUI ROM или восстановления мобильного устройства из «кирпичного» состояния является наличие на ПК установленного драйвера Qualcomm HS-USB QDLoader 9008. Указанное условие актуально для устройств Андроид, работающих на чипсетах от Qualcomm брендов Samsung, LG, Oneplus, Motorola, Xiaomi и других. В данном материале мы разберём, откуда можно загрузить драйвер QDLoader 9008, и каковы особенности инсталляции данного драйвера.

Как загрузить драйвер Qualcomm
Как известно, наличие драйвера HS-USB QDLoader 9008 является важным условием идентификации и прошивки мобильных устройств. К примеру, без данного драйвера вы не сможете обнаружить и прошить на своём ПК гаджеты от Xiaomi на Qualcomm Flash Tool, QFIL и других аналогичных инструментах.
Сам же QDLoader 9008 являет собой драйвер, благодаря которому осуществляется подключение устройств на базе чипсетов Snapdragon к ПК.
На нынешний момент данный драйвер представлен в 32-битной и 64-битной версиях, и одинаково хорошо подходит для версий ОС Виндовс 7, 8/8.1 и 10.
Имеется два способа загрузки и установки данного драйвера. Первый – полуавтоматический, с запуском инсталлятора. Второй – в ручном режиме. Рассмотрим каждый из вариантов.
Установка драйвера Qualcomm HS-USB QDLoader 9008 с помощью инсталлятора
- В данном случае будет необходимо скачать архив с инсталлятором, и распаковать его содержимое помощью любого удобного архиватора.
- Внутри вы найдёте две версии инсталлятора драйвера: 32 и 64-битную.
- В зависимости от версии вашей ОС Виндовс (если не знаете какая у вас, тогда нажмите клавиши Win+Pause), запустите соответствующую версию инсталлятора.
- Выберите «Free Bld» (в случае 32-битной версии) — «Next» — «Install» и дождитесь завершения процесса установки.
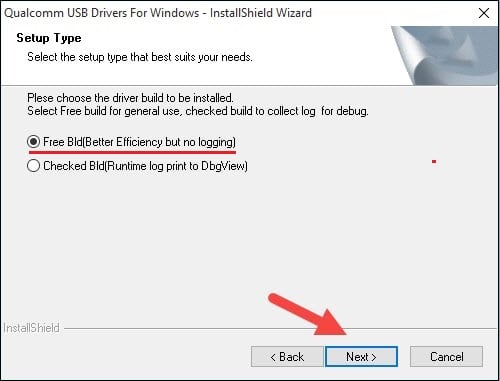
Выберите «FreeBld» и дождитесь окончания процедуры установки
Ручная установка драйвера Qualcomm HS-USB
В случае ручной установки драйвера Qualcomm выполните следующее:
- Скачайте и распакуйте данный архив с пакетом драйверов Qualcomm QDLoader;
- Загрузите и установите ADB и Fastboot driver. При запуске файла подтвердите установку, нажав на Y- Enter – Y – Y –Y. Откроется окно установки, нажмите на «Next», дождитесь завершения процедуры, после чего нажмите на «Finish»;
- Включите на вашем Андроид устройстве отладку по ЮСБ. Перейдите в Настройки, далее «Параметры разработчика», и активируйте опцию «Отладка USB»;
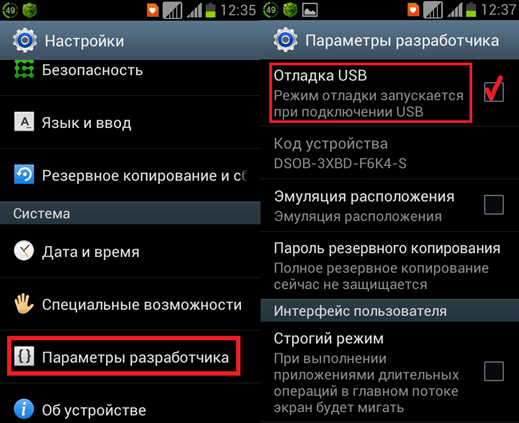
Активируйте опцию отладки по ЮСБ
- Запустите Диспетчер устройств (нажмите на Win+R, введите там devmgmt.msc и нажмите ввод). В ДУ вы увидите неопознанное устройство под именем «QHSUSB_BULK»;

- Наведите на него курсор, щёлкните ПКМ, выберите «Обновить драйвер»;
- В появившемся меню выберите «Выполнить поиск драйверов на этом компьютере»;
- Нажмите на кнопку «Обзор», и укажите путь к распакованному вами ранее пакету Qualcomm QDLoader (первый шаг в данной ручной установке). Затем нажмите на «ОК»;
- В случае запроса Виндовс, подтвердите установку драйверов в любом случае;
- Драйвера будут установлены в системе, и в Диспетчере устройств вы увидите корректное отображение устройства Qualcomm HS-USB в подразделе «Порты».
Заключение
В данном материале мы разобрали, где можно скачать драйвер Qualcomm HS-USB QDLoader 9008, и как корректно установить его в системе. Указанный драйвер подходит для всех версий современных ОС Виндовс, от 7 до 10, и с помощью инсталлятора может быть легко установлен на вашем ПК.
Драйверы QualcommDrv и пошаговая инструкция по их установке

Драйверы QualcommDrv и пошаговая инструкция по их установке.

1. Устанавливаем драйвера. Из архива QualcommDrv.zip
Распаковываем этот архив во временный каталог и получаем два каталога для 32-х битной и 64-х битной версий Windows.
Для 32-х битной версии Windows запускаем из каталога Allx86 файл dpinst32.exe. Для 64-х битной версии Windows запускаем из каталога Allx64 файл dpinst64.exe.
После запуска dpinstXX.exe получаем:

2. Подключаем включенный аппарат USB кабелем к компьютеру.
После обнаружения Windows новых USB устройств получаем. (Выберите устройство из списка устройств и по правой кнопке мыши выберите «Свойства» закладка «Сведения» из выпадающего меню «ИД Оборудования»)

Определилось одно устройство «Android ADB Interface» в сведениях о котором «ИД оборудования» указано на скриншоте выше.
3. Обновляем вручную драйвера для этого найденного устройства.
В свойствах этого устройства (Выберите устройство из списка и по правой кнопке мыши выберите «Свойства») на закладке «Драйвер» выбираем «Обновить» -> «Выполнить поиск драйверов на этом компьютере»

Выбираем «Выбрать драйвер из списка уже установленных драйверов».

Выбираем «Составное USB устройство»

После нажатия «Далее» Windows сменит драйвер и обнаружит новые устройства которые установятся автоматически. (Номера COM портов могут отличаться но наименования устройств будут такие как на скриншоте). Кроме того будут найдены драйверы для внешней SD карты, внутренней флеш памяти аппарата и виртуального CD диска с драйверами для аппарата.

В результате получите. (Номера COM портов могут быть другие)

4. В списке устройств Windows будет одно неопределенное устройство.
С идентификатором как на скриншоте. (Выберите устройство из списка устройств и по правой кнопке мыши выберите «Свойства», закладка «Сведения» из выпадающего меню «ИД Оборудования»).

Выберите его свойства и на закладке «Общие» выберите «Обновить драйвер. » в окне «Обновление драйверов» выберите «Выполнить поиск драйверов на этом компьютере»

Далее выберите «Выбрать драйвер из списка уже установленных драйверов» и кнопку «Далее»

В открывшемся списке типа устройств выберите «Переносные устройства»

Выберите изготовителя устройств «Microsoft» и модель устройства «Составное устройство WPD». Нажмите кнопку «Далее».

В возникшем окне предупреждения выберите «Да»

В результате последнее неопределенное устройство будет установлено нормально.

Состояние данного устройства (определено оно или нет) не влияет на работу компьютера с аппаратом.
Задача процедуры установки драйверов — установка драйвера для «Qualcomm HS-USB Diagnostics 9025» COM порта.
Если вы будете подключать аппарат к другому USB порту на компьютере — процедуру установки начиная с пункта 3 возможно будет необходимо повторить.
Если у вас процедуру установки не получается воспроизвести — попробуйте сменить USB порт к которому вы подключаете аппарат на компьютере или USB кабель который вы используете для подключения. Если вы устанавливали другие драйвера для аппарата возможен так же конфликт драйверов, попробуйте их удалить и повторить установку.
Драйвера из архива 100% обеспечивают нормальное подключение аппарата в любых режимах к компьютеру по USB и любые действия с аппаратом.
Список возможных режимов работы аппарата.
1) Нормальный режим (Normal mode).
Подключение к компьютеру включенного или выключенного аппарата.
2) Режим восстановления (Recovery mode).
Включение (кнопкой включения) предварительно выключенного аппарата при удержании нажатой кнопки увеличения громкости (Volume Up / Volume +).
3 ) Режим прошивки разделов через fastboot программу (Fastboot mode).
Включение предварительно выключенного аппарата при удержании нажатой кнопки уменьшения громкости (Volume Down / Volume -).
4) Режим прошивки утилитами прозводителя аппарата или QPST (Утилитами производителя платформы аппарата Qualcomm).
Выключенный аппарат подключается к компьютеру USB кабелем когда одновременно нажаты кнопки увеличения и уменьшения громкости (Volume Up + Volume Down).
Qualcomm USB Driver
Download Qualcomm USB Driver for Windows
Qualcomm USB Driver is a very useful tool when it comes to detecting your Qualcomm powered phone to a computer. Basically, It creates a bridge to communicate any Qualcomm smartphone to a computer or laptop. Here you can download Mediatek Driver’s latest official version for free of cost. So, If you have any Qualcomm powered Android smartphone or tablet and try to connect it to the computer, then the Qualcomm drivers will help you to fix the problem very quickly. Once, you will install Qualcomm USB Driver successfully then it will detect Qualcomm smartphone to the computer for MTP, Charging, File Transfer, flashing, and Firmware update. On this page, you can download Qualcomm USB All drivers including old and latest versions from here. So check below to download the Qualcomm Drivers for your PC.
Note: Qualcomm drivers compatible with all versions of Microsoft Windows 7, Windows 8, Windows 10 version (32 & 64bit).
Qualcomm USB Driver Features
General Connecting: Qualcomm driver allows connecting any Mediatek devices to the computer or laptop to transfer data between the device and the computer. Make sure, to install the USB driver and enable USB debugging mode on your phone before connecting.
Flash Stock Firmware: If your Qualcomm device stuck at the Boot logo or not turning on then you easily flash the stock firmware to fix your device. In this case, you need to install the MTK USB Driver to get detected your device to the Computer.
Repair IMEI: Sometimes Qualcomm USB VCOM and CDC driver unable to detect devices while writing IMEI using SN and MAUI meta IMEI writer tool. In this situation, Mediatek Drivers helps to get detected your device to the Computer.
Official Supports: Well, Universal Qualcomm drivers help all MTK devices to be detected by most of Qualcomm device repair applications on Windows PC, including all Qualcomm Flash Tool, Qualcomm Writer Tool, QPST Flash Tool.
Supported Software tools
These drivers are also compatible and supported all paid GSM box and dongle and other flashing and repair tools.
- Qualcomm Flash Tool
- Qualcomm Writer Tool
- Miracle Box
- MRT Key
- CM2 Qualcomm
- UMT Qualcomm
- Qualcomm FRP Tool
- Volcano Tool
- MCT Qualcomm Tool
- Piranha tool
- Infinity-Box and dongle
- Falcon Box
- Medusa Tool
- Qualcomm PC Suite
- Android Multi-Tool
Download Qualcomm Driver
Qualcomm USB Driver is fully compatible with all versions of Windows OS, including Windows XP, 7, 8 and also Windows 10 (32 or x64 bit architecture). In case if you are looking for the latest version of the Qualcomm Driver, then use the following below links to download it on your computer:
How to Install Qualcomm USB Driver
Here we share with you three different methods to install Qualcomm USB Drivers on any Windows 32 and 64bit PC. The first method is an automatic method by simply using the setup wizard. This is the safest way to Install Qualcomm Drivers on your PC.
Automatic Installation
- Download Qualcomm drivers according to your PC’s OS (32-bit or 64-bit).
- Open the downloaded folder and extract the file.

- Then open the folder and double click to run the Setup.exe.

- You will get Installation Wizard Setup, click on the Next button there.

- Then Accept the Terms in the license agreement.

- Tap again on the Next button.

- Then click on the “Install‘ to install the Mediatek Driver drivers.

- Now, wait for a few seconds to complete the Installation.

- Once the driver installation is completed then click on the finish button to exit the Wizard.
- Done to install the Qualcomm Android USB Driver to your PC.
Manually Install Qualcomm Android USB Driver on Windows
If the first method is failed or not working for you then you can follow the second method to install the Qualcomm Android USB driver manually. follow the step by step process here:
- Open the Control Panel >Device Manageron your Windows PC.

- Click on the Action =>>Add legacy hardware.

- Now a new popup will be opened, click on the “Next” button there.

- Then select the “Install the hardware that I have manually select from a list (Advanced)” and click on Next.

- Select “Show All Devices” and click on Next.

- Click on Browse.

- Choose the downloaded driver files there.
- Then click on the “OK“.
- Now you will get back to the Add Hardware popup and click on the Next button.
- Then click on the Next and wait for a few seconds.
- That’s it.
How to Update Qualcomm Driver
Here on the below, I share a method to update Qualcomm USB Drivers. If any of these above-listed methods are not working then you follow the below procedure to install the USB driver properly. for this method, you need to connect your PC with a good internet connection.
- Open the Control Panel >Device Manageron your Windows PC.

- You will see “MediaTek USB Com” under the ports.

- Right-click on the “Qualcomm USB COM“, and select the “Search Automatically Updated Driver Software“.
- Windows will automatically find the right USB driver for your MTK device.
- Wait for the installation finish.
- Once the driver installation finishes, now you can check your device recognize as a Mediatek USB Drivers in the device manager.
Additional information:
The Third-Party INF Does Not Contain Digital Signature:
If you are also facing the digital signature errors while installing the driver then check out this article once to fix the problem in a few steps.
- Run the CMD with Administrator Permission.
- Then copy and paste the Code:bcdedit /set testsigning on
- Now restart your computer.
- Check on the right bottom side, there you can see “Test Mode” is enabled.
- Now you can install any Qualcomm USB Driver on your computer without facing any error.
Well, here I share the best and simple way to install and Download MTK USB Drivers Latest for Windows 7/8/10. I think I clear all your problems regarding the MTK Driver error problem.


