- Установка и настройка Qubes OS 4
- Установка Qubes OS 4
- 1. Системные требования Qubes OS
- 2. Установка системы
- Настройка Qubes OS 4
- 3. Первоначальная настройка
- 4. Обновление QubesOS
- 5. Установка программ
- 6. Дополнительные настройки для Fedora
- 7. Копирование файлов
- 8. Копирование текста
- 9. Работа с USB флешками
- Заключение
- User documentation / Downloading, installing, and upgrading Qubes
- Page contents
- Installation guide
- Pre-installation
- Hardware requirements
- Copying the ISO onto the installation medium
- Linux ISO to USB
- Windows ISO to USB
- Installation
- Getting to the boot screen
- The installer home screen
- Installation summary
- Localization
- Software
- Installation destination
- Create your user account
- Post-installation
- First boot
- Initial Setup
- Next steps
- Updating
- Security
- Backups
- Submit your HCL report
- Get Started
- Getting help
Установка и настройка Qubes OS 4

Qubes OS 4 — операционная система ориентированная на безопасность методом разделения процессов по виртуальным машинам. Виртуализация происходит на базе технологии XEN, что позволяет работать виртуальным машинам значительно быстрее чем при использовании программной виртуализации (VirtualBox, VMware и так далее).
Однако данная операционная система все же достаточно специфична и может показаться сложной в использовании после классических Linux OS. В данной статье постараюсь как можно подробнее описать установку Qubes OS, настройка, также нюансы системы.
Установка Qubes OS 4
1. Системные требования Qubes OS
Перед установкой системы необходимо посетить сайт разработчика и проверить свой компьютер на совместимость аппаратной части, так же в данном разделе можно добавить свою конфигурацию оборудования после тестирования и описать работоспособность системы конкретно на Вашем железе:
Минимальные системные требования:
- Процессор: Intel или AMD 64 Bit поддерживающие аппаратную виртуализацию;
- Оперативная память: 4 GB;
- Жесткий диск: минимум 32 GB.
- Процессор: Intel или AMD 64 Bit поддерживающие аппаратную виртуализацию;
- Оперативная память: 8 GB;
- Жесткий диск: минимум 32 GB SSD;
- Видеокарта: очень рекомендуется наличие интегрированного графического процессора Intel, на дискретных видеокартах AMD и Nvidia возможны ошибки.
Согласно списку совместимого оборудования наиболее подходящими будут ноутбуки с процессорами Intel 6 поколения и выше. В моем случае это Dell Inspirion 13 5378, заявлена полная совместимость, но ошибки все же иногда выявляются, методы решения наиболее часто встречающихся в следующих статьях.
Необходимо обязательно проверить свою систему на совместимость, иначе работоспособность не гарантируется и исходя из моего опыта гарантирую множество проблем, вплоть до полного отказа системы.
2. Установка системы
И так, железо проверено пора устанавливать. Загружаем ISO образ с официального сайта. Записываем любым удобным способом на USB флешку с объемом памяти минимум 8 GB, желательно USB 3.0 (система достаточно долго устанавливается). Перезагружаем компьютер, в настройках BIOS отключаем Trusted Boot и Legasy Boot. Загружаемся с флешки или иного носителя. Дальнейшая установка вплоть до первого запуска системы ничем не отличается от установки других дистрибутивов. Дожидаемся полной установки, перезагружаемся.
Настройка Qubes OS 4
3. Первоначальная настройка
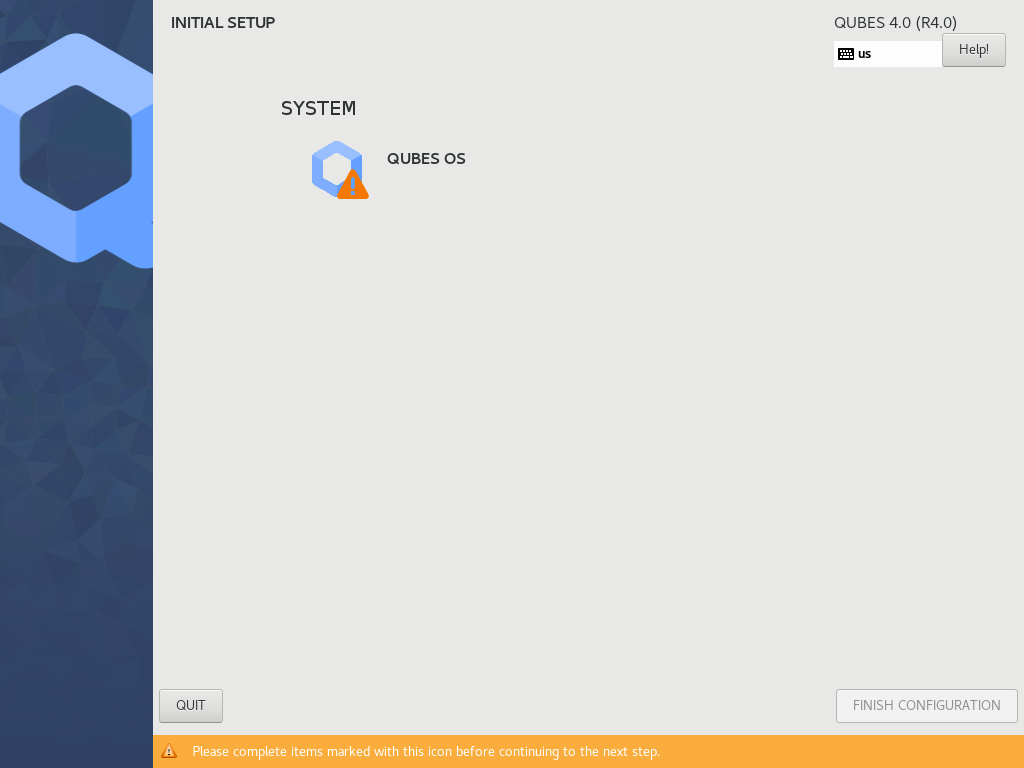
После загрузки системы появляется меню первоначальной настройки:

Извините за качество изображений выполнялась реальная установка на ноутбук без возможности сделать скриншот. Выбираем единственный пункт, далее видим следующее меню.

Разработчик рекомендует оставить все без изменений, я рекомендую так же, позже указанные параметры можно будет отредактировать. Нажимаем Done в левом верхнем углу экрана и довольно долго ждем завершения начальной настройки (если индикатор остановился не пугаемся, такое бывает). После окончания начальных настроек, система возвращает на первый экран, где в правом нижнем углу нужно нажать FINISH CONFIGURATION.
Внимание! Если нажать на QUBES OS всю настройку системы придется повторить!
4. Обновление QubesOS

И так система запущена на экране рабочее окружение XFCE в базовом виде. Первоначально необходимо обновить систему и пакеты встроенных Qubes VM. Для этого подключаемся к Wi-Fi или проводному подключению.
Далее открываем Меню, Terminal Emulator. Вводим следующие команды. Обновляем VM Dom0 (подробнее о всех VM в следующих статьях):

Обновить VMs можно двумя способами: либо через графическое приложение, либо через терминал VM-ов.
Первый способ. Переходим в меню, далее System Tools, Qubes Update, выбираем все VMы, жмем Next и ожидаем полного обновления.

Второй способ чуть сложнее, однако позволяет просматривать объем обновлений и списки обновляемых пакетов. Переходим в меню, Template: debian-9 далее debian-9: Terminal.
Вводим стандартные команды обновления Debian:
Далее повторяем это для всех VMs. Fedora:
После выполнения всех указанных операций, Ваша система полностью обновлена.
5. Установка программ
В Qubes OS есть нюанс, обновление и установка необходимого ПО и пакетов выполняется только в группе VM Template! Если вы выполняете, все согласно данной инструкции, то другие VM кроме необходимых у вас не запущены, но если вы уже посмотрели и попробовали, что то открыть в других VM они уже запущены, и их необходимо отключить. Делается это следующим образом:
Открываем меню, System Tools -> Qube Manager. Выбираем необходимую VM, нажимаем правой кнопкой и выбираем Shutdown Qube, ждем когда зеленый значок работы VMа в графе State не пропадет. Должны быть включены только VMы группы Template, sys-net, sys-usb, sys-firewall, sys-whonix.

Далее открываем терминал и устанавливаем все, что необходимо, нужно и нравится. Так же можно и нужно подключать необходимые репозитории и PPA
Далее после установки всех приложений обязательно отключаем VM в котором производилась установка. Сразу отмечу, что по умолчанию, все личные VM такие как Personal, Work, Vault и т.д. работают на Fedora 29. Соответственно добавлять можно приложения установленные из Template Fedora. Аналогично с Whonix. Как создать VM на базе Debian в следующих статьях.
Следующим действием необходимо добавить приложение в меню запуска. Это не обязательно, можно выполнять запуск из терминала. Но многим удобнее через меню. Переходим в меню выбираем нужную VM, открываем приложение Qube Settings, переходим в Application и переносим стрелочкой нужные приложения.

6. Дополнительные настройки для Fedora
Репозитории RPMFusion по умолчанию установлены, но отключены. Для их включения откройте терминал и перейдите в yum.repos.d:
Открываем любым текстовым редактором файл rpmfusion-free.repo:
Открываем любым текстовым редактором файл rpmfusion-nonfree.repo:
В обоих файлах находим строку enabled=0 и меняем на 1. Теперь репозитории RPMFusion активны.
7. Копирование файлов
Копирование файлов из основного домена Dom0 в другие VM. Такое иногда бывает нужно. Например вы воспользовались приложением Screenshot из System Tools.
- Открываем Terminal Emulator из основного меню;
- Переходим в необходимый каталог командой cd;
- Копируем файлы в нужную VM: qvm-copy-to-vm ;
- Ваши файлы появятся в
Копирование в каталоги Dom0 будет описано в следующих статьях.
8. Копирование текста
Копирование текста внутри одной VM происходит стандартно, сочетанием клавиш Ctrl+C, Ctrl+V или из меню ПКМ. Немного сложнее при копировании между разными VM’ами. Для копирования текста и файлов необходимо:
- Выделить текст или файл и нажать Ctrl+C;
- Далее не снимания выделения и фокусировки на окне нажать Ctrl+Shift+C;
- Выделить окно целевого VM нажать Ctrl+Shift+V и далее Ctrl+V;
Немного сложно, но со временем привыкаешь, к тому же данное действие не выполняется часто.
9. Работа с USB флешками
Далее вводим команду подключения:
Все, флешка примонтирована к требуемой VM. После перезагрузки или перезапуска VM повторно эту операцию выполнять не нужно, флешка примонтируется автоматически.
Заключение
Это только первая статья из цикла по работе с Qubes OS 4. На мой взгляд этого минимально необходимого перечня действий достаточно для начала использования. В следующих статьях рассмотрим создание новых VM (в том числе Kali-Linux), подключение к Tor, Proxy, VPN, настройку каждой VM в отдельности и еще многое и многое. Надеюсь вам будет интересно.
Источник
User documentation / Downloading, installing, and upgrading Qubes
Page contents
Installation guide
Welcome to the Qubes OS installation guide! This guide will walk you through the process of installing Qubes. Please read it carefully and thoroughly, as it contains important information for ensuring that your Qubes OS installation is functional and secure.
Pre-installation
Hardware requirements
Qubes OS has very specific system requirements. To ensure compatibility, we strongly recommend using Qubes-certified hardware. Other hardware may require you to perform significant troubleshooting. You may also find it helpful to consult the Hardware Compatibility List.
Even on supported hardware, you must ensure that IOMMU-based virtualization is activated in the BIOS or UEFI. Without it, Qubes OS won’t be able to enforce isolation. For Intel-based boards, this setting is called Intel Virtualization for Directed I/O (Intel VT-d) and for AMD-based boards, it is called AMD I/O Virtualization Technology (or simply AMD-Vi). This parameter should be activated in your computer’s BIOS or UEFI, alongside the standard Virtualization (Intel VT-x) and AMD Virtualization (AMD-V) extensions. This external guide made for Intel-based boards can help you figure out how to enter your BIOS or UEFI to locate and activate those settings. If those settings are not nested under the Advanced tab, you might find them under the Security tab.
Copying the ISO onto the installation medium
Pick the most secure existing computer and OS you have available for downloading and copying the Qubes ISO onto the installation medium. Download a Qubes ISO.
Once the ISO has been verified as authentic, you should copy it onto the installation medium of your choice, such as a USB drive, dual-layer DVD, or Blu-ray disc. The size of each Qubes ISO is available on the downloads page by hovering over the download button. The instructions below assume you’ve chosen a USB drive as your medium. If you’ve chosen a different medium, please adapt the instructions accordingly.
Linux ISO to USB
On Linux, if you choose to use a USB drive, copy the ISO onto the USB device, e.g. using dd :
Change Qubes-RX-x86_64.iso to the filename of the version you’re installing, and change /dev/sdY to the correct target device e.g., /dev/sdc ). Make sure to write to the entire device (e.g., /dev/sdc ) rather than just a single partition (e.g., /dev/sdc1 ).
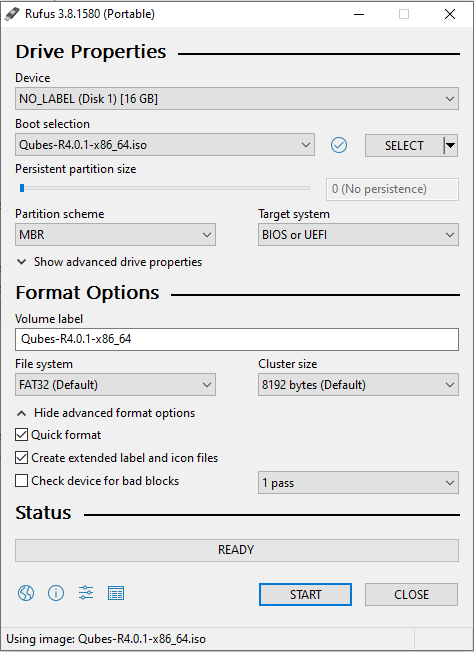
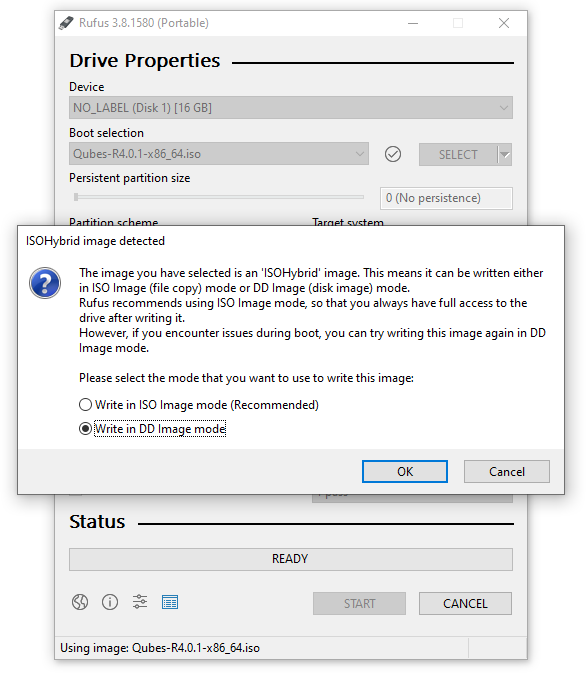
Windows ISO to USB
On Windows, you can use the Rufus tool to write the ISO to a USB key. Be sure to select “Write in DD Image mode” after selecting the Qubes ISO and pressing “START” on the Rufus main window.
Installation
This section will demonstrate a simple installation using mostly default settings.
If you are an advanced user, and you would like to customize your installation, please see custom installation. Otherwise, follow the instructions below.
Getting to the boot screen
“Booting” is the process of starting your computer. When a computer boots up, it first runs low-level software before the main operating system. Depending on the computer, this low-level software is may be called the “BIOS” or “UEFI”.
Since you’re installing Qubes OS, you’ll need to access your computer’s BIOS or UEFI menu so that you can tell it to boot from the USB drive to which you just copied the Qubes installer ISO.
To begin, power off your computer and plug the USB drive into a USB port, but don’t press the power button yet. Right after you press the power button, you’ll have to immediately press a specific key to enter the BIOS or UEFI menu. The key to press varies from brand to brand. Esc , Del , and F10 are common ones. If you’re not sure, you can search the web for BIOS key or UEFI key (replacing with your specific computer model) or look it up in your computer’s manual.
Once you know the key to press, press your computer’s power button, then repeatedly press that key until you’ve entered your computer’s BIOS or UEFI menu. To give you and idea of what you should be looking for, we’ve provided a couple of example photos below.
Here’s an example of what the BIOS menu looks like on a ThinkPad T430:
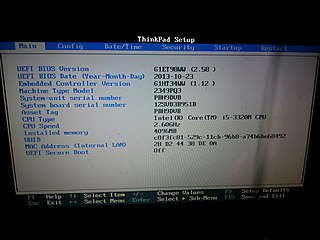
And here’s an example of what a UEFI menu looks like:
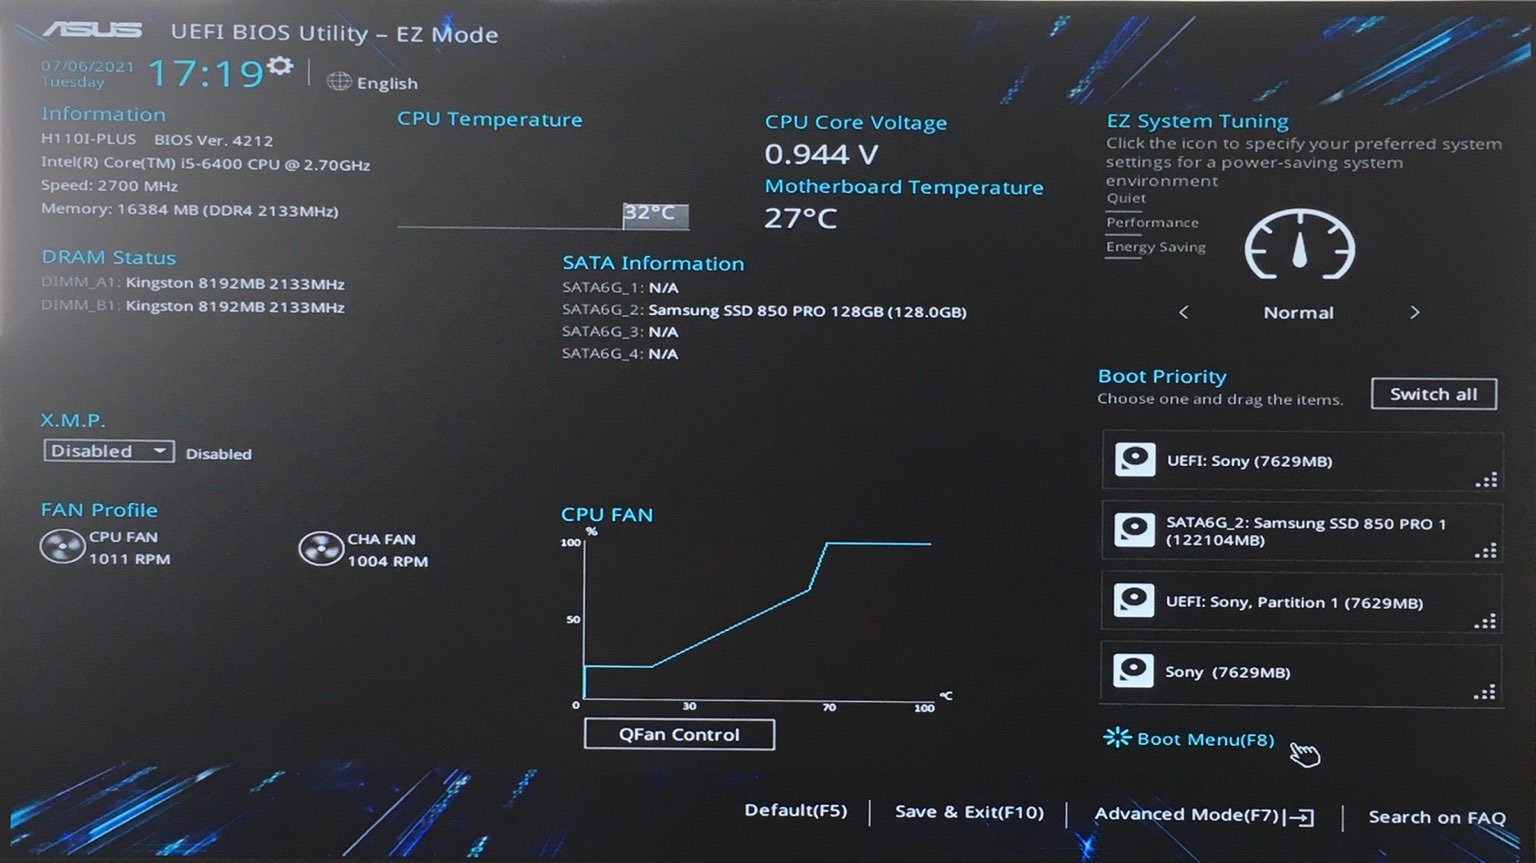
Once you access your computer’s BIOS or UEFI menu, you’ll want to go to the “boot menu,” which is where you tell your computer which devices to boot from. The goal is to tell the computer to boot from your USB drive so that you can run the Qubes installer. If your boot menu lets you select which device to boot from first, simply select your USB drive. (If you have multiple entries that all look similar to your USB drive, and you’re not sure which one is correct, one option is just to try each one until it works.) If, on the other hand, your boot menu presents you with a list of boot devices in order, then you’ll want to move your USB drive to the top so that the Qubes installer runs before anything else.
Once you’re done on the boot menu, save your changes. How you do this depends on your BIOS or UEFI, but the instructions should be displayed right there on the screen or in a nearby tab. (If you’re not sure whether you’ve saved your changes correctly, you can always reboot your computer and go back into the boot menu to check whether it still reflects your changes.) Once your BIOS or UEFI is configured the way you want it, reboot your computer. This time, don’t press any special keys. Instead, let the BIOS or UEFI load and let your computer boot from your USB drive. If you’re successful in this step, after a few seconds you’ll be presented with the Qubes installer screen:
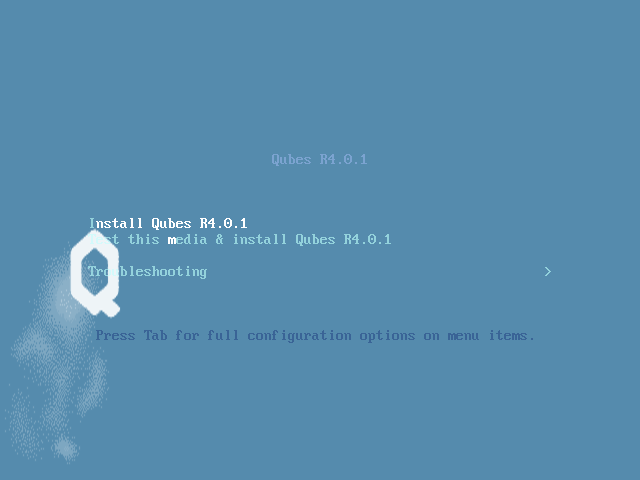
From here, you can navigate the boot screen using the arrow keys on your keyboard. Pressing the “Tab” key will reveal options. You can choose one of three options:
- Install Qubes OS
- Test this media and install Qubes OS
- Troubleshooting
Select the option to test this media and install Qubes OS.
If the boot screen does not appear, there are several options to troubleshoot. First, try rebooting your computer. If it still loads your currently installed operating system or does not detect your installation medium, make sure the boot order is set up appropriately. The process to change the boot order varies depending on the currently installed system and the motherboard manufacturer. If Windows 10 is installed on your machine, you may need to follow specific instructions to change the boot order. This may require an advanced reboot.
The installer home screen
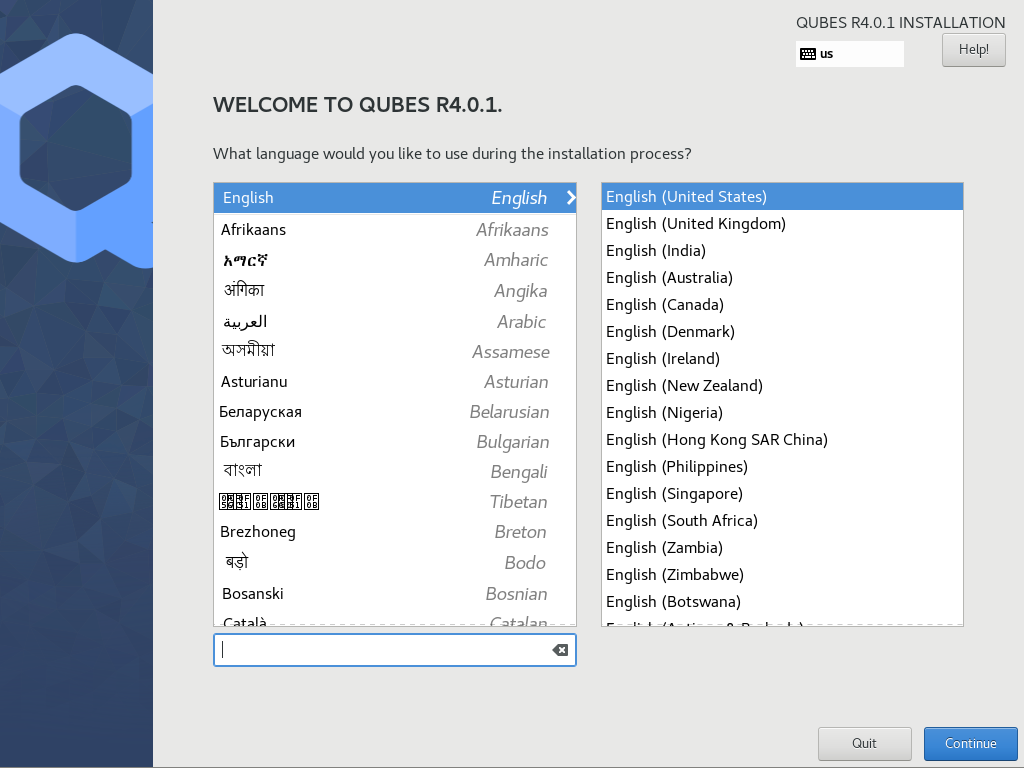
On the first screen, you are asked to select the language that will be used during the installation process. When you are done, select Continue.
Prior to the next screen, a compatibility test runs to check whether IOMMU-virtualization is active or not. If the test fails, a window will pop up.
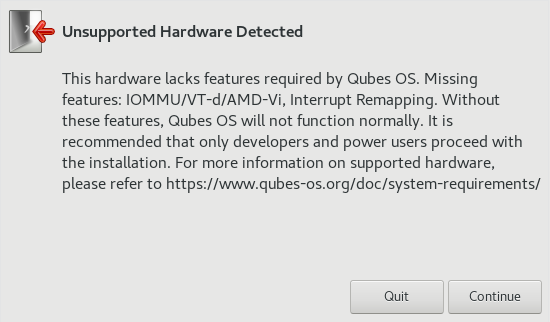
Do not panic. It may simply indicate that IOMMU-virtualization hasn’t been activated in the BIOS or UEFI. Return to the hardware requirements section to learn how to activate it. If the setting is not configured correctly, it means that your hardware won’t be able to leverage some Qubes security features, such as a strict isolation of the networking and USB hardware.
If the test passes, you will reach the installation summary screen. The installer loads Xen right at the beginning. If you can see the installer’s graphical screen, and you pass the compatibility check that runs immediately afterward, Qubes OS is likely to work on your system!
Like Fedora, Qubes OS uses the Anaconda installer. Those that are familiar with RPM-based distributions should feel at home.
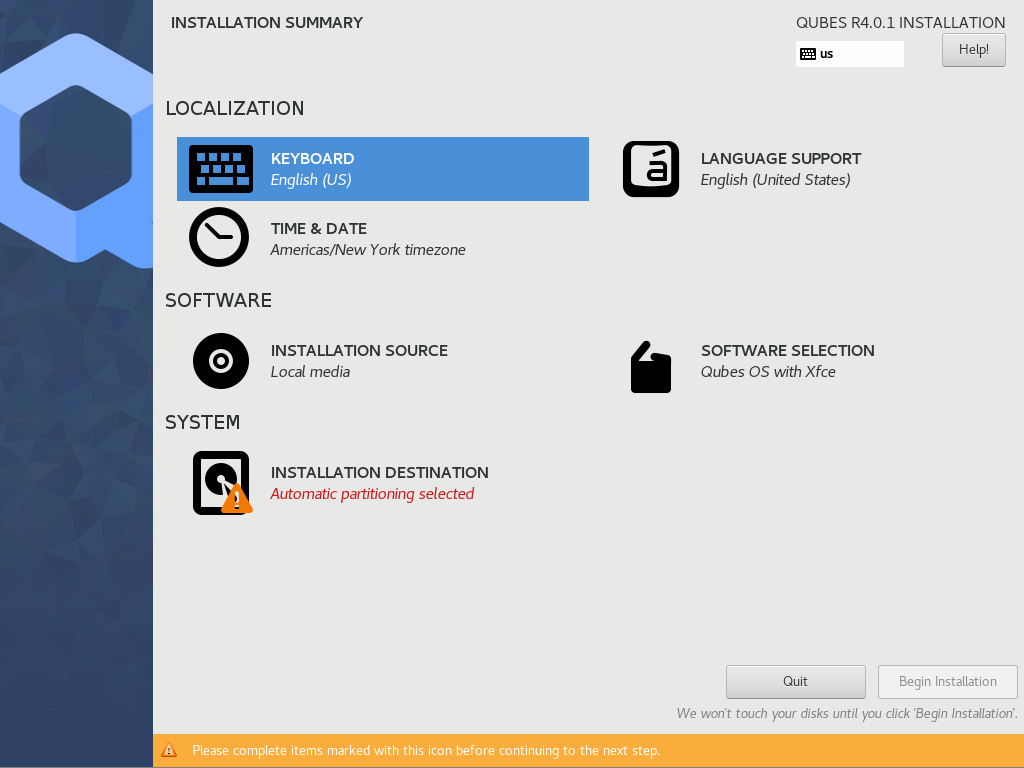
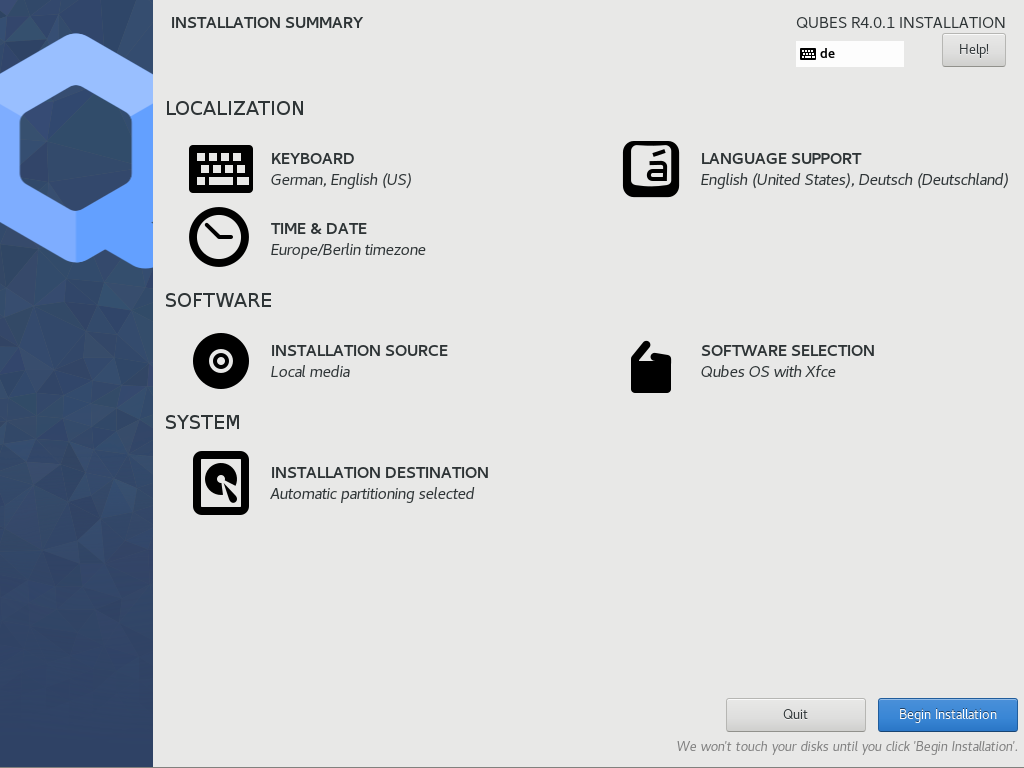
Installation summary
The Installation summary screen allows you to change how the system will be installed and configured, including localization settings. At minimum, you are required to select the storage device on which Qubes OS will be installed.
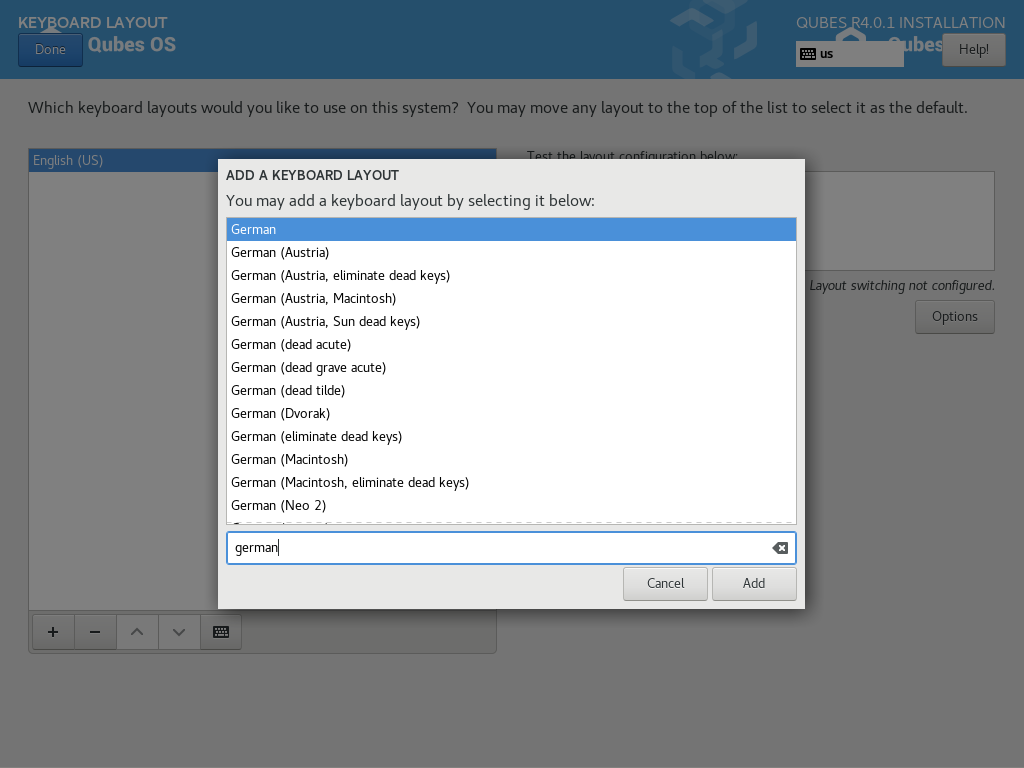
Localization
Let’s assume you wish to add a German keyboard layout. Go to Keyboard Layout, press the “Plus” symbol, search for “German” as indicated in the screenshot and press “Add”. If you want it be your default language, select the “German” entry in the list and press the arrow button. Click on “Done” in the upper left corner, and you’re ready to go!
The process to select a new language is similar to the process to select a new keyboard layout. Follow the same process in the “Language Support” entry.
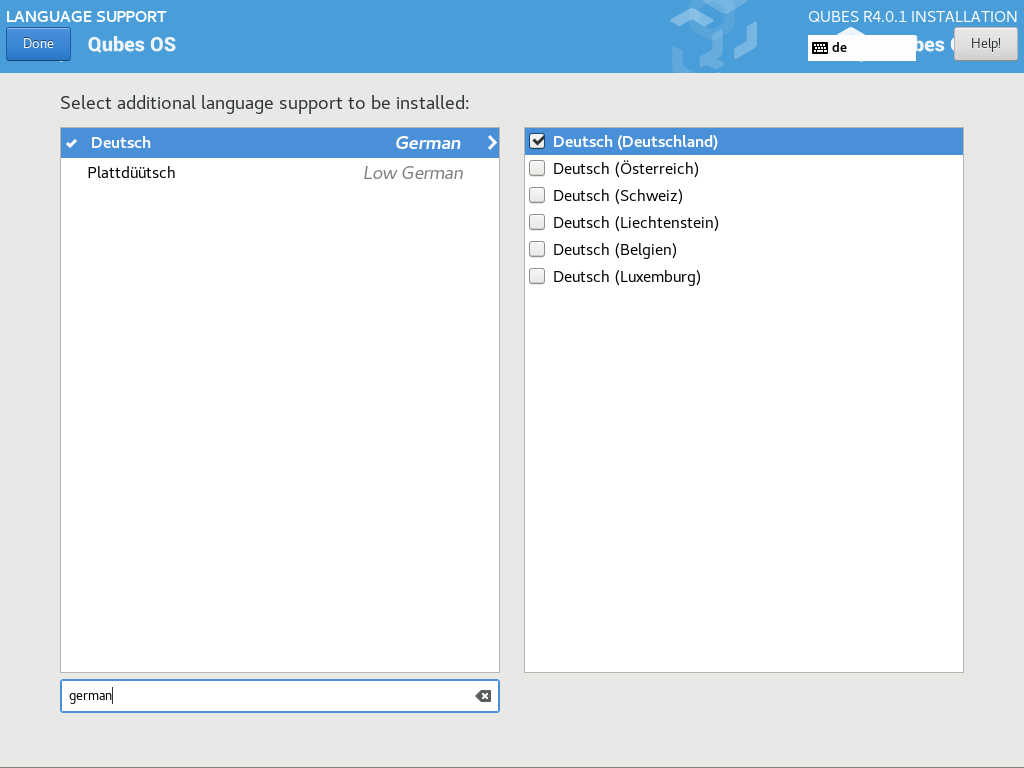
You can have as many keyboard layout and languages as you want. Post-install, you will be able to switch between them and install others.
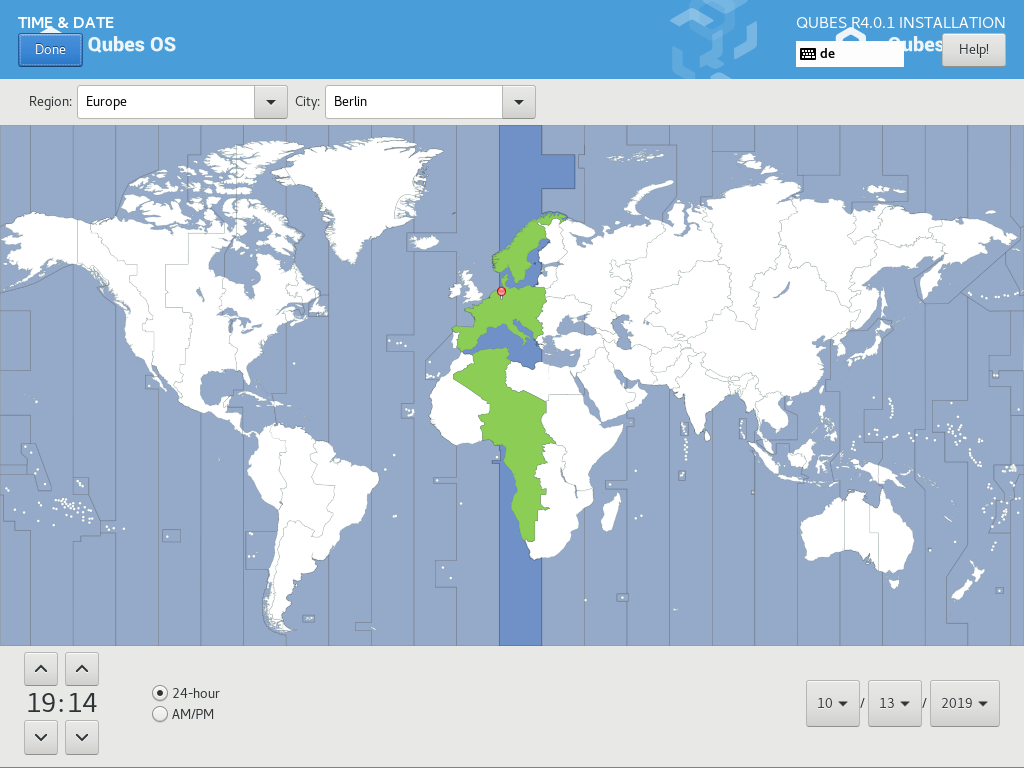
Don’t forget to select your time and date by clicking on the Time & Date entry.
Software
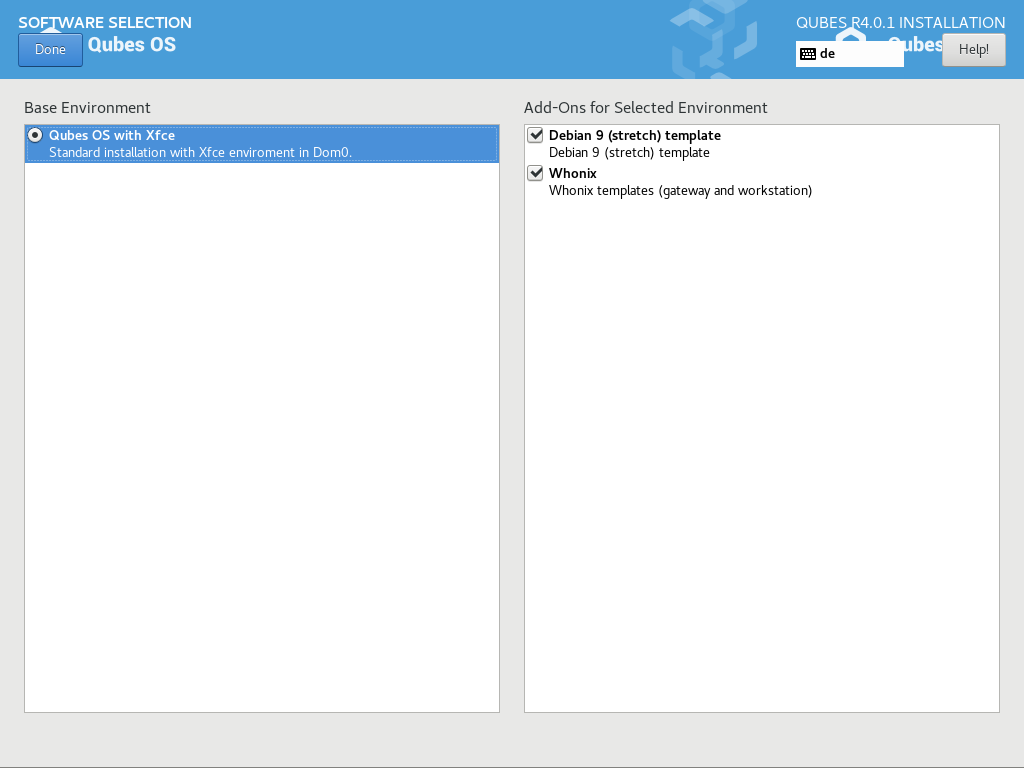
On the software selection tab, you can choose which software to install in Qubes OS. Two options are available:
- Debian: Select this option if you would like to use Debian qubes in addition to the default Fedora qubes.
- Whonix: Select this option if you would like to use Whonix qubes. Whonix allows you to use Tor securely within Qubes.
Whonix lets you route some or all of your network traffic through Tor for greater privacy. Depending on your threat model, you may need to install Whonix templates right away.
Regardless of your choices on this screen, you will always be able to install these and other templates later. If you’re short on disk space, you may wish to deselect these options.
By default, Qubes OS comes preinstalled with the lightweight Xfce4 desktop environment. Other desktop environments will be available to you after the installation is completed, though they may not be officially supported (see Advanced Topics).
Press Done to go back to the installation summary screen.
Installation destination
Under the System section, you must choose the installation destination. Select the storage device on which you would like to install Qubes OS.
Your installation destination can be an internal or external storage drive, such as an SSD, HDD, or USB drive. The installation destination must have a least 32 GiB of free space available.
Installing an operating system onto a USB drive can be a convenient way to try Qubes. However, USB drives are typically much slower than internal SSDs. We recommend a very fast USB 3.0 drive for decent performance. Please note that a minimum storage of 32 GiB is required. If you want to install Qubes OS onto a USB drive, just select the USB device as the target installation device. Bear in mind that the installation process is likely to take longer than it would on an internal storage device.
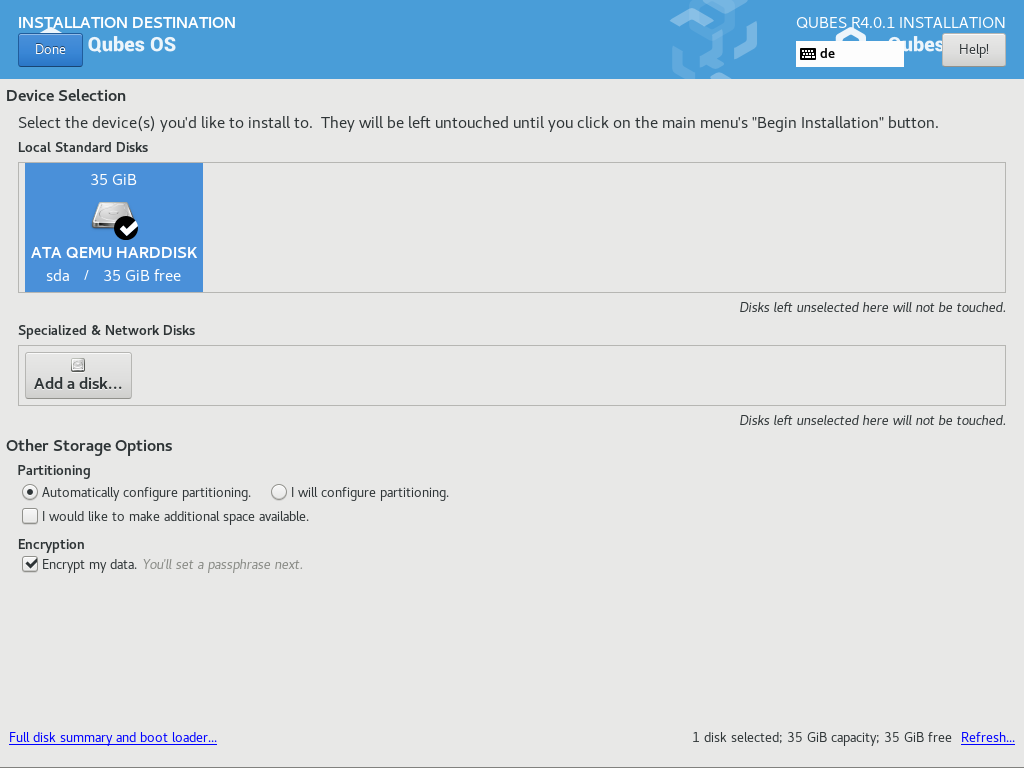
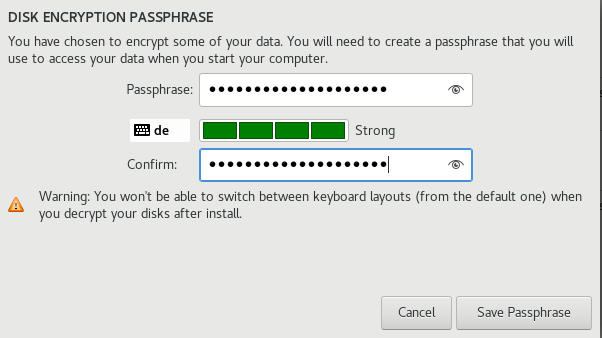
As soon as you press Done, the installer will ask you to enter a passphrase for disk encryption. The passphrase should be complex. Make sure that your keyboard layout reflects what keyboard you are actually using. When you’re finished, press Done.
When you’re ready, press Begin Installation.
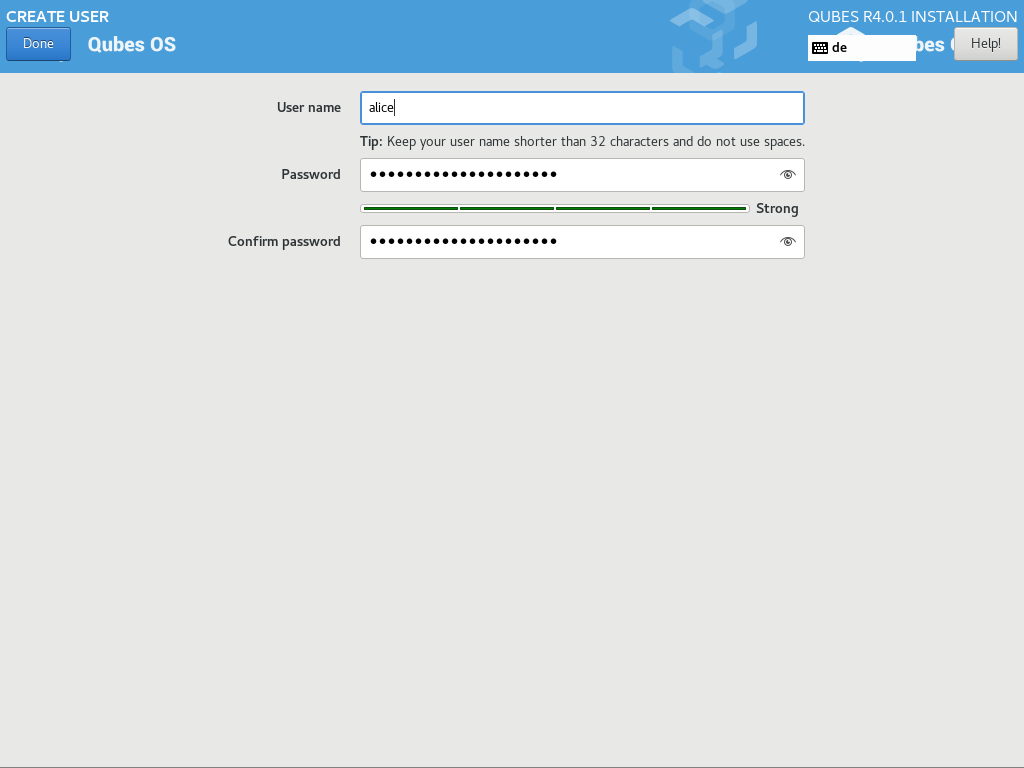
Create your user account
While the installation process is running, you can create your user account. This is what you’ll use to log in after disk decryption and when unlocking the screen locker. This is a purely local, offline account in dom0. By design, Qubes OS is a single-user operating system, so this is just for you.
Select User Creation to define a new user with administrator privileges and a password. Just as for the disk encryption, this password should be complex. The root account is deactivated and should remain as such.
When the installation is complete, press Reboot. Don’t forget to remove the installation medium, or else you may end up seeing the installer boot screen again.
Post-installation
First boot
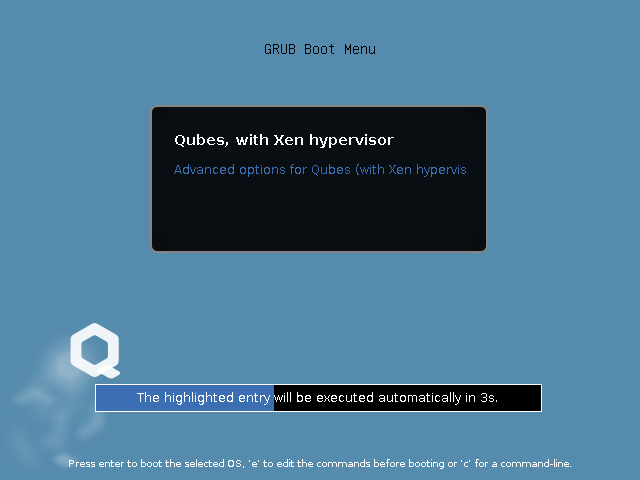
If the installation was successful, you should now see the GRUB menu during the boot process.
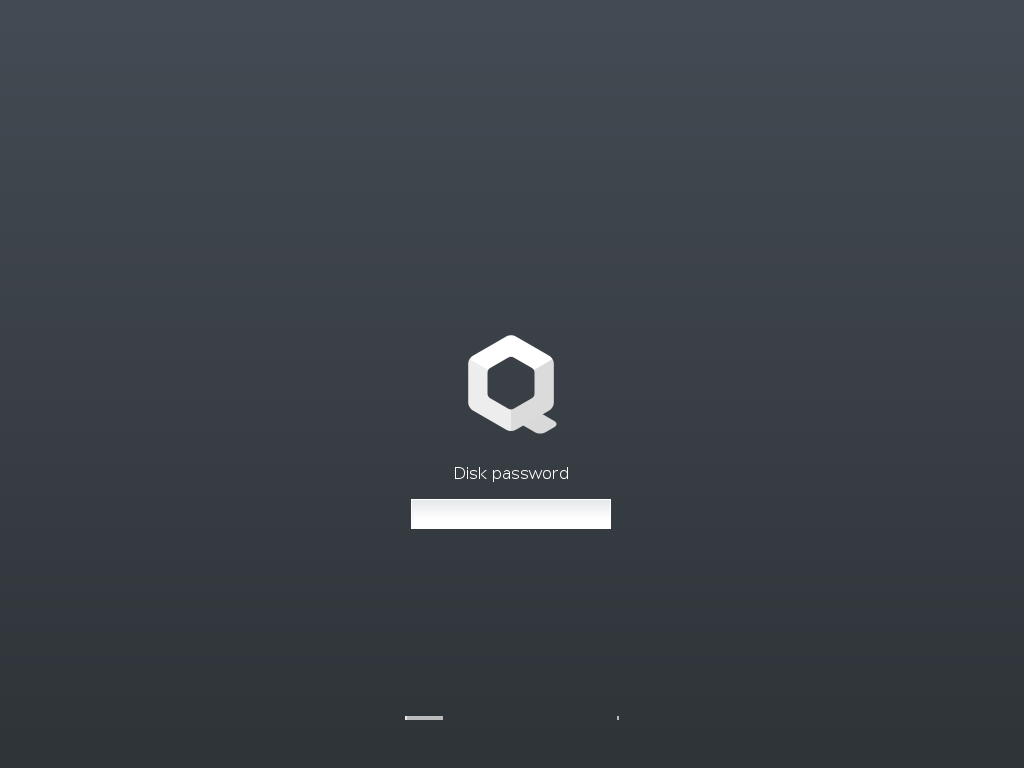
Just after this screen, you will be asked to enter your encryption passphrase.
Initial Setup
You’re almost done. Before you can start using Qubes OS, some configuration is needed.
By default, the installer will create a number of qubes (depending on the options you selected during the installation process). These are designed to give you a more ready-to-use environment from the get-go.
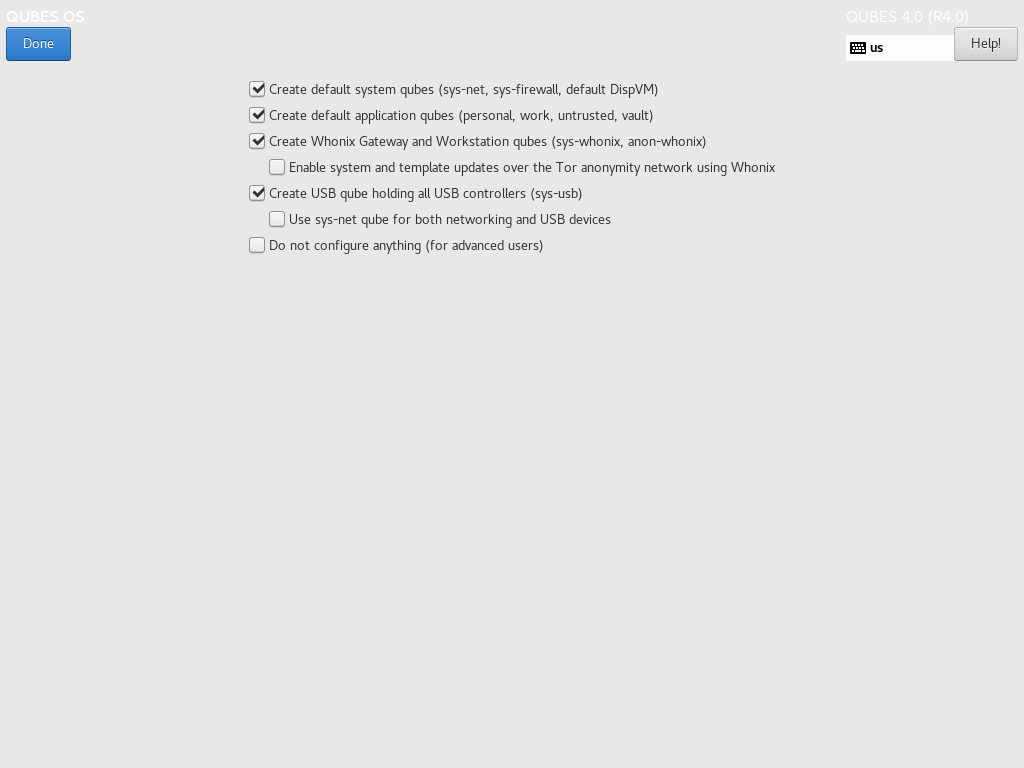
Let’s briefly go over the options:
- Create default system qubes: These are the core components of the system, required for things like internet access.
- Create default application qubes: These are how you compartmentalize your digital life. There’s nothing special about the ones the installer creates. They’re just suggestions that apply to most people. If you decide you don’t want them, you can always delete them later, and you can always create your own.
- Create Whonix Gateway and Workstation qubes: If you want to use Whonix, you should select this option.
- Enabling system and template updates over the Tor anonymity network using Whonix: If you select this option, then whenever you install or update software in dom0 or a template, the internet traffic will go through Tor.
- Create USB qube holding all USB controllers: Just like the network qube for the network stack, the USB qube isolates the USB controllers.
- Use sys-net qube for both networking and USB devices: You should select this option if you rely on a USB device for network access, such as a USB modem or a USB Wi-Fi adapter.
- Do not configure anything: This is for very advanced users only. If you select this option, you’ll have to set everything up manually afterward.
When you’re satisfied with you choices, press Done. This configuration process may take a while, depending on the speed and compatibility of your system.
After the configuration is done, you will be greeted by the login screen. Enter your password and log in.
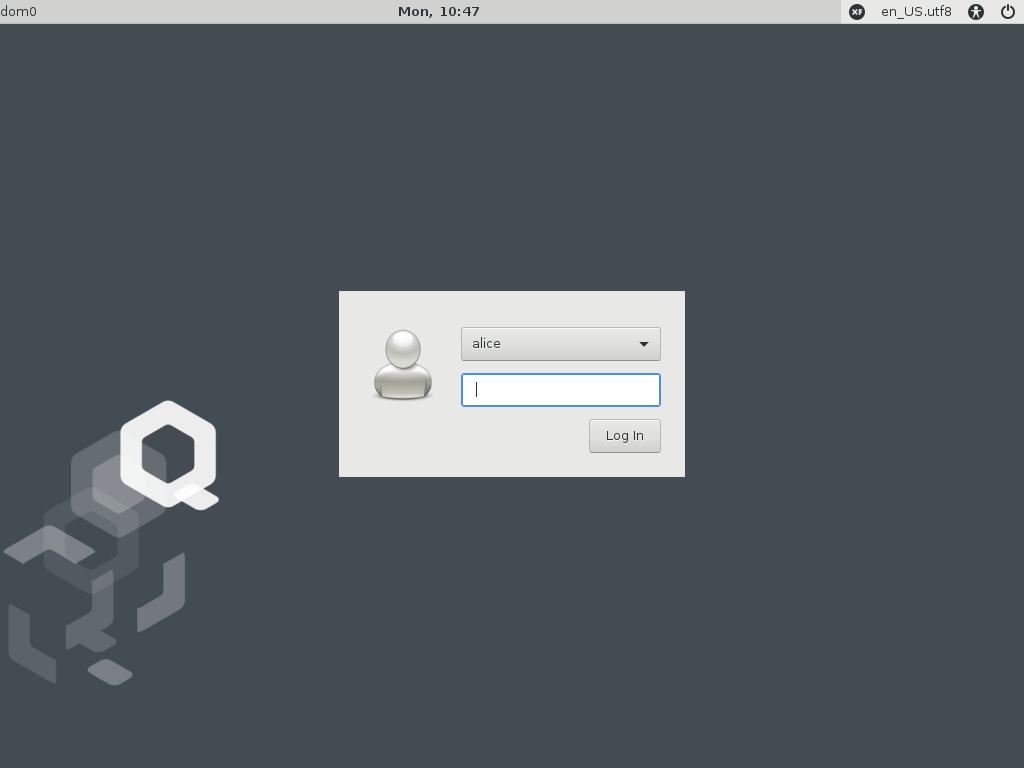
Congratulations, you are now ready to use Qubes OS!

Next steps
Updating
Next, update your installation to ensure you have the latest security updates. Frequently updating is one of the best ways to remain secure against new threats.
Security
The Qubes OS Project occasionally issues Qubes Security Bulletins (QSBs) as part of the Qubes Security Pack (qubes-secpack). It is important to make sure that you receive all QSBs in a timely manner so that you can take action to keep your system secure. (While updating will handle most security needs, there may be cases in which additional action from you is required.) For this reason, we strongly recommend that every Qubes user subscribe to the qubes-announce mailing list.
In addition to QSBs, the Qubes OS Project also publishes Canaries, XSA summaries, template releases and end-of-life notices, and other items of interest to Qubes users. Since these are not essential for all Qubes users to read, they are not sent to qubes-announce in order to keep the volume on that list low. However, we expect that most users, especially novice users, will find them helpful. If you are interested in these additional items, we encourage you to subscribe to the Qubes News RSS feed or join one of our other venues, where these news items are also announced.
For more information about Qubes OS Project security, please see the security center.
Backups
It is extremely important to make regular backups so that you don’t lose your data unexpectedly. The Qubes backup system allows you to do this securely and easily.
Submit your HCL report
Consider giving back to the Qubes community and helping other users by generating and submitting a Hardware Compatibility List (HCL) report.
Get Started
Find out Getting Started with Qubes, check out the other How-To Guides, and learn about Templates.
Getting help
We work very hard to make the documentation accurate, comprehensive useful and user friendly. We urge you to read it! It may very well contain the answers to your questions. (Since the documentation is a community effort, we’d also greatly appreciate your help in improving it!)
If issues arise during installation, see the Installation Troubleshooting guide.
If you don’t find your answer in the documentation, please see Help, Support, Mailing Lists, and Forum for places to ask.
Please do not email individual members of the Qubes team with questions about installation or other problems. Instead, please see Help, Support, Mailing Lists, and Forum for appropriate places to ask questions.
Источник


