- Панель быстрого запуска в Windows 10: как включить, настроить и выключить
- Windows 10. Возвращение панели быстрого запуска (Quick Launch)
- 3 способа назначить быстрые клавиши на запуск приложения в Windows 10
- Закрепляем программу на панели задач
- Быстрый вызов из меню
- Назначение комбинации клавиш для ярлыка
- Quick Launch Buttons Not Working Windows 10
- How to enable Quick Launch in Windows 10
- About Sergey Tkachenko
- 29 thoughts on “ How to enable Quick Launch in Windows 10 ”
Панель быстрого запуска в Windows 10: как включить, настроить и выключить
Панель быстрого запуска, которая еще со времен Windows XP считалась стандартной фичей следующих версий Microsoft-овской операционки и, что самое главное, была на самом деле решением полезным, потом как-то совершенно незаслуженно пропала.
Потому, в этом посте мы вкратце расскажем о том, как снова включить эту панель в ОС Windows 10.
#1 — как включить Панель быстрого запуска в Windows 10

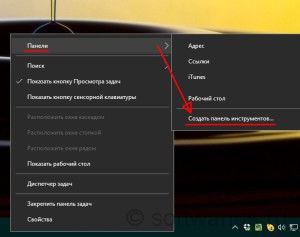
Кликаем правой кнопкой мыши по пустому месту на Панели задач, в появившемся меню жмем сначала «Панели«, а потом — «Создать панель инструментов«.
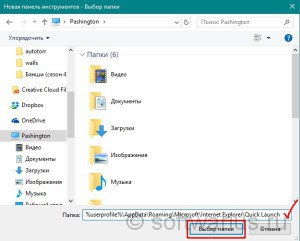
Далее в строку «Папка» в окошке Проводника копируем (или вводим вручную) следующее: %appdata%\Microsoft\Internet Explorer\Quick Launch, после чего жмем кнопку «Выбрать папку» внизу окна. Пaнель быстpoго запуска появится в правой части Панели задач.

#2 — как настроить Панель быстрого запуска в Windows 10
Создав пaнель быстpoго запуска, мы можем также изменить ее расположение и содержимое. Для начала надо ее разблокировать. Для этого снова жмем правой кнопкой мыши по пустому месту на панели задач и снимаем галочку возле «Закрепить панель задач«.

Теперь нашу новую «Панель быстрого запуска» можно перемещать по Панели задач (перетаскивая мышкой) и настроить ее внешний вид (меню настроек открывается, если кликнуть по ней правой кнопкой мыши). Закончив с настройками, снова блокируем панель (ПКМ -> «Закрепить панель задач»).
#3 — как удалить Панель быстрого запуска в Windows 10
Тоже ничего сложного: кликаем ПКМ по Панели задач, в меню жмем «Панели» и затем просто убираем галочку возле ненужной больше Панели быстрого запуска.
Windows 10. Возвращение панели быстрого запуска (Quick Launch)
Как известно, в Windows XP была удобная Панель быстрого доступа или Quick Launch. Из более новых версий Windows ее убрали непонятно зачем и некоторые пользователи могут испытывать ностальгию по данному инструменту.
Для тех, кто скучает по панели быстрого доступа я покажу, как ее вернуть в Windows 10. Для Win7 эта инструкция тоже подойдет. Итак, приступаем!
Кликните по Панели задач правой кнопкой мышки, выберите Панели и затем Создать панель инструментов…
Но перед этим скопируйте в буфер обмена адрес, он вам дальше понадобится:
%userprofile%\AppData\Roaming\Microsoft\Internet Explorer\Quick Launch
Можете, конечно, вручную пройти по маршруту:
\Users\[ваш username]\AppData\Roaming\Microsoft\Internet Explorer\Quick Launch,
но это долго и неспортивно. К тому же, должен быть включен показ скрытых папок и файлов.
Теперь предстоит выбор папки для Quick Launch. Для того мы и копировали адрес на первом шаге, чтобы сейчас его вставить в поле Папка внизу и нажать кнопку Выбор папки.
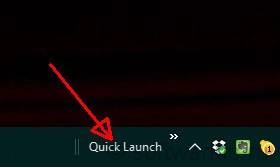
Когда мы нажали на Выбор папки, окно закроется и появится панель быстрого доступа внизу справа.
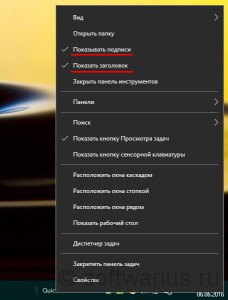
Чтобы сделать Панель быстрого доступа более компактным можно убрать заголовки и подписи. Кликните правой кнопкой по панели Quick Launch и в меню снимите галочки с пунктов Показывать подписи и Показывать заголовок.
Теперь панель приобрела знакомый вид. Теперь ее можно растянуть, зажав мышкой две вертикальные палочки слева от панельки. Если их нет, то проверьте, что Панель задач не закреплена (Правой кнопкой мыши по панели задач -> Свойства -> Закрепить панель задач). Чтобы перетащить Quick Launch ближе к кнопке Пуск, зажмите мышкой и тащите влево до упора (см. рис.)
Когда упор закончится, вид будет примерно вот такой. На неё можно мышкой перетаскивать иконки программ для добавления, удалять, тасовать мышкой между собой, в общем, вам понравится)
3 способа назначить быстрые клавиши на запуск приложения в Windows 10
Когда часто запускаешь одни и те же программы, возникает желание настроить на них горячие клавиши. Быстрый старт программ удобен и повысит эффективность работы на компьютере. Три способа, как это сделать в Windows 10 буквально за 5 секунд — в этой статье.
Закрепляем программу на панели задач
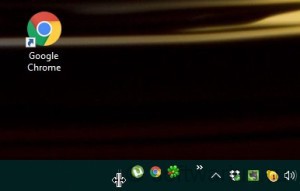
Начнем с самого очевидного способа ускорить запуск программы — закрепить ее значок на панели задач. Откройте приложение. На его иконке в панели задач нажмите правую клавишу мыши и выберите Закрепить.
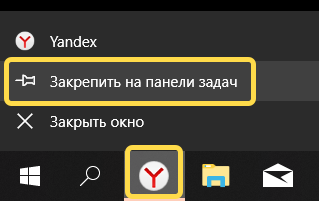
В нашем случае это Яндекс.Браузер. Теперь вызвать его можно всего двумя кнопками Win+1, где 1 — номер программы в Панели задач. Таким образом, можно закрепить до 10 программ и запускать их комбинацией кнопки Win и цифрой от 1 до 0 (десятая задача).
Быстрый вызов из меню
В стартовом меню, выпадающем по кнопке Win, программы можно вызывать по первой букве их названия. В случае Яндекс.Браузера нужно последовательно нажать Win и букву Я.
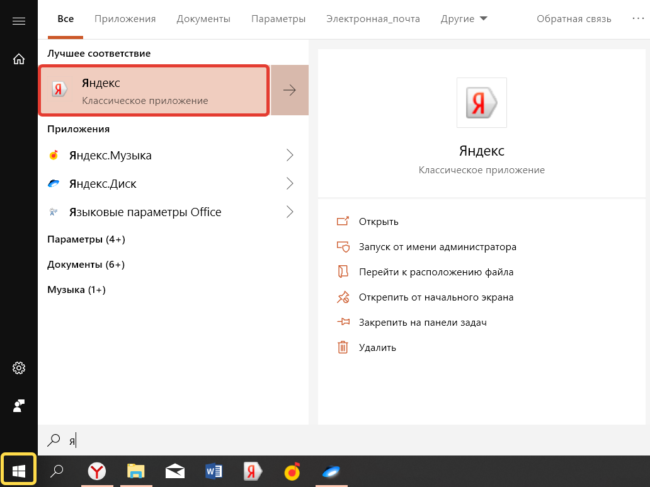
Если автоматически в Лучшее соответствие нужное приложение не попало, выберите его из списка мышью. На следующий раз Windows предложит именно его. Для запуска достаточно нажать Enter. Таким образом, запуск браузера будет осуществляться по последовательному нажатию трех клавиш: Win, Я, Enter.
Такой способ быстрого вызова чувствителен к языку поиска. Чтобы запустить Word придется использовать W. В русской раскладке будут предложены программы на Ц.
Назначение комбинации клавиш для ярлыка
Этот метод работал и в прежних версиях Windows, но в десятой версии есть свои особенности. Нажмите клавишу Win для открытия меню, найдите нужный ярлык и вытащите его на Рабочий стол.
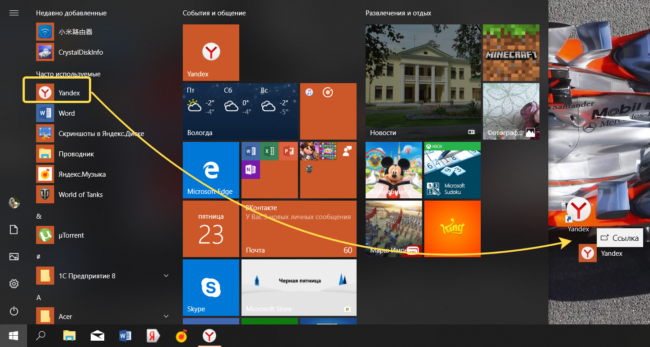
На ярлыке нажимаем правую клавишу мыши, выбираем Свойства и назначаем комбинацию кнопок.
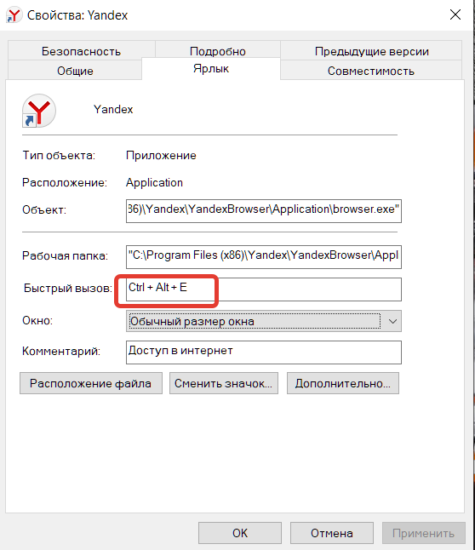
Отметим, что в Windows 10 запуск по назначенным хоткеям происходит с задержкой от 3 секунд. По словам разработчиков, это связано с особенностью реализации механизма в этой версии операционной системы. Комбинация кнопок сначала предлагается фоновым приложениям. Если никто не признал ее своей, запускается ярлык с заданной комбинацией клавиш.
Quick Launch Buttons Not Working Windows 10
12-14-2016 11:32 AM
- Mark as New
- Bookmark
- Subscribe
- Permalink
- Email to a Friend
- Flag Post
I recently did a clean install to Windows 10 on my computer. Since then, I have been unable to get the quick launch buttons to work. I’ve attempted to install the driver from my products support page and that hasn’t restored functionality. It was suggested to me that I attempt to upgrade the BIOS as well, however, when I downloaded the BIOS update from my product page Windows told me the certificate for the installer had been revoked.
I would appreciate any help in getting this fixed. I rather like those nifty function buttons.
12-14-2016 08:59 PM
- Mark as New
- Bookmark
- Subscribe
- Permalink
- Email to a Friend
- Flag Post
Well, after some Google-fu I was able to get the BIOS flashed. So that’s one thing fixed. Still unable to get the function keys working. I didn’t have this problem with my old laptop when I upgraded it, I can’t for the life of me figure out why I can’t get this to work.
12-15-2016 12:48 PM
- Mark as New
- Bookmark
- Subscribe
- Permalink
- Email to a Friend
- Flag Post
Thanks for using the HP Forums . One Stop for all sort of solutions for your HP Products
I have read your post and understand that the function keys are not working on the PC after Windows 10 update. Is that, right?
I searched for the solution and found that your PC was originally provided with Windows 7 operating system and there are no drivers available for Windows 10 which includes keyboard drivers unavailable.
I request you to try the steps below and check if that helps you in getting those function keys working.
Method 1 : I suggest you perform the Hardware and Devices troubleshooter. It will resolve
the common system problems.
1. Tap on Windows Key and click on the search bar.
2. Type “ Troubleshooting ” without the quotes and click on Troubleshooting.
3. Click on View All on the left panel of the screen.
4. Click on Hardware and Devices .
5. Click on Next and follow the prompts to run the troubleshooter.
If the issue still persists, refer to the below method.
Method 2 : I would suggest you to try to update the keyboard drivers and check if it helps.
1. Press Windows logo + X key on the keyboard.
2. Select Device Manager .
3. Expand Keyboards.
4. Click on the driver and click on Update Driver Software
5. Then click on Next and follow the steps in the wizard that appears.
This should solve the issue. Let me know for more solution.
Glad to help you . I work for HP
Please click “ Accept as Solution ” if you feel my post solved your issue, it will help others find the solution.
Click the “ Kudos Thumbs Up » to say “Thanks” for helping!
«HP respects and is committed to protecting the personal information of our covered individuals.» You can read more in the HP Privacy Statement .
Resolv_S
I work on behalf of HP
If you found this post helpful, you can let others know by clicking the “ Accept as Solution ” button. You can also show your appreciation, with a kudos, by clicking the “ Thumbs up » button!
How to enable Quick Launch in Windows 10
One of my favorite features of the taskbar is the Quick Launch toolbar. This small yet useful toolbar was located near the Start button in previous Windows versions like Windows XP and earlier. It was enabled by default for the last time in Windows Vista, but with the release of Windows 7, Microsoft decided to drop official support for the Quick Launch toolbar in favor of pinning icons to the taskbar. Quick Launch has not been completely removed and can be revived in Windows 10. It is not so obvious to a novice user how to enable Quick Launch in Windows 10 as it involves numerous steps and cannot be automated. In this article, we will see how to add the Quick Launch back to the taskbar in Windows 10.
- Even if you set pinned icons to a small size, they are still spaced too far apart from one another.
- The taskbar mixes running programs with non-running ones, whereas if you use the Quick Launch toolbar, running programs will always appear to its right.
- Quick Launch has a more customizable appearance; you can easily put any shortcut or folder there without having to use tools like Winaero Taskbar Pinner or Pin to 8. You can change their icons, have multiple rows of icons if you make the taskbar larger, and save overall space on the taskbar.
To restore the Quick Launch toolbar, follow these simple steps:
Right click on an empty space of the taskbar. From its context menu select the Toolbars -> New Toolbar. item. 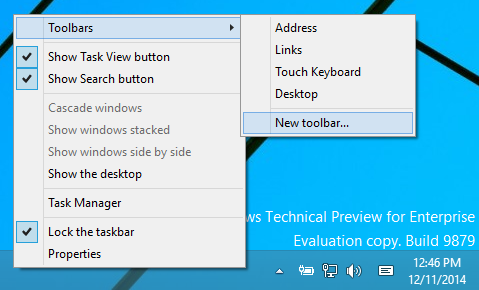
The following dialog will appear on the screen: 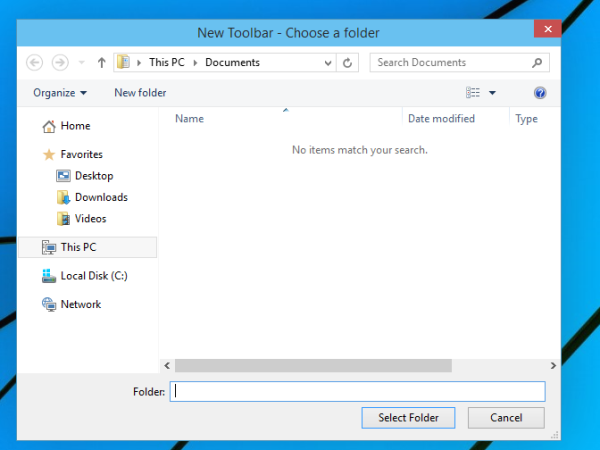
In this dialog, select the following folder:
Replace the «YOUR USER NAME» text with your actual user name in Windows 10.
Alternatively, you can type or copy-paste the following text into the Folder text box in the dialog above and then press Enter:
The shell: protocol gives quick access to special folders as I covered previously.
Yet another way to access the Quick Launch folder is by entering the following path instead of the shell command:
%userprofile% is an environment variable which points directly to your user profile in Windows 10. This way, you don’t have to enter your user name in the path. 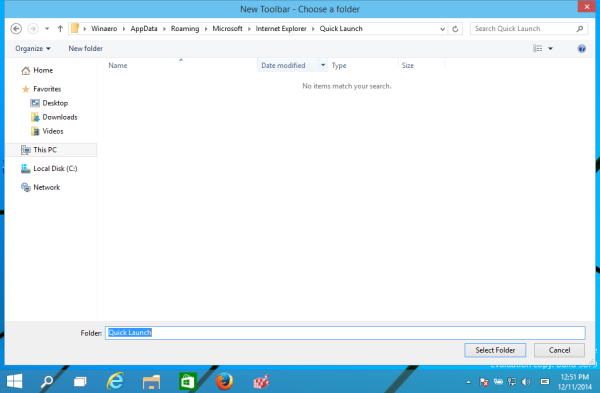
Now click the Select Folder button.
The Quick Launch toolbar will get added to the taskbar: 
As you can see, it is locked to the right side of the taskbar and has a title. Let’s move it to the left side and hide the title.
Right click on the taskbar and untick Lock the taskbar. 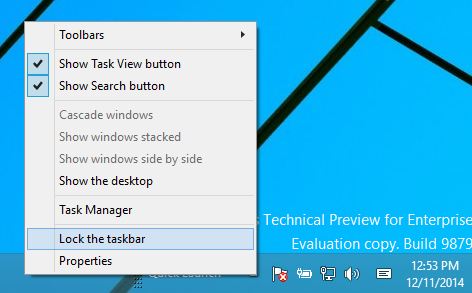
Now drag the Quick Launch toolbar from the right to the left, using the dotted bar which appears after your have unlocked the taskbar. Drag all the way to the left of any pinned icons you may have.
After that, right click on the Quick Launch toolbar and untick the following options:
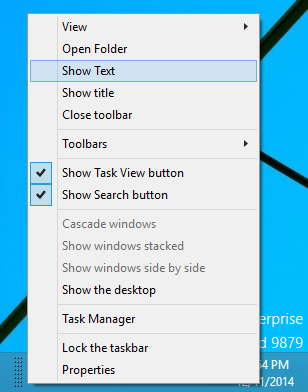
That’s it. Now you have the good old Quick Launch enabled in Windows 10. 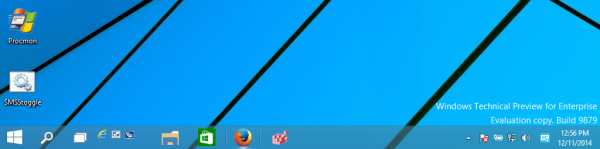
Now see: Add Quick Launch to the Send To menu to create new shortcuts faster
.
This trick to enable Quick Launch also works on Windows 7 and Windows 8. You can also get rich tooltips to show useful information if you do this Registry tweak:

Rich tooltip on Quick Launch
Winaero greatly relies on your support. You can help the site keep bringing you interesting and useful content and software by using these options:
Share this post
About Sergey Tkachenko
Sergey Tkachenko is a software developer from Russia who started Winaero back in 2011. On this blog, Sergey is writing about everything connected to Microsoft, Windows and popular software. Follow him on Telegram, Twitter, and YouTube.
29 thoughts on “ How to enable Quick Launch in Windows 10 ”
i know how to do it but thank you!
THIS IS WRONNNNNNNG… WIN7 has had the QUICK LAUNCH menu ALL ALONG mine has 750+ entries in it door to 30 MILLION files on this particular comp… w t H are you talkin’ bout!
I believe there‘s no much need for this tutorial, since the steps are the same as for Windows 8.
Well, you are right
Thanks for confirming that this still works in Windows 10!
I had hoped that since they finally partly saw reason, they might have put it back in but… Guess not. At least they didn’t take it out.
Thank you so much! Why do they insist on taking away the things we love and adding things we’ll never use?! Again, thank you!
The main reason I prefer QuickLaunch is that each click of the icon in the QuickLaunch bar starts up a new instance of the target application. With “pinned” applications, this only works for one instance, then the taskbar icon becomes the button for the running instance. To start another instance of that program, you have to right-click on the icon and select the application again from the pop-up menu.
you can use the shift-key to quickly launch a new instance of a running pinned program
ahhhh, what a relief! First thing i saw when i updated was the quick launch missing and i freaked out but thanks to this article i’m back at peace! Kudos!!
pheww… thanks a lot – i love that feature and hope i could reuse it in w10… 😉
You are welcome.
Sergey – I believe you missed a very valuable feature/benefit of Quick Launch, which is a program in Quick Launch can accept a file/folder via drag and drop. For example, I (like many other programmers) develop programs which can accept files/folders by dragging and dropping them onto the program icon, or any shortcut to it. Taskbar shortcuts don’t behave that way. In other words, drag and drop a file onto a program icon in Quick Launch and that file is immediately opened in that application (if the program is designed for this, of course). This is very convenient operation, and is what Windows is/was all about – drag and drop!
You are right. It is very useful.
let us not forget how amazing it was to be able to also directly launch scripts, I remember when I first used win 7 and instead of starting a script (I was lied to and told that pinned programs would have equal functionality but in truth its much lesser and have never been properly fixed) I just stared at a blank command window.
now you need third party work arounds and put in effort to get a very simple function back, windows is losing its touch. Win 10 is a bad OS compared to other actual modern alternatives out there. Win 10 appears nice, runs alright but it handles like a drunken mule the moment you don’t want to walk the path they have set you on.
Is anyone having trouble getting the quick launch bar to stay put and take title to show properties and display text?
Thanks for the article explaining how to add the quick launch toolbar to the task bar in Windows 10.
Unfortunately, after each re-start, it disappears and requires a fresh installation.
This occurred after many attempts to add the quick launch toolbar only to have it disappear regardless of which browser was used; Edge, Internet Explorer, or Firefox.
Any one have a fix for this?
Thanks,
Every Windows version starting with Windows 7 resets it from time to time. IDK why and how to stop it.
But not with every restart. It is not normal.
Can you tell me which version of Windows 10 you are using?
mate you are the gun . thanks for the quick fix …….why do boffins even try to fix things that we all love and are working . seriously. and thx for the quick launch yr a gem.
Thanks! I sure missed this feature.
Thank you so much Sergey!
Be it Windows 7 or 8, I always used similar procedure to reestablish quick launch with 24 icons in two lines. It occupies a small place, starts new instances, does not mix up different functions, and allows to have *MUCH MORE SPACE* for open window /running program tags (also in two lines). I am power user, 16 hours a day, since 25 years, and personally prefer that way.
For the general discussion:
1) Why combine keyboard and mouse commands if not necessary? Quick launch allows mouse-only commands.
2) Isn’t it better to avoid desnecessary ‘motions/movements’ on the screen which occupy your eyes and brain? So if I use quick launch and therefore have more space to see every *individual* open program/window tag, I can open specific windows with a ONE CLICK action, instead of opening each time a list, which is two-click-action and visually/mentally tiring. – If I am switching unto THOUSAND times a day between specific open windows, I get an economy of thousand desnecessary clicks and ‘list/menu-motions’.
3) Evidently I immediately UNPIN anything of the factory-like taskbar to get rid of those enormous, grotesque, monster-buttons.
4) Always use the same icon sequence/arrangement in the quick launch bar, so that my mind doesn’t have to think about it.
With best regards from Brazil
The icons are way too small, the quick launch doesn’t like my high resolution screen. I am unwilling to go to a lower resolution and I’m unwilling to give up the quick launch. Does anyone have a solution?
FYI: you can enable big icons for quick launch by right clicking it (the toolbar, not icons in toolbar).
It works, thanks for that.
Note: when I started to drag, I saw the Quick Launch area to expand and the application icons to shrink.
It confused me…
We have to continue to drag, and eventually the Quick Launch area moves to the left.
I am very thankful – my language is Dutch, I am 73 and I did not like all those icons om my screen, I loved Quick Launch! But in my country I could not find how to bring Quick Launch (in our language ‘SnelStart Balk’) back to Windows 10. And now I found how to do it – and it works again. Thanks!
Happy to hear that this article was helpful for you!
Finally sat down & worked on this (wasn’t sure what minimal search words to use); came across your site, the fix, & some additional helpful comments. Not fond of Win8 in the least and since Win7 I just put up with the ‘missing’ QuickLaunch.
Much appreciate the info and additionally the layout of your site (bookmarked).
Thx Sergey
You are welcome Jeff.
I’ve enabled Quick Launch on Windows 10. However, when I reboot, the icons come back rearranged. They stay fixed on Windows 7. Yes, I’ve set “Lock The Taskbar” on (in Windows 10). Anyone else have or fix this issue?


