- FireMonkey for Linux
- Contents
- What is FMX for Linux?
- Key features:
- How to access FMX for Linux
- FireMonkey GUI Application Prerequisites
- Installing Linux Platform Support
- Installing and running PAServer
- Installing dependencies on your Linux server
- Getting Started
- FMXLinux Configuration
- Building and deploying your first project
- Additional Capabilities
- Web Deployment to Ubuntu Server
- Supported Linux Distributions
- Additional Resources
- Как подготовиться к работе Delphi на Linux?
- Как настраивать Linux-сервер для работы с RAD Studio
- Linux Application Development
- Contents
- Prerequisites
- Preparing Your Linux Development Environment
- Installing Development Packages
- Preparing Your Linux Machine
- Creating a Connection Profile
- Adding the Installed SDK to RAD Studio
- Running PAServer on Linux machine
FireMonkey for Linux
Contents
What is FMX for Linux?
FireMonkey for Linux, also known as FMXLinux, is an add-on component provided to Delphi and RAD Studio Enterprise and Architect edition customers via an exclusive OEM agreement with FMXLinux. FMXLinux provides capabilities for building GUI applications for Linux, extending RAD Studio’s (Delphi Edition) FireMonkey cross-platform framework.
Starting with 10.3.1, the FireMonkey for Linux (FMX) client add-on is available for Delphi and RAD Studio Enterprise customers that are current on Update Subscription via the RAD Studio GetIt Package Manager in the IDE.
Key features:
- FireMonkey for Linux provides the ability to create GUI applications for Linux, extending Delphi’s FireMonkey cross-platform framework.
- FMXLinux expands Delphi’s support from server applications to FMX client applications for popular Linux distributions.
- Includes several ready-to-use user interface styles.
- Many of the FMX components, such as grids, widgets, etc. work seamlessly on Linux clients.
- Leverage RAD Studio’s innovative features, such as Live Bindings, and much more, in your Linux client applications.
- Leverage WebKitGTK support to run an FMXLinux application as an HTML5 web application in the browser.
How to access FMX for Linux
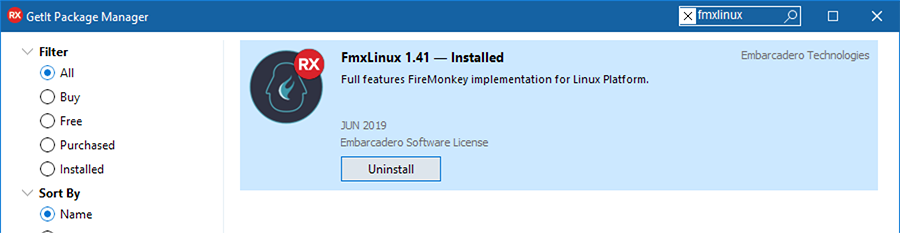
To download and install FMXLinux, open Delphi, go to Tools > GetIt Package Manager , and search for fmxlinux. At the end of the process, you need to restart the IDE, as requested by the GetIt package manager.
FireMonkey GUI Application Prerequisites
Installing Linux Platform Support
Before installing FMXLinux, you need to have Linux platform support for Delphi installed. Go to Tools > Manage Platforms to verify that Delphi Linux 64-bit is installed.

Installing and running PAServer
After installing Linux platform support, you need to install the Platform Assistant on Linux to build and deploy Linux applications. PAServer enables you to use the Deployment Manager, import the Linux SDK, and perform remote debugging on a Linux system. After installing PAServer for Linux, you will need to run PAServer before you can start building FMX Linux GUI applications.
Installing dependencies on your Linux server
To use graphical features in your server application, you will need to install some dependencies. You don’t need to install the whole X11 system on your server.
To install dependencies on Ubuntu/Debian, type this into the terminal:
Getting Started
FMXLinux Configuration
When installing FMXLinux via GetIt, the system registers a DLL Expert (which adds the “Add Linux Platform”) menu indicated below and also adds the catalog repository library folder to the Library Path for the Linux platform. You can verify this in Tools > Options > Language > Delphi Options > Library and choose Linux 64-bit from the Selected Platform combo box at the top:
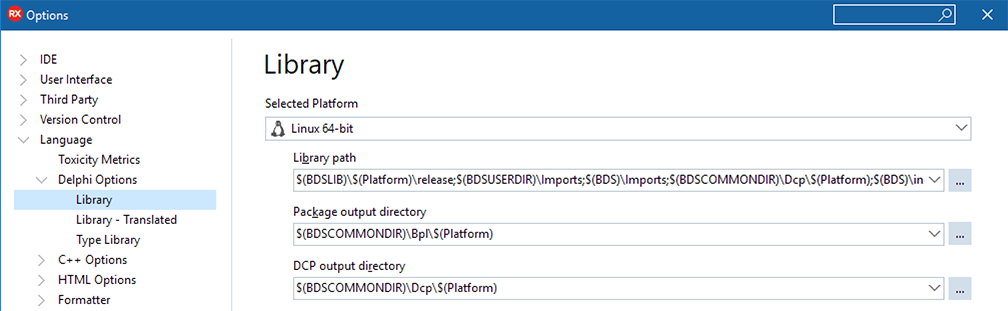
Click the ellipsis  to expand the list of paths and eventually fine tune them.
Building and deploying your first project
After installing the prerequisites listed above and FMXLinux via the GetIt Package Manager, go to File > Open Project to open an existing FireMonkey Project or File > New > Multi-Device Application to create a new FireMonkey project.
Next, right-click on the project in the Project Group to Add Linux platform.
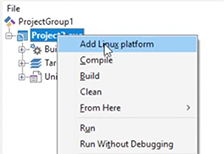
Once you’ve added the Linux platform to your project, you will be able to switch to Linux 64-bit and deploy your FMX GUI applications to Linux. Ensure that PAServer is running on your target Linux machine. Click Run to deploy your Linux GUI application.

This happens because your library paths are not properly configured and instead of building against the proper DCU file, the compiler looks for the original version of the source code file, which is not compatible (FMXLinux patches that file).
Additional Capabilities
Web Deployment to Ubuntu Server
You can use the GTK-Broadway backend to run an FMXLinux application as an HTML5 web application in the browser:
- Install Required Libs: sudo apt install xorg libgl1-mesa-dev libosmesa-dev libgtk-3-bin
- Start broadway server: broadwayd
- Run application from IDE
- Load :8080 in the browser
Supported Linux Distributions
Delphi Linux supports RedHat Enterprise and Ubuntu distributions, see the list of Supported Target Platforms for more information.
Additional Resources
There are a number of videos that you can view for help with getting started building FMX Linux applications:
Источник
Как подготовиться к работе Delphi на Linux?

Если нет, то потратьте пару минут на этот пост, чтобы проверить степень своей готовности. Linux, как новая платформа в RAD Studio, был включен в план развития достаточно давно и с нетерпением ожидается многими отечественными пользователями. И вот, наконец, мы приближаемся к цели. Пользователи RAD Studio 10.1 Berlin с действующей подпиской получат право и возможность поучаствовать в программе раннего ознакомления на практике с поддержкой в RAD Studio этой дополнительной платформы. А чтобы нерационально не тратить время во время тестирования, давайте познакомимся с некоторыми рекомендациями для более приятного и эффективного изучения предложенного инструмента.
Кто сможет участвовать: пользователи Berlin с действующей подпиской. Если у вас более старая версия, то можно воспользоваться действующими акциями Embarcadero, чтобы перейти на Berlin со скидками и получить дополнительные бонусы. Узнать подробности можно на сайте http://www.embarcadero.com/ru или обратившись в представительство по телефону.
Если вы в списке, то получите специальное письмо-приглашение, где будут ссылки для установки RAD Studio с поддержкой Linux. Но с каким вариантом Linux вы будете работать?
Заранее установите Linux-сервер! В программу раннего ознакомления войдет официальная поддержка Red Hat / Fedora и Ubuntu. В перспективе поддержка и других дистрибутивов. Если у вас уже есть работающий Linux-server, то можно использовать и его, учитывая возможные последствия от сбоев в предварительной версии RAD Studio и удаленного Linux-отладчика. Возможно, разумнее создать новую виртуальную машину для проверки. Доступные и бесплатные образы таких машин можно найти в интернете, например, всем хорошо известный LAMP. Можно воспользоваться контейнером Docker или многими другими вариантами. 
В RAD Studio поддерживается разработка серверных, консольных и web приложений для Linux, но с полными возможностями работы с базами данных, в том числе InterBase. InterBase работает в среде Linux уже очень давно и сертифицирован для работы различными вариантами Linux, включая RHEL 7, RHEL 6, SuSE 11.3, Ubuntu 14. В следующем посте я перечислю соответствующие рекомендации для подготовки Interbase.
Освежите свои навыки управления сервером из Linux terminal. Не исключено, что придется давать дополнительные разрешения на доступ к каталогам и инструментам.
А теперь, продумайте стратегию и тактику своей проверки и ознакомления. Что из ваших приложений следует проверять и в каком порядке? Выберите тестовое приложение и убедитесь, что оно гарантировано правильно функционирует в Windows-среде разработки, и его баги не будут влиять на результаты опробывания в Linux. Не поленитесь заранее создать набор автоматических тестов, которым вы будете тестировать Linux-компилятор. Продумайте перенос на сервер необходимых архитектурных частей для этого приложения. Убедитесь, что не требуется рефакторинг этого приложения из-за каких-либо используемых компонент.
И еще один добрый совет: Поддержка Linux в новом релизе RAD Studio входит в завершающую, но все-таки, не окончательную фазу. Устанавливайте проверяемую среду и компиляторы RAD Studio в виртуальные машины или на специально выделенные ПК. Это даст вам большие удобства при переходе на более поздние варианты предварительного релиза и обеспечит дополнительную надежность и безопасность ваших рабочих сред.
Встретимся в Linux!


Reduce development time and get to market faster with RAD Studio, Delphi, or C++Builder.
Design. Code. Compile. Deploy.
Start Free Trial Upgrade Today
Источник
Как настраивать Linux-сервер для работы с RAD Studio

Возьмем, для иллюстрации, VMWare Worksation и создадим ВМ c Ubuntu 16 — 64 битным сервером.
Образ ISO с дистрибутивом Ubuntu можно бесплатно скачать на официальном сайте Ubuntu. Запускаем инструмент VMWare Workstation и через File -> New Virtual Machine (CTRL-N) переходим в режим создания нового экземпляра.
 |  |  |
 |  |  |
VMware Workstation «знает», как устанавливать Ubuntu, поэтому если вы указали Typical конфигурацию на первом экране диалога, workstation использует режим упрощенной установки (Easy Install) и освободит вас от необходимости указывать нужные опции в процессе установки. Параметры, которые использовались для создания моей виртуальной машины, видны на картинках.
Возможно, у вас есть большой опыт создания различных виртуальных машин из доступных дистрибутивов и сказанное выше вам прекрасно известно. Но даже в этом случае, после начальной установки необходимо провести дополнительную настройку.
Обязательно установите VMware Tools — во-первых, нам потребуется обмениваться файлами между Windows-хостом и Ubuntu-сервером. Во-вторых, виртуальная машина сможет работать быстрее за счет использования специфических параметров виртуализации. В двух словах процедура установки VMware Tools выглядит так: выбрать в меню VMWare VM -> Install VMware Tools (это «загрузит» соответствующий установочный образ в виртуальный CD), подключиться к Ubuntu, смонтировать CD в файловую систему и установить с него соответствующие модули. Команды для каждого варианта Linux приведены в справочной информации по VMware. Если вы использовали режим easy install, вам придется сначала освободить виртуальные дисководы прежде, чем делать VM -> Install VMware Tools.
После создания ВМ, подключитесь к ней с заведенными вами в процессе login и password и выполните ряд необходимых команд:
Источник
Linux Application Development
RAD Studio allows you to develop applications for the target Linux platform. Using RAD Studio installed on Windows machine, you can create a 64-bit Linux application and deploy it to the Linux machine. Developing Linux applications is similar to creating Android apps in RAD Studio. However, for Linux, you cannot create the visual VCL and FireMonkey applications. Here is the list of apps that are available for the Linux platform:
- Console Application
- EMS Package (RAD Server)
- DataSnap
- DataSnap WebBroker
- WebBroker
- Dynamic-link Libraries
- DUnitX Project
Contents
Prerequisites
To develop Linux applications, you need to have the RAD Studio installed on the Windows PC as well as a machine with the Linux platform (can be a virtual machine).
Preparing Your Linux Development Environment
To prepare your development system (PC) and Linux machine for application development with RAD Studio:
Installing Development Packages
To install the development packages on Ubuntu:
- Right-click your desktop and select Open Terminal.
- To upgrade the packages you have already installed , type sudo apt update && sudo apt upgrade && sudo apt dist-upgrade in the terminal.
- Type your user password and press Enter
- Wait until prompted to agree to the package upgrade operation. Type Y and press Enter
- Wait until the package upgrade operation is complete. It may take a few minutes to complete.
- To add the development packages, type sudo apt install joe wget p7zip-full curl openssh-server build-essential zlib1g-dev libcurl4-gnutls-dev libncurses5 in the terminal.
- Type your user password and press Enter
- Wait until prompted to agree to the package installation operation. Type Y and press Enter
- Wait until the pacjage installation operation is complete. It may take a few minutes to complete.
To install the development packages on Red Hat:
- Right-click your desktop and select Open Terminal.
- Type yum groupinstall ‘Development Tools’ in the terminal.
- Press Enter and wait until the package installation operation is complete. It may take a few minutes to complete.
Preparing Your Linux Machine
To create Linux applications, you need to add a virtual machine PAServer:
1. Find the LinuxPAServer21.0.tar.gz file in the following location: C:\Program Files (x86)\Embarcadero\Studio\21.0\PAServer\LinuxPAServer21.0.tar.gz 2. Unpack the LinuxPAServer21.0.tar.gz file.
To use the System.zLib unit on Red Hat:
1. Install the zLib-devel library to your RHEL machine with the following command: sudo yum install zlib-devel 2. Update the local SDK cache.
To use the System.zLib unit on Ubuntu:
1. Install the zLib-devel library to your Ubuntu machine with the following command: sudo apt-get install zlib1g-dev 2. Update the local SDK cache.
Creating a Connection Profile
- Right-click the folder where you have unpacked the LinuxPAServer21.0.tar.gz file, and then click Open in Terminal.
- Enter ./paserver in terminal. Then, press Enter.
- On the Tools > Options > Environment Options > Connection Profile Manager page, click the Add button. The Create a Connection Profile wizard opens.
- On the Profile information page, enter the following:
- In the Profile name field, enter the needed name.
- In the Platform field, click the 64-bit Linux platform.
- Click Next.
- On the Remote machine information page, enter the following:
- In the Remote machine field, enter the IP address or Machine name.
- Click Test Connection to check if the values are valid.
- Click Finish.
Adding the Installed SDK to RAD Studio
- On the Tools > Options > Environment Options > SDK Manager page, click the Add button.
- In the Add a New SDK dialog, enter the following:
- In the Select a platform field, click 64-bit Linux.
- In the Select a profile to connect, select a created profile from the drop-down list.
- In the Select an SDK version field, the name of the SDK that you just installed will automatically appear. If you have not installed SDK previously, you can do it on this step. If you have already installed SDK, move on to the next step.
Running PAServer on Linux machine
To run the PAServer on your Linux machine:
- Open the terminal, and then run PAServer in the terminal.
Источник


