RAMDisk Manager 1.2.1 for Mac
С RAMDisk Менеджер для Mac OS X вы сможете создать виртуальный жесткий диск в оперативной памяти вашего компьютера. Вы выбираете его размер (конечно, в пределах доступной оперативной памяти), букву диска и файловую систему и работаете с ним как с обычным диском — можете копировать, перемещать и удалять файлы на нем.
Основные характеристики:
- Создание стандартных и нестандартных система, основанная RAM диски без использования сценария кодирования
- Синхронизация RAM Диски содержание со связанными между собой папок
- Автоматически создавать и восстанавливать Ram дисков на сессии входе пользователя
- Мониторинг RAM Диски используется пространство и сделать что-то полезное ниже пользовательских уровней
- Показать/скрыть RAM Диски из Finder
- Доля RAM Диски настройками с другими пользователями ОЗУ Disk Manager с помощью функции Импорт/Экспорт
RAMDisk менеджер также предлагает:
- Easily create and delete standard RAM Disk or mounted on folder without using script coding
- Automatically create and restore Ram Disks at user session login
- Automatically alert, erase or eject and back-up RAM Disks before saturation
- Hide RAM Disks individually or globally
- Create as much RAM Disks as wished: RAM will not be allocated by default to your RAM Disks, it is kept available for the System and your Applications till not used by the RAM Disks
- Monitor and access RAM Disks in the main menu bar
- Edit existing RAM Disks settings and share them with other RAMDisk Manager users
- Purge system memory
Что нового в версии 1.2.1:
- Bug fix: RAMDisk Manager sometimes quit before synchronization or post command have completed when the option to «create RAM Disk then quit after login» is chosen in Preferences.
Разработчик: MacMagna
Системные требования: Mac OS X 10.8 or later
Язык интерфейса: английский
Таблэтка: Не требуется
Скачать программу RAMDisk Manager 1.2.1 (2.9 Mb):
Источник
Ram disk mac os

Need really fast Java IDE or browser? Then keep reading.
This app will create a RAM disk in OS-X with specified size to store the apps cache in RAM, which is known as SSD optimization — reducing disk IO or making browsing the web and programming using IntelliJ more enjoyable.
Supported apps (you can add yours):
The IntelliJ Idea (or JetBrains IDEs) are really fast after this. Be aware that for the large code base you will need to have larger RAM Disk. I don’t have exact numbers, sorry, it can vary because of many factors. Mine machine have 16GB — it works very good for small code bases.
If you observing performance degradation — revise how much memory you are using and may be adding more can help. By default script will create RAM disk of 1/4 size of your RAM. If you need to change the size — edit startupRAMDiskandCacheMover.sh header section. The RAM disk works with hibernate option — you don’t need to worry about this part.
Have something to discuss? 
If you have any issues (compatibility etc) — I am glad to have them reported in the issues tab.
- MAC OS X 10.10.2 Yosemite
- MAC OS X 10.11 EI Capitan
- MAC OS X 10.12 Sierra
Note that you have to re-run the script in order to get the ram disk back after machine restart. Currently it does not place it on startup — I’m working on it.
Give it a try before installing
Jetbrains IDE notes (IntelliJ)
In order to speed up the compilation and responsiveness of the IDE you can change «Project compiler output» and point it to ram disk:
and in your project/module settings (Command+down) point to this directory. You can also set this setting by default for your projects at the main menu, choose File | Other Settings | Default Settings
In addition to above you can tune jvm with following flags vim /Applications/IntelliJ\ IDEA\ 15.app/Contents/bin/idea.vmoptions
Do not use it now — the startup script does not work yet — work in progress
Run make uninstall or manually do following
Close the chrome, idea or any other application you configured to use ram disk.
If you are Linux user use
Was made with ♥ in NYC
About
RAM Disk creator in OS-X for IntelliJ, Google Chrome and other apps cache to make them fly.
Источник
[FAQ] Про создание RAM-дисков в Mac OS X

Если вы хотите увидеть на нашем сайте ответы на интересующие вас вопросы обо всём, что связано с техникой Apple, операционной системой Mac OS X (и её запуском на PC), пишите нам через форму обратной связи.
К нам поступил следующий вопрос:
Мы твёрдо уверены, что нет никакого смысла пользоваться сторонними (тем более платными) утилитами для создания RAM-диска нет смысла. Для решения обозначенных вами задач вполне хватает встроенных в систему возможностей.
Но для начала поясним остальным читателям, зачем это всё. Если в вашем Маке много оперативки, то не секрет, что большую часть времени она простаивает. Тем не менее, можно занять её весьма оригинальным образом — выделить часть оперативной памяти под виртуальный диск. Он будет необычно быстрым, но есть один главный минус — после выключения или перезагрузки он будет уничтожен. Соответственно, хранить пользовательские данные на нём нет никакого смысла, а вот размещать там разнообразные временные файлы Mac OS X очень даже можно. Для Маков с SSD-носителями создание RAM-дисков весьма желательно, поскольку позволяет существенно продлить жизнь вашего SSD-шника (количество записываемых на диск файлов в этом случае сильно снизится).
Чтобы создать RAM-диски для системных директорий с кэшами, вам пригодится следующий скрипт:
[php]#!/bin/sh
# Create a RAM disk with same perms as mountpoint
RAMDisk() <
mntpt=$1
rdsize=$(($2*1024*1024/512))
echo «Creating RamFS for $mntpt»
# Create the RAM disk.
dev=`hdik -drivekey system-image=yes -nomount ram://$rdsize`
# Successfull creation…
if [ $? -eq 0 ]; then
# Create HFS on the RAM volume.
newfs_hfs $dev
# Store permissions from old mount point.
eval `/usr/bin/stat -s $mntpt`
# Mount the RAM disk to the target mount point.
mount -t hfs -o union -o nobrowse $dev $mntpt
# Restore permissions like they were on old volume.
chown $st_uid:$st_gid $mntpt
chmod $st_mode $mntpt
fi
>
# Test for arguments.
if [ -z $1 ]; then
echo «Usage: $0 [start|stop|restart] »
exit 1
fi
# Source the common setup functions for startup scripts
test -r /etc/rc.common || exit 1
. /etc/rc.common
StartService () <
ConsoleMessage «Starting RamFS disks…»
RAMDisk /private/tmp 1024
RAMDisk /var/run 256
>
StopService () <
ConsoleMessage «Stopping RamFS disks, nothing will be done here…»
diskutil umount -f /private/tmp /private/var/run
>
RestartService () <
ConsoleMessage «Restarting RamFS disks, nothing will be done here…»
>
RunService «$1»
EOF
sudo chmod u+x,g+x,o+x RamFS/RamFS
Создайте на рабочем столе текстовый файл, скопируйте туда всё содержимое выше. Обратите внимание на строки RAMDisk /private/tmp 1024 и RAMDisk /var/run 256 — в них задаётся объём RAM-дисков для системных файлов (в мегабайтах). Слишком маленькое значение (128 и меньше) может привести к проблемам в работе системы. Слишком большое значение замедлит выключение и перезагрузку компьютера.
После копирования сохраните файл и поменяйте имя и расширение на ramdisk.sh.
Затем запустите Терминал и выполните следующие команды:
RAM-диски будут созданы при следующей загрузке компьютера. Обращаем ваше внимание на то, что визуально ничего не изменится — эти диски не будут видны ни в Finder, ни в Дисковой утилите.
Отменить использование RAM-дисков можно будет командой:
[php]sudo rm -rf /System/Library/StartupItems/RamFS[/php]
Опять-таки, диски перестанут создаваться лишь при следующей загрузке.
Источник
iRamDisk. Быстрое создание RAM-диска из свободного объема оперативной памяти
Каким бы суперскоростным не был бы жесткий диск, установленный в Маке, обмен данными в ОЗУ все равно происходит на несколько порядков быстрее. Если оперативной памяти на борту Мака предостаточно, то почему бы не создать из части ее объема виртуальный диск, скорость работы которого будет в десятки раз выше, чем у HDD или SSD-дисков, и использовать его для тех операций, которые требуют частого обращения к диску? Создать такой RAM-диск можно силами терминала или, если разбираться с командами Терминала нет ни желания, ни времени — с помощью ряда утилит, коих можно найти в достаточном количестве не только в Mac App Store, но и на просторах сети Интернет. Одной из таких утилит является совсем небольшая программа под недвусмысленным названием iRamDisk.
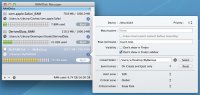
Интерфейс программы прост до безобразия: небольшое окно разделено на две части, в одной из которых отображается список созданных RAM-дисков, а в другой — набор опций, используемых при создании или обслуживании любого из них. Про интерфейс и дизайн можно сказать в двух словах: минималистично и красиво.

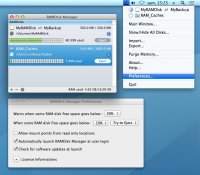
Несомненным плюсом утилиты является то, что в статусной строке, расположенной внизу окна утилиты, отображается состояние оперативной памяти на компьютере пользователя, в том числе и ее свободный объем. Это позволит пользователю быть всегда в курсе того, чем он может располагать при создании очередного виртуального диска.
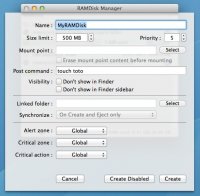
Создание диска осуществляется не просто, а очень просто. Клик на иконке «+» откроет в правой части окна список опций и параметров будущего диска. В число обязательных параметров входит название диска, его размер и папка монтирования.
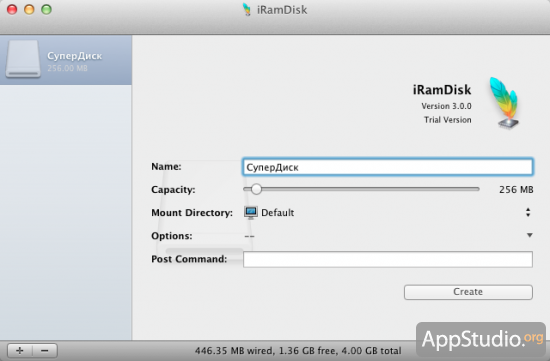
Нажимаем кнопку Create и наш первый виртуальный диск готов. Стоит отметить, что после создания RAM-диска объем оперативной памяти тут же не уменьшится на величину его размера (хотя возможен и такой вариант, о котором мы расскажем чуть ниже). Уменьшение свободного объема ОЗУ будет происходить только по мере заполнения виртуального диска данными. Задавая его размер при создании, мы просто выставляем определенную величину, до размера которой может вырасти диск. В системе такой виртуальный диск отображается как самый обычный съемный том (мобильный HDD, флешка и пр.) и его точно также можно размонтировать.


Для повторного же монтирования необходимо снова запустить iRamDisk и, выбрав нужный диск, снова нажать кнопку Create. Казалось бы, зачем диск размонтировать, пусть себе находится в системе, пока Мак не будет выключен или перезагружен. Все дело в том, что возможности утилиты позволяют менять свойства размонтированного виртуального диска. Например, можно дать ему другое имя или изменить его размер в любую сторону и пр.
Дабы не приходилось при каждом сеансе работы в Mac OS X вручную монтировать RAM-диск, в числе необязательных опций можно выбрать вариант Create At Login и тогда виртуальный диск будет автоматически монтироваться при старте системы. Две другие опции позволяют сделать диск скрытым и он не будет отображать в Finder (Hide On Finder), либо жестко зарезервировать объем оперативной памяти, равный размеру диска (Wired Memory), независимо от того, на сколько процентов он будет использоваться.
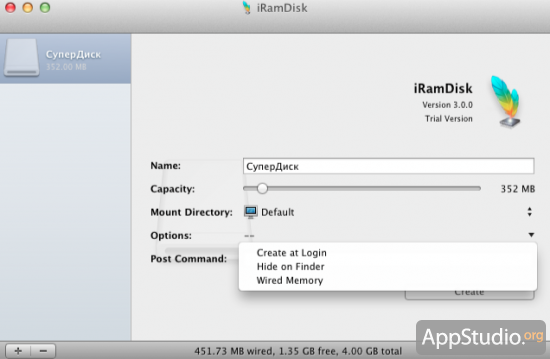
Каких либо дополнительных настроек не предусмотрено, а из прочих опций можно отметить наличие наглядного индикатора заполненности диска и, что более полезно, возможность для продвинутых пользователей использовать пост-команды при создании или модификации диска.

При использовании RAM-диска стоит помнить о том, что он энергозависим, и данные на нем могут храниться только тогда, когда работает сам компьютер. Стоит выключить или перезагрузить Мак, как все данные на диске будут потеряны, независимо от того, будет ли он автоматически создан и смонтирован при запуске системы или нет. Поэтому ВАЖНО не забывать перед выключением или перезагрузкой Мака делать бэкап данных с RAM-диска, если они представляют какую-либо ценность. Очень жаль, что iRamDisk не умеет делать это автоматически, как, например, утилита RAMDrive.
Способов применения RAM-диска можно придумать достаточно много, например выделить его целиком и полностью под временные файлы Adobe Photoshop, что более, чем благотворно скажется на времени запуска редактора, скорости загрузки изображений и общей производительности.
Как уже было сказано выше, утилит по созданию RAM-дисков достаточно много и все они отличаются как функциональностью, так и своей стоимостью. Мы не будем говорить за то, что iRamDisk — лучшая утилита из себе подобных, но то, что в ней создание дисков осуществляется предельно просто и с этим справиться пользователь с любым уровнем подготовки — это факт. Ну а цена, составляющая 1.99$, является не такой уж и большой за возможность не заучивать длинные команды Терминала, а просто нажать пару кнопок для создания виртуального диска.
Источник
How to Create and Use a RAM Disk with Your Mac (Warnings Included!)
Once a popular option in the early days of the Mac, RAM disks, which were used to speed up the performance of a Mac, have fallen by the wayside.
Conceptually, RAM disks are a simple idea: a chunk of RAM set aside that looks, to the Mac system, like just another storage drive. The system, as well as any installed apps, can write files to or read files from the RAM disk, just as if it really were another storage drive mounted on your Mac.
But unlike any storage drive, a RAM disk can operate at the speed of RAM, which is usually many times faster than most drive storage systems.
RAM Disk History
RAM disks existed before the Macintosh ever hit the market, but we’re going to predominantly explore how RAM disks were used with the Mac.
The Mac Plus, released in 1986, had quite a few new features, including the use of SIM (Single Inline Memory) modules that users could easily upgrade. The Mac Plus shipped with 1 MB of RAM, but users could increase the memory size to 4 MB. That was an amazing amount of RAM in 1986, and begged the question: What can I do with all this memory space?
At the same time, many users were asking how they could speed up their Macs. And while many users were happy to just max out the RAM, and enjoy the performance gain of having more memory, which let them run more applications concurrently, some users discovered the joys of using a RAM disk to speed up the system and apps. Other users discovered that a RAM disk could be used to create an amazingly fast storage system. Remember, back then, most Mac Plus users were getting by with a single 800 KB floppy drive, while those who felt like splurging could add an additional external floppy drive. If you really had cash to burn, you could hook up a 20MB SCSI (Small Computer System Interface) hard drive, which would likely set you back well over $1,200.
The first prominent use of a RAM disk was to copy the Mac’s slow ROM (Read Only Memory), which contained many of the system’s core components, along with the operating system, which was stored on a floppy drive, and move them both to a RAM disk where they could operate at the speed of RAM; many, many times faster than either the floppy disk or the ROM.
The performance increase was amazing, and was achieved for just the cost of a RAM disk utility app.
The second common use of a RAM disk back in the Mac Plus days was to create a tiered storage system. Floppy drives weren’t fast enough for professionals or avid amateurs to work with new rich media editing systems, such as audio editors, image editors, or page layout apps. SCSI drives could meet the needs of image editing and page layout, but audio editing was at best iffy, with most SCSI drives being too slow to provide the needed bandwidth for audio or other real-time editing.
RAM disks, on the other hand, were very fast, and could easily meet the needs of real-time editing with their ability to write or read files as quickly as the RAM could be accessed, without the mechanical latency inherent in SCSI or floppy disks.
The only disadvantage to RAM disks was that the data stored in them was lost every time you turned your Mac off, or the power went out. You had to remember to copy the content of the RAM disk to your main storage system or your work would be lost.
Modern Uses for RAM Disks
RAM disks are likely to be the fastest storage location available on a Mac, easily outperforming any hard drive, and in most cases, beating out SSDs. If you can live with the downside of RAM disks, primarily their small sizes, and the issue of not being able to retain data when power to your Mac is turned off, then there are still plenty of good uses for them.
- Scratch space and temp files: Assigning RAM disk space for use with a multimedia app as scratch space can increase the app’s performance. This assumes the app in question prefers to use disk space for its temporary files.
- Games: Try loading your favorite game, or for small RAM disks, just the saved game files to a RAM disk. You should see faster load times and rendering speeds, and smoother play.
- Video or audio editing/rendering: Load textures, images, audio loops, or other media assets you’ll be using onto a RAM disk for better overall performance.
- Compression: If you need to compress a large number of files as part of your workflow, moving them to a RAM disk can speed up the compression time.
- Batch file processing: If you’re converting a number of image, audio, or video files from one format to another, moving the files to your RAM disk can increase performance.
Creating a RAM Disk
There are two ways to create a RAM disk; you can use the Terminal app to manually create a RAM disk, or you can make use of a third-party utility for creating a RAM disk.
It’s a good idea to start the process of creating a RAM disk by knowing how much free RAM space you have available to work with:
Launch Activity Monitor, located at /Applications/Utilities/.
Select the Memory button in the Activity Monitor window.
At the bottom of the window is a summary of how the RAM is being used. You should see entries for Physical Memory, and Memory Used. Subtract Memory Used from Physical Memory to figure out how much free memory is available to you.
It’s a good idea not to use all of the free memory; your Mac always needs some free memory to work with. Apps like web browsers can quickly swallow up free memory, not to mention the RAM disk you’re about to create. I suggest you leave the Activity Monitor app open, so you can see how memory is being used on your Mac as you experiment with creating and using RAM disks.
Note: The RAM disk you create will not affect the Memory Used entry until you actually use the RAM disk to store data.
Let’s start with using the included Terminal app:
Launch Terminal, located at /Applications/Utilities/.
The following command will create the RAM disk:
diskutil erasevolume HFS+ «RAMDisk» `hdiutil attach -nomount ram://2048`
The command has a number of parameters you’ll likely wish to change; the first is the name of the RAM disk, which in the example is “RAMDisk”. You can use any name you wish; just be sure the name is contained within the double-quotes.
The second option you may wish to change is the size of the RAM disk; in this example, the entry ram://2048 will create a 1 MB RAM disk. The size you enter is how many memory blocks to use in the RAM disk; 2048 blocks will create a 1 MB RAM disk. Multiply the 2048 value by the number of MB you wish to use for the RAM disk; some examples:
- 256 MB = 524288
- 512 MB = 1048576
- 1 GB = 2097152
- 2 GB = 4194304
The last note about the command is the accent grave ` character used before hdiutil and after the size parameter. The character is not a single quote; the accent grave character is found at the top left of most QWERTY keyboards; the accent grave character is usually on the same key as the tilde (
With all the notes taken into account, if you wished to create a 1 GB RAM disk, you would enter the following at the Terminal prompt:
diskutil erasevolume HFS+ «RAMDisk» `hdiutil attach -nomount ram://2097152`
and then press enter or return.
After a moment or two, the RAM disk will be mounted on your Mac’s desktop, ready for you to work with.
Third-Party RAM Disk Utilities
There are a number of utilities that make creating and managing a RAM disk a bit easier than using Terminal.
- TmpDisk: Available at github.com/imothee/tmpdisk, TmpDisk is a simple Open Source RAM disk management app. It allows you to create RAM disks by simply filling in a few fields. It installs as a menu bar item and includes the ability to create RAM disks automatically at startup.
- Ultra RAM Disk: Available from the Mac App Store, Ultra RAM Disk installs as a menu bar item that allows you to create RAM disks when needed.
- RAMDisk: Available from the Mac App Store, RAMDisk is an app for creating as well as backing up RAM disks, to allow you to save their contents as well as restore RAM disks when you restart your Mac.
Using the RAM Disk
Now that you have a RAM disk mounted on your Mac you can use it just as if it were another drive. Try copying an image file to the RAM disk and then open it in your favorite editor. You may be amazed at how fast it opens, as well as how fast you can perform edits and save the image.
If you have a favorite game, and enough free memory to house the game, try using the RAM disk to run the game from. You may be racking up points faster than ever.
Remember: The key to using a RAM disk is that the information stored within it is volatile. It won’t survive a shutdown or power loss. Make sure you copy any information you need from the RAM disk before shutting down.
Источник


