- Backups
- Home folder
- SD card copier (recommended)
- SD card image
- MySQL
- Automation
- The Best Way to Backup Raspberry Pi SD Card in Windows
- The case: need to backup Raspberry Pi SD card in Windows
- Image Raspberry Pi SD card with the best freeware
- How to Backup Raspberry Pi SD card in Windows step by step?
- Summary
- Как создать резервную копию всей системы на Raspberry Pi
- Содержание
- Бэкап на Windows
- Создание резервной копии
- Восстановление из резервной копии
- Бэкап на macOS/Linux
- Создание резервной копии
- Восстановление из резервной копии
Backups
It is highly recommended that you keep regular backups of any important files. Backups are often not limited to user files; they could include configuration files, databases, installed software, settings, and even an entire snapshot of a system.
Here, we’ll guide you through some backup techniques for your Raspberry Pi system.
Home folder
A sensible way to keep your home folder backed up is to use the tar command to make a snapshot archive of the folder, and keep a copy of it on your home PC or in cloud storage. To do this, enter the following commands:
This creates a tar archive called pi_home.tar.gz in /home/ . You should copy this file to a USB stick or transfer it to another machine on your network.
SD card copier (recommended)
The SD Card Copier application, which can be found on the Accessories menu of the Raspberry Pi Desktop, will copy Raspberry Pi OS from one card to another. To use it, you will need a USB SD card writer.
To back up your existing Raspberry Pi OS installation, put a blank SD card in your USB card writer and plug it into your Pi, and then launch SD Card Copier. In the ‘Copy From Device’ box, select the internal SD Card. This could have a number of different names, and may have something like (/dev/mmcblk0) in its entry, but will usually be the first item in the list. Then select the USB card writer in the ‘Copy To Device’ box (where it will probably be the only device listed). Press ‘Start’. The copy, depending on the size of the SD card, can take ten or fifteen minutes, and when complete you should have a clone of your current installation on the new SD card. You can test it by putting the newly-copied card into the Pi’s SD card slot and booting it; it should boot and look exactly the same as your original installation, with all your data and applications intact.
You can run directly from the backup, but if you want to recover your original card from your backup, simply reverse the process – boot your Pi from the backup card, put the card to which you want to restore into the SD card writer, and repeat the process above.
The program does not restrict you to only copying to a card the same size as the source; you can copy to a larger card if you are running out of space on your existing one, or even to a smaller card (as long as it has enough space to store all your files – the program will warn you if there isn’t enough space). It has been designed to work with Raspberry Pi OS and NOOBS images; it may work with other OSes or custom card formats, but this is not guaranteed.
The only restriction is that you cannot write to the internal SD card reader, as that would overwrite the OS you are actually running, which could break the installation completely.
Note, everything on the destination card will be overwritten, so ensure you do not have any critical data on it before starting the copy.
SD card image
It may be sensible for you to keep a copy of the entire SD card image, so you can restore the card if you lose it or it becomes corrupt. You can do this using the same method you’d use to write an image to a new card, but in reverse.
This will create an image file on your computer which you can use to write to another SD card, and keep exactly the same contents and settings. To restore or clone to another card, use dd in reverse:
These files can be very large, and compress well. To compress, you can pipe the output of dd to gzip to get a compressed file that is significantly smaller than the original size:
To restore, pipe the output of gunzip to dd :
If you are using a Mac, the commands used are almost exactly the same, but 4M in the above examples should be replaced with 4m , with a lower case letter.
MySQL
If you have MySQL databases running on your Raspberry Pi, it would be wise to keep them backed up too. To back up a single database, use the mysqldump command:
This command will back up the recipes database to the file recipes.sql . Note that, in this case, no username and password have been supplied to the mysqldump command. If you don’t have your MySQL credentials in a .my.cnf configuration file in your home folder, then supply the username and password with flags:
To restore a MySQL database from a dumpfile, pipe the dumpfile into the mysql command. Provide credentials, if necessary, and the database name. Note that the database must exist, so create it first:
Alternatively, you can use the pv command to see a progress meter as the dumpfile is processed by MySQL. This is not installed by default, so install with sudo apt install pv . This command is useful for large files:
Automation
You could write a Bash script to perform each of these processes automatically, and even have it performed periodically using cron.
The Best Way to Backup Raspberry Pi SD Card in Windows
Want to backup Raspberry Pi SD card in Windows? You can achieve this goal easily with the best free backup software – AOMEI Backupper Standard.

By AOMEI  / Last Updated December 11, 2020
The case: need to backup Raspberry Pi SD card in Windows
When it comes to SD cards, many users will think of Raspberry Pi SD card. It is popular with users because of its reasonable price and optimum performance. Usually, the SD card is used to store large amounts of data.
“Hi, I have built a Pi and put some software on it. I’d like to make an image of — so instead of requiring a flash of an SD and then installation and configuration. I would only need to run one step. Is this possible? And what tool would be best? I have WIN32DiskImager, but I think it only let me push images out to the SD card.”
This real case comes from Reddit. Backing up Raspberry Pi SD card is a crucial task that you should do it frequently, especially if your data change often. Why need to do a disk backup of Raspberry Pi SD card? There are two main reasons.
Raspberry Pi SD card may sometimes simply stop working due to a number of reasons: overheating, cable connection failure, and energy supply issues, etc.
Upgrade to a new larger Raspberry Pi SD card. If you run out of the space of the Raspberry Pi SD, you may need to replace the old one with a new larger SD card.
Image Raspberry Pi SD card with the best freeware
To create a Raspberry Pi SD card backup, you need a powerful freeware – AOMEI Backupper Standard. This freeware supports all brands of SD cards like SanDisk, Samsung, and Transcend, etc. Besides, it works great with Windows 10/8/7, Windows Vista and XP.
With this useful software, you can backup SD card to computer, network, cloud drives, and external hard drives, etc. The most important thing is that you can backup multiple SD cards at the same time.
What’s more, many advanced settings can be supported by this freeware. You can enable email notification to see if the operation is finished successfully. Also, you can backup Raspberry Pi SD card at a fixed time, including daily, weekly and monthly.
It is worth mentioning that the backup process won’t interrupt your work. You can do your work without any concern! By the way, the easy steps and user-friendly interface are also praised by a lot of people. Now, you can download this freeware to have a try. Then, see detailed steps below.
How to Backup Raspberry Pi SD card in Windows step by step?
Before you do, you need to connect Raspberry Pi SD card to the PC.
Step 1. Install and launch this freeware.
Step 2. Click Backup and Disk Backup subsequently.

Step 3. The Task Name can be modified by your needs. Select the Raspberry Pi SD card as source disk.

Step 4. Select the destination path. Then click Start Backup.
Notes:
In Step 4, you can click Options to choose General, Compression, Splitting, Intelligent Sector, VSS and Other. If you don’t want others to access your backup image, you can create an encryption backup (supported by AOMEI Backupper Professional) by clicking General.
You can click Schedule in Step 4 to backup Raspberry Pi SD card automatically. For schedule settings, you can choose Daily, Weekly, Monthly, Event triggers, USB plug in or Real-time Sync. The last three features are available in paid version. You can upgrade to the advanced version to enjoy these practical functions.
You can click Scheme in Step 4 to delete older backups automatically (in paid version).
You can go Home > the Disk Backup > Restore to do a disk restore later.
It is recommended that you use file sync to backup your data, if the Raspberry Pi SD card is only used to store files or folders. Compared to files backup, files sync would not create image file. Thus, you can view your contents at any time.
AOMEI Backupper Standard also allows you to clone Raspberry SD card safely.
Summary
AOMEI Backupper Standard can help you backup Raspberry Pi SD card in Windows 10 easily and efficiently. It is suggested to backup your data frequently with this freeware. With this freeware, you also can transfer files from PC to SD card, clone SD card to larger card, recover files from formatted SD card.
Как создать резервную копию всей системы на Raspberry Pi
Полные бэкапы будут полезны для владельцев Raspberry Pi, которые часто экспериментируют с разными операционными системами, но обладают лишь одним накопителем для этого. Вместо постоянной настройки ОС с чистого листа или покупки новых карт памяти можно сохранять готовые образы и восстанавливать их по мере надобности.
Содержание
Бэкап на Windows
Самый удобный способ создания резервной копии с помощью компьютера под управлением Windows — использование утилиты Win32DiskImager. Ниже представлена инструкция по созданию и восстановлению бэкапа с её применением.
Создание резервной копии
Шаг 1. Подключите к компьютеру USB-накопитель или карту памяти с операционной системой и данными.
Шаг 2. Запустите Win32DiskImager и в поле Image File выберите папку, в которой будет располагаться скопированный образ системы, а также имя будущего файла с расширением .img на конце.
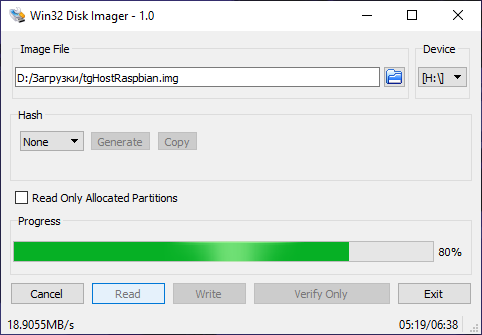
Шаг 3. Выберите диск, на котором располагается система для Raspberry Pi, и нажмите Read.
Шаг 4. По завершении создания резервной копии появится окно с уведомлением. Программу можно закрыть, а накопитель извлечь.
Восстановление из резервной копии
Шаг 1. Подключите к компьютеру USB-накопитель или карту памяти, на которую вы хотите записать образ системы.
Шаг 2. Запустите приложение balenaEtcher, выберите ранее созданный бэкап, укажите подключенный диск и нажмите Flash.
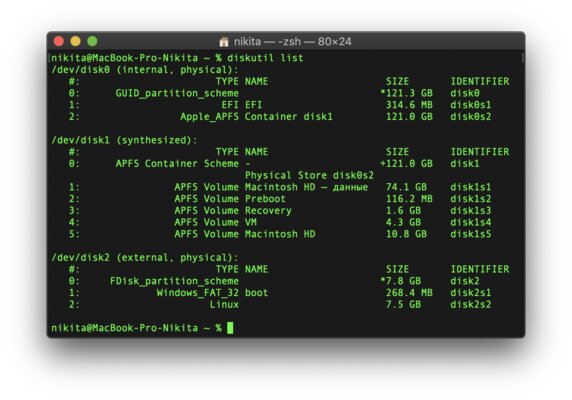
Бэкап на macOS/Linux
На компьютерах под управлением ОС macOS или Linux наиболее оптимально использовать для этого терминал. Для того, чтобы создать копию диска или восстановиться из неё, необходимо следовать инструкции ниже.
Создание резервной копии
Шаг 1. Подключите к компьютеру USB-накопитель или карту памяти с операционной системой и данными.
Шаг 2. Откройте терминал.
Шаг 3. На macOS введите команду diskutil list и узнайте путь к подключённому хранилищу. На Linux для этого надо ввести команду sudo fdisk -l
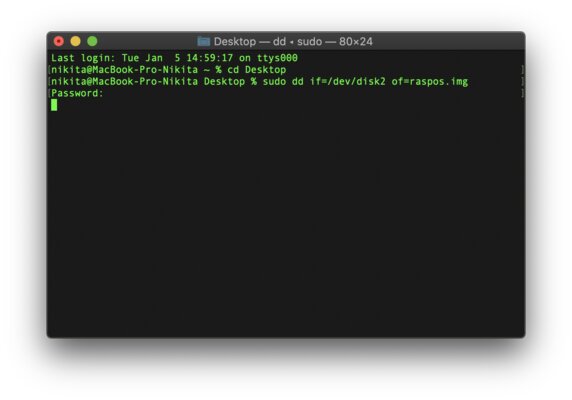
Шаг 4. Перейти в директорию, где будет сохранён образ, можно командой cd . Например, чтобы в macOS перейти на рабочий стол, введите cd Desktop
Шаг 5. Этап создания копии. В случае с macOS используйте команду ниже.
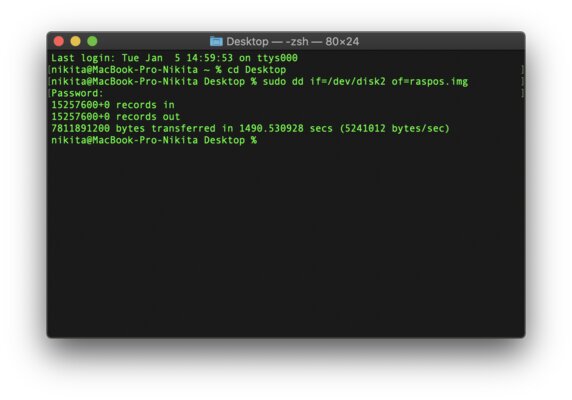
sudo dd if=/dev/disk of=/name.img bs=1m
Вместо /dev/disk подставьте путь, найденный на 3 шаге, а вместо name — желаемое название файла образа, который будет получен в итоге (обязательно добавьте в конец расширение .img). Будет запрошен пароль от вашей учётной записи — введите его и подтвердите нажатием Enter. Обратите внимание на то, что при его вводе символы не отображаются.
Если на компьютере установлен Linux, вводимая строка будет немного отличаться:
sudo dd if=/dev/sda of=/name.img bs=1M
Вместо /dev/sda подставьте путь, найденный на 3 шаге, вместо name введите желаемое название файла образа, который будет получен в итоге (обязательно добавьте в конец расширение .img).
Шаг 6. Операция может занять продолжительное время, особенно, если объём подключённого накопителя большой. По завершении копирования в терминале появится сообщение о количестве обработанной информации и затраченном времени.
Восстановление из резервной копии
Шаг 1. Подключите к компьютеру USB-накопитель или карту памяти, на которую вы хотите записать образ системы.
Шаг 2. Откройте терминал.
Шаг 3. На macOS введите команду diskutil list и узнайте путь к подключённому хранилищу. На Linux для этого надо ввести команду sudo fdisk -l
Шаг 4. Перейдите в директорию, где располагается бэкап, командой cd .
Шаг 5. Для восстановления из копии введите следующую команду, правильную как для macOS, так и для Linux:


