- Размер шрифта kali linux
- Issue
- Locating the Problem
- Why is it wrong?
- Finding the correct value
- Fixing
- Xresources
- xsessionrc
- NVIDIA driver settings
- Xfce Settings
- References
- Увеличить размер значка / текста в Kali Linux
- Размер шрифта kali linux
- Desktop Environments — Xfce
- Scaling Factor
- Cursor size
- Login Screen — LightDM
- Делаем Linux терминал красивым и удобным
- Добавляем функциональность
- Командная оболочка
- Настройка Zsh
- Настраиваем внешний вид
Размер шрифта kali linux
Upon starting Kali Linux up, certain things may appear larger than expected. This could be because of DPI (Dots Per Inch) / PPI (Pixels Per Inch) being incorrect. If things are looking smaller than expected, you may wish to look at our HiDPI guide.
This could be happening for various reasons, such as the graphic card drivers and/or the monitor profile causing issues.
This guide will cover single screen setups. We do not have the hardware in order to test multiple display outputs to write up the guide. So we are looking for community contribution to help out. If you have the hardware, and expertise, please edit this guide!
Issue
Upon opening some applications, the font may appear larger than expected, like in the example below. Here you can see two different terminal software, the one on the left is using Qt ( QTerminal ) and the one on the right is using GTK ( xfce4-terminal ).

Qt is too large, and needs to be altered. First we need to find what value to alter it to, then we need to apply the change.
Locating the Problem
We first use xrdb, which looks up in the database of X server (X is what is sponsorable for the graphical display output), to see what values are there:
There is no sign of DPI being pre-defined. Time to move onto the next tool.
Using xdpyinfo, we can look at the display information about X, which is currently in use (as things will get defined dynamically at various points. e.g. startup, new screen attached etc):
We only get the values back once, which means there is only one monitor. Great! What isn’t so great, is the size of the physical screen, 160x90mm , being detected, which may start to explain why the font is very large (as the DPI is huge). We can also see the screen resolution is set to 1680 x 1050 and the DPI is
Next we can use xrandr as this handles the extension RandR (resize and rotate) to see if what that is reporting matches up:
Again, one screen. ALso, its resolution matches up with what xdpyinfo told us. We can see its using a HDMI cable and also same the same resolution & size.
Checking the logs of X, we can see:
Which is very close to the DPI value which xrandr reported (but off by one). We can see the graphic drive in question is NVIDIA, and its trying to get the DPI value from EDID (The GPU is trying to read the data from the monitor)
If we wanted to, we can look at the value of EDID by using edid-decode:
So it looks like the values from EDID are incorrect, so we shouldn’t listen to the monitor! We are going to need to manually define the values to use.
The easiest way to do this would be to look at the make/model of the screen (is there a a sticker on the back/under of the device?). Otherwise we can use the old fashion method of getting out a tape measure.
Why is it wrong?
So what does the OS think our screen size is?
Using a bit of math ( 1cm is 10mm & 25.4mm is 1 inch ), we can convert the millimeters (mm) to inches (in):
Remember that the output was dimensions: 1680×1050 pixels (160×90 millimeters) , so we are taking “width” as 160 and “height²” as 90
Now, we can find the diagonal screen size by doing √(width² + height²) = diagonal :
The sticker on the back of the screen says its 20 inches, yet only 7.2 inches is detected!
Finding the correct value
Using the formula √(width² + height²) / diagonal = DPI , we get:
Remember that the output was dimensions: 1680×1050 pixels (160×90 millimeters) , so we are taking “width” as 1680 and “height” as 1050 , and correct diagonal is 20
So we need to set our DPI to be 99×99 rather than 267×296.
Fixing
There are various ways we can do to fix this, each with their pros and cons:
/.Xresources (X configuration Recommended method)
Editing
/.xsessionrc (X startup script)
Xresources
We can configure X (per user). In a terminal window, run the following commands:
After running xrdb -merge , a logout shouldn’t be required, so the next time you open a problematic program back up, the font should now be “normal”.
xsessionrc
This is a shell script, which will automatically get executed upon a graphical login. In a terminal window, run the following commands:
After logging out and in again, the next time you open a problematic program back up, the font should now be “normal”.
NVIDIA driver settings
Another approach would be to get the NVIDIA drivers to handle the DPI.
If there isn’t a configuration file for X, we are going to generate one and then move it:
We can now edit the configuration file, to include the following two lines in the Section «Device» section:
- Option «UseEdidDpi» «False»
- Option «DPI» «99 x 99»
After logging out and in again, the next time you open a problematic program back up, the font should now be “normal”.
Xfce Settings
We can configure Xfce by doing:
- Kali -> Settings -> Appearance -> Fonts -> DPI
- Enable: Custom DPI Settings
- Value: 99
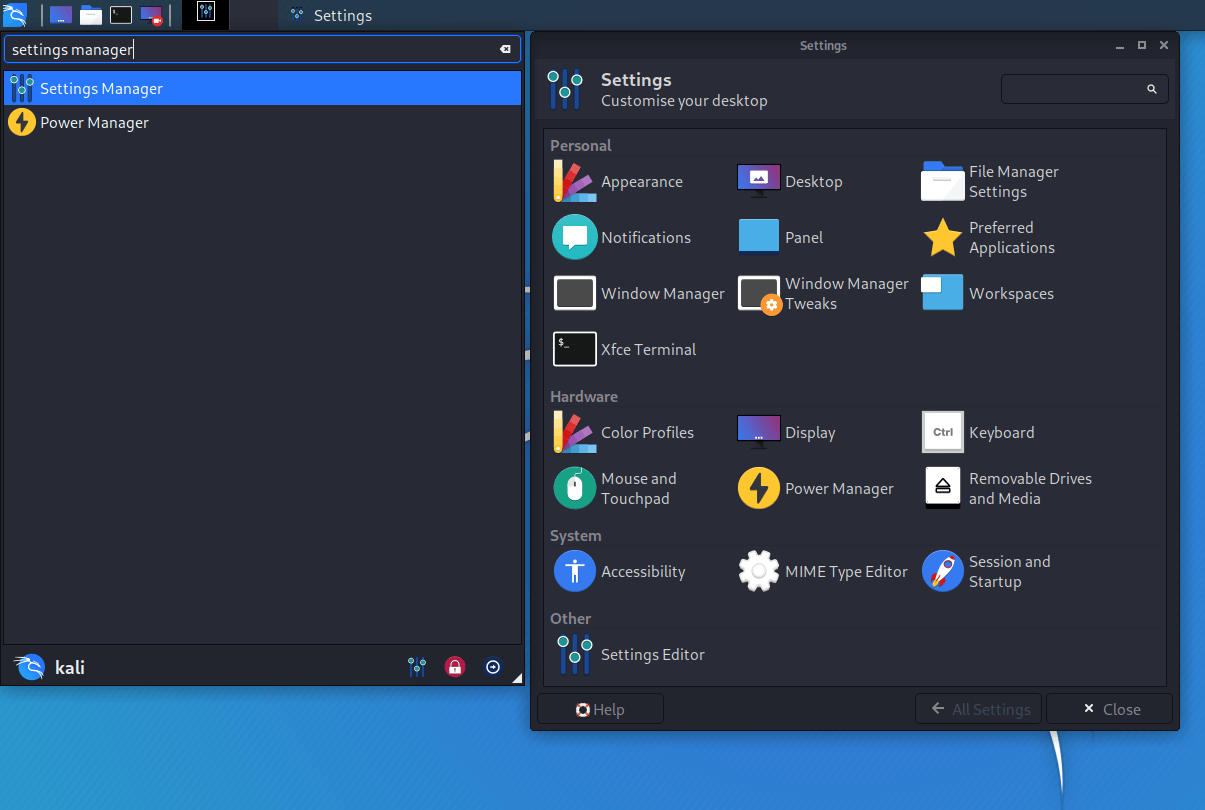
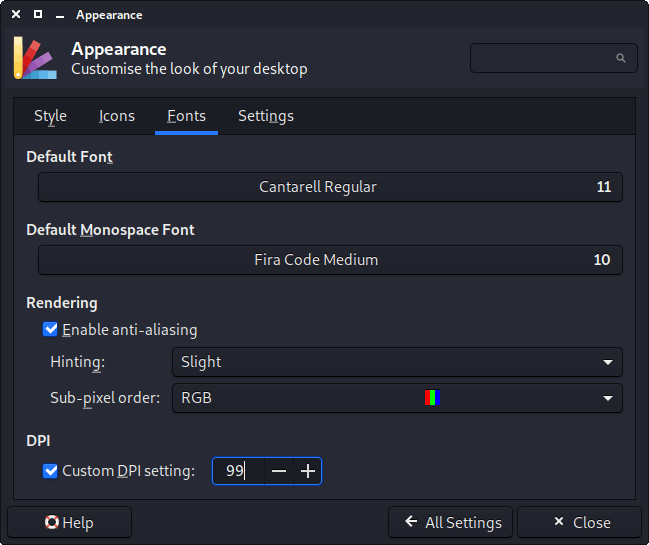
Due to a bug, you will need to either toggle Custom DPI Settings or increase/decrease the value then restore it back to the value previously.
A logout shouldn’t be required, so the next time you open a problematic program back up, the font should now be “normal”.
References
For additional reading material, you may wish to reference:
Updated on: 2021-Sep-27
Author: g0tmi1k
Источник
Увеличить размер значка / текста в Kali Linux
Я запускаю Kali Linux в виртуальной коробке (VMWare Player), и хотя разрешение подходит для моего экрана правильно, значки, окна, текст настолько малы. В примере, когда я использую терминал или просматриваю, используя Iceweasel, окна, которые они отображаются, показывают небольшой текст, и все не пропорционально соответствует размеру.
Кажется, что все сократилось; даже выпадающие меню на рабочем столе и открытые окна не отображаются должным образом относительно размера.
Как увеличить размер, чтобы окна, текст, значки на рабочем столе и меню рабочего стола отображались правильно (стандартный размер)?
Когда вы устанавливаете гостевые дополнения в свой VBox Kali, в нижней части экрана должен появиться столбец, который отображается каждый раз, когда ваш курсор находится внизу (с опциями: «Файл», «Машина», «Вид», «Вход», «Устройства», «Справка», «Кали» ). Я не могу сделать снимок экрана, но вы можете его найти.
Нажмите кнопку «Просмотр», и вы можете выбрать полный экран или бесшовные или в зависимости от того, что вам нравится. Но с высоким разрешением значки будут небольшими, как вы упомянули. Все в порядке, потому что в нижней части списка просмотра вы видите «Масштабный коэффициент», наведите курсор на него, и он отобразит разное масштабирование, например 125% или 150%. Я считаю, что 125% и 150% подходят моему экрану лучше всего. Надеюсь это поможет.
Вы можете перейти к: config-> выбрать и согласовать предупреждение и выполнить поиск layout.css.devPixelsPerPx, выберите его двойным щелчком и установите значение 2.
Просто найдите «твики», которые уже находятся на Кали. Перейдите в fonts-> interface. Изменение любого шрифта, который вы хотите
Вы также можете щелкнуть правой кнопкой мыши по док-станции, чтобы открыть «dash to dock», который позволяет вам изменять шрифт
Источник
Размер шрифта kali linux
Upon starting Kali Linux up, certain things (Windows/buttons or text/font) may appear smaller than expected. This could be because of HiDPI (aka High DPI). It all depends on the software in question, with how it was made, (e.g. GTK2, GTK3, Qt5 etc). This could be happening for various reasons, such as the graphic card drivers and/or the monitor profile.
If things are looking larger than what you would believe to be “normal”, please see our Fixing DPI guide.
This guide will cover single screen setups. We do not have the hardware in order to test multiple display outputs to write up the guide. So we are looking for community contribution to help out. If you have the hardware, and expertise, please edit this guide!
Desktop Environments — Xfce
Xfce does support HiDPI monitors. Though you may need to alter a few places, depending on your hardware, versions and issues to get it working.
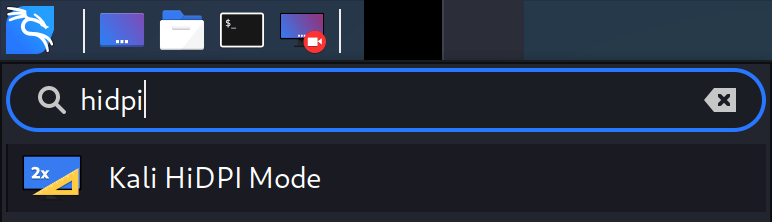
In order to make this process easier, Kali now provides a HiDPI mode. This mode adjusts the scaling-factor for GTK, QT and even Java based interfaces, so that the user doesn’t need to modify each one of them manually. You can toggle it by opening ‘Kali HiDPI mode’ from the applications menu or by running kali-hidpi-mode from the terminal.
Even though kali-hidpi-mode is able to alter the scaling-factor without the need of restarting, it is recommended to close the session and login again to ensure all changes are properly applied.
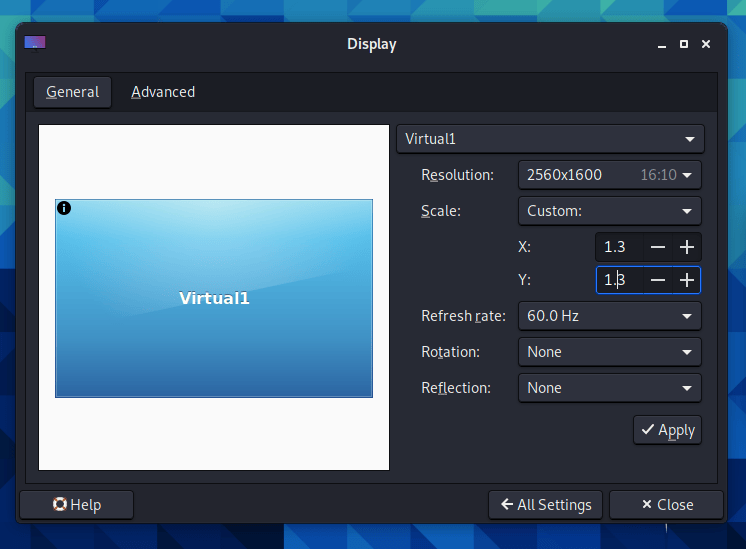
This mode is able to scale every window to a 2x factor, but in some cases, this ratio is too big for some displays. In this situation, you can enable the HiDPI mode and later configure a custom fractional scaling inside the Xfce’s display settings. A recommended configuration would be 1.3x-1.5x
Below is more of an explanation for a manual setting.
Scaling Factor
After logging into Kali, the wallpaper may look “normal”, but everything else might be “a little small to read”.
Increasing the “Scaling Factor” from “x1” to “x2” should address this problem. You have two ways todo this, either through the command line or graphical:
- In a terminal window, run the following commands:
- Graphical:
- Kali -> Settings -> Appearance ->Settings ->Windows Scaling
- Kali -> Settings -> Appearance ->Window Manager ->Theme: Kali-Dark-xHiDPI

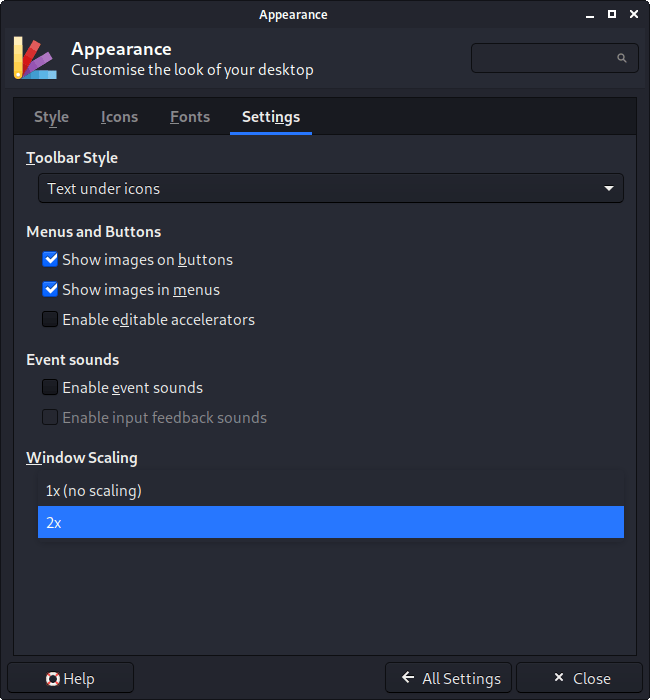
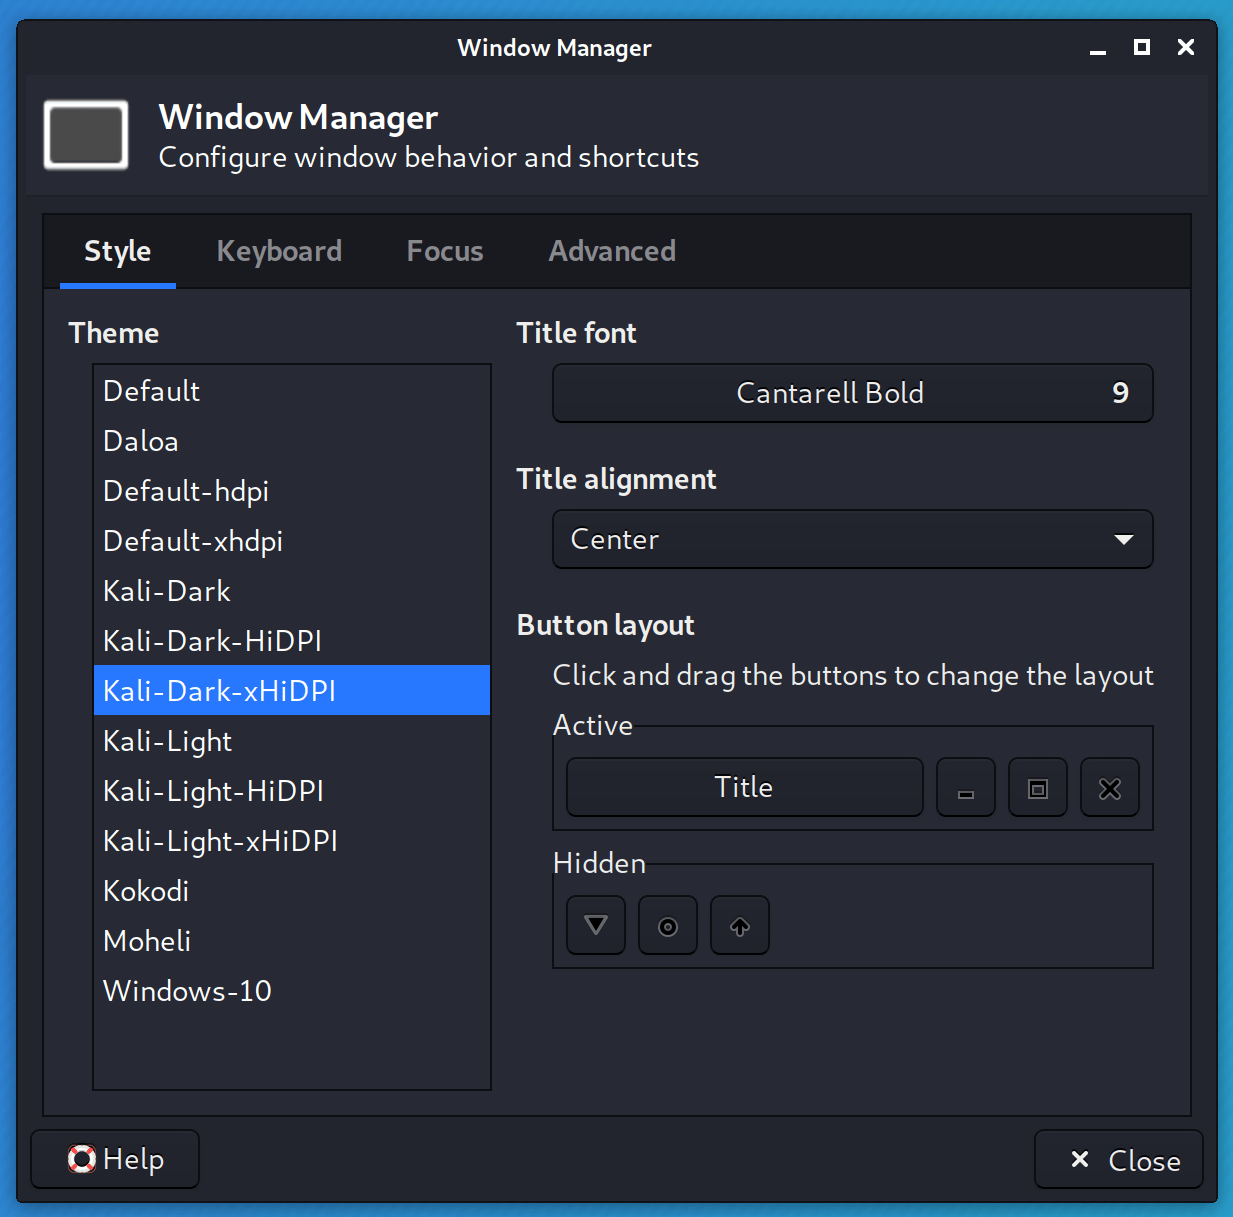
The quickest way to clean up any left over artifacts is to log out and in again.
Some apps, such as qTerminal, don’t use the scale factor explained before, so they need to be configure separately.
To do so, you need to set the following environmental variables in the
Cursor size
Enabling HiDPI settings can cause some issues with the mouse size, and you might see how its size varies depending on the application you place it over.
To solve this, you can force the cursor size with the following command:
You may need to try increasing the value from 48 .
Login Screen — LightDM
Are you experiencing an issue with the login screen ( lightdm ), with the login box being smaller than “normal”?
A possible solution would be to set “ xft-dpi ” to “ 180 (or higher):
You may need to try increasing the value from 180 .
Updated on: 2021-Sep-27
Author: g0tmi1k
Источник
Делаем Linux терминал красивым и удобным
Добавляем функциональность
Командная оболочка
Большинство дистрибутивов поставляется со встроенным Bash. Используя дополнения можно сделать из него все что захотите, но гораздо проще этого добиться с Zsh. Почему?
Настройка Zsh
Для начала, установим Zsh (если он уже установлен, например, как в Manjaro, можете пропустить этот пункт):
Когда вам предложат установить Zsh как оболочка по-умолчанию, нажмите Y , чтоб подтвердить.
Oh-My-Zsh — популярный и активно развивающийся фреймворк Zsh, который позволяет гибко настроить оболочку терминала. Установим его:
Подсветка синтаксиса. Гораздо проще ориентироваться по содержимому терминала, когда разные части команд подсвечены разными цветами. Например, директории будут подчеркиваться, а команды — выделяться цветом, отличным от обычного текста. Установим плагин zsh-syntax-highlighting :
Чтоб плагин заработал, его надо подключить.
/.zshrc меняем строку с plugins= :
Если такой строки нет — добавьте её.
Готово! Получаем удобный и функциональный терминал. Теперь сделаем его визуально приятным.
Настраиваем внешний вид
Скачиваем и добавляем в систему шрифт JetBrains Mono Nerd (c иконками):
Выберитеодин из списка, в папке шрифт/complete выберите шрифт без «Windows Compatible», с окончанием «Mono».
Подключаем шрифт и тему.
Если в файле эти строки уже есть — замените их.
Цвета. Важная часть оформления терминала — цветовая схема. Я перебрал много разных схем, редактировал их, остановился на Monokai Dark. Не режет глаза, но при этом приятная и яркая. Список цветов:
В разных терминалах по-разному меняется цветовая схема (обычно, это делается через настройки терминала), но порядок цветов везде одинаковый. Вы можете импортировать этот шаблон в формате Termite и экспортировать его для вашего терминала через terminal.sexy
Запускаем конфигурацию темы: p10k configure .
Настройте тему, выбирая варианты отображения, которые вам больше нравятся.
Финальный штрих — меняем конфиг темы и заменяем встроенные цвета.
Если в файле эти строки уже есть — замените их. Коды цветов можно получить командой
- Отображение только текущей директории:
Источник


