- Install the VNC Remote Access Server on Oracle Linux 8
- Introduction
- Background
- Objectives
- Prerequisite
- Install a graphical desktop environment
- Install the VNC packages
- Set the VNC password
- Configure the VNC service
- Set up the VNC service
- Configure X509 encryption (optional)
- Configure firewall rules (optional)
- Open a VNC client and test your deployment
- Video demonstration
- For More Information
- More Learning Resources
- Rdp client oracle linux
- 7.4.1.1.В How Does it Work?
- 7.4.1.2.В Supported RDP Clients
- 7.4.1.3.В Examples With Uttsc
- 7.4.1.4.В Security Considerations
- 7.4.2.В How to Access Desktops with Microsoft RDC
- Steps
- Accessing a Specific Desktop or Pool
- Лучшие RDP клиенты для Linux
- Лучшие RDP клиенты в Linux
- 1. Remmina
- 2. Gnome Connections
- 3. Vinagre
- 4. Xfreerdp
- 5. Rdesktop
- Выводы
Install the VNC Remote Access Server on Oracle Linux 8
Introduction
This tutorial shows you how to install and set up the VNC remote access server software on an Oracle Linux 8 system to enable you to remotely operate a graphical desktop environment.
Background
Virtual Network Computing (VNC) is a graphical desktop sharing system that controls remote machines by sending keyboard and mouse events over the network. VNC is particularly useful for remotely controlling Oracle Linux servers that have a graphical desktop environment installed.
You can connect to a VNC server by using any compatible software client. VNC is suitable for thin client computing where multiple dumb terminals can share the same hardware resources that are hosted on an Oracle Linux server.
This tutorial uses TigerVNC to illustrate how to remotely connect to systems. However, you can use a different VNC software of your choice. Some alternative software is listed at the end of the tutorial.
TigerVNC Server was rebased from 1.9.0 to 1.10.1 in Oracle Linux 8 Update 3. This newer version is configured differently to previous versions and no longer requires the creation of systemd unit files. The instructions provided here assume that you are using the latest version.
Objectives
In this tutorial you:
- Install a graphical desktop environment along with the VNC service
- Set the VNC Password for a user on the system
- Configure the VNC service for a specific user
- Start and enablve the VNC service across subsequent boots
- Optionally enable x509 encryption for direct VNC access
- Optionally create firewall rules to allow direct VNC access
- Access the VNC server from a remote client, either directly or using an SSH tunnel
Prerequisite
- Any system with Oracle Linux 8 installed
- Client software such as TigerVNC
Install a graphical desktop environment
Install a GNOME desktop environment and all of its dependencies.
Set graphical mode as the default login type for user accounts, then reboot the server.
Uncomment the following line in the /etc/gdm/custom.conf file to ensure that VNC uses X.org instead of Wayland:
Install the VNC packages
Install the VNC server package and all of its dependencies.
Set the VNC password
Create a VNC password for the user account that you intend to use for remote sessions.
The command prompts you for a password and then prompts you again to validate the password. Optionally you are able to set a ‘view-only’ password that allows you to share the screen but not allow control over the mouse or keyboard.
This action generates configuration information specific to the user account in $HOME/.vnc/ . If this directory already exists from a previous installation, you can either remove the directory prior to running the vncpasswd command; or you can restore the SELinux context on the directory to ensure that you do not have any issues with SELinux for this service. For example:
Configure the VNC service
Append the user account and the X Server display for the VNC service to /etc/tigervnc/vncserver.users file:
Also append the default desktop and screen resolution to the /etc/tigervnc/vncserver-config-defaults file:
By default, the VNC server terminates when the last user signs out. You can manually force the VNC server to persist by creating the /etc/systemd/system/vncserver@.service.d/10-restart.conf file as the root user, and then adding the following content:
Set up the VNC service
Reload the systemd service, then enable and start the VNC server by using X Server display 1:
Configure X509 encryption (optional)
By default, VNC is not an encrypted protocol and you should use an SSH tunnel to access it across an unprotected network. You can configure X509 TLS to encrypt your VNC session, however this requires that your client software supports X509Vnc encryption and has access to the CA certificate used to sign your certificates.
If you do not have a CA signed certificate, you can use self-signed certificates, but your client system must have a copy of the public certificate to be able to connect. To create a self-signed certificate, run:
Edit the user’s custom VNC configuration options in `
/.vnc/config`. If the file does not exist yet, you may need to create it yourself. Update the configuration to enable x509Vnc encryption and to provide the full path to the X509 key file and that x509 certificate file. For example, assuming that the username is opc, the following configuration should work correctly:
Note that you must provide the full path to the key and certificate files. You cannot depend on shell expansion or use variables for this purpose.
When you have finished editing the configuration, you can restart the service:
Configure firewall rules (optional)
If you are using X509 encryption and you are running a custom firewall profile or an Oracle Cloud Infrastructure instance, you can open the firewall port for the VNC service (5901) on your firewall or in your security lists for your network.
If you are using X509 encryption and the firewalld service is running on the host, you can add access for the VNC service. Then, reload the default firewall service.
Note: VNC is not an encrypted protocol and you should not open the firewall to this port and connect directly to a VNC server over an unprotected network. Although we list this step as optional, it is not generally advised and you should consider using SSH tunneling or some other mechanism to protect the connection.
Open a VNC client and test your deployment
If your client is running Oracle Linux 8, you can install the TigerVNC software client:
On the client machine, use the VNC software to connect to the remote Oracle Linux server domain or IP address. Make sure to specify the correct port. The default VNC port is 5900, but that number is incremented according to the configured display number. Thus, display 1 corresponds to 5901, display 2 to 5902, and so on.
Note that if you enabled X509 encryption, you may need to provide the CA certificate used to sign your keys, or if you used a self-signed certificate you can use the public certificate as the CA certificate. Some clients may be willing to allow you to simply accept a self-signed certificate automatically.
If you encounter connectivity problems, troubleshoot these issues by connecting to the remote server over an SSH connection that has been configured for an SSH tunnel. Then, use the tigervnc client to connect to the local host:
Video demonstration
The video demonstration and tutorial provided at https://www.youtube.com/watch?v=Z5vhER7K34E may also be useful if you need more information on configuring a VNC server.
For More Information
Other related resources include:
- Tiger VNC Server configuration documentation in /usr/share/doc/tigervnc/HOWTO.md/
- GNOME desktop sharing with Vino at https://wiki.gnome.org/Projects/Vino
- KDE desktop sharing with Krfb at https://kde.org/applications/internet/org.kde.krfb
- Using VNC client software such as:
- Vinagre; or
- KRDC
- Oracle Linux Documentation
The basic steps included in this tutorial are available in the shell script at ol8-vnc-setup.sh
More Learning Resources
Explore other labs on docs.oracle.com/learn or access more free learning content on the Oracle Learning YouTube channel. Additionally, visit education.oracle.com/learning-explorer to become an Oracle Learning Explorer.
For product documentation, visit Oracle Help Center.
Install the VNC Remote Access Server on Oracle Linux 8
Copyright © 2021, Oracle and/or its affiliates.
Источник
Rdp client oracle linux
Oracle VDI includes a built-in RDP broker that enables easy desktop access leveraging the Remote Desktop Protocol (RDP) . This way users can take advantage of existing RDP clients (for example, the remote desktop connection in Windows XP) for accessing desktops.
7.4.1.1.В How Does it Work?
The RDP client first contacts the Oracle VDI RDP broker (passing over any information like username, password, etc).
The RDP broker will then contact the Oracle VDI service on behalf of the client and will ask to startup the desired desktop.
The Oracle VDI service will first verify the username/password combination if client authentication is enabled on the service side (default), see Section 7.2.7, “How to Disable Client Authentication”.
If authentication succeeds, the corresponding desktop will be started up and the Oracle VDI service returns the IP and optionally RDP port of the virtual machine (VM) running the desktop.
This information is used by the RDP broker to construct an RDP Server Redirection Packet containing either:
the VM host/IP address as the server to redirect to (if using Windows RDP, as done for VMware Infrastructure 3)
or a routing token containing encoded IP address and RDP port information (if using Oracle VM VirtualBox RDP, also known as VRDP)
The latter is necessary, because VRDP does not use the standard Windows RDP port. Thus the RDP broker needs to hand back both the IP and the RDP port information. For details of the routing token encoding, see the «Routing Token Format» section of Session Directory and Load Balancing Using Terminal Server; see: http://download.microsoft.com/download/8/6/2/8624174c-8587-4a37-8722-00139613a5bc/TS_Session_Directory.doc.
Finally, this RDP redirection packet is sent back to the RDP client and the client will redirect accordingly.
7.4.1.2.В Supported RDP Clients
RDP clients that support all the above mentioned mechanism and that have been tested with Oracle VDI are:
The Microsoft RDP client (also known as remote desktop connection)
The Sun Ray Windows connector (also known as uttsc )
The Oracle Secure Global Desktop Remote Desktop Client (also known as ttatsc )
Other clients may work, but have not been tested by QA.
7.4.1.3.В Examples With Uttsc
To connect to any machine from a pool, run the following.
To connect to a specific desktop, run the following.
7.4.1.4.В Security Considerations
Oracle VDI authenticates users each time they sign into their desktop. If you would prefer to disable this feature, refer to the Section 7.2.7, “How to Disable Client Authentication” section.
7.4.2.В How to Access Desktops with Microsoft RDC
Oracle VDI includes a built-in RDP broker that allows easy desktop access leveraging the Remote Desktop Protocol (RDP) . This way users can take advantage of existing Windows PCs for accessing desktops. There is typically no need to install any additional software on your PC. Both Windows XP and Windows Vista provide out of the box the necessary functionality. The following screenshots illustrate how to access a desktop from an end-user perspective using Windows XP.
Steps
Click on Start , All Programs , Accessories , Remote Desktop Connection .
In the dialog, specify as Computer the name, or IP address of the host running the Oracle VDI.
Specify the user name, and optionally Windows domain. Click Connect .
A popup dialog will come up asking for the user password. Enter the password and click OK .
After a while, the desktop should be displayed, and be ready to use.
FigureВ 7.11.В Microsoft RDC Connection

The remote desktop connection on your computer might be configured for performance optimization. Thus certain elements like desktop background, theming, menu and window animations might not be displayed in your setup. You can easily adapt these settings (see Experience tab of the remote desktop connection) to meet your personal requirements.
Accessing a Specific Desktop or Pool
If multiple desktops are assigned to a user, then the Oracle VDI connects to the user’s default desktop, which can be defined using Oracle VDI Manager.
Alternatively, it is possible to specify the desired desktop or pool when opening the remote desktop connection. To do this, enter the user name, followed by the pool name, and the optional desktop ID using the following syntax:
It is usually sufficient to just specify the pool name. However, if you have multiple desktops assigned from the same pool, you must specify both the pool name and the desktop ID. Desktop identifiers can be listed via the Oracle VDI CLI executing /opt/SUNWvda/sbin/vda user-desktops username
FigureВ 7.12.В Specifying Pool Name and Desktop ID for Microsoft RDC

If you frequently switch between various desktops, then it is convenient to store the remote desktop connection settings for each desktop in an RDP file, using the Save As button in Connection Settings . You can then create shortcuts to these files allowing you to initiate a connection via a simple mouse double-click.
| PrevВ | Up | В Next |
| 7.3.В Secure Web Access with Oracle Secure Global DesktopВ | Home | В 7.5.В Logging Out of Desktop Sessions |
Copyright В© 2008, 2012, Oracle and/or its affiliates. All rights reserved. Legal Notices
Источник
Лучшие RDP клиенты для Linux
Протокол RDP или Remote Desktop Protocol — это основной протокол удалённого доступа в операционных системах семейства Windows. В современных версиях Windows уже по умолчанию предустановлено всё необходимое программное обеспечение для обеспечения доступа к вашему компьютеру удалённо, а также для удалённого подключения к другим компьютерам с Windows.
Для операционных систем на базе ядра Linux было разработано несколько свободных клиентов, реализующих поддержку протокола RDP. В этой статье мы собрали лучшие клиенты RDP для Linux, работающие как в графическом интерфейсе, так и в командной строке.
Лучшие RDP клиенты в Linux
1. Remmina
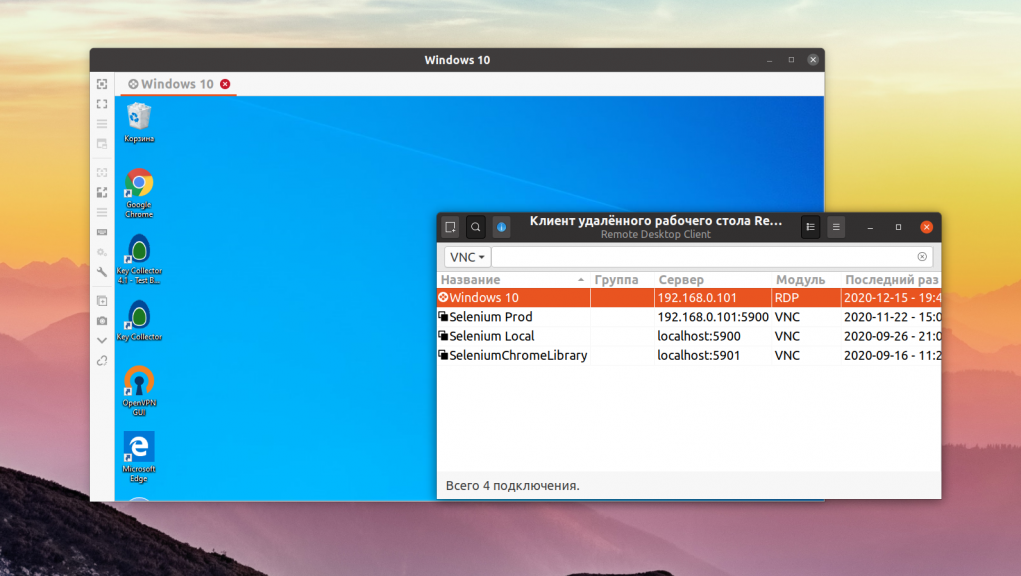
Для этой операционной системы существует не так много клиентов и это лучший клиент RDP для Linux. У программы есть удобный графический интерфейс, множество различных настроек, возможность сохранения ярлыков для быстрого подключения к удалённым узлам с нужными вам настройками. Но автоматически ярлыки не сохраняются, вам надо будет делать это вручную. Кроме протокола RDP поддерживается VNC и SSH. Программа разрабатывается в рамках проекта FreeRDP, с использованием библиотеки GTK. Есть порт на Qt. Разрабатывается достаточно активно и новые версии выходят раз в несколько месяцев. Для установки достаточно выполнить команду:
sudo apt install remmina
2. Gnome Connections
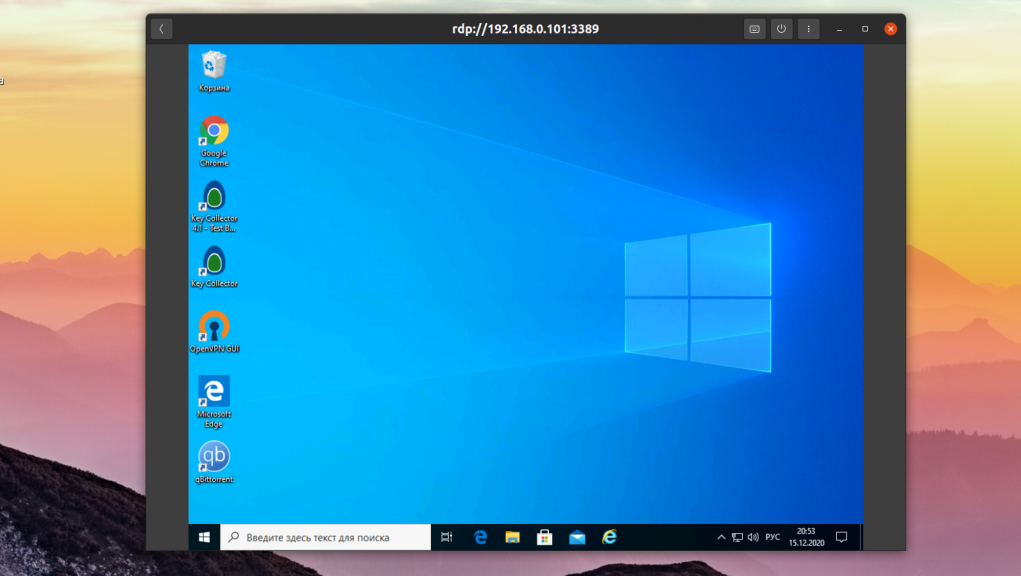
Это совсем новая утилита, разработка которой стартовала в начале 2020 года. Connections — очень простое приложение, сделанное специально для Gnome и предназначенное для управления удалёнными подключениями. Из протоколов поддерживаются RDP и VNC. В отличие от Remmina, настроек в утилите совсем нет, вы можете только указать адрес и порт компьютера, к которому надо подключится и включить или отключить масштабирование. И всё никаких настроек передачи звука, буфера обмена, захвата клавиш, разрешения экрана нет. Программа всё ещё находится в разработке, но её уже можно установить из Flathub:
flatpak install flathub org.gnome.Connections
А для запуска используйте команду:
flatpak run org.gnome.Connections
3. Vinagre
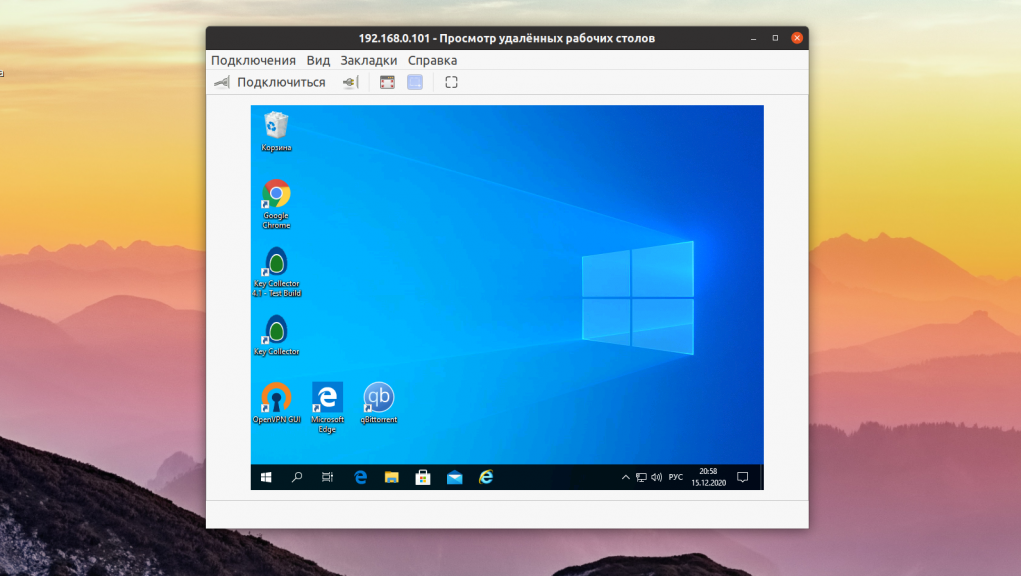
Это ещё одно приложение для Gnome, которое раньше позиционировалось как программа по умолчанию для управления удалёнными соединениями в Gnome. Настроек здесь уже немного больше, по сравнению с Connections, но всё ещё меньше, чем у Remmina. При подключении вы можете выбрать протокол, имя пользователя и разрешение экрана, а также надо ли масштабировать рабочий стол удалённой машины. Из протоколов поддерживается RDP, SSH, SPICE и VNC. Программа довольно простая и свою работу выполняет, но разрабатывается уже не очень активно. Установить в Ubuntu можно командой:
sudo apt install vinagre
4. Xfreerdp

С полностью графическими клиентами RDP для Linux мы закончили. Но есть ещё несколько использующих консольный интерфейс. Первая из них — xfreerdp. Настроек здесь ещё больше чем у Remmina, но задавать их все надо в командной строке. Поддерживается только протокол RDP. Программа достаточно активно разрабатывается и поддерживает все необходимые новшества протокола RDP. Для подключения к серверу используется опция /v. Например:
xfreerdp /v:ip_сервера:порт /u:имя_пользователя
Для установки программы в Ubuntu используйте команду:
sudo apt install freerdp2-x11
5. Rdesktop
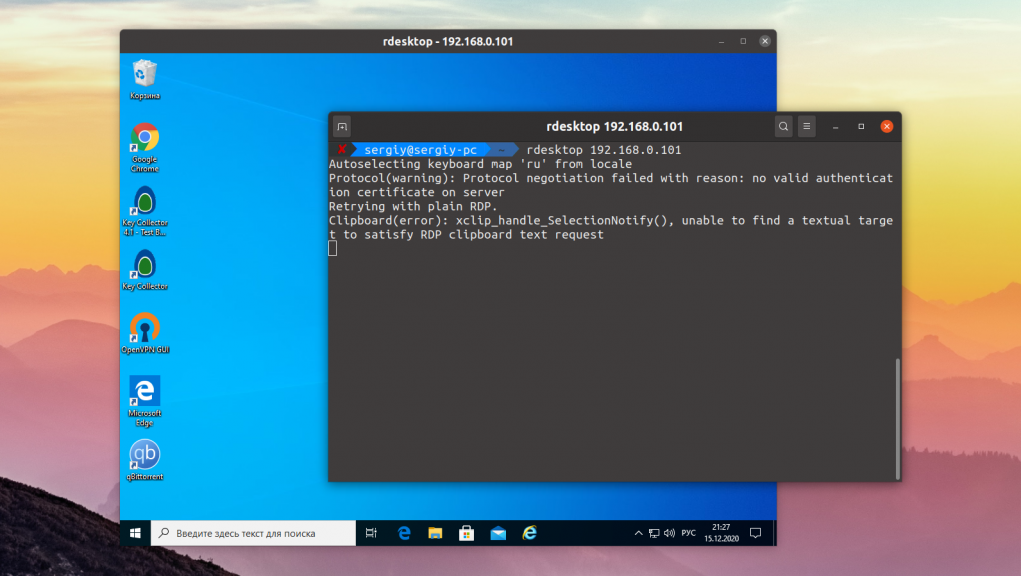
Последняя в нашем списке консольная утилита rdesktop. Это самая первая реализация клиента RDP для Linux. В далёком 2009 году, проект FreeRDP был создан на основе форка Rdesktop. Сейчас проект почти не развивается, а с 2019 года ищет мэйнтейнера. И у программы есть ещё одна проблема. В новых версиях Windows компания Microsoft добавила новую авторизацию NLA (Network Level Authentication). Программа Rdesktop её не поддерживает, поэтому если вы захотите использовать её для подключения к Windows, эту технологию стоит отключить. Или же вы можете использовать любую другую программу из перечисленных выше. Чтобы подключится к удалённой машине надо просто передать её адрес программе:
Для установки rdesktop выполните:
sudo apt install rdesktop
Выводы
В этой статье мы разобрали лучшие программы для подключения по RDP из Linux, которые вы можете использовать для своей работы. Может некоторые из них не такие уже и лучшие, но других у нас нет. А каким клиентом пользуетесь вы? Напишите в комментариях!
Источник


