- Installing xRDP on Kali Linux
- Install xRDP
- “Authentication is required to create a color managed device”
- Open your Firewall
- Connecting via an SSH tunnel
- Install PuTTY & Set Up
- Create a Private Key file with PuTTYGen
- Connect the tunnel
- Last bits of security
- Set SSH to accept Certificates only
- Set xRDP to require SSH tunnels
- How to Connect to Kali Linux in Windows With RDP
- Ethical hacking and penetration testing
- InfoSec, IT, Kali Linux, BlackArch
- How to connect to Windows remote desktop from Linux
- How to use freerdp
- How to connect with freerdp command
- Xfreerdp options
- How to create shared folders in freerdp
- How to bring remote desktop to another monitor
- How to set the size of the remote desktop window
- How to use rdesktop
- How to connect to remote desktop with rdesktop
- How to connect from Linux to another Linux via RDP
Installing xRDP on Kali Linux
13 October 2019
There are a lot of complicated tutorials on how to get xRDP working on Kali Linux. I suspect the tutorials have become complicated as they address a variety of bugs that xRDP and connecting software has had over time, but there isn’t much you actually need to do.
Note that if you are using Gnome, you’ll run into issues. I have got RDP working with Gnome before, but I haven’t been able to create a reliable set of steps to replicate it, as it usually starts working after several hours of messing around. If this is you, then you can try the below, but it may just be your starting point.
Install xRDP
The only package you need is xrdp, which you should enable after installation.
“Authentication is required to create a color managed device”
If you get this message there are a few potential fixes. The one I use is to add the following file to policy kit, and restart it:
Open your Firewall
If you are using UFW, you’ll need to open up a port.
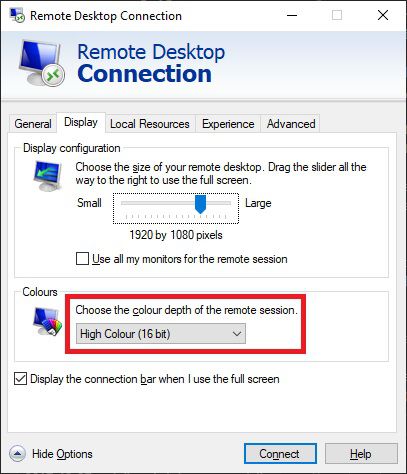
Then in Windows, you’ll need to lower your color depth in the RDP settings when you make a connection:
And it should work from this point.
Connecting via an SSH tunnel
xRDP transport is encrypted using TLS by default, and should be as secure as RDP is on windows, but if you open it up to the internet you can expect to be subject to ongoing brute force attacks. If a vulnerability is found, you can expect it to be used against you pretty soon. A safer option is to connect using an SSH tunnel, and secure that using certificates instead of passwords.
Install PuTTY & Set Up
I’m assuming you know how to set up port forwarding on your router, and how to install puTTY. If not, Google is your friend. First step is just to put in your IP address (take a look at duckdns.org if you need a static one) and the external port that you’ve chosen into puTTY.
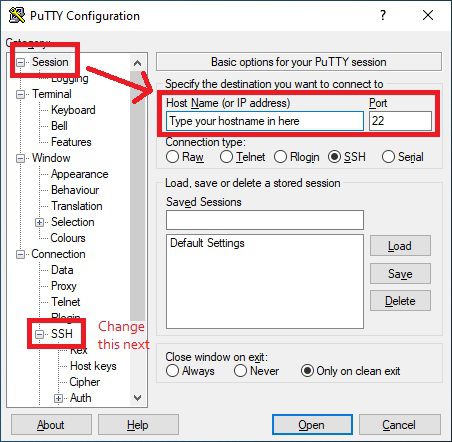
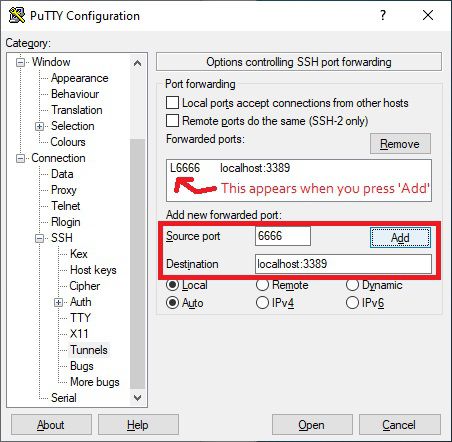
Next, you need to go into Tunnel under SSH. Here you need to add a Source port, which can be any port you have available on Windows. I’ve used 6666 in this example. Then under destination, add localhost:3389 .
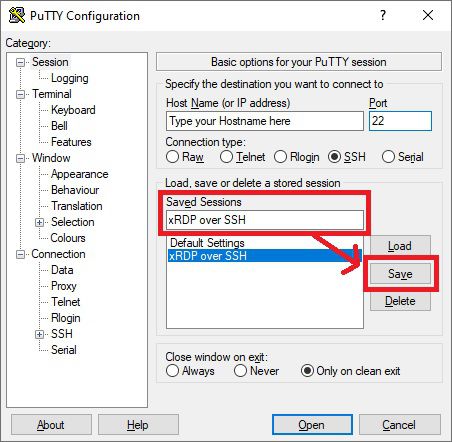
Under Session, you will probably want to save these settings so that you don’t need to do the setup every time.
Create a Private Key file with PuTTYGen
Press the Windows key and type in ‘PuttyGen’, which should open up the following program:
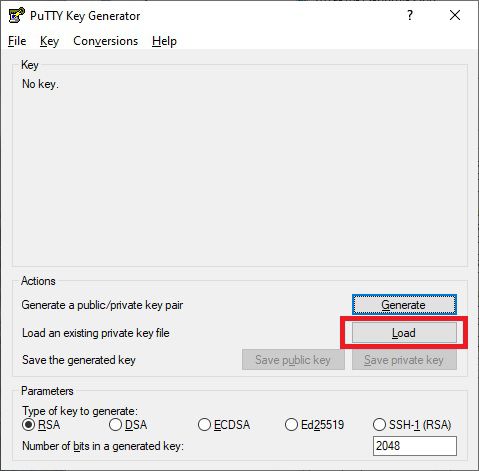
Click on Load, and select your private ‘id_rsa’ key that you normally use for logging in via SSH. You can then save this as a .ppk file. Once you have this, under SSH and Auth, add the .ppk key file.
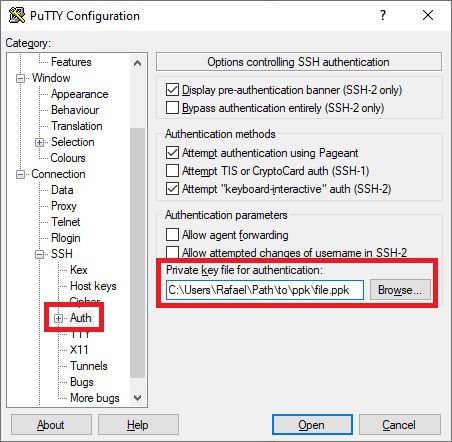
Again, you’ll want to go back to Session and save this.
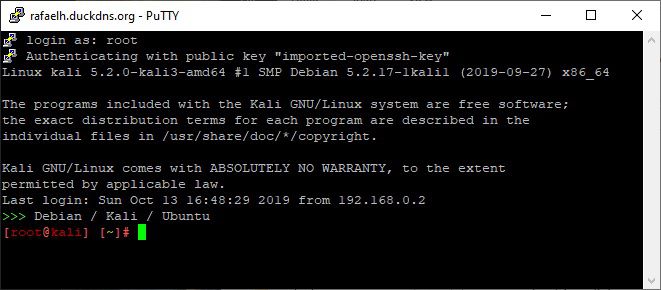
Connect the tunnel
Now that this is set up, connect using puTTY by pressing ‘Open’. You’ll get a black window, asking you for the username, which will probably be ‘root’ for Kali.
Now that the connection is established, go into RDP and use localhost and the port you configured in puTTY to connect:
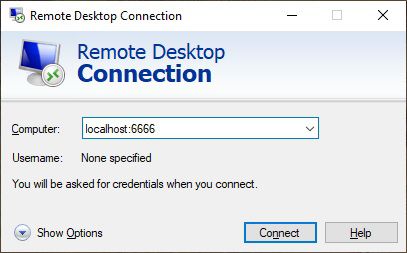
And all being well, you should successfully connect to xRDP via an SSH tunnel at this point
Last bits of security
Set SSH to accept Certificates only
You will need to edit the SSH daemon config and restart it. Make sure you have certificates set up and can authenticate without a password before you turn this off.
Set xRDP to require SSH tunnels
The last bit of security you can apply is to force xRDP to require a tunnel by constraining it to accept local connections only.
Hopefully that’s all you’ll need to connect in a reasonably secure fashion to your Kali box over the internet.
Источник
How to Connect to Kali Linux in Windows With RDP
This tutorial will show how to install and run the graphical environment of Kali Linux in Windows.

Using Kali Linux graphical environment (GUI) in Windows.
After installing Kali Linux on Windows, you will have the Kali Linux terminal (command environment). For using the graphical environment you have to make some adjustments.
- Open Kali through CMD or from the start menu.
- Enter the following command to install wget.
sudo apt-get install wget
- Enter the following command to access the graphical environment.
The above command will download a script from the Kali site.
- Entering the command below will run that script.
Note that the entered command includes downloading the graphics package and installing Xrdp and it may take some time.
sudo /etc/init.d/xrdp start
- Now you can start XRDP service by this command.
sudo /etc/init.d/xrdp start
By running the above command and running Xrdp service, the port number will be shown.

- Open Remote Desktop(RDP)
- After opening Remote Desktop window, enter 127.0.0.1 with given port number as address then click on connect button.

8. After opening Kali Linux, enter username and password and click on OK

9. Now you are connected to Kali Linux via Xrdp.

- After completing your work, enter the following command to stop the Xrdp
Источник
Ethical hacking and penetration testing
InfoSec, IT, Kali Linux, BlackArch
How to connect to Windows remote desktop from Linux
RDP (Remote Desktop Protocol) clients exist for many platforms, even for mobile phones, of course, there are RDP clients for Linux as well
We will look at 2 RDP clients for Linux
- freerdp is a free implementation of the Remote Desktop Protocol (RDP)
- rdesktop is an open source client for remote desktop windows services
How to use freerdp
To install freerdp on Debian, Kali Linux, Linux Mint, Ubuntu and derivatives, run the command:
If the freerdp2-x11 and freerdp2-shadow-x11 packages are not found, look for a package named freerdp.
To install freerdp on Arch Linux and derivatives, run the command:
How to connect with freerdp command
To connect to the remote desktop using xfreerdp, run a command of the form:
In this command:
- /f is option means to open the remote desktop in full screen mode
- /u:USERNAME is a name of the account on the computer to which we are connecting
- /p:PASSWORD is a password of the specified account
- /v:HOST[:PORT] is an IP address or name of the computer to which the remote table is connected. PORT optional (recommended: “Windows Computer name: how to change and use”)
For example, I want to open a remote computer desktop with IP address 192.168.0.101, on which there is a Tester user with a password of 1234, and I want to open a remote working collision in full screen mode, then the command is as follows:
To toggle between full-screen and windowed modes, use the keyboard shortcut Ctrl+Alt+Enter.
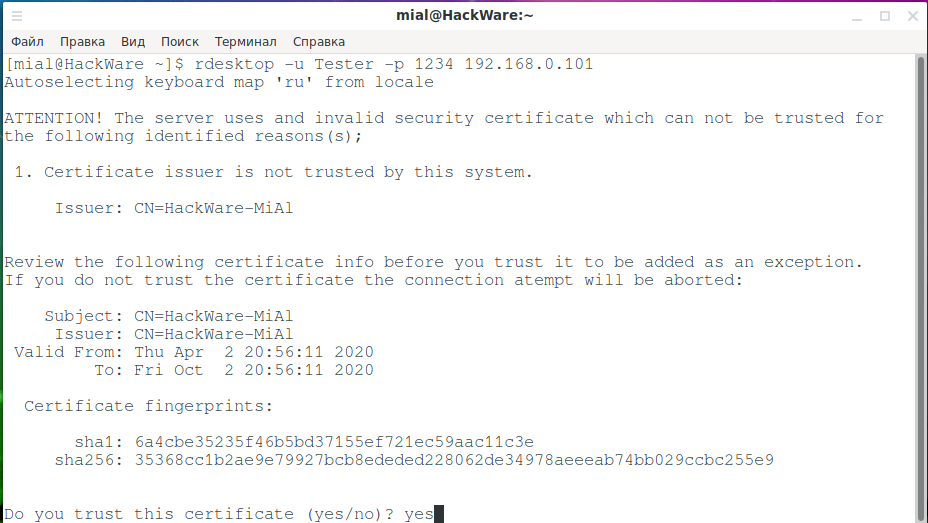
When connecting for the first time, the following message about the problem with the certificate appears:

Since self-signed certificates are used without a private CA (authentication center, certification authority) added to the store, the only choice is to agree to trust the specified certificate, enter Y for this.
In full screen mode, you can disconnect from the remote desktop in two ways:
- press the cross on the top panel
- Start button → Shutdown → Disconnect

To run in windowed mode, do not use the /f option:

Xfreerdp options
The xfreerdp program has many options,I picked up the most interesting of them:
How to create shared folders in freerdp
With remote desktop connected via RDP, you can have shared folders. Let’s look at a few examples.
To connect all mount points in the current system as shared folders on the remote desktop, use the +drives option, for example:
The screenshot shows the remote Windows desktop, in which the Linux system folders are accessible:

To connect only the home folder of the current Linux user as a network folder to the computer via RDP, specify the +home-drive option:
In this case, the home folder is mounted on a system connected via the remote desktop protocol:
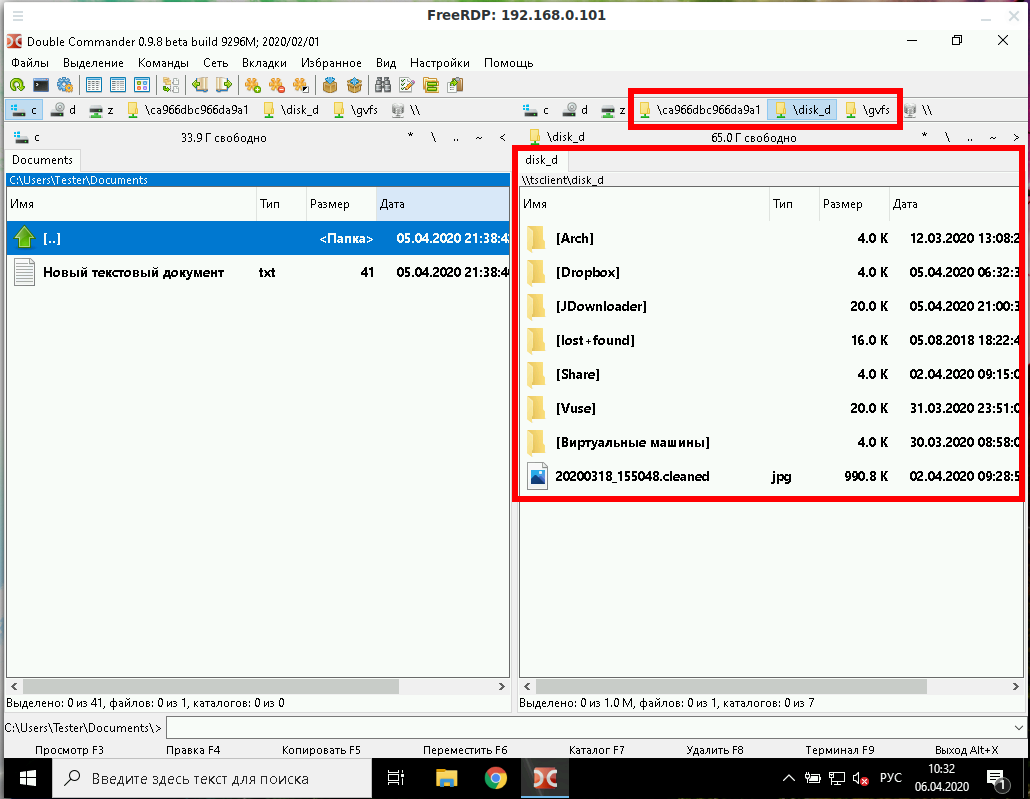
With the option /drive:NAME,/PATH/IN/LINUX, you can connect any folder with any name. The path in the current system must be specified as /PATH/IN/LINUX, and NAME is the name that will have the share in the remote system. For example, to connect the root folder of the current system (/) to the remote folder with the root name:
How to bring remote desktop to another monitor
If you have several monitors, then you can choose which one to use for the remote system. To list the monitors, run the command:
Select the monitor (or multiple monitors) identifier using the /monitors: [,[,…]] option.
How to set the size of the remote desktop window
The following example connects to the rdp.contoso.com host with the name USER and is 50 percent of the height.
If width (w) is set instead of height (h), something like /size:50%w, then 50 percent of the width will be used.
How to use rdesktop
To install rdesktop on Debian, Kali Linux, Linux Mint, Ubuntu and derivatives, run the command:
To install rdesktop on Arch Linux and derivatives, run the command:
How to connect to remote desktop with rdesktop
To connect to RDP with rdesktop, use a command of the form:
As usual, at the very beginning there will be a problem with the certificate:
We type yes.
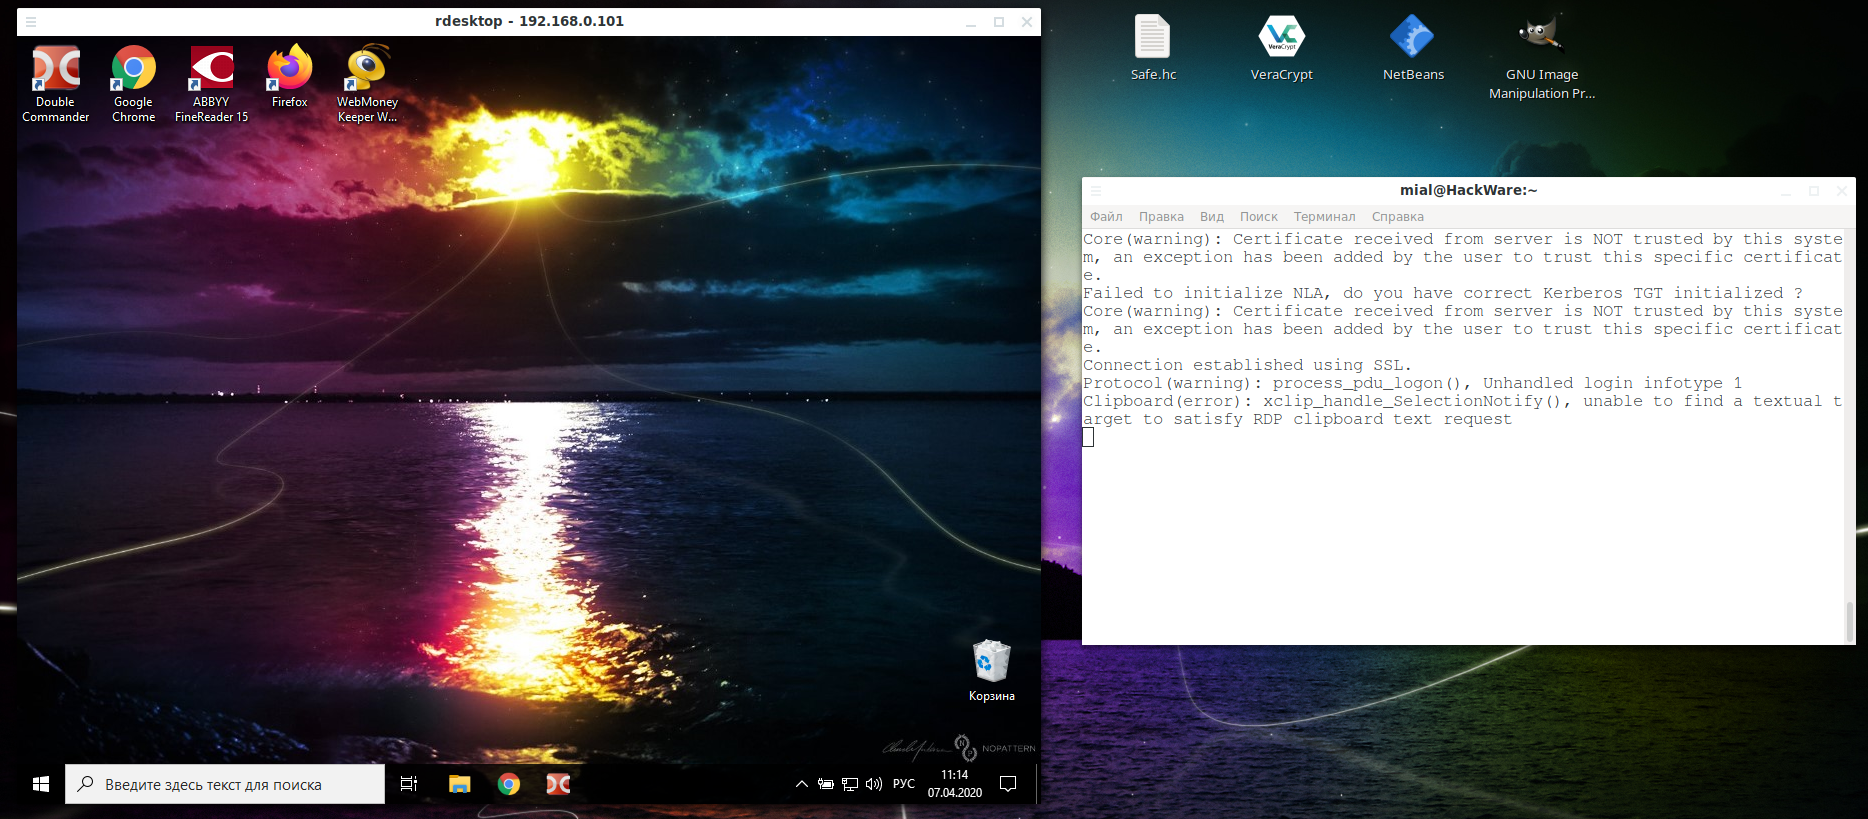
Then an error will occur:
This is because network-level authentication (Kerberos TGT) is not configured. Setup instructions at: https://github.com/rdesktop/rdesktop/wiki/Network-Level-Authentication-(NLA)
Another option that allows you to connect to Windows via RDP using rdesktop without setting up Network Level Authentication (NLA) is to disable network-level authentication in Windows. It is clear that this will weaken the security of RDP, therefore it is not recommended. But as a “quick dirty fix” this can be done as follows: Start menu → Settings → System → Remote Desktop → Advanced settings → Uncheck “Require computers to use Network Level Authentication at the to connect (recommended)”:

After that, rdesktop connection passes without errors:
In the Windows settings, you could see the link “Why allow connections with Network Level Authentication?”, It says the following:
If you want to restrict who can access your PC, choose to allow access only with Network Level Authentication (NLA). When you enable this option, users have to authenticate themselves to the network before they can connect to your PC. Allowing connections only from computers running Remote Desktop with NLA is a more secure authentication method that can help protect your computer from malicious users and software. To learn more about NLA and Remote Desktop, check out Configure NLA for RDS Connections. If you’re remotely connecting to a PC on your home network from outside of that network, don’t select this option.
How to connect from Linux to another Linux via RDP
There are no special features when connecting using the xfreerdp program, it is enough to start the RDP server, and if you use freerdp-shadow, then the /sam-file:SAM /sec:nla options are also needed:
Or run xrdp-sesman and xrdp as an RDP server.
And then the connection to Linux via RDP is the same as to Windows:
As for rdesktop, it could not be forced to work with any of the RDP servers under consideration under Linux – if you know how to do this, then write in the comments.
Источник


