- Remote Desktop Connection to Windows from Linux using RDP clients
- Enabling remote desktop on Windows
- Remmina
- FreeRDP
- rdesktop
- Vinagre
- References
- VPS на Linux с графическим интерфейсом: запускаем сервер RDP на Ubuntu 18.04
- Оглавление:
- Установка графического окружения
- Русификация сервера и установка ПО
- Установка и настройка сервера RDP
- Настройка межсетевого экрана
- Подключение к серверу RDP
- Менеджер сессий и сеансы пользователей
- Переключение раскладок клавиатуры
Remote Desktop Connection to Windows from Linux using RDP clients
Have you seen the ad that should be here?
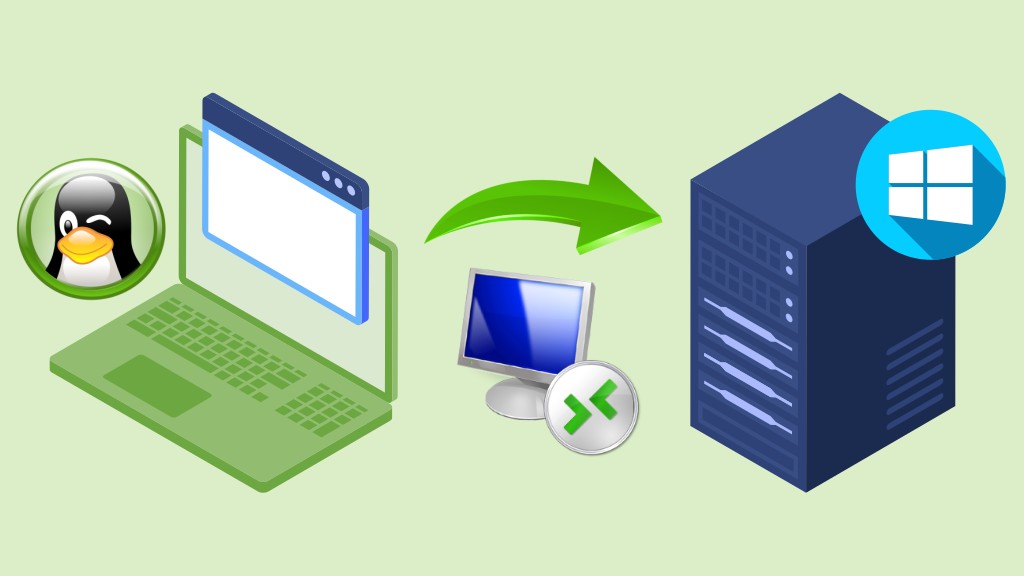
Have you ever used the Windows app Remote Desktop Connection? This app, included in all Windows installations, allows you to remotely access another Windows PC or a server with Windows Server. For this purpose, it employs the Remote Desktop Protocol (RDP).
Organizations can install applications on a central server instead of various computers. To use those applications, employees must remotely access that server. Such centralization can make maintenance and troubleshooting easier. This technology was formerly known as Terminal Services (TS). Currently, web systems are more common. But, in some scenarios, Windows remote apps are still needed.
In those scenarios, Linux users can remotely access Windows computers and servers from their favorite system using an RDP client.
There are a few RDP clients available for Linux and we are going to talk about them today:
You can choose the one you like best or the one that best suits your needs.
Out of curiosity, FreeRDP is both an app and a library, which provides reusable features for other apps. Except for rdesktop, all of the other clients above use the FreeRDP library.
Enabling remote desktop on Windows
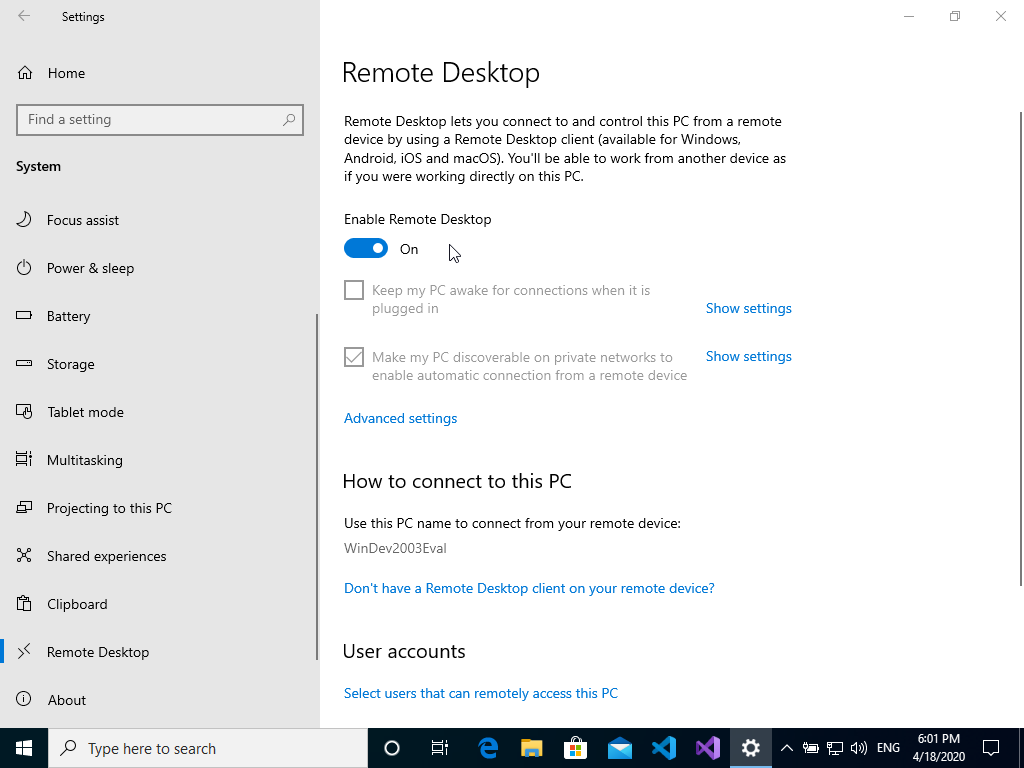
First of all, you must set up the computer you want to connect to so it allows remote connections. On the Windows machine you want to connect to, logged on with an administrator account, open the Start menu and click Settings. To do that, on the window that appears, open the System category, and then Remote Desktop. Finally, enable it:
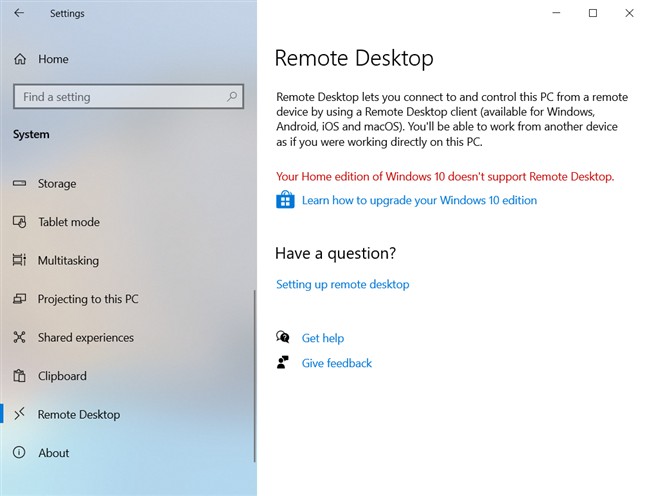
Note that you can’t connect to computers running a Windows Home edition (for instance, Windows 10 Home). This screen informs you, if that is the case:
Your Home edition of Windows 10 doesn’t support Remote Desktop.
Source of the image: Digital Citizen
If you want more information about remote desktop on Windows, take a look at:
Remmina
Remmina is a remote desktop client that supports many remote access protocols such as RDP, VNC, NX, XDMCP and SSH. It aims to be useful for system administrators and travellers, who need to work with lots of remote desktops and/or servers. Remmina is included in the Ubuntu Linux distribution and is its default remote desktop client.
To install Remmina on Linux Kamarada and openSUSE, run:
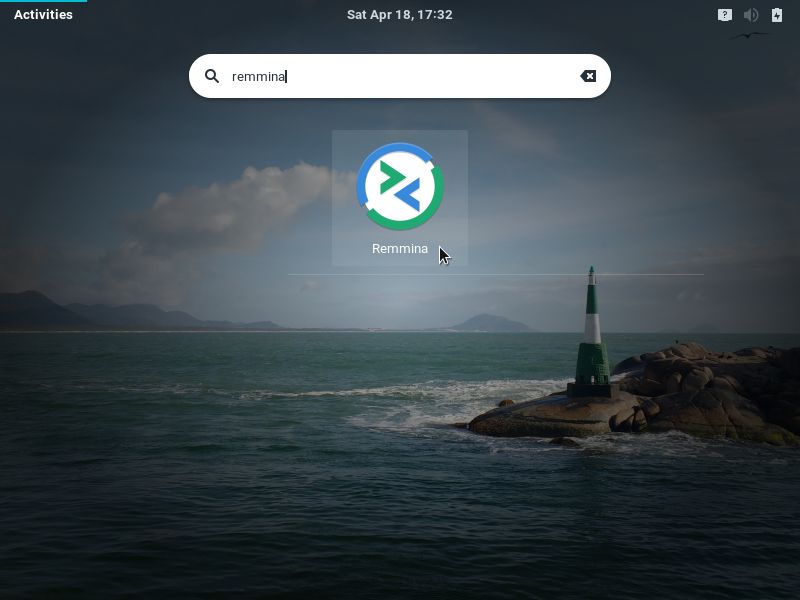
Once installed, to start Remmina, if you use the GNOME desktop environment, open the Activities menu, on the top-left screen corner, type remmina and click its icon:
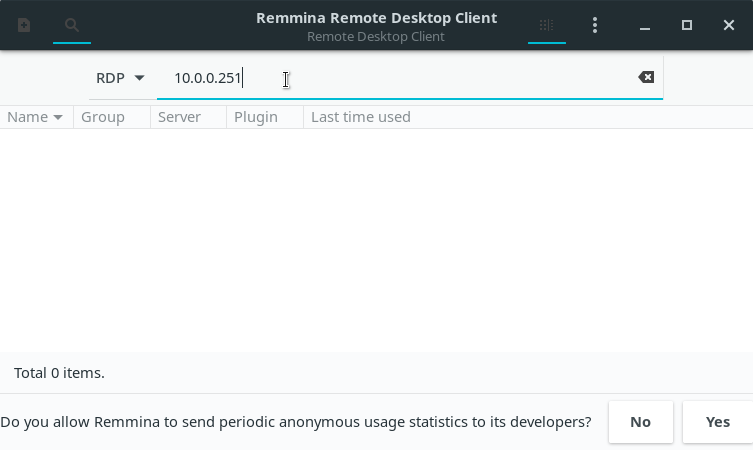
To quickly start a remote access, select the RDP protocol, type the hostname or IP address of the computer you want to connect to (e.g. 10.0.0.251 ) and hit Enter:
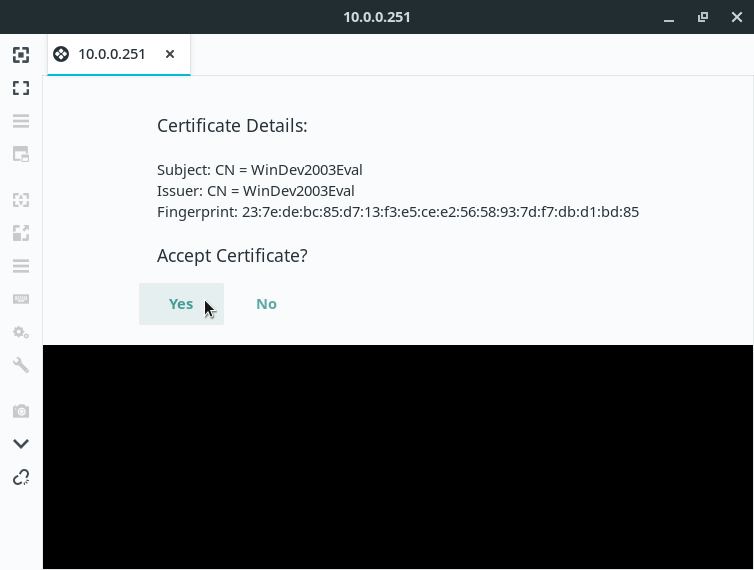
If it’s the first time you connect to this computer, Remmina asks whether to trust its certificate, click Yes:
On the next screen, enter your User name and Password on the remote computer. Also inform the Domain, if necessary. Optionally, you can choose to Save password. Click OK:
You will see the remote computer’s desktop in the Remmina window:
From now on, you are using that computer, but remotely, without sitting in front of it. Each clicking and typing is sent to be processed on the remote computer.
If the remote computer is a Windows desktop, its screen is locked during remote access.
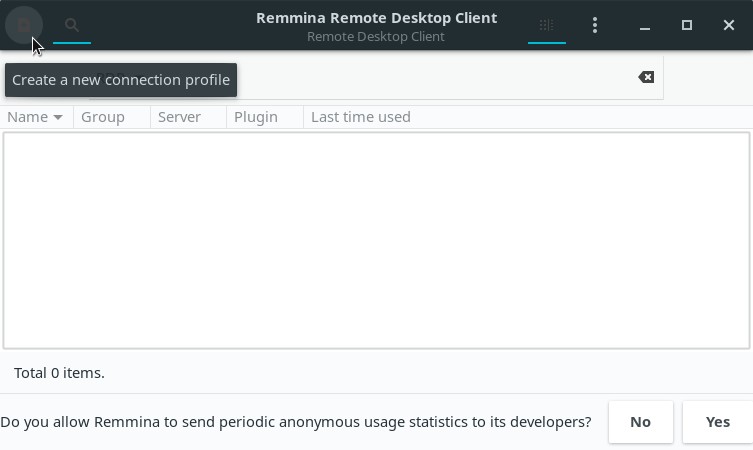
If you are going to access this computer often, consider saving the connection settings, so that remote access can be easily initiated. To do this, click the Create a new connection profile button on the top-left corner of the Remmina main window:
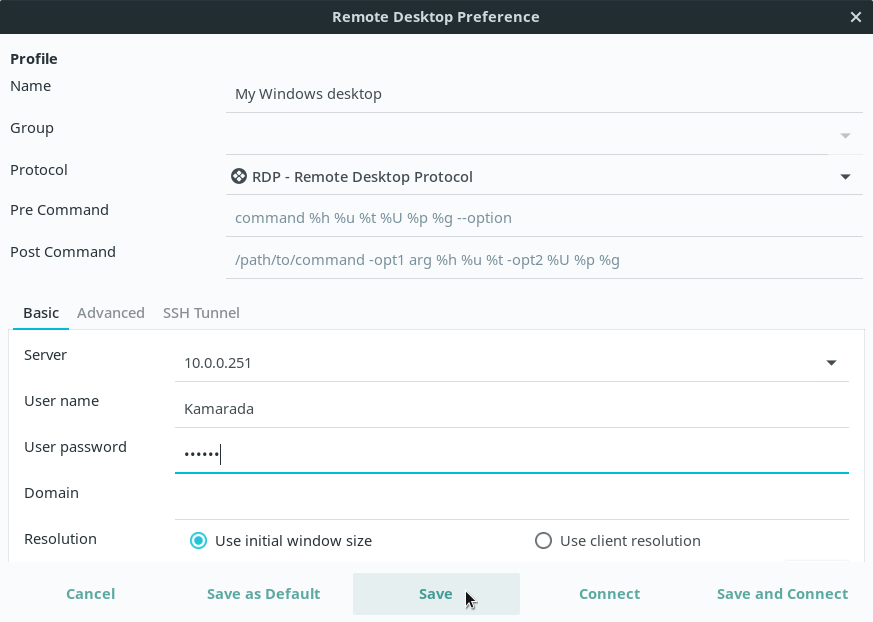
On the next screen, give a Name to identify the connection, select RDP in the Protocol field and enter the connection settings: Server, User name, User password and Domain (if necessary). When you’re finished, click Save:
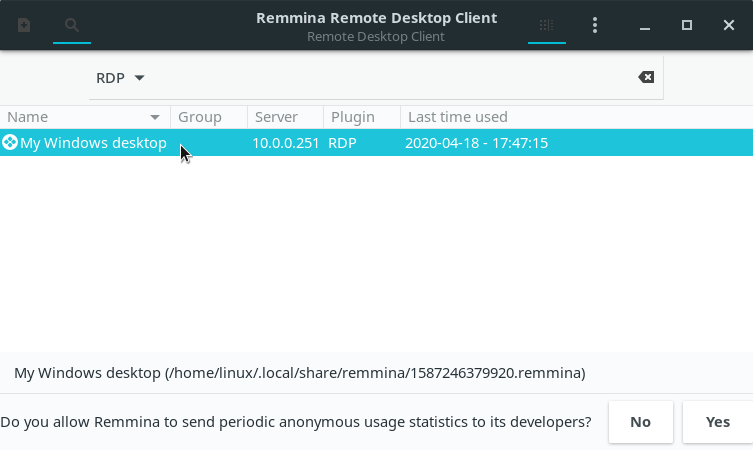
After that, the connection becomes listed on the Remmina main window:
When you want to remotely access that computer, just double-click it on the list.
FreeRDP
FreeRDP is a free implementation of the Remote Desktop Protocol following the Microsoft Open Specifications. This implementation provides both the client and the server applications as well as a library, which allows other applications to use the RDP protocol. Today, we are interested in the FreeRDP client application.
To install the FreeRDP client on Linux Kamarada and openSUSE, run:
The FreeRDP client does not have a main screen like Remmina. To start a remote access using the FreeRDP client, run this command from a terminal:
Making the appropriate substitutions. For example:
If you need to inform the computer’s domain, use the /d parameter:
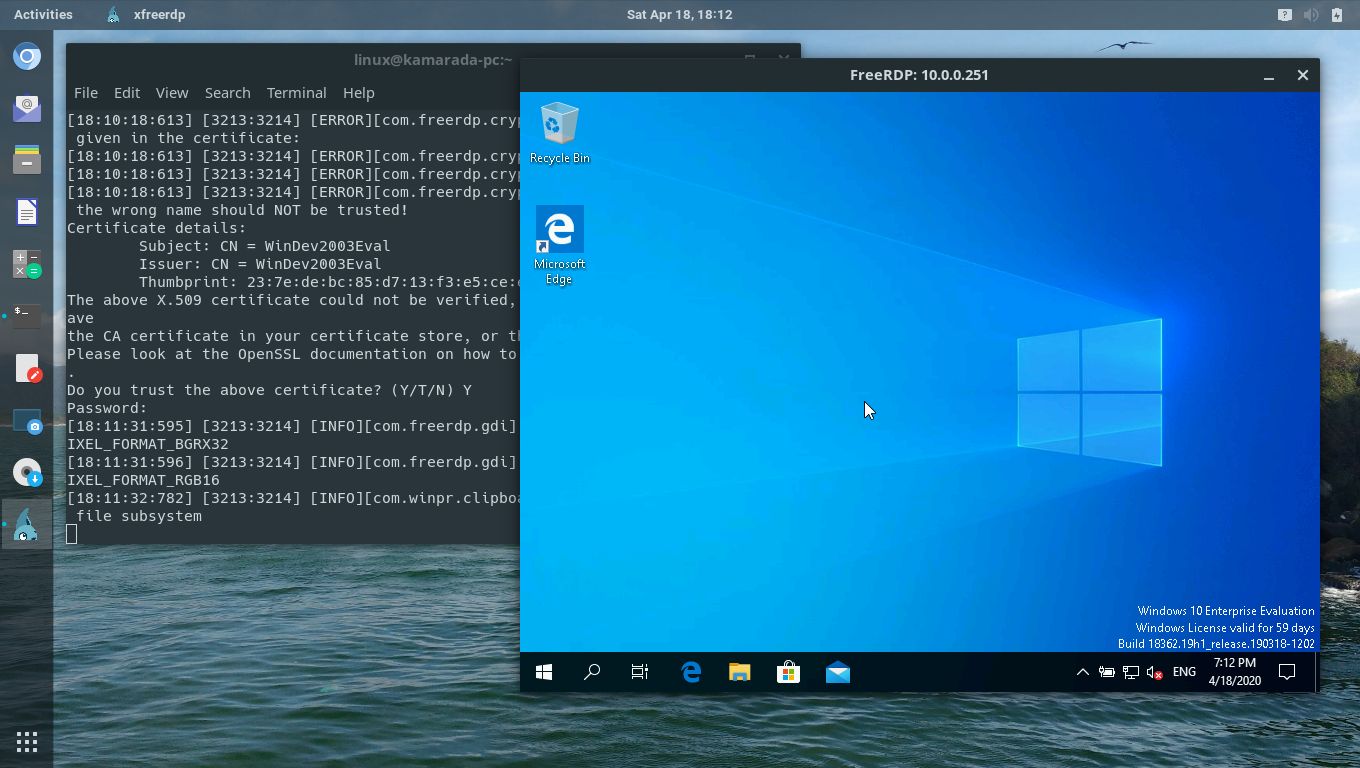
If it’s the first time you connect to this computer, the FreeRDP client asks whether to trust its certificate:
Type Y (yes) and hit Enter. Then type your user password on the remote computer and hit Enter:
After that, the remote desktop connection is initiated:
If you have ever started the remote desktop connection on Windows by the Command Prompt (using the mstsc command), you may have noticed that the FreeRDP client uses the same command syntax. It was implemented that way on purpose, to keep compatibility.
If you are a curious person and want to check it out by yourself:
rdesktop
rdesktop was the first RDP client for Linux and, for many years, it was the most used. But since November 2019, the project is looking for a new maintainer.
In contrast, FreeRDP was born in 2009 as a fork of rdesktop, when Microsoft decided to open the RDP specifications. As time passed and the FreeRDP project evolved, it became the standard RDP client on systems where no native Microsoft client is available.
I present rdesktop here for information purposes only. Unless you have a good reason to use it, you are advised to use one of the other RDP clients, based on FreeRDP.
To install rdesktop on Linux Kamarada and openSUSE, run:
Then, to start a remote access using rdesktop, invoke it from a terminal followed by the hostname or IP address of the computer you want to connect to. For example:
In the past, that would suffice and rdesktop would just work. But now we face a problem that comes from the lack of proper maintenance and updates:
At some point, Microsoft released an Windows update that has since made the use of Network Level Authentication (NLA) required by default. FreeRDP does support NLA, while rdesktop does not. You can still use rdesktop for remote access, as long as you disable NLA on the computer you want to connect to. Note that this makes the connection less secure.
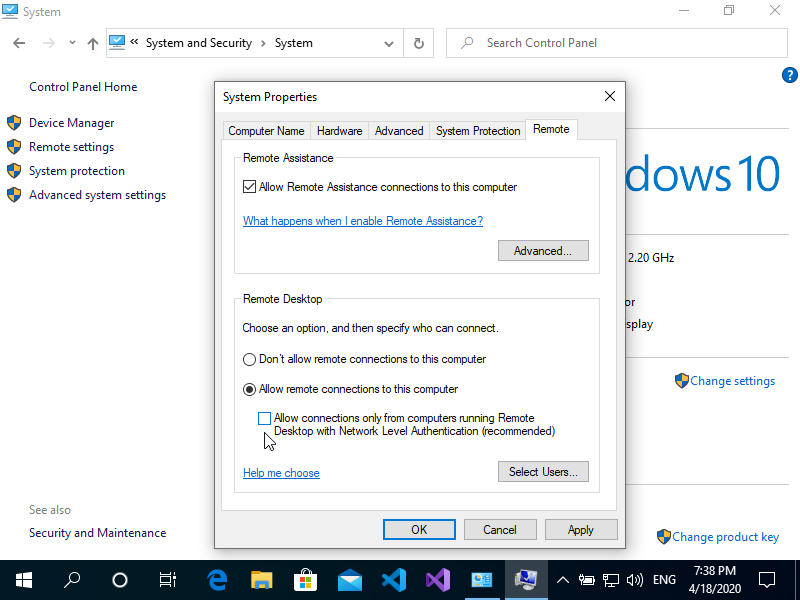
To disable NLA on the Windows machine you want to connect to, logged on with an administrator account, open the Control Panel, open the System and Security category, then click the System icon. On the next screen, click the Remote settings link by the left. On the dialog box that appears, select the Remote tab. Finally, disable the option Allow connections only from computers running Remote Desktop with Network Level Authentication and click OK:
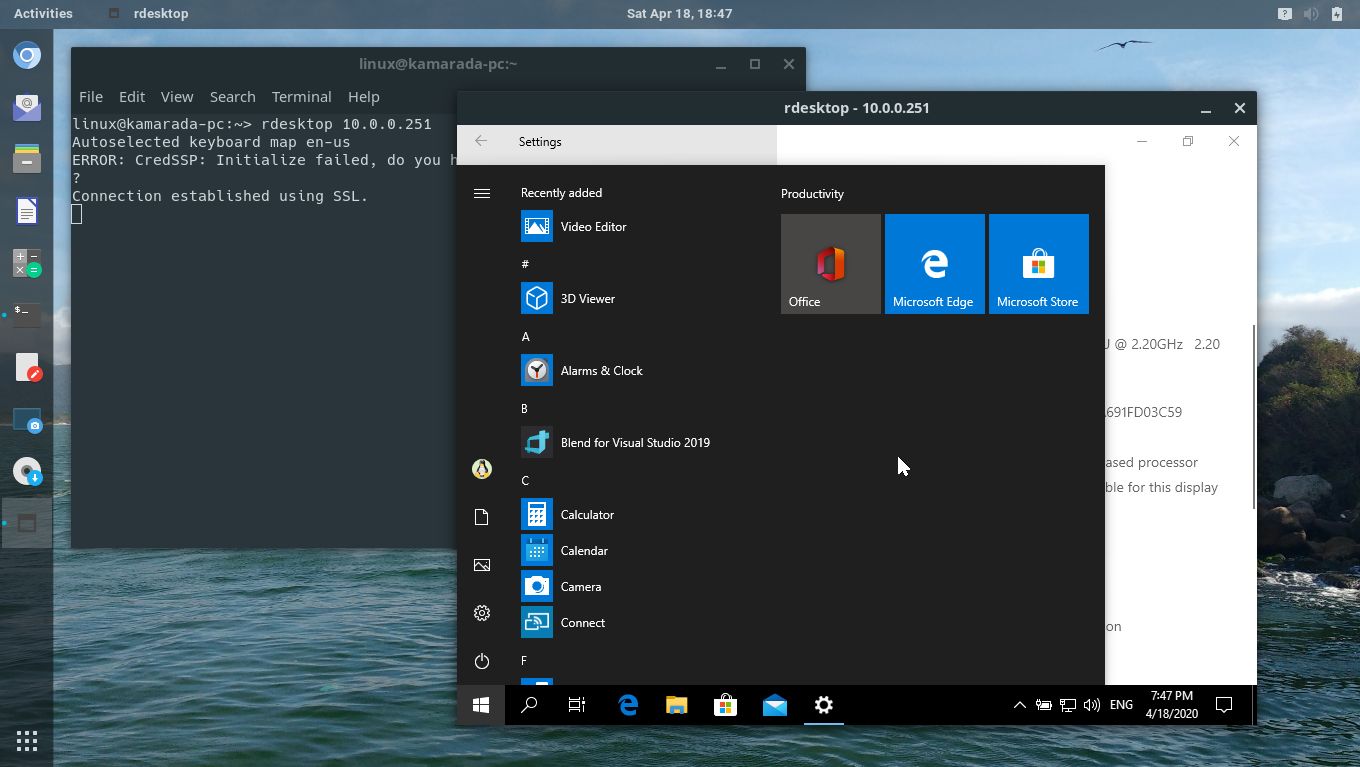
With NLA disabled, back to the Linux computer that will start the remote access, try again:
This time, rdesktop will work. A window presents the Windows logon screen. Enter your username and password and press Enter to start the remote access:
If you want more information about that rdesktop bug, see:
Vinagre
Vinagre is the default remote desktop client for the GNOME desktop. That’s why it is also the default remote desktop client for Linux Kamarada 15.1, the current stable release. Like Remmina, it supports some connection protocols: SSH, RDP, SPICE and VNC. However, like rdesktop, Vinagre is unmaintained for some time now.
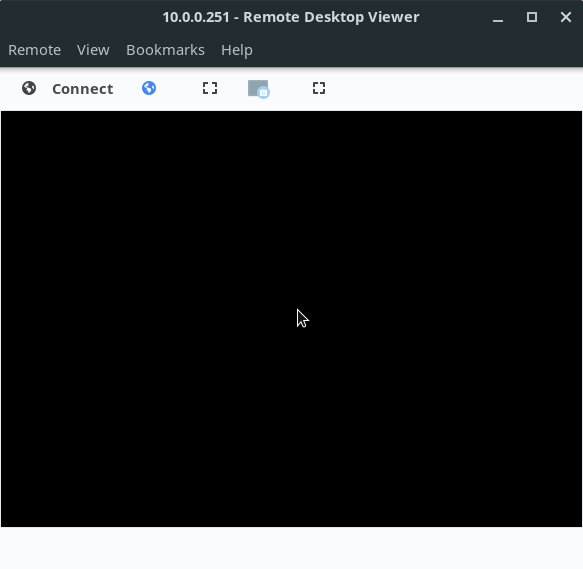
When trying a RDP access, Vinagre only displays a black screen, as I reported on the openSUSE mailing list some time ago:
On some distributions, like Debian, Vinagre works. I believe that those distributions applied some patch to Vinagre.
Probably, the next Linux Kamarada release will come with Remmina instead of Vinagre, following the Ubuntu Linux distribution.
Because of that, I present Vinagre here just for information purposes as well.
Vinagre comes already installed by default on Linux Kamarada and openSUSE, if you chose the GNOME desktop, but if you need or want to install it, you can do this by running:
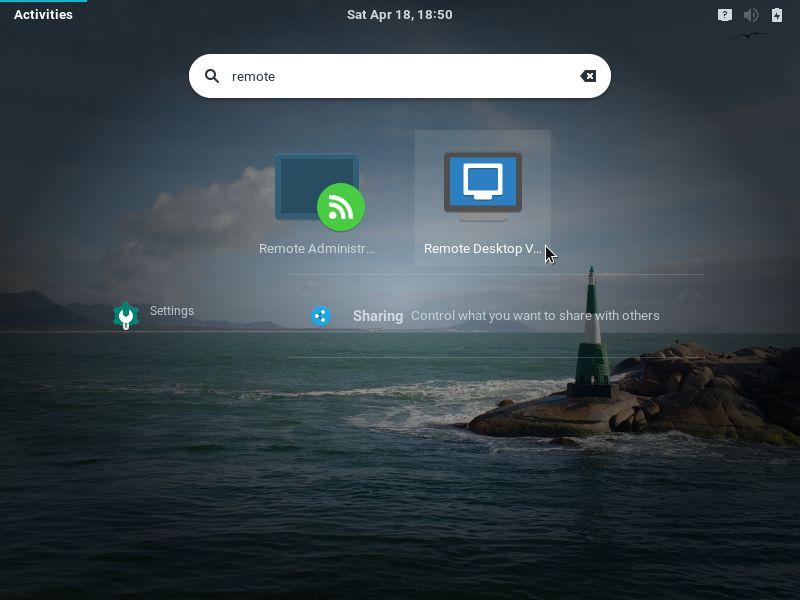
To start Vinagre, which appears as Remote Desktop Viewer on the applications list, open the Activities menu, on the top-left screen corner, type remote or vinagre and click the corresponding icon:
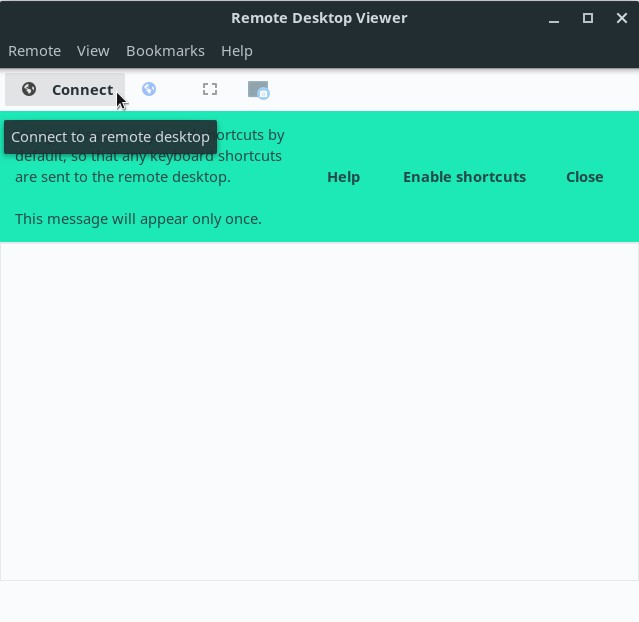
On the Vinagre main screen, click Connect:
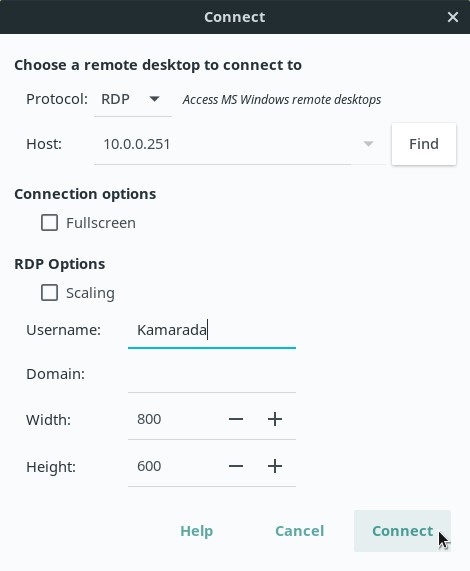
Fill in the next screen fields with the connection settings:
- on the Protocol field, select RDP;
- on the Host field, enter the hostname or IP address of the computer to connect to;
- enter your Username on the remote computer; and
- enter the Domain, if necessary.
When you are finished, click Connect.
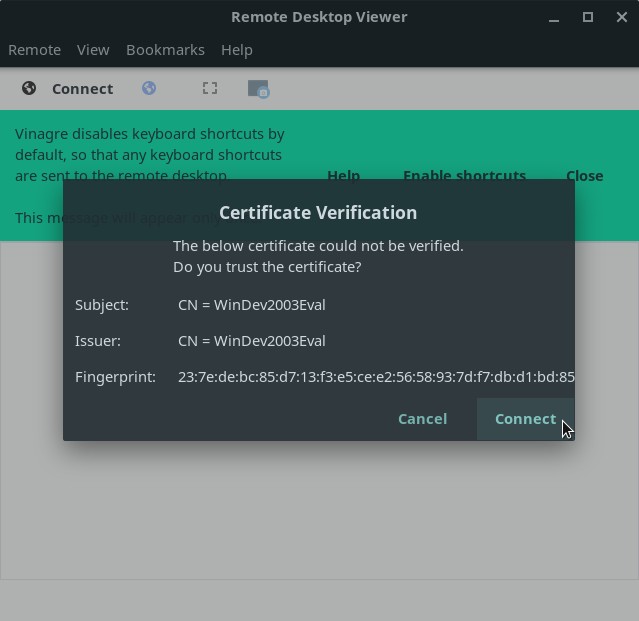
If it’s the first time you connect to this computer, Vinagre asks whether to trust its certificate:
Tell it to do so by clicking Connect.
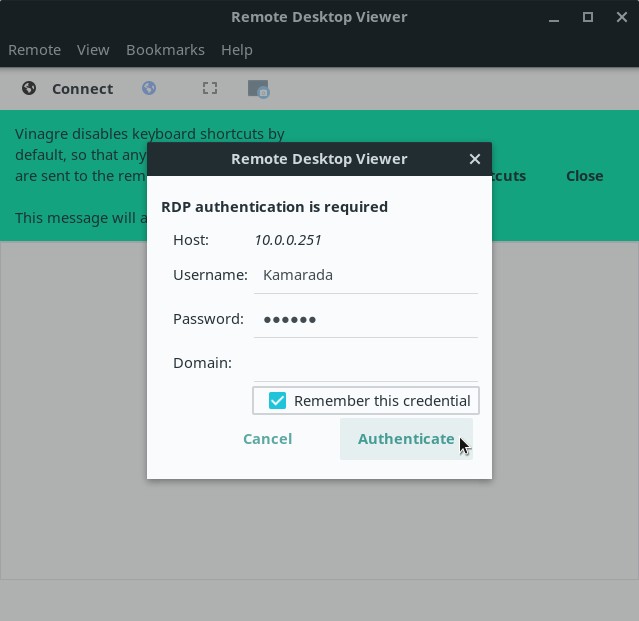
Enter your Password, optionally enable Remember this credential and click Authenticate:
At this point, you should see the remote computer’s desktop. You can notice it has its screen locked (as it normally does during RDP accesses). But, as I said, Vinagre only displays a black screen:
Like Remmina, Vinagre allows you to memorize the connection settings, to easily connect to the same computer again in the future. To do this, during the remote access, open the Bookmarks menu and click Add Bookmark.
After you created the bookmark, it will now be listed on the Bookmarks menu. When you want to remotely access this computer again, just open this menu and click the bookmark.
References
Since it’s not possible to remotely access computers running Windows 10 Home, to write this how-to I used a VirtualBox virtual machine with a Windows 10 Enterprise evaluation version legally downloaded from:
Источник
VPS на Linux с графическим интерфейсом: запускаем сервер RDP на Ubuntu 18.04
В предыдущей статье мы разобрали запуск сервера VNC на виртуальной машине любого типа. У этого варианта масса недостатков, основным из которых являются высокие требования к пропускной способности каналов передачи данных. Сегодня мы попробуем подключиться к графическому рабочему столу на Linux по RDP (Remote Desktop Protocol). Система VNC основана на передаче массивов пикселей по протоколу RFB (Remote Framebuffer), а RDP позволяет отправлять более сложные графические примитивы и высокоуровневые команды. Обычно он используется для организации служб удаленных рабочих столов в Windows, но серверы для Linux также доступны.
Оглавление:
Установка графического окружения
Мы возьмем виртуальную машину с Ubuntu Server 18.04 LTS с двумя вычислительными ядрами, четырьмя гигабайтами оперативной памяти и жестким диском (HDD) на двадцать гигабайт. Более слабая конфигурация плохо подходит для графического десктопа, хотя это зависит от решаемых задач. Не забывайте использовать промокод Habrahabr10 для получения скидки в 10% при заказе.
Установка окружения рабочего стола со всеми зависимостями выполняется следующей командой:
Как и в предыдущем случае, мы выбрали XFCE из-за относительно невысоких требований к вычислительным ресурсам.
Русификация сервера и установка ПО
Часто виртуальные машины разворачиваются только с английской локализацией. На десктопе может потребоваться русская, настроить которую несложно. Сначала установим переводы для системных программ:
Того же эффекта можно достичь, отредактировав вручную файл /etc/default/locale.
Для локализации GNOME и KDE в репозитории есть пакеты language-pack-gnome-ru и language-pack-kde-ru — они понадобятся, если вы будете использовать программы из этих сред рабочего стола. В XFCE переводы устанавливаются вместе с приложениями. Дальше можно инсталлировать словари:
Кроме того, инсталляция переводов может потребоваться для некоторых прикладных программ:
На этом подготовка окружения рабочего стола завершена, осталось настроить сервер RDP.
Установка и настройка сервера RDP
В репозиториях Ubuntu есть распространяемый свободно сервер Xrdp, которым мы и воспользуемся:
Если все прошло нормально, сервер должен запуститься автоматически:
Сервер Xrdp запускается с правами пользователя xrdp и по умолчанию берет cертификат /etc/ssl/private/ssl-cert-snakeoil.key, который можно заменить собственным. Для доступа на чтение файла нужно добавить пользователя в группу ssl-cert:
Настройки по умолчанию можно найти в файле /etc/default/xrdp, а все прочие конфигурационные файлы сервера лежат в каталоге /etc/xrdp. Основные параметры находятся в файле xrdp.ini, который можно не менять. Конфиг хорошо документирован, к тому же в комплекте имеется соответствующие manpages:
Осталось только отредактировать скрипт /etc/xrdp/startwm.sh, который исполняется при инициализации пользовательской сессии. Предварительно сделаем резервную копию скрипта из дистрибутива:
Чтобы запустить окружение рабочего стола XFCE, потребуется сценарий примерно такого содержания:
Обратите внимание: в скриптах лучше прописывать полный путь к исполняемым файлам — это хорошая привычка. Сделаем скрипт исполняемым и на этом настройку сервера Xrdp можно считать законченной:
Настройка межсетевого экрана
По умолчанию Xrdp слушает TCP-порт 3389 на всех интерфейсах. В зависимости от конфигурации виртуального сервера может потребоваться настройка межсетевого экрана Netfilter. В Linux это обычно делается с помощью утилиты iptables, но в Ubuntu лучше использовать ufw. Если IP-адрес клиента известен, настройка осуществляется следующей командой:
Разрешить соединения с любого IP можно так:
Протокол RDP поддерживает шифрование, но открывать доступ к серверу Xrdp из сетей общего пользования — плохая идея. Если у клиента нет фиксированного IP, для повышения уровня безопасности сервер должен слушать только localhost. Доступ к нему лучше настроить через туннель SSH, который безопасно перенаправит трафик с клиентского компьютера. Аналогичный подход мы использовали в предыдущей статье для сервера VNC.
Подключение к серверу RDP
Для работы с окружением рабочего стола лучше создать отдельного непривилегированного пользователя:
Добавим пользователя в группу sudo, чтобы он мог решать связанные с администрированием задачи. Если такой потребности нет, этот шаг можно пропустить:
Подключиться к серверу можно с помощью любого клиента RDP, включая встроенный клиент службы удаленных рабочих столов Windows. Если Xrdp слушает внешний интерфейс, никаких дополнительных телодвижений не понадобится. Достаточно указать в настройках соединения IP-адрес VPS, имя пользователя и пароль. После подключения мы увидим примерно такую картину:
После первичной настройки окружения рабочего стола мы получим полноценный десктоп. Как видите, он потребляет не так много ресурсов, хотя дальше все будет зависеть от используемых приложений.
Если сервер Xrdp слушает только localhost, на клиентском компьютере трафик придется упаковать в туннель SSH (на VPS должен быть запущен sshd). Под Windows можно использовать графический клиент SSH (например, PuTTY), а в UNIX-системах нужна утилита ssh:
После инициализации туннеля клиент RDP будет подключаться уже не к удаленному серверу, а к локальному хосту.
С мобильными устройствами сложнее: способные поднять туннель клиенты SSH придется покупать, к тому же в iOS и iPadOS фоновая работа сторонних приложений затруднена из-за слишком хорошей оптимизации энергопотребления. На iPhone и iPad поднять туннель в отдельном приложении не получится — потребуется приложение-комбайн, которое само умеет устанавливать соединение RDP через SSH. Такое, например, как Remoter Pro.
Менеджер сессий и сеансы пользователей
Возможность многопользовательской работы реализована непосредственно в сервере Xrdp и не требует дополнительной настройки. После запуска сервиса через systemd один процесс работает в режиме демона, слушает порт 3389 и взаимодействует через localhost с менеджером сессий.
Менеджер сеансов пользователям обычно не виден, потому что заданные в настройках клиента логин и пароль передаются ему автоматически. Если этого не произошло или при аутентификации возникла ошибка, вместо рабочего стола появится интерактивное окно для входа в систему.
Автоматический запуск менеджера сессий прописан в файле /etc/default/xrdp, а конфигурация хранится в /etc/xrdp/sesman.ini. По умолчанию выглядит она примерно так:
Здесь можно ничего не менять, стоит только запретить вход с правами root (AllowRootLogin=false). Для каждого авторизовавшегося в системе пользователя запускается отдельный процесс xrdp: если отсоединиться не завершив сеанс, пользовательские процессы по умолчанию продолжат работать, а к сеансу можно будет подключиться заново. Настройки можно изменить в файле /etc/xrdp/sesman.ini (секция [Sessions]).
Переключение раскладок клавиатуры
С двухсторонним буфером обмена проблем обычно не возникает, а вот с русской раскладкой клавиатуры придется немного пошаманить (русская локаль должна быть уже установлена). Отредактируем клавиатурные настройки сервера Xrdp:
В конец конфигурационного файла нужно добавить следующие строки:
Остается сохранить файл и перезапустить Xrdp:
Как видите, поднять сервер RDP на линуксовом VPS несложно, а в предыдущей статье мы уже разобрали настройку VNC. Помимо этих технологий, есть еще один интересный вариант: использующая модифицированный протокол NX 3 система X2Go. С ней мы разберемся в следующей публикации.
Источник
