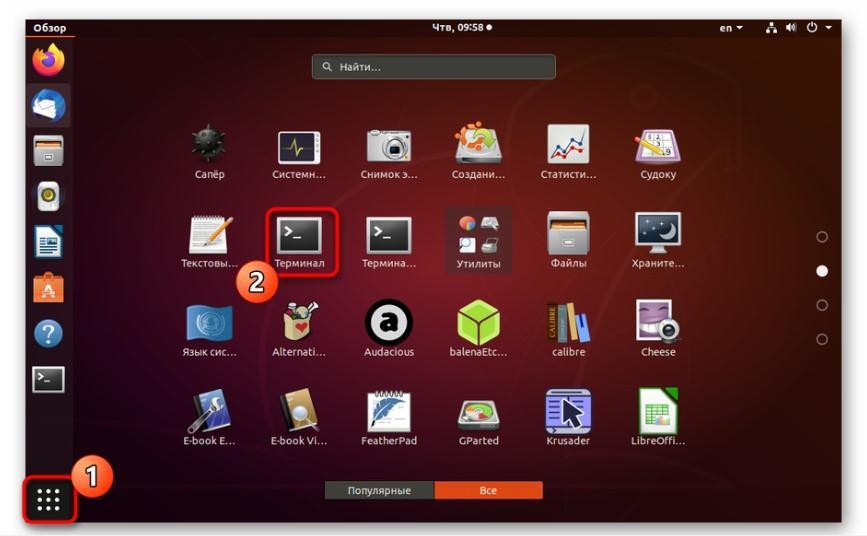
- Как в Linux создать RDP подключение
- Удаленный рабочий стол RDP Linux Mint
- Как установить сервер RDP в Linux для подключения к Windows
- Rdesktop Client Linux
- Клиент Freerdp Linux Mint RDP
- Как подключиться к Ubuntu из Windows
- Зачем нужно подключение к Linux из Windows
- Как использовать Freerdp-Shadow для запуска RDP сервера
- Настройки и аудит безопасности RDP
- Griffon’s IT Library
- Simple IT Library for the rest of us
- xRDP – How to Install on Linux Mint – Part I
- xRDP on Linux Mint 18.1
- Assumptions
- Installation Process
- Step 1 – Install xRDP package
- Step 2 – Install TigerVnc Server package
- Step 3 – Configure the xRDP keyboard Settings
- Perform the remote Connection
- Final Notes
- 14 thoughts on “ xRDP – How to Install on Linux Mint – Part I ”
- Leave a Reply Cancel reply
- Copyrights & Disclaimers
- Support Us
Как в Linux создать RDP подключение
В домашней сети порой возникает необходимость дистанционно управлять каким-либо компьютером через другой ПК. Удаленный рабочий стол является очень удобной функцией, которую не так сложно запустить. Так чем же она полезна? В данной статье подробно описано, как настроить удаленный доступ Linux.
Удаленный рабочий стол RDP Linux Mint
RDP (англ. Remote Desktop Protocol) — это протокол удаленного рабочего стола, разработанный компанией Microsoft. С его помощью можно подключиться к операционной системе другого компьютера через сетевое соединение.
Логотип Linux Mint
К сведению! RDP появился вместе с ОС Windows NT 4.0 в 1996 г., с тех пор выпускались новые версии протокола для новых ОС Windows. Последняя 10 версия выпущена в составе Windows 10 в 2015 г.
Для подключения по RDP к Linux нужен так называемый протокол, который позволяет производить соединение и обмен данными. В итоге один ПК становится управляемым операционной системой другого с возможностью взаимодействия мышью и клавиатурой, программами и Интернетом.
Как установить сервер RDP в Linux для подключения к Windows
Чтобы подключить удалённый рабочий стол линукс минт, понадобится настройка сервера. Для начала нужно зайти на Linux в «Меню» — «Параметры» и в пункте «Совместный доступ» поставить галочки у каждого подпункта.
RDP клиент для Linux — rdesktop и freerdp.
Rdesktop Client Linux
Rdesktop — это консольная утилита, имеющая открытый исходный код для Windows. Начать надо с ее установки. Нужно запустить «Терминал» в меню или зажать комбинацию клавиш «Ctrl + Alt + T» и набрать «apt-get install rdesktop». Данную команду надо ввести от лица Root.
Чтобы подключиться к удаленному столу, требуется ввести в командной строке «Терминала» «rdesktop -z -P -g 1280×900 -u имя -p пароль или rdesktop -u -p ХОСТ»:
- z — это включение сжатия потока;
- Р — кэширование;
- g — геометрия окна;
- u — имя пользователя ПК, к которому нужно подключиться;
- р — пароль учетной записи того же компьютера;
- ХОСТ — IP-адрес компьютера, к которому выполняется подключение.
Обратите внимание! Указание пароля в данном случае не является безопасным действием, так как его могут увидеть другие локальные или удаленные пользователи при помощи команды ps. Поэтому рекомендуется эту опцию пропускать, а пароль набрать после установленной сессии.
«Терминал» в Linux
Чтобы узнать свой IP-адрес, в командную строку надо напечатать «ifconfig».
Вместо геометрии окна (-g) можно ввести опцию —f, которая позволит открыть окно rdesktop на весь экран. Для выхода нужно нажать комбинацию клавиш «Ctrl + Alt + Enter».
Появится окно с командами, где потребуется подтверждение того, что пользователь доверяет данному сертификату. Нужно набрать слово «yes».
Обратите внимание! Далее может возникнуть ошибка. Это связано с тем, аутентификация (NLA — Network Level Authentication) на уровне сети не была настроена.
Есть другой способ для настройки подключения к Windows через RDP без настройки аутентификации, но это небезопасно. Данная проверка подлинности нужна, чтобы защитить ПК от вредоносных программ или злоумышленников. Но для быстрого подключения этим вариантом можно воспользоваться.
В ОС Windows нужно пройти путь: «Пуск» — «Параметры» — «Система» — «Удалённый рабочий стол» — «Дополнительные параметры». Далее требуется убрать галочку в настройке аутентификации с пункта «Требовать для использования компьютерами аутентификации на уровне сети для подключения». Затем выйдет окно с предупреждением, что это небезопасное действие. Нужно нажать «Все равно продолжить». После этого процесса подключение Rdesktop пройдет без ошибок.
RDP требует пройти аутентификацию перед соединением с сервером. Если пользователь не воспользовался последним способом, то ему необходимо пройти проверку подлинности. Нужно установить клиент Kerberos, состоящий из пакетов krb5-user и libpam-krb5. Для этого в «Терминале» нужно ввести «sudo apt-get install krb5-user libpam-krb5 libpam-ccreds auth-client-config». Для дальнейшей настройки в «Терминале» нужно набрать «sudo dpkg-reconfigure krb5-config». Затем пользователя попросят напечатать имя области. Есть возможность проверить настройки с помощью ввода утилиты kinit, а чтобы посмотреть детали — klist.
Клиент Freerdp Linux Mint RDP
Для установки клиента Freerdp на Linux Mint нужно ввести следующую команду — «sudo apt install freerdp2-x11 freerdp2-shadow-x11». Для Arch Linux используется «sudo pacman -S freerdp». Если данные пакеты не найдены, то рекомендуется поискать пакет «freerdp».
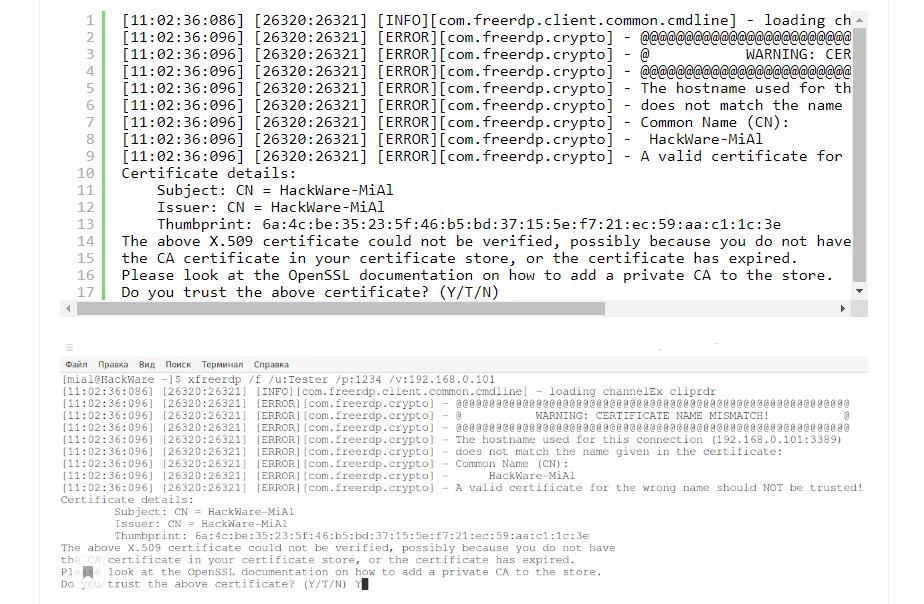
Возможные проблемы с сертификатом
Чтобы подключится к удаленному столу, в «Терминале» следует ввести «xfreerdp /f /u: /p: /v»:
- f — открывает полноэкранный рабочий стол;
- u — имя учетной записи компьютера, к которому выполняется подключение;
- p — пароль учетной записи нужного ПК;
- v — IP-адрес компьютера, к которому надо подключиться.
К сведению! Чтобы перейти из полноэкранного режима в оконный, нужно использовать комбинацию клавиш «Ctrl + Alt + Enter». Для работы в оконном режиме в команду не нужно вписывать опцию «f».
При первичном подключении к удаленному столу появится надпись о проблеме сертификата. Для согласия с тем, чтобы работать с данным сертификатом, нужно нажать клавишу «Y».
Отключить удаленный рабочий стол в полноэкранном режиме можно:
- нажав на крестик вверху экрана;
- кликнув на «Пуск» — «Выключение» — «Отключиться».
Как подключиться к Ubuntu из Windows
Ubuntu является операционной системой на основе Linux. Так как на Windows функция удаленного стола уже встроена, для Ubuntu нужно производить настройку. Надо открыть «Терминал», ввести «sudo apt-get install xrdp», а потом «sudo systemctl enable xrdp». Далее произойдет установка. Затем в Windows нужно запустить приложение RDP и ввести IP-адрес компьютера с Ubuntu. Потом требуется нажать на кнопку «Показать опции», ввести имя пользователя для ОС Ubuntu и кликнуть на «Сохранить». Нажав на «Подключить», произойдет соединение компьютеров, нужно лишь ввести пароль учетной записи Ubuntu.

Установка удаленного рабочего стола на Ubuntu
Зачем нужно подключение к Linux из Windows
Удаленное управление Linux очень полезно во многих случаях. Например, если пользователю нужно с работы срочно подключиться к домашнему компьютеру или в офисе в другом кабинете нужно запустить обновление. Все это можно сделать из одного ПК.
Зачем еще это нужно:
- выполнение задач, которые нужно исполнить на разных компьютерах или серверах;
- помощь другому человеку в исправлении каких-либо ошибок;
- обучение специальным программам учащихся дистанционно.
Обратите внимание! Удаленным доступом чаще пользуются системные администраторы, чтобы устранять сбои в работе операционной системы из своего компьютера.
Как использовать Freerdp-Shadow для запуска RDP сервера
Freerdp-Shadow входит в пакет Freerdp. Freerdp-Shadow-x11 является файлом для запуска RDP у Kali Linux, Linux Mint, Ubuntu, Debiаn. Чтобы запустить сервер без аутентификации, нужно использовать опцию «auth»: freerdp-shadow-x11 —auth.
Важно! Без настроек аутентификации любой пользователь может подключиться к компьютеру.
Для запуска Freerdp-Shadow с поддержкой NLA требуется ввести в строку «Пользователь. ХЕШ. ». Чтобы узнать хеш, нужно ввести следующую команду «winpr-hash -u пользователь -p пароль».
Далее для запуска опции надо задать «freerdp-shadow-x11 /sam-file:Файл /sec:nla», где файл — это расположение NTLM SAM для аутентификации, а sec:nla — включение аутентификации.
Затем пользователь проводит проверку на ОС Windows. Если происходит запрос пароля, то на сервере аутентификация подключена.
Обратите внимание! Если при запуске RDP произошла ошибка «ERROR», нужно создать файл с расположением SAM и запустить вышеуказанную опцию «freerdp-shadow-x11 /sam-file:Файл /sec:nla».
Настройки и аудит безопасности RDP
Незащищенный RDP сервер очень уязвим. Пользователь может оказаться жертвой злоумышленников, ведь подобные взломы с целью получения личных данных — довольно частое явление. Как же защитить RDP и настроить его при подключении Linux к Windows:
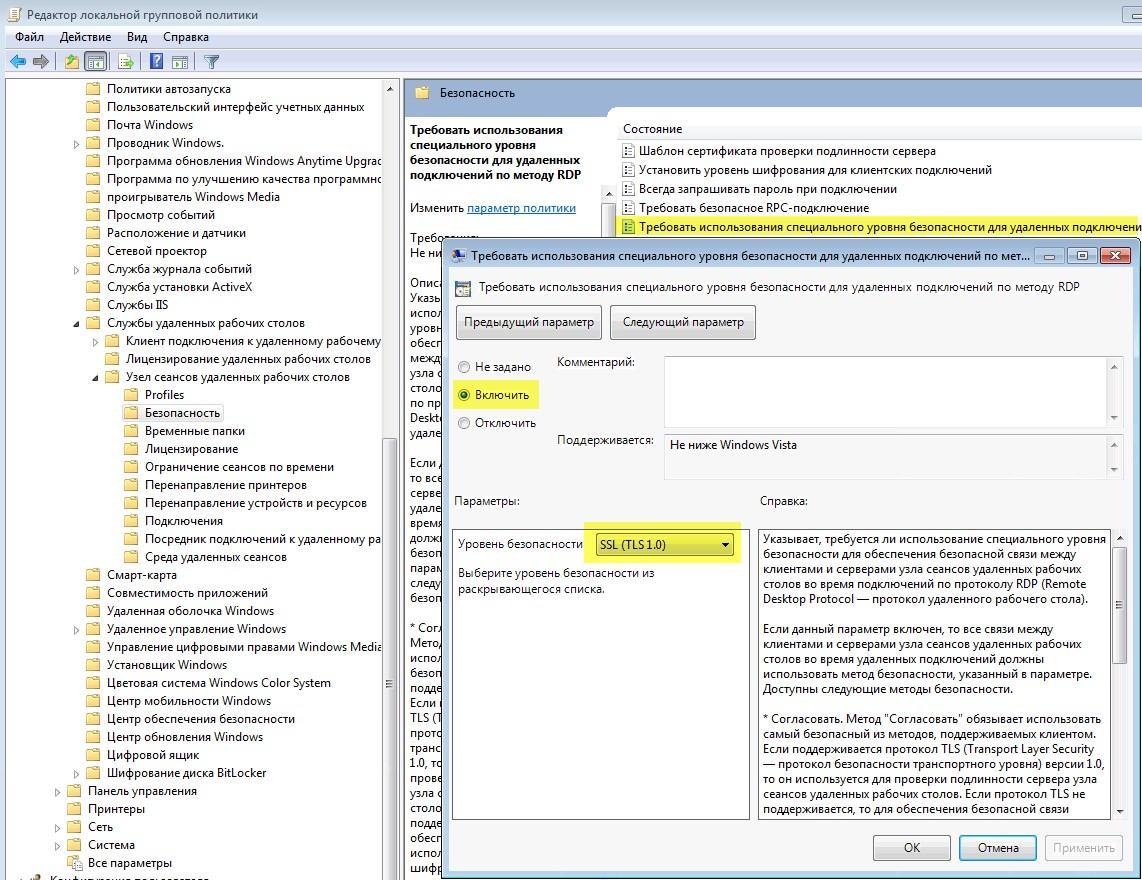
- шифрование. На ОС Windows в командной строке требуется ввести «gpedit.msc» и пройти путь: «Конфигурация компьютера» — «Административные шаблоны» — «Компоненты Windows» — «Службы удаленных рабочих столов» в левой части экрана. Далее нужно кликнуть на раздел «Безопасность». В правой части необходимо выбрать «Требовать использования специального уровня безопасности для удаленных подключений по методу RDP» и указать на «Включить», а в пункте «Уровень безопасности» отметить «SSL TLS 1.0»;
- смена порта. Изначально протокол RDP находится на TCP 3389. Чтобы изменить порт, в реестре рекомендуется поменять ключ PortNumber по адресу: HKEY_LOCAL_MACHINE\System\CurrentControlSet\Control\Terminal Server\WinStations\RDP-Tcp;
- пустые пароли. Для безопасности необходимо включить параметр «Учетные записи: разрешать использование пустых паролей только при консольном входе». Путь для включения такой же, как в пункте «Шифрование»;
- список пользователей. Его нужно проверить в «Свойствах системы» — «Удаленный доступ»;
- аутентификация NLA.
Удаленный рабочий стол Linux является весьма удобной функцией для взаимодействия с несколькими ПК. Если следовать инструкции, то все можно подключить быстро и без проблем. Главное — не забывать о безопасности системы.
Источник
Griffon’s IT Library
Simple IT Library for the rest of us
xRDP – How to Install on Linux Mint – Part I

As announced in our previous post, we are starting a series of post related to xRDP software and how to install it on different Ubuntu flavors. Today, we will show you how you can install the xRDP software package on a Linux Mint 18.1.
The recent release of Linux Mint 18.1 makes it a perfect candidate for an xRDP instructions guide plus multiple people asked us about xRDP and Linux Mint.
xRDP on Linux Mint 18.1
Assumptions
When we have performed our installation & testing, we have been using the following infrastructure
- We have performed a Fresh installation of theLinux Mint 18.1
- We have performed the installation on a Virtual Machine running on Hyper-V Server and Virtualbox
We are assuming that
- Your Linux Mint machine is connected to Internet (so you can download the necessary packages for the installation to occur). If you are not connected to internet, you will have to manually download the necessary packages and make them available on your offline machine
Installation Process
Step 1 – Install xRDP package
At this stage, you should have a Linux Mint machine installed and ready to be used.

Click on Picture for Better Resolution
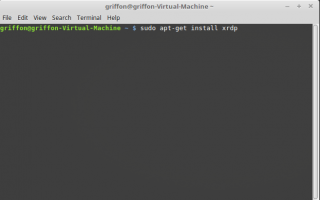
Once logged onto the system, open a terminal and issue the following command
sudo apt-get install xrdp
Click on Picture for Better Resolution
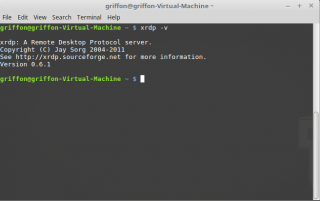
Wait for the installation to complete. At the end of the process, check the version of xRDP installed on your system by issuing the command
As you can see in the screenshot, the version is 0.6.1.
Click on Picture for Better Resolution
At this stage, you would think that you are ready to go. This is not the case. If you try to perform a remote desktop session to your Linux Mint machine, nothing will happen or you will end up with the following error
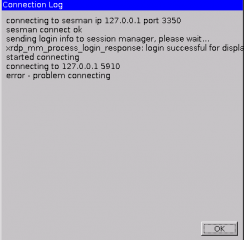
Click on Picture for Better Resolution
In Linux Mint, this is a normal behavior because no VNC Server is being installed along with the xRDP package. This means that we need to install an additional package to establish a remote desktop session…
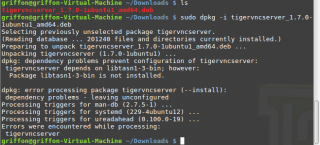
Step 2 – Install TigerVnc Server package
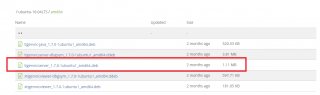
In order to connect to the Cinnamon interface through the xRDP software, it’s necessary to install a specific VNC Server package :
- the TigerVNC server software.
The TigerVNC Software is not available in the Ubuntu repository. You will need to download the installation package from the following location : https://bintray.com/tigervnc/stable/tigervnc/1.7.0#files/
Click on Picture for Better Resolution
After you have downloaded the package, Open a Terminal console and move to your Download folders (or location where you have saved the packaged downloaded above)
In the terminal console, to perform the installation, type the following
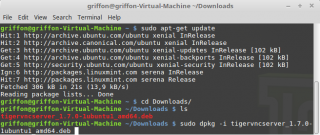
Click on Picture for Better Resolution
You might see some warning and errors messages. Ignore these messages for the moment…
Click on Picture for Better Resolution
To ensure that all the dependencies are installed, issue the following command in the Terminal console
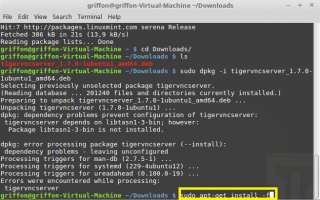
Click on Picture for Better Resolution
Step 3 – Configure the xRDP keyboard Settings
Note : You need to perform this action on the local Ubuntu machine (and not through the xrdp connection !!)
By default, the xRDP login screen will use an en-us keyboard layout. You remote session will also be using the en-us keyboard layout. If you are using a different keyboard layout than the english one, you might want to use your actual keyboard layout and not the english us one.
To configure you keyboard layout settings, in your terminal console; simply copy/paste this text and it will try to find out automatically your keyboard layout
At this stage, you are done and ready to work
Perform the remote Connection
At this stage, you should be able to perform a remote desktop session to your Linux Mint machine. The first time you login, you might receive a message error. If you try the second time, you should be presented with your Cinnamon Desktop environment and you can start working on your Linux Mint.
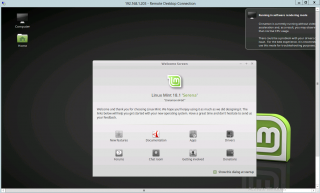
Click on Picture for Better Resolution
As already mentioned, you will be connected to your cinnamon desktop interface but it’s not the full one. In the screenshot above, you see that you are logged on in the software rendering version of cinnamon.
Final Notes
This is the end of this post. As you can see, if you install the xrdp package and the tigerVNC server software, you should be able to remote connect to your Linux Mint Operating System. However, we will investigate a little bit further xRDP and Linux Mint topic. Indeed, in this post, we have been using the xrdp package version 0.6.1. A newer version is available (0.9.0) which ships by default in Ubuntu 16.10
In the second part, we will see how we can install the xrdp version 0.9.0 on Linux Mint which bring more features and settings than xRDP 0.6.1
14 thoughts on “ xRDP – How to Install on Linux Mint – Part I ”
Hello and thanks for the info!
I’ve now tried 3 of the RDP tutorials on your site with some limited success. I am able to get connected but with woefully slow speed. Is there any way I can adjust something to make it run faster? It’s like a 5 second lag, and this server has gig internet.
Thanks,
Pasbt
What do you call limited success ? Please provide more information about what you are trying to achieve, Which distribution you are using, which desktop environment you want to use, which version of xrdp you are using as well
Xrdp is not superfast but performance are usually good enough to perform your job through the remote session
Waiting for some feedback
Till next time
See ya
Thank you so much! I’ve fought with this kind of thing for a while. You make it simple!
Thank you for the positive feedback. We too had to fight for a long time to get stuff working with XRDP…:-). We hope that the info provided through this blog is somewhat useful…
Till next time
See ya
Thanks mate, did manage but I still have a small problem, my keyboard works well in applications however when I use in terminal and search box it’s completely srewed.
We are not using extensively Linux Mint so could not help you here…. we would need to install it and check for this…. to solve your issue, you could try to perform a custom installation of xrdp….
You can have a look at part II of the post and use the script. HOWEVER, you would need to tweak the script as the latest xrdp binaries have introduced important changes….You cannot use it as is (you have a look at the script in this post – see http://c-nergy.be/blog/?p=10752 – as a base as this one is the most recent and should work with the latest xrdp binarie….
Use it at your own risk and test it before in a standalone or virtual machine
Hope this help
Till next time
Thanks for the post, got me past the ‘error – problem connecting’ issue.
However, now it gets through to the ‘connected ok’ and the RDP window closes. I thought that it might have been the resolution of my client (3440×1440) but I tried from a VM with a 1024×768 resolution and got the same thing. Any guidance would be appreciated.
We are working on that… Several people have noticed that a change has occurred in xRDP or UBuntu Operating system that generate this behavior. Some fixes are already available from Ubuntu.. We will try to publish asap information and workaround about the issue
Stay tuned
Till next time
Cinnamon desktop wont come up.
This works:
echo xfce4-session >
/.xsession
This doesn’t:
echo cinnamon >
@Bert,
Ok Thank you for he feedback… As we are not regular users of Linux Mint, we might investigate this issue when time permit
Till next time
See ya
Hi, I tried this but Windows RDP doesn’t connect to my Linux server it just times out and returns this error:
Remote Desktop can’t connect to the remote computer for one of these reasons:
1) Remote access to the server is not enabled
2) The remote computer is turned off
3) The remote computer is not available on the network
I double-checked and none of these is true
@William
I was getting this as well and it appears to have been the firewall on my linux machine.
I opened port 3389 for xRDP:
# firewall-cmd –permanent –add-port=3389/tcp
but forgot to reload:
# firewall-cmd –reload
However, I am now getting another error that seems pretty vague. I have a feeling it has to do with TigerVNC, which I am reading is required to be able to connect to the Cinnamon UI. I am not 100% sure on this though; my Linux knowledge is limited and I pretty much learn as I go and try to document everything I can.
Thanks Donnie I did that and now I can log in but with another problem. After my computer goes to sleep or the session ends, I get a blank screen after I re-log into the xrdp session.
xRdP is not the perfect solution but can be really helpful in mixed environement…
Hope you succeeded with your installation and confiuration
Till next time
See ya
Leave a Reply Cancel reply
Copyrights & Disclaimers
Support Us
You can support us by downloading Brave Browser and tip us through Brave Browser Reward System.
Download FREE Brave Browser
You can also decide to Buy us a coffee if your think that the information provided here was useful to you.
Источник


