- Raspberry Pi – Install Remote Desktop (XRDP)
- Difficulty level:
- Schritt 1: Activate Boot to Desktop
- Step 2: Install XRDP Server
- Step 3: Reboot
- Step 4: Remote Desktop Client
- Step 5: Establishing a Remote Desktop Connection
- Setup XRDP remote desktop on Raspberry Pi
- 5 ways to remote desktop on Raspberry Pi (Windows/Linux/Mac)
- Remote desktop with xrdp
- Introduction
- Installation
- From Linux
- From Windows
- From Mac OS
- From a smartphone
- Remote desktop with SSH and X11 forwarding
- Introduction
- Installation
- From Linux or Mac OS
- From Windows
- From a smartphone
- Remote desktop with VNC
- Introduction
- Installation
- From Linux
- From Windows
- From Mac OS
- From a smartphone
- Remote desktop with Teamviewer
- Introduction
- Installation
- From Linux
- From Windows and Mac OS
- From a smartphone
- Remote desktop with NoMachine
- Introduction
- Installation
- From any OS
- From a smartphone
- Video
- Conclusion
- Raspberry Pi Resources
Raspberry Pi – Install Remote Desktop (XRDP)
To manage the Raspberry Pi over the network, it is also possible to access it remotely via remote desktop in addition to SSH and VNC. Microsoft’s Remote Desktop Protocol (RDP) enables the transmission and control of screen content over the network. This is particularly useful for Windows users, since Windows already has the appropriate client (Microsoft Terminal Services Client). In the following article I show step-by-step how to set up Remote Desktop on the Raspberry Pi and then access it using Windows/Mac/iPhone/Android.
Difficulty level:
Schritt 1: Activate Boot to Desktop
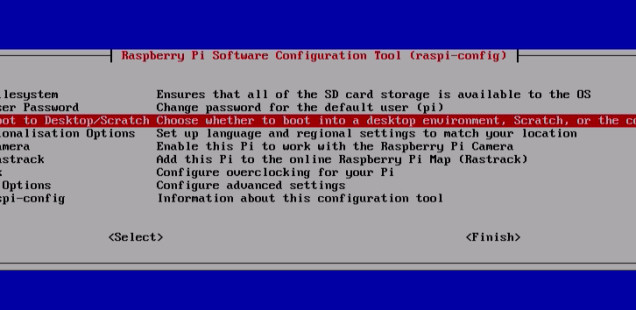
First, the Raspberry Pi must be configured to start the (graphical) desktop after booting. This can be configured with a few clicks via raspi-config:
Select the entry »3 Enable Boot to Desktop/Scratch« and then confirm »Desktop Log in as user ‘pi’ at the graphical desktop«.
Step 2: Install XRDP Server
NOTE – Raspberry Pi with PIXEL desktop
Unfortunately, XRDP does not work with the new Raspbian Image right away. The integrated RealVNC Server and XRDP are in conflict and cannot be used together. To resolve this conflict, RealVNC must be uninstalled before installing XRDP:
After boot to Desktop has been activated, the actual installation of the Remote Desktop Server follows. Under Linux, XRDP is a free implementation of the Remote Desktop Protocol. We can install these directly using the package manager APT. When the installation is complete, the XRDP daemon starts automatically.
The basic installation is already done. In the future, the XRDP server will be started automatically in the background when the system is started.
If necessary, the XRDP settings in the files /etc/xrdp/xrdp.ini and /etc/xrdp/sesman.ini can still be adjusted. However, this is not mandatory and may only be required in special applications. That’s why I’m not going to go into that.
Step 3: Reboot
A restart of the Raspberry Pi is recommended to complete the setup:
Step 4: Remote Desktop Client
To be able to access the Raspberry Pi remotely, we need a corresponding remote desktop client software on the client.
As already mentioned in the introduction, Windows comes with a suitable client. You can find it under:
All Programs -> Accessories -> Remote Desktop Connection
If you have installed MS Office for Mac, you will find the Microsoft Client at “Applications → Remote Desktop Connection”. Otherwise it can be downloaded via iTunes – Microsoft Remote Desktop.
For other operating systems the following clients are available:
Step 5: Establishing a Remote Desktop Connection
To establish a remote desktop connection with the Raspberry Pi, we must first specify its IP address.
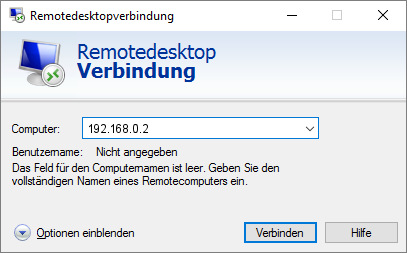
After we click on Connect, we get a login screen from the XRDP server of our Raspberry Pi. The access data are identical to those for SSH. If the user or password has not been changed under Raspbian, the default user is pi and the password is raspberry.
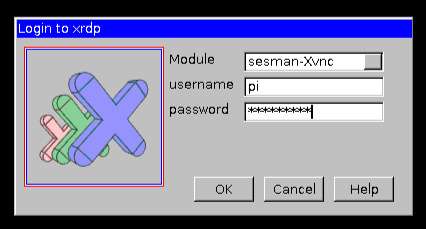
After successful registration we can already see the desktop of the Raspberry Pi after a few seconds and operate it with mouse and keyboard.
This article was helpful for you?
Please support Datenreise.de – Thank you!
Rate this Post: 

4.45/5 (11 votes)
Raspberry Pi – Install Remote Desktop (XRDP) , 4.45 out of 5 based on 11 ratings
Источник
Setup XRDP remote desktop on Raspberry Pi
Last Updated on May 29, 2020 by Kalitut Leave a Comment
How to setup remote desktop on raspberry pi
In Windows, we speak of Remote Desktop Support or Remote Desktop Connection via RDP to serve a remote computer via screen transfer. If you’re working with Windows clients, setting up an RDP server on Raspberry Pi is a viable alternative to VNC. VNC is less common in the Windows world.
With RDP you have to live with the following restrictions:
- The development of open-source software depends on the RDP protocol development. That means you do not get all the features and flexibility of VNC solutions here.
- RDP is a security issue over insecure networks because all data is transmitted in plain text. So also entered usernames and passwords.
- XRDP (the Linux RDP) connects to a separate screen each session. So you can not return to the current screen or to an existing one.
Task
- Install Remote Desktop Service on Raspberry Pi.
- Start RDP session from a Windows client.
Solution: Install Remote Desktop Service
Windows Remote Desktop Service is implemented by the “xrdp” package and must be installed first.
Whether the Remote Desktop Service has been successfully installed and running can be checked as follows.
The status information “Loaded: loaded” and “Active: active (running)” show that the service is loaded and automatically started.
Solution: Start the Remote Desktop session on the Windows client
Tested with Windows 10.
To build a remote desktop session, Windows has the Microsoft Terminal Services Client (MSTSC). There are three ways to access this program.
- Call the client via “Start> Run> mstsc”.
- Via the Explorer by calling “c:\Windows\system32\mstsc.exe”.
- Search for apps: “apps: mstsc”.
After the program has been started enter the IP address of the Raspberry Pi and click on “Connect”. Then the connection is established (confirm security question). On the illustrated desktop you then enter username and password of the user on the Raspberry Pi.
Источник
5 ways to remote desktop on Raspberry Pi (Windows/Linux/Mac)
If you don’t have the Raspberry directly at hand (or no screen) and you need to make regular changes on it, it may be interesting to have access to the desktop from another computer (in addition to ssh)
How to access a Remote Desktop on Raspberry Pi?
There are five ways you can use to run a remote desktop on Raspberry Pi, sorted by ease of installation :
- Xrdp
- SSH and X11 forwarding
- VNC
- Teamviewer
- NoMachine
For each method, I will explain how to set it up on your Raspberry Pi and how to access it from the main OS (Windows, Linux, Mac and even from your smartphones)
To install the necessary packages and to connect, you will need to find the IP address of your Raspberry Pi, and probably activate and log in SSH
I’ll let you read my two articles on the subject if needed
Also, if you are really interested in improving your skills on Raspberry Pi, I highly recommend to check out my e-book here. It’s a 30-days challenge from beginner to master, with step-by-step tutorials and many projects to practice along the way.
Remote desktop with xrdp
Introduction
Xrdp is an opensource remote desktop protocol server, which allows you to connect to the Linux desktop from any operating system
If you need to open or redirect access on your router or firewall, know that xrdp uses the standard port 3389
Installation
The installation of xrdp is straightforward since it is available in the original Raspbian repositories
So just run the following command:
sudo apt-get install xrdp
Xrdp is present on raspberry as a service, so you can manage it with the usual controls if needed :
sudo service xrdp start | stop | restart | status
If you are not familiar with the command line on Linux, you might consider checking this other article first. I explain the most useful command on Raspberry Pi, you can even download a cheat sheet with all of them.
From Linux
To connect from a pc under Linux, I advise you to use Remmina
It is provided in the repositories for most distributions:
sudo apt install remmina
Once installed, launch it and connect to the IP address of your Raspberry Pi
On my Ubuntu I encountered the following error:
So I had to add it as a shortcut, the quick connection does not allow to define the color depth
By choosing GFX RFX in the list, the error disappeared, and I was able to connect
Here are the options I filled :
From Windows
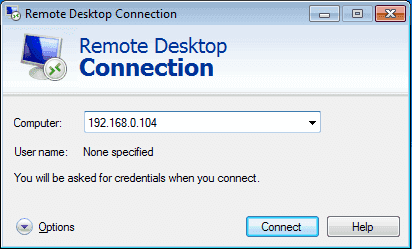
From Windows start the “Remote Desktop Connection” tool from the start menu and fill the IP address :
Click on “Connect” and you will come to the xrdp login screen
All you need to do is enter the credentials and click OK
Set Xorg for Session if you do not know what you are doing
The desktop will then be displayed relatively well
In my case the icon was a bit big, so I changed in the appearance options, but otherwise it was usable
From Mac OS
I could not do the test on Mac OS, but there are several RDP clients that you can use the same way
Download for example “Microsoft Remote Desktop” from the App Store, and connect to your Raspberry Pi by specifying its IP address
From a smartphone
You can use the RDP protocol from a smartphone quite easily
Indeed the application “Microsoft Remote Desktop” is also available for Android and iOS
So yes it’s possible to connect and use it, but it’s not great
Remote desktop with SSH and X11 forwarding
Introduction
X11 is the main Linux graphical window manager
X11 forwarding over SSH is a way to start an app from a server when connected to it via SSH
In our case, this will launch Raspberry Pi applications from our desktop (so it is not full access to the desktop)
This method could work from a remote location. It would be enough to open SSH port (22) from outside
Remember to limit the allowed IP addresses in this case, and maybe set up additional protections like fail2ban to avoid any security issues
Installation
There is nothing to do on the Raspberry Pi, X11 Forwarding is enabled by default on Raspbian
If you have any problem you can check that X11Forwarding is uncommented and set to yes in /etc/ssh/sshd_config,
From Linux or Mac OS
Using Linux or macOS, the access is almost as usual because you only have to log in to SSH by adding a parameter:
ssh -X pi@192.168.1.15
Enter your password, and then start your app with the nohup command :
nohup chromium-browser &
Replace chromium-browser with the app of your choice
The application will open on your computer (with more or less slow depending on the case 🙂 )
From Windows
Using Windows you will need:
– Putty (which you probably already have for the SSH connection)
– Xming (download it on Sourceforge)
Once Xming is installed (the default options work very well), follow these steps:
- Start Putty
- Fill the hostname with something like pi@192.168.1.15
- Fill the Saved sessions with something like Raspberry Pi
- Go to Connection > SSH in the left menu, and check “Enable X11 forwarding”
- Go back to Session and click Save
- Then double-click on your new saved session to connect
You can read this article to get more details on how to connect via SSH to a Raspberry Pi.
Once this is done, your SSH access to the Raspberry Pi is kept, with the X11 forwarding enabled
Once in the console, you can launch a Raspberry application on your Windows computer with the nohup command:
nohup baobab &
This will start the Raspberry Pi disk manager on your Windows desktop :
From a smartphone
I don’t think it’s possible to use this method from your phone (tell me if you know how)
I’ve already seen people start an X server on Android to use an android app on their computer, but not the other way around
Remote desktop with VNC
Introduction
VNC (Virtual Network Computing) is a system to share a graphical desktop, pretty close to xrdp
The difference is that you connect to the current session directly, unlike xrdp which created a new session
There are a large number of VNC servers and clients (RealVNC, TightVNC, UltraVNC, …)
VNC runs on port 5900
You can do NAT to make it available from the outside if needed
Installation
We will install the RealVNC server on the Raspberry Pi, which is available in the repositories
Follow the steps below to install it:
- Update your repository :
- Install RealVNC server :
- Enable VNC Server :
- Start raspbian configuration
- Got to Interfacing options
- Select VNC
- Answer Yes
- Select Finish to quit (or ESC)
Now that we finished installing VNC, let’s see how to connect
From Linux
On Linux, the easiest way I found was to install the RealVNC client (Remmina also allows VNC connections in theory, but it didn’t work for me)
So, you can download RealVNC viewer here
Leave the default option (Standalone) if it is to use once, but I advise you to choose the .deb or the .rpm according to your OS, to have the RealVNC shortcut in the programs
In most cases, you can install it by double clicking on the file, but if necessary you can do it on the command line, for example:
Debian like : dpkg -i VNC-Viewer-6.18.625-Linux-x64.deb
Redhat like : rpm -ihv VNC-Viewer-6.18.625-Linux-x64.rpm
Then the use of RealVNC is super simple, just indicate the IP of Raspberry Pi and validate
Access will be automatically bookmarked for future times
From Windows
From Windows it is the same thing, you can download and install RealVNC from their official website
Then launch the software via the start menu, type the IP of the Raspberry Pi and here you are connected to the remote desktop
The requested logins are the usual users of the system (for example pi/raspberry if you have not changed the password)
From Mac OS
RealVNC is also available for Mac OS so just get and install it and then follow the same steps as below 🙂
From a smartphone
RealVNC also provide an app for iOS and Android smartphones so that you can use it every time, everywhere 🙂
You can also use this solution with an iPad (as explained in my article here), it would be like if your iPad was the Raspberry Pi monitor.
Remote desktop with Teamviewer
Introduction
Teamviewer is a proprietary software very close to VNC for remote desktop use but adds additional features, mostly business oriented
For example, Teamviewer facilitates remote access to a machine on another building/city over the Internet.
There is no need to open a specific port for each computer as with previous solutions
By default, TeamViewer connect on port 5938 but can also use ports 80 and 443 if not opened (so it will work natively most of the time)
Installation
The installation is not obvious, because even if it is mentioned in the documentation of a package for the ARM, it is not present in the Linux download links and there is no Raspberry Pi category
The download is done from this page, but that redirects very quickly to the Linux downloads
In short, I give you the installation procedure without having to go to their site:
- Get the ARM package for TeamViewer
- Install it
- You will get some dependencies errors, fix them by doing
- If you have a TeamViewer account, you can configure it by doing :
- Otherwise, you will need to set a password to connect, like this :
- And then you can just get the Raspberry Pi ID in this way:
From Linux
On Linux, start by downloading the TeamViewer client from the official website
Then install it with your package manager or by doing something like :
sudo dpkg -i teamviewer_13.2.13582_amd64.deb
Start the app via the Start menu or by typing “TeamViewer” in a terminal
Log in if you have an account
Then enter the TeamViewer ID in the Partner ID field and press enter
It will ask you the password defined previously and connect to the Raspberry Pi in remote desktop
From Windows and Mac OS
For Windows and Mac OS users it’s the same procedure, so I will not duplicate it
Download Teamviewer, install it and then enter ID & Password previously get/set
From a smartphone
TeamViewer provides support for its software to Android, iPhone, Windows and Blackberry smartphones
It is, therefore, possible to use the app in the same way to make spontaneous support from anywhere
Remote desktop with NoMachine
Introduction
NoMachine is another remote desktop access tool that you can use with your RaspberryPi
NoMachine is based on the NX protocol, which was created to improve the performance of the classic X display
The use is very close to VNC
If used behind a firewall, please note that NoMachine uses port 4000 for connections from the client
It is possible to change the default ports in the administration tools of the NoMachine server
Installation
NoMachine is provided for Raspberry Pi so that you can get the package corresponding to your environment on this page
Download it and install it with :
wget https://download.nomachine.com/download/7.0/Raspberry/nomachine_7.0.211_1_armhf.deb
sudo dpkg -i nomachine_7.0.211_1_armhf.deb
Replace the version number with the last one you get
Installation may take a few minutes
From any OS
Once the installation is complete on the Raspberry Pi, you have to install it on the client computer as well
Go back to the official site and download this time the version corresponding to your computer
Install the downloaded file and launch NoMachine
An assistant will start, then NoMachine will automatically detect your Raspberry Pi on the network
You have to double click on the Raspberry Pi to connect
It will ask you for your credentials (pi/raspberry or the password you have defined), and you will be logged in
From a smartphone
NoMachine is also available for Android and iOS so that you can connect to your Raspberry Pi from anywhere.
I also made a video on how to use this solution with an iPad, you can watch it there.
Video
Check the RaspberryTips YouTube channel to receive new videos in your feed :
Conclusion
So we learned to connect to the remote desktop in 5 ways:
- With the Xrdp package that provides a Windows-like remote desktop
- With SSH and X11 Forwarding that allows launching an app on the client computer (and not the entire desktop)
- With VNC that enables local access to the Raspberry Pi
- With Teamviewer which allows among others remote access to the Raspberry Pi
- With NoMachine that allows local access more elegantly and quickly than VNC
So, what is your favorite?
In my opinion, I think that VNC and NoMachine are my favorites, with a quick and clean display, without the heaviness of Teamviewer
But it’s because I need it only on my local network, it depends on the cases
If you have any comment, suggestion or just want to chat with us about this tutorial,
you can post your messages in the community on Patreon. See you there!
Raspberry Pi Resources
Not sure where to start?
Understand everything about the Raspberry Pi, stop searching for help all the time, and finally enjoy completing your projects.
Watch the Raspberry Pi Bootcamp course now
Master your Raspberry Pi in 30 days
Don’t want the basic stuff only? If you are looking for the best tips to become an expert on Raspberry Pi, this book is for you. Learn useful Linux skills and practice multiples projects with step-by-step guides.
Download the e-book
VIP Community
If you just want to hang out with me and show your support, you can also join the Patreon community. I share behind-the-scenes content there and give you early access to my content. You’ll also get a shoutout when you join.
More details here
Need help to build something with Python?
Create, understand and improve any Python script for your Raspberry Pi.
Learn the essentials, step-by-step, without losing time understanding useless concepts.
Get the e-book now
You can also find all my recommendations for tools and hardware on this page.
Источник


