- Get Started with Windows
- React desktop для windows
- About
- React desktop для windows
- About
- Как развернуть окружение для разработки приложений на React Native на Windows
- Доброго времени суток!
- Node, Python2, JDK
- React Native CLI
- Android development environment
- Переменные среды
- Создаем приложение и запускаем эмулятор
Get Started with Windows
This guide will help you get started on setting up your very first React Native for Windows app.
Make sure you have installed all of the development dependencies.
For information around how to set up React Native, see the React Native Getting Started Guide.
Install React Native for Windows
Remember to call react-native init from the place you want your project directory to live.
To create TypeScript template, run npx react-native init
If you’ve installed react native globally in the past, via npm install -g react-native , and are having issues with the new instructions, try adding —ignore-existing to your npx command:
npx —ignore-existing react-native init
—template react-native@^0.64.0 instead.
Navigate into this newly created directory
Once your project has been initialized, React Native will have created a new sub directory where all your generated files live.
Install the Windows extension
Lastly, install the React Native for Windows packages.
The —overwrite flag copies a custom metro.config.js file. If you are starting a new app, this should have no impact. If you are adding Windows to your existing app and you have modified the metro.config.js file, please back up your changes, run the command and copy over to take effect.
Here are the options that react-native-windows-init takes:
| Option | Input Type | Description |
|---|---|---|
| —help | boolean | Show help. |
| —version | string | The version of react-native-windows to use. |
| —namespace | string | The native project namespace. |
| —verbose | boolean | Enables logging. |
| —language | string [» cs «,» cpp «] [default: » cpp «] | Which language the app is written in. |
| —projectType | string [» app «,» lib «] [default: » app «] | The type of project to initialize. |
| —overwrite | boolean | Overwrite any existing files without prompting. |
| —useWinUI3 | boolean | Targets WinUI 3.0 (Preview) instead of UWP XAML. |
| —no-telemetry | boolean | Disables sending telemetry that allows analysis of usage and failures of the react-native-windows CLI |
This sends telemetry to Microsoft by default. You can prevent the telemetry from being sent by using the —no-telemetry command line option. See the react-native-windows-init README for more details.
Running a React Native Windows App
Make sure a browser is launched and running before running a React Native Windows app. Also ensure your system meets all the requirements to build a Windows app as well.
Without Using Visual Studio
In your React Native Windows project directory, run:
A new Command Prompt window will open with the React packager as well as a react-native-windows app. This step may take a while during first run since it involves building the entire project and all dependencies. You can now start developing! :tada:
This sends telemetry to Microsoft by default. You can prevent the telemetry from being sent by using the —no-telemetry command line option. See the @react-native-windows/cli README for more details.
For a description of the options that run-windows offers, see run-windows usage.
Using Visual Studio
- From the root of the project directory, run the following script which will automatically link your app’s dependencies:
- Open the solution file in the application folder in Visual Studio (e.g., AwesomeProject/windows/AwesomeProject.sln if you used AwesomeProject as
)
- Open your applications folder in VS Code.
- Install the React Native Tools plugin for VS Code.
- Create a new file in the applications root directory, .vscode/launch.json and paste the following configuration:
- Press F5 or navigate to the debug menu (alternatively press Ctrl+Shift+D ) and in the Debug drop-down select «Debug Windows» and press the green arrow to run the application.
Authoring Native Modules
Building a standalone React Native Windows App
Follow these steps to build a version of your app that you can install or publish to the store. This version will package your bundle and assets into the APPX package so you don’t need to run Metro.
- Open the solution in Visual Studio
- Select the Release configuration from the Configuration Manager drop-down.
- Build the solution. You can now launch without first launching Metro.
- If you want to build an APPX package to share or publish, use the Project >Publish >Create App Packages. option.
React desktop для windows
React Windows Desktop
Create native Windows applications using React + TypeScript for the UI and C# .NET for native things (file system, OS access etc)!
How does it work?
You build the UI of your app just like building a regular React webpage (this project is even setup using create-react-app with the Microsoft TypeScript starter).
Your UI is hosted in a native Windows (WinForms) app using CefSharp (a Chromium wrapper for .NET).
Why not WPF?
When using CefSharp WinForms is a lot faster than WPF.
To run C# code for access to the native features like the file system, OS etc you create a Bridge class that get’s called from TypeScript, but runs C# in the Windows app (outside the web sandbox). It’s really simple!
What’s the difference between this and Electron?
Basically that it uses .NET and C# for the bridge instead of Node.js (JavaScript). Also this is still a pretty small project and you have to build the bridge classes yourselves (in Electron a file system API is available right away and so on).
However this is the perfect project for those of us coming from a WinForms, WPF or just .NET backend background. It’s also perfect if you already have an existing C# library that you want to use in your app.
To make it really fast and easy getting your started the react project comes preloaded with these great libraries:
- TypeScript for a better developer experience especially together with Visual Studio Code.
- MobX for state management.
- Semantic-UI React for some great looking React components like buttons, lists etc.
Of course you can easily remove these and use something else like Redux, Bootstrap and so on.
For fist time use: In the RwdReactUI folder do a npm install .
In the RwdReactUI do a npm start to load the UI and make it available for live reload.
Launch the Windows app ( RwdApp folder) solution in Visual Studio in Debug + x64 mode.
Very important! You must launch using the x64 mode. Using Any CPU will cause CefSharp to not launch.
The app should now show the UI you built using React!
You are free to rename these projects as you see fit.
All native / C# code goes into the RwdApp solution (use Visual Studio).
All UI code goes into the RwdReactUI project. Use you favorite editor (we use VS Code).
TypeScript C# Bridges
A Bridge class is a regular .NET C# Class. From TypeScript you will be able to invoke methods on these classes and get back results. While the default CefSharp solution only allows simple data types to be returned ( string , int , boolean etc) we have built our own layer on top of this that will automatically serialize complex objects into Json! So no more limitations to how advanced data your bridge classes can return, it just works.
We have also built an event system that makes it really easy to run TypeScript code when an event is fired from the C# side.
You can see some sample bridges in the Bridges folder in the RwdApp solution.
Important limitations:
On the C# side your bridge classes can currently not use async methods. It will be run in it’s own thread by CefSharp though so the GUI should not lock up.
Registering a new Bridge class
Edit the Bridges.cs file in the root of the RwdApp project.
Calling a bridge class from TypeScript and return values
Listening to Bridge events
To fire an event from C# just create a regular event of type Action or Action :
Note: Your event args should be an object, primitives like int or other value types are not yet supported (but might be in a future update).
Note: Because of the asynchronous nature of JavaScript the Bridge classes will be asynchronous, therefor use async await and Promise on the TypeScript side.
Building for production
- Build the RwdApp as Release , x64 (in Visual Studio).
- In the RwdReactUI project run npm run build
- Copy the files from the ./build ( RwdReactUI ) folder to the bin\x64\Release\ ( RwdApp ) folder.
- Launch and test your .exe file, all done.
Help and resources
To modify how the CefSharp browser instance behaves read about it here:
A great article about different UI Framework options:
About
Create native Windows applications using React + TypeScript for the UI and C# .NET for native things (file system, OS access etc)
React desktop для windows
React Native for Windows
Build native Windows apps with React.
![]()
![]()

See the official React Native website for an introduction to React Native.
React Native is a framework developed by Facebook that enables you to build world-class application experiences on native platforms using a consistent developer experience based on JavaScript and React. The focus of React Native is on developer efficiency across all the platforms you care about — learn once, write anywhere.
This repository adds support for the Windows 10 SDK, which allows you to build apps for all devices supported by Windows 10 including PCs, tablets, 2-in-1s, Xbox, Mixed reality devices etc.
Status and roadmap
Check out our blog if you’d like to stay up to date on the status of React Native for Windows and check out current and past roadmaps. We will post all new releases, updates and general news about the project there.
You can run React Native Windows apps only on devices supported by the Windows 10 SDK.
For a full and detailed list of the system requirements and how to set up your development platform, see our System Requirements documentation on our website.
See the Getting Started Guide on our React Native for Windows + macOS website to build your first React Native for Windows app.
Search the existing issues and try to make sure your problem doesn’t already exist before opening a new issue. If your issue doesn’t exist yet, try to make sure you provide as much information as possible to us so we can help you sooner. It’s helpful if you include information like:
- The version of Windows, React Native, React Native Windows extension, and device family (i.e., mobile, desktop, Xbox, etc.) where you ran into the issue.
- A stack trace and reduced repro case when possible.
- Ensure the appropriate template is used when filing your issue(s).
See Contributing guidelines for how to setup your fork of the repo and start a PR to contribute to React Native for Windows.
good first issue and help wanted are great starting points for PRs.
React Native already has great documentation and we’re working to ensure the React Native Windows is part of that documentation story.
React Native for Windows has it’s own separate documentation site where Windows and macOS specific information, like API docs and blog updates live.
- Using the CLI in the Getting Started guide will set you up with a sample React Native for Windows app that you can begin editing right away.
- If you’re looking for sample code, just browse the RNTester folder in the GitHub web UI
The React Native Windows extension, including modifications to the original Facebook source code, and all newly contributed code is provided under the MIT License. Portions of the React Native Windows extension derived from React Native are copyright Facebook.
Code of Conduct
This project has adopted the Microsoft Open Source Code of Conduct. For more information see the Code of Conduct FAQ or contact opencode@microsoft.com with any additional questions or comments.
About
A framework for building native Windows apps with React.
Как развернуть окружение для разработки приложений на React Native на Windows
Доброго времени суток!
Решив начать разрабатывать приложения на React Native, я столкнулся с проблемами разворачивания окружения. Сегодня я хочу поделиться опытом его настройки.
Конечно, на официальном сайте есть подробное описание, но следуя только этим рекомендациям, было довольно сложно сделать все настройки.

Итак, начнём:
Node, Python2, JDK
- Установить NodeJS. У меня последняя версия на момент написания статьи 10.11.0
- Установить Python2 и JavaSE. Использовался jdk-10.0.2
React Native CLI
- Установим React Native CLI
npm install -g react-native-cli
Android development environment
После запуска выбираем кастомную установку
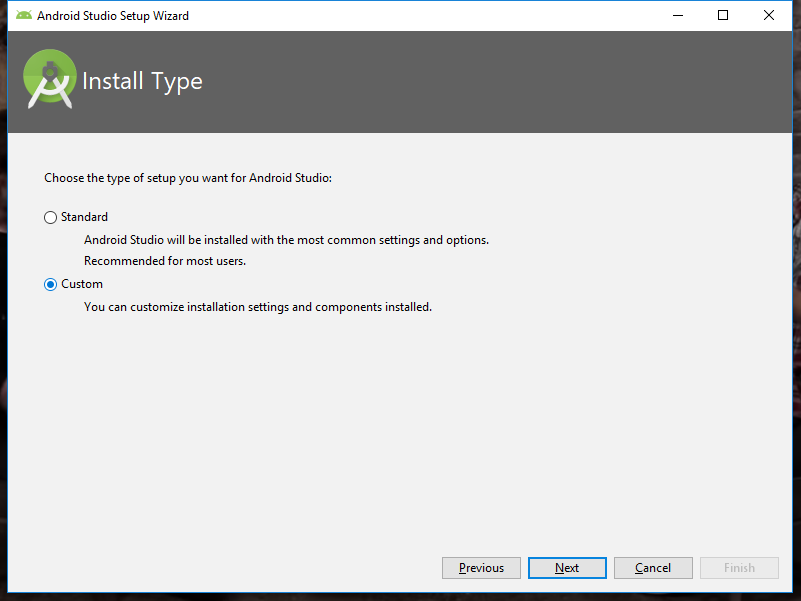
Далее отмечаем галочкой «Android Virtual Device» и указываем пусть до папки Android — либо оставляем как есть C:\Users\%USERNAME%\AppData\Local\Android\Sdk
Главное, чтобы в пути не было кириллицы!
Особенно с этим могут возникнут проблемы в будущем. Например, у меня имя пользователя системы было на кириллице «C:\Users\Александр», и после запуска приложения grandle не мог найти путь, т. к. путь выглядел как «C:\Users\. \. »
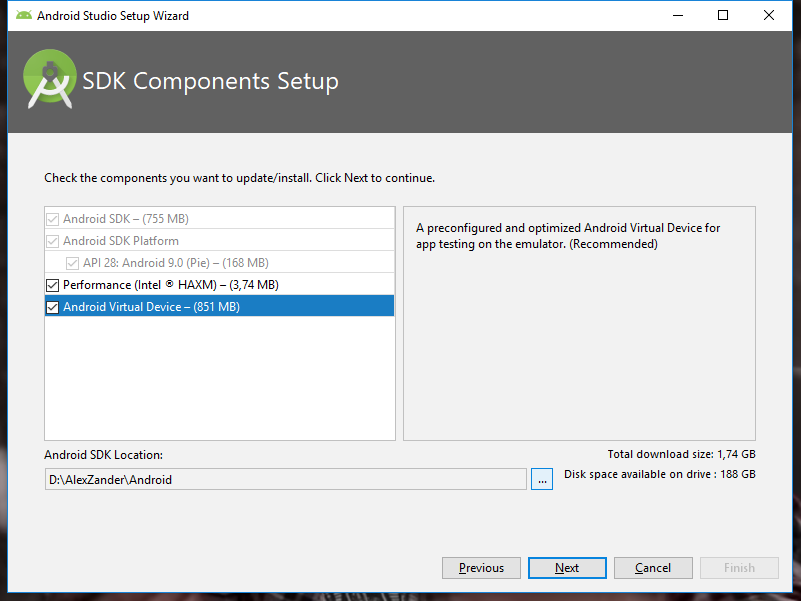
Нажимаем «далее». Оставляем рекомендуемый объем оперативной памяти, нажимаем далее и устанавливаем.
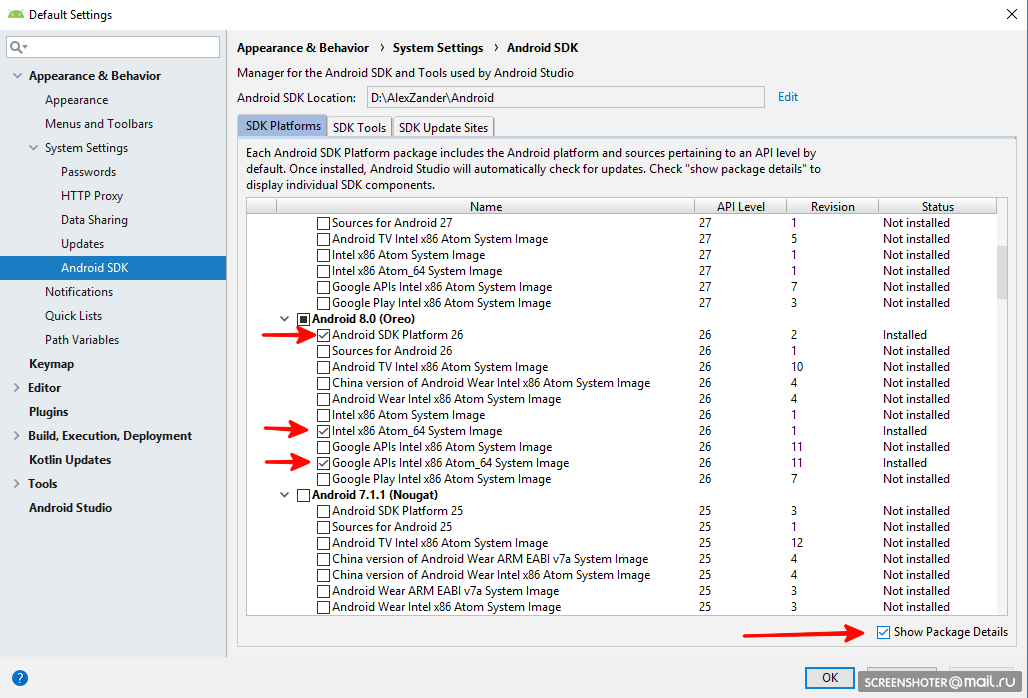
Android SDK — открываем студию и переходим в настройки
Appearance & Behavior → System Settings → Android SDK.
На вкладке «SDK Platforms» включаем галочку «Show Package Details» и для «Android 8.0 (Oreo)» устанавливаем:
- Android SDK Platform 26
- Intel x86 Atom_64 System Image
- Google APIs Intel x86 Atom_64 System Image
Теперь выбираем вкладку «SDK Tools», включаем галочку «Show Package Details»
и устанавливаем пакет
Переменные среды
- ANDROID_HOME
Создадим переменную для ANDROID_HOME:
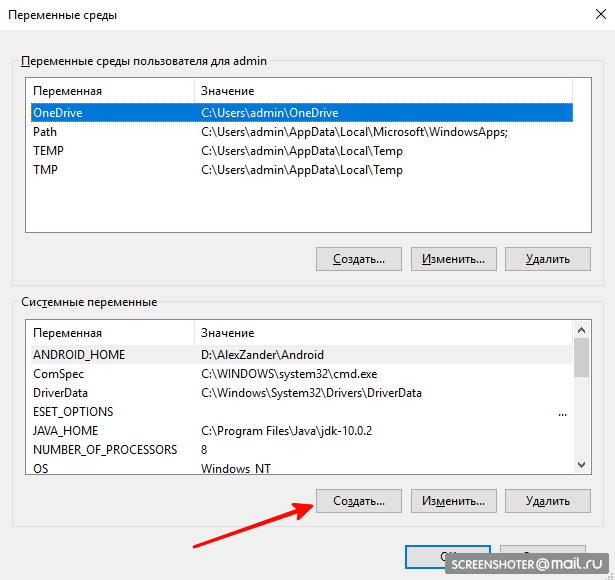
- Имя переменной ANDROID_HOME
- Значение переменной (можно посмотреть в Android Studio)

По аналогии создадим переменную JAVA_HOME:
- Имя переменной: JAVA_HOME
- Значение переменной: C:\Program Files\Java\jdk-(версия)

Добавим 4 значения:
Создаем приложение и запускаем эмулятор
- Переходим в удобную для нас папку в консоли и набираем:
react-native init MyTestProject - Открываем в Android Studio наш проект и открываем AVD Manager

Если AVD не скачан, скачиваем и запускаем
Далее переходим в консоли в папку с приложением и набираем:
react-native run-android
После чего нашел приложение запустилось.
В этой статье использовались официальное руководство от React Native
+ личный опыт!
Надеюсь, эта статья поможет тем, кто столкнулся с проблемами или решил начать разрабатывать нативные приложения на React


