- Get Started with Windows
- Пишем первое приложение на React Native. Часть 1.
- Что такое React Native?
- Инструменты
- Среда разработки
- Заготовка
- Тулинг
- Привет, мир!
- Installing React Native on Windows Tutorial
- Step 1. Install Required Software :
- Step 2. Install React Native :
- Step 3. Install JDK( Java Development Kit ) :
- Step 4. Install Android Studio + SDK Manager :
- Step 5. Add Environment Variable ANDROID_HOME in Windows :
- 6. Start Android Virtual Device (AVD) :
- Step 7. Create your first React Native project :
Get Started with Windows
This guide will help you get started on setting up your very first React Native for Windows app.
Make sure you have installed all of the development dependencies.
For information around how to set up React Native, see the React Native Getting Started Guide.
Install React Native for Windows
Remember to call react-native init from the place you want your project directory to live.
To create TypeScript template, run npx react-native init
If you’ve installed react native globally in the past, via npm install -g react-native , and are having issues with the new instructions, try adding —ignore-existing to your npx command:
npx —ignore-existing react-native init
—template react-native@^0.64.0 instead.
Navigate into this newly created directory
Once your project has been initialized, React Native will have created a new sub directory where all your generated files live.
Install the Windows extension
Lastly, install the React Native for Windows packages.
The —overwrite flag copies a custom metro.config.js file. If you are starting a new app, this should have no impact. If you are adding Windows to your existing app and you have modified the metro.config.js file, please back up your changes, run the command and copy over to take effect.
Here are the options that react-native-windows-init takes:
| Option | Input Type | Description |
|---|---|---|
| —help | boolean | Show help. |
| —version | string | The version of react-native-windows to use. |
| —namespace | string | The native project namespace. |
| —verbose | boolean | Enables logging. |
| —language | string [» cs «,» cpp «] [default: » cpp «] | Which language the app is written in. |
| —projectType | string [» app «,» lib «] [default: » app «] | The type of project to initialize. |
| —overwrite | boolean | Overwrite any existing files without prompting. |
| —useWinUI3 | boolean | Targets WinUI 3.0 (Preview) instead of UWP XAML. |
| —no-telemetry | boolean | Disables sending telemetry that allows analysis of usage and failures of the react-native-windows CLI |
This sends telemetry to Microsoft by default. You can prevent the telemetry from being sent by using the —no-telemetry command line option. See the react-native-windows-init README for more details.
Running a React Native Windows App
Make sure a browser is launched and running before running a React Native Windows app. Also ensure your system meets all the requirements to build a Windows app as well.
Without Using Visual Studio
In your React Native Windows project directory, run:
A new Command Prompt window will open with the React packager as well as a react-native-windows app. This step may take a while during first run since it involves building the entire project and all dependencies. You can now start developing! :tada:
This sends telemetry to Microsoft by default. You can prevent the telemetry from being sent by using the —no-telemetry command line option. See the @react-native-windows/cli README for more details.
For a description of the options that run-windows offers, see run-windows usage.
Using Visual Studio
- From the root of the project directory, run the following script which will automatically link your app’s dependencies:
- Open the solution file in the application folder in Visual Studio (e.g., AwesomeProject/windows/AwesomeProject.sln if you used AwesomeProject as
)
- Open your applications folder in VS Code.
- Install the React Native Tools plugin for VS Code.
- Create a new file in the applications root directory, .vscode/launch.json and paste the following configuration:
- Press F5 or navigate to the debug menu (alternatively press Ctrl+Shift+D ) and in the Debug drop-down select «Debug Windows» and press the green arrow to run the application.
Authoring Native Modules
Building a standalone React Native Windows App
Follow these steps to build a version of your app that you can install or publish to the store. This version will package your bundle and assets into the APPX package so you don’t need to run Metro.
- Open the solution in Visual Studio
- Select the Release configuration from the Configuration Manager drop-down.
- Build the solution. You can now launch without first launching Metro.
- If you want to build an APPX package to share or publish, use the Project >Publish >Create App Packages. option.
Пишем первое приложение на React Native. Часть 1.

Сообщество DevSchacht растёт, накапливает контент и завоёвывает преданных читателей. В свою очередь последние всегда желают получать информацию быстро и удобно. А лучше сразу на своё мобильное устройство. Можно сделать сайт, а можно пойти дальше и создать полноценное приложение, которое будет уведомлять о новых статьях, кешировать их и позволит читать там, где нет мобильной связи (например, в метро).
И тут у нас есть два варианта: новый кленовый PWA и старое доброе нативное приложение. К сожалению, PWA пока не работают полноценно на iOS (как минимум до появления сервис-воркеров в Safari). А написание нативных приложений требует знаний незнакомых нам технологий. Но мы фронтендеры и не хотим учить Java и Swift. Мы хотим React, CSS и в продакшен, и благодаря компании Facebook у нас есть всё, для того, чтобы реализовать наше желание.
В этой серии статей мы постараемся шаг за шагом разработать мобильное приложение DevSchacht на React Native и довести его до публикации.
Дисклеймер: автор не является профессиональным разработчиком на React Native. Советы, данные в статье, могут быть не оптимальны — но, как говорится, мы открыты для пул-реквестов 🙂
Что такое React Native?
React Native — это фреймворк для разработки кроссплатформенных приложений. Он даёт возможность создавать и использовать компоненты точно так же, как обычно мы это делаем в React, вот только рендериться они будут не в HTML, а в нативные контролы операционной системы, под которую будет собрано наше приложение.
Итак, у нас есть знакомый JavaScript, JSX и CSS (на самом деле это полифил, реализующий подмножество CSS). C JavaScript есть некоторая неприятная особенность: и на Android, и на iOS ваш код будет исполнять движок JavaScriptCore (тот самый, который идёт в комплекте с WebKit). А вот отлаживать код в режиме дебаггера и запускать тесты вы будете в node.js и Chrome, то есть на движке V8.
- На симуляторах и устройствах iOS, эмуляторах и устройствах Android React Native использует JavaScriptCore. В iOS JavaScriptCore не использует JIT.
- При использовании дебаггера весь код запускается внутри среды отладки (например, в Chrome), общение с нативным кодом происходит через WebSocket. Таким образом, при отладке вы используете V8.
Инструменты
Среда разработки
Сам я являюсь ярым поклонником WebStorm, это немного тяжеловесная и интерфейсно перегруженная, но потрясающе мощная и удобная IDE на основе IntelliJ IDEA от компании JetBrains. В настоящее время в неё неплохо интегрирован набор утилит для работы с React и React Native.
Когда возможностей WebStorm становится слишком много, а свободного ОЗУ в системе — слишком мало, я расчехляю старый добрый vim. В принципе, никто не запрещает использовать его с React Native, особенно если подключить подсветку JSX-синтаксиса.
Так же, можно дать шанс результату симбиоза Facebook и GitHub — редактору Nuclide. Этот редактор является набором расширений для Atom и позиционируется компанией Facebook как первоклассное решение для разработки на React Native. Честно говоря, в моём случае этот редактор оказался невероятно требователен к ресурсам и я отказался от его использования.
Заготовка
Для разработки нашего приложения воспользуемся заготовкой от Facebook — Create React Native App. Установить её не сложно:
К сожалению, если вы уже установили пятую версию npm, то ничего не получится. Либо ставьте четвёртую версию npm, либо попробуйте yarn — новый пакетный менеджер от Facebook, в котором всё отлично работает (что неудивительно).
Далее создаём каркас нашего будущего приложения:
Тулинг
В принципе, у нас уже есть всё для начала разработки. Однако стоит установить ещё пару полезных утилит, которые упростят нам жизнь в будущем.
Create React Native App поставляется вместе с Expo. Expo — это набор утилит, библиотек и сервисов, облегчающих разработку на React Native. Expo SDK позволяет обращаться к системной функциональности (такой как камера, контакты, локальное хранилище данных и так далее). Это значит, что вам не нужны Xcode или Android Studio и умение писать нативый код. А так же это значит, что благодаря этому слою абстракции, ваш код становится действительно кроссплатформенным.
Более того, вам даже не нужен XCode и симулятор iOS для запуска приложения, с помощью Expo приложение в режиме отладки можно запустить прямо на телефоне. Для этого на телефон нужно установить клиент Expo для iOS или Android.
Так же, для большего удобства разработки, рекомендую установить Expo XDE, существующий в версиях под MacOS, Windows и Linux.
And last but not the least ( последний, но тоже важный): нам нужен хороший дебаггер. По умолчанию в качестве дебаггера открывается Google Chrome. Это неплохо, но недостаточно удобно. Есть сторонние дебаггеры, один из лучших это React Native Debugger.

Так как стандартный упаковщик (или packager — утилита, упаковывающая ваш JavaScript код в бандл) React Native запускается на порту 8081, а упаковщик Expo на порту 19001, то в дебаггере нужно указать этот порт.
Привет, мир!
Итак, всё готово, для того, чтобы попробовать запустить наше первое приложение. Нам надо выбрать, где мы запустим наше приложение. Так как я работаю на MacOS и у меня установлен XCode, то я выбираю симулятор.
Если у вас нет MacOS, то вы можете запустить приложение прямо на устройстве. Откройте клиент Expo и просканируйте QR-код, который выведется после запуска.
Вы должны увидеть на экране следующий текст
Открываем App.js и меняем
Сработает Hot Reload (горячая перезагрузка), и в приложении вы увидите «Привет, мир!».
Что тут происходит? Наш код шаблона выглядит как обычный HTML, но вместо веб-элементов, таких как
является встроенным компонентом, отвечающим за отображение текста.
Этот код определяет новый компонент App . Все, что вы видите на экране — это набор компонентов. Компонент может быть довольно простым: единственное, что требуется, это функция рендеринга, возвращающая JSX. В следующий раз я покажу как можно писать компоненты в более компактном стиле.
Вот и всё, что я хотел сказать на сегодня, увидимся во второй части.
Installing React Native on Windows Tutorial
Getting Started with React Native Development on Windows XP, Vista, 7, 8.1, 10 for android application development beginners step by step guide.
As we all know that Mobile application development is recently a very big market and everyone is using their own Android or iOS mobile phones. But for companies who has developing Android and iOS apps together gets very high cost for their customers, because they have to develop individual applications for each platform and that makes their application cost high.
So here we comes with React Native. React Native is a fully responsive mobile application development language which gives us the coding environment to code in JavaScript, HTML and CSS. You can find more about React Native on here.
In this tutorial we would going to install, run and create Android app development’s first project using React Native on windows machine. So just follow the below steps . If you like my tutorial than please share it with others.
Step 1. Install Required Software :
The first step to install React Native is Download and Install below required software packages.
NodeJS : Download and install the latest NodeJS windows machine installer software package from nodejs.org .
Python : Download and install the latest Python windows installer package from Python.org .
Step 2. Install React Native :
After installing NodeJS we can access the nmp packages via Command Line Interface ( DOS ) in windows. So open Command prompt type the below command to install React Native .
Step 3. Install JDK( Java Development Kit ) :
JDK : Download and install JDK from Oracle’s official website oracle.com .
Step 4. Install Android Studio + SDK Manager :
Download the Android Studio latest version from Google Android Developers official Page developer.android.com .
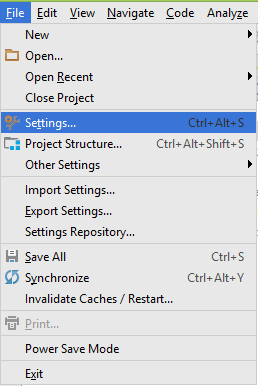
After installing Android Studio Open it Goto Files -> Settings .
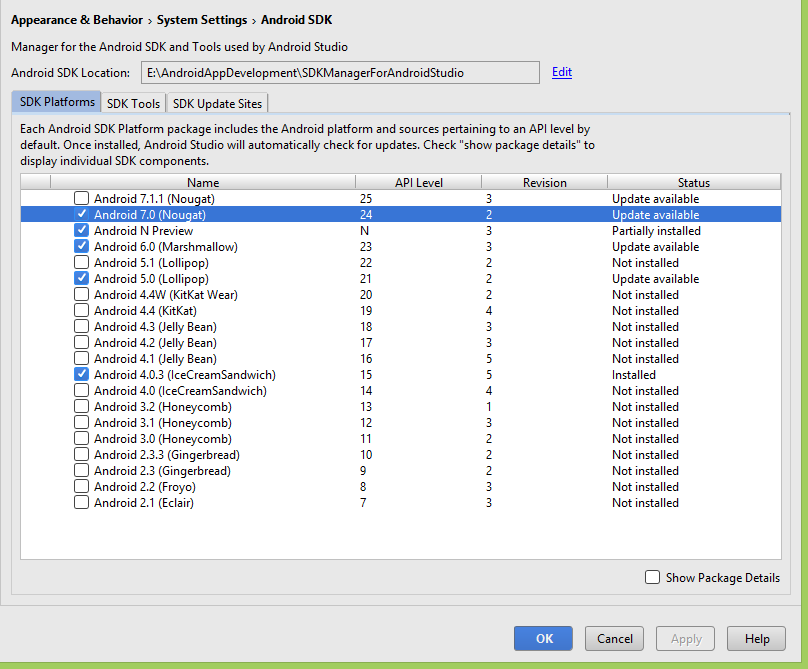
Goto Appearance and Behavior -> System Settings -> Android SDK and install latest android platform.
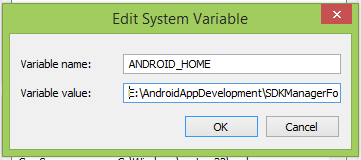
Step 5. Add Environment Variable ANDROID_HOME in Windows :
React Native required ANDROID_HOME variable to compile and run apps. So define the ANDROID_HOME variable.
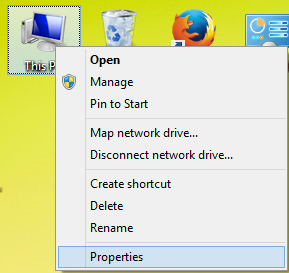
- Right Click on My Computer.
- Goto Properties.

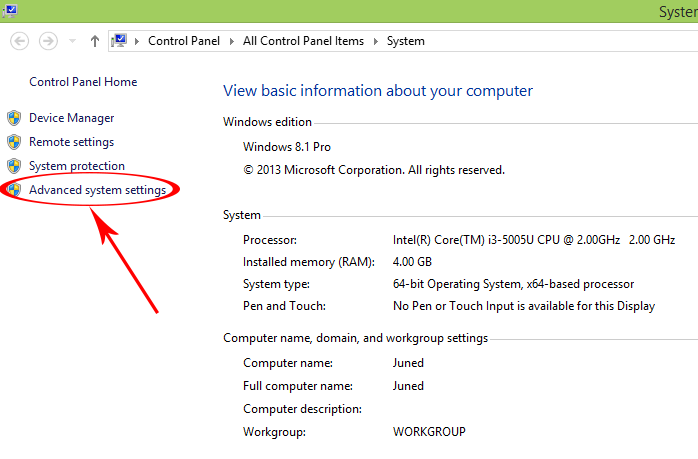
- Click on Advanced System Settings.
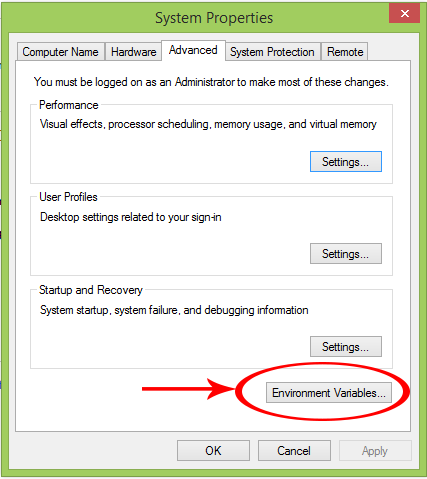
- Click on Environment Variables.
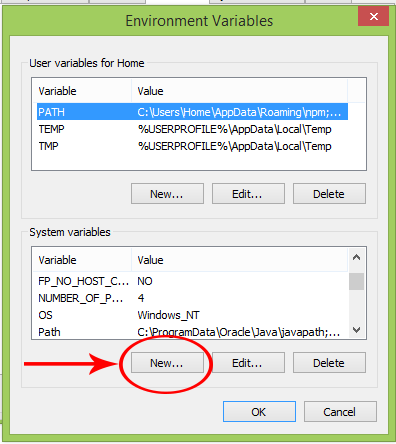
- Under System Variables click on New .
- Set variable name as ANDROID_HOME and variable value as your SDK Manager’s Path.
- Here you go now your ANDROID_HOME variable has been successfully set.
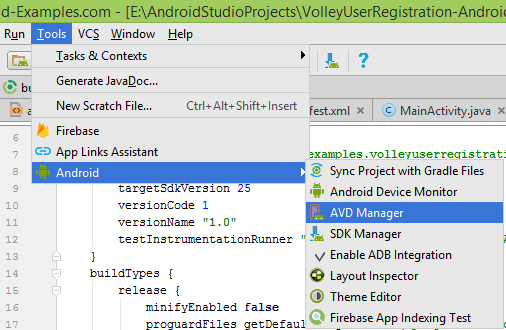
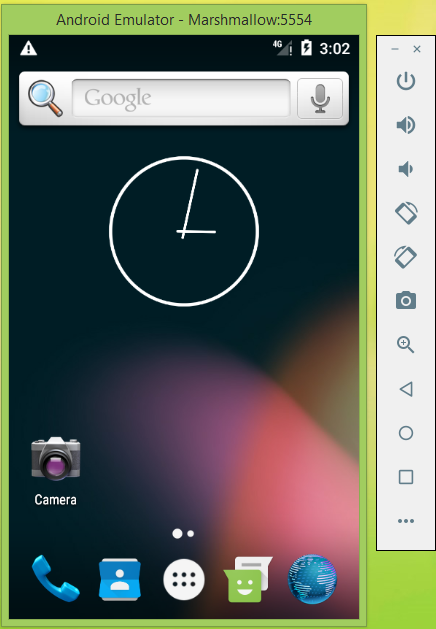
6. Start Android Virtual Device (AVD) :
1. Android virtual device is used to see the test result of our coding inside a virtual android machine just like a real android mobile phone. To setup AVD Open Android Studio -> Tools -> Android -> AVD Manager.
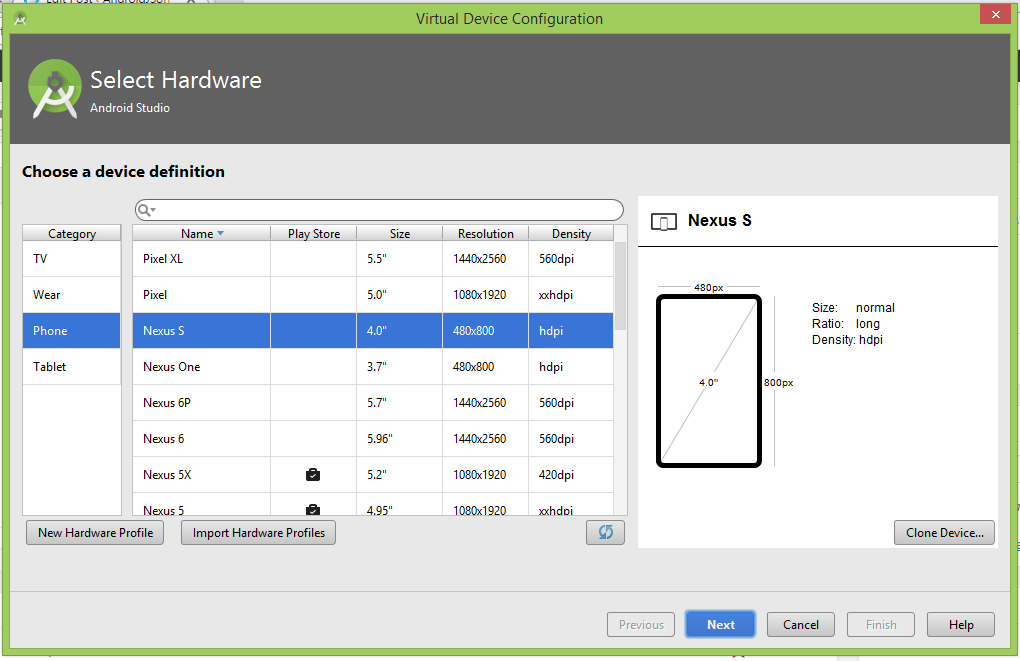
2. Click on Create New Virtual Device.
3. Select your device.
4. Select Android OS version System Image.

5. Name the AVD and hit the Finish button.
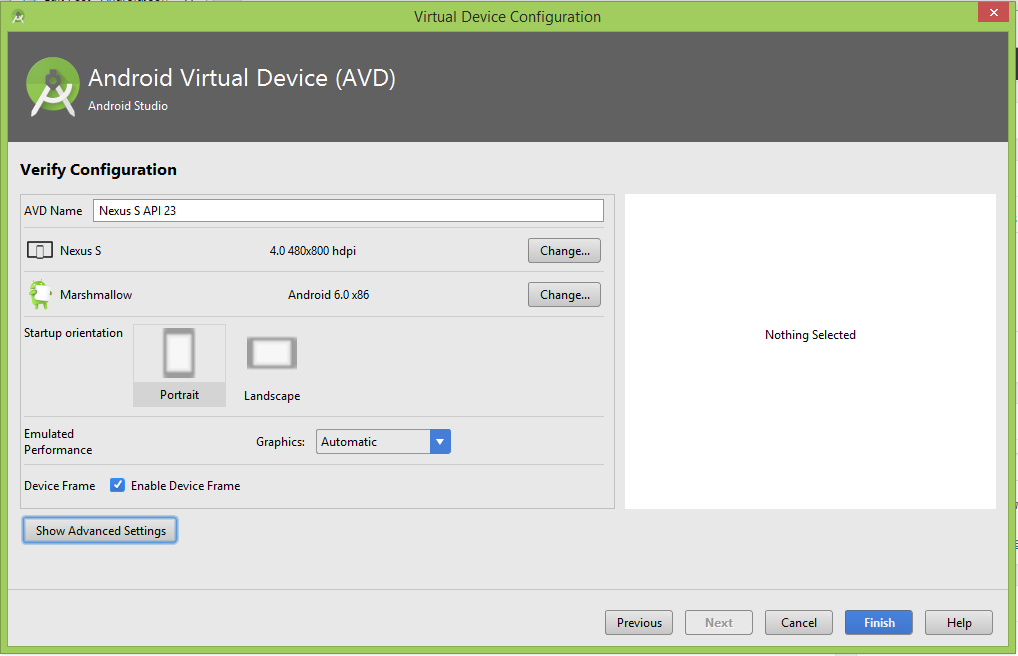
6. After done creating AVD just hit the Run button to start the AVD.
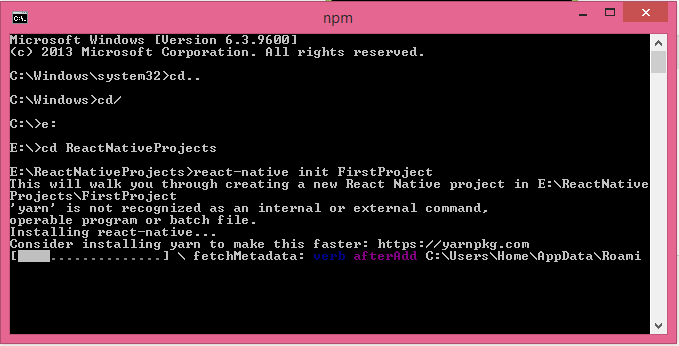
Step 7. Create your first React Native project :
1. Once you have finish all the installing than Create a folder in your drive in which you will store your all React Native projects. Than start command prompt and goto that folder inside command prompt. You can use cd.. command to go back individually from folder to folder.
2. Now type react-native init FirstProject and press enter.

3. Now it will start downloading the React Native app support libraries from internet.
4. The final output will like below screenshot.
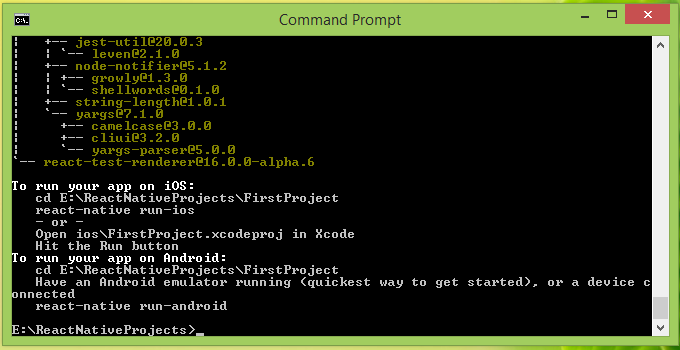
5. Now build the created app and run it into Android Emulator using below command.


