- React Native WebView: The complete guide
- What is React Native WebView?
- Platforms supported with React Native WebView
- Getting started with React Native WebView
- For iOS:
- For Android:
- We made a custom demo for . No really. Click here to check it out .
- Basic quickstart with WebView
- Loading inline HTML in WebView
- What is the originWhitelist property in WebView?
- Loading local HTML files in WebView
- Controlling navigation state changes by user
- How to add support for file uploads in WebView
- For iOS:
- For Android:
- Controlling multiple file uploads
- Adding support for file downloads
- For iOS:
- For Android:
- How to inject JavaScript in WebView
- The injectedJavaScript prop
- What’s going on internally?
- The injectJavaScript method
- What’s going on internally?
- The window.ReactNativeWebView.postMessage method and onMessage prop
- Conclusion
- LogRocket: Full visibility into your web apps
- React native webview windows
React Native WebView: The complete guide
February 5, 2021 7 min read 2133

Editor’s Note: This article was updated February 2021.
What is React Native WebView?
In simple terms, WebView is a component that used to load webpages in your React Native app. It was formerly available out of the box in React Native, but it has since been removed from React Native core and added as a component of the React Native Community libraries; for more information, read The Slimmening proposal.
So, now, you have to install the react-native-webview library in order to use it.
Platforms supported with React Native WebView
I am a React Native developer, too, so I understand how important cross-platform support is for a library you plan to use in your app. Whenever I have to use a library in my app, the first question I ask is whether it’s cross-platform. You don’t need to worry with react-native-webview — it supports both iOS and Android platforms.
Note: Expo support for React Native WebView started with Expo SDK v33.0.0.
Getting started with React Native WebView
First, you need to install the library by running the below command.
Then, link the dependencies. From react-native 0.60, auto-linking will handle the linking process, but don’t forget to run pod install .
React Native modules that include native Objective-C, Swift, Java, or Kotlin code have to be “linked” so that the compiler knows to include them in the app.
To link it, run the below command:
For iOS:
If you’re using CocoaPods in the ios/ directory, run:
For Android:
If you’re using react-native-webview version ≥6.X.X, make sure AndroidX is enabled in your project by editing android/gradle.properties and adding the two lines below:
We made a custom demo for .
No really. Click here to check it out .
Note: If you ever need to uninstall React Native WebView, run react-native unlink react-native-webview to unlink it.
I hope you’ve successfully installed it. If you’re stuck somewhere, please refer to the official installation guide.
Now I’ll show you useful examples of WebView, from simple to advanced, and some how-tos after that.
Basic quickstart with WebView
Let’s begin by reviewing the basic properties of WebView.
First, the source property is used to get the content either from a URL or HTML. If you want to load a webpage by its URL, you have to pass an object with the property uri , as shown below:
Loading inline HTML in WebView
Above, we saw how to load a webpage by its URL. But if you want to load HTML directly, you can use the html property in WebView’s source property, as shown below:
Note: Setting an html source requires the originWhiteList property to be set to [‘*’] .
What is the originWhitelist property in WebView?
In simple terms, the originWhitelist property takes control of where users can navigate in your WebView. It takes an array of strings, and the default whitelisted origins are http:// and https:// .
For example, if you want to ensure that users are only allowed to navigate to URIs that begin with https:// or git:// , you would implement like so:
Let’s explore some other examples.
Loading local HTML files in WebView
Sometimes you have HTML files locally along with your app that you would like to load in WebView.
In iOS, all you need to do is import the HTML file like any other asset, as shown in the below example:
Very simple — exactly what you’d expected.
But in Android, you need to put your HTML files inside the Android assets directory. For example, if you want to load a file called logrocket.html in your Android app, you have to move it into the Android assets directory, which is yourProject/android/src/main/assets/ .
Then you can load the HTML file, as shown in the below example:
Controlling navigation state changes by user
onNavigationStateChange is a function that is invoked when the WebView loading starts or ends.
If you need to control the navigation state changes and do something different than navigating there in the WebView, this is the perfect way to do that. Here’s an example:
Note that this method will not be invoked on hash URL changes (e.g., from https://logrocket.com/users#list to https://logrocket.com/users#help ). However, since version 8.0.0, if you use onNavigationStateChange on iOS specifically, it will now trigger on # changes to the URL.
How to add support for file uploads in WebView
You’ll need to add the below permissions if you want to allow file uploads in WebView. I separated them by task and platform below, so you can choose exactly what you need.
For iOS:
If you are using iOS, all you need to do is specify the permissions in your ios/[project]/Info.plist file.
For photo capture:
For gallery selection:
For video recording:
For Android:
Add permission in AndroidManifest.xml . located at /android/app/src/main/AndroidManifest.xml .
When I started Android development, I had real trouble finding those files in my project, which is why I added those file locations.
File upload using is not supported for Android 4.4 KitKat (see details here), but if you want to check whether the file upload is supported, you can check it using isFileUploadSupported() . See the example below:
Controlling multiple file uploads
In any case, if you want to control single and multiple file uploads, you can simply add the multiple attribute on your input element, as shown in the below example:
Adding support for file downloads
Yes, if you want your users to be able to download files from your WebView, you need to add permission for that.
For iOS:
For iOS, all you need to do is specify the permissions in your ios/[project]/Info.plist file.
Save to gallery:
For Android:
Add permission in AndroidManifest.xml , which, again, is located at /android/app/src/main/AndroidManifest.xml :
How to inject JavaScript in WebView
Sometimes you will find yourself in a situation where you want to run JavaScript with the WebView. For that case, WebView provides you with three different methods:
- The injectedJavaScript prop
- The injectJavaScript method
- The postMessage method and onMessage prop
The injectedJavaScript prop
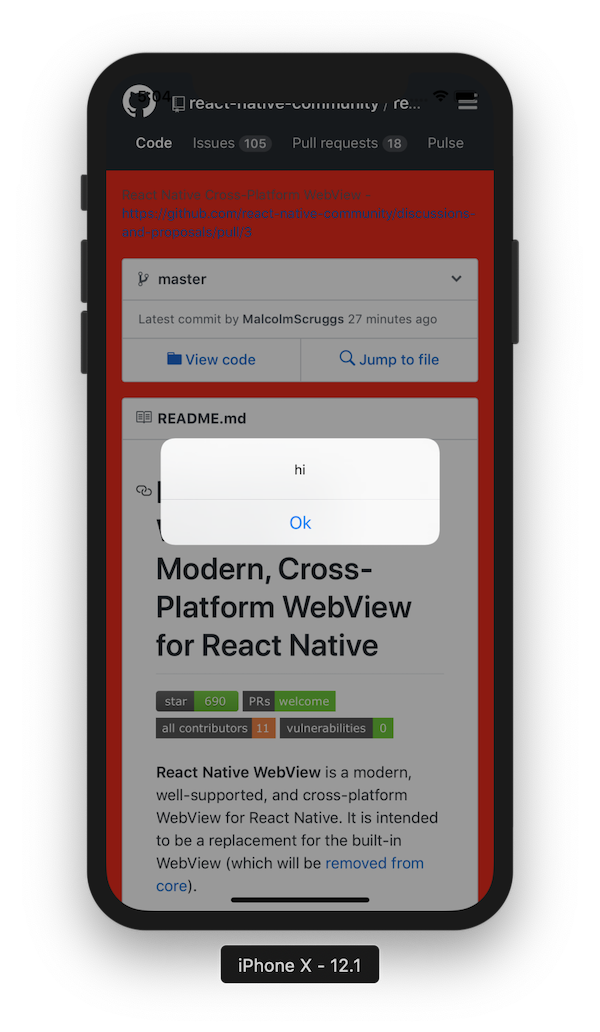
This method runs your provided script immediately after the webpage loads for the first time. It only runs once, even if the page is reloaded or the user navigates away. For example:
Note: I don’t know why, but as its official documentation says, true; is required at the end of the script. If you don’t use it, you will sometimes get silent failures, so it’s just better to include it.
So, in the above script, I set the background color to red and alert hi after two seconds, as you can see in the below image. myScript will run once the page is loaded.
What’s going on internally?
In iOS, injectedJavaScript runs a method on WebView called evaluateJavaScript:completionHandler: . On Android, injectedJavaScript runs a method on the Android WebView called evaluateJavascriptWithFallback .
As we mentioned, the injectedJavaScript prop runs after content load. But what if you need to run the JavaScript code before loading the content?
For that we have another prop called injectedJavaScriptBeforeContentLoaded that runs your JavaScript code before the page loads for the first time. It only runs once, even if the page is reloaded or the user navigates away. You can use this prop when you want to inject anything into the window, localStorage , or document prior to the code executing.
The injectJavaScript method
The downside of the injectedJavaScript prop is that it only runs once. That’s why they also expose a method on the WebView ref called injectJavaScript . (Note the little difference in name!)
This is how you can use the injectJavaScript prop:
After three seconds, the code will run and make the background blue:

What’s going on internally?
On iOS, injectJavaScript calls WebView’s evaluateJS:andThen: . On Android, injectJavaScript calls Android WebView’s evaluateJavascriptWithFallback method.
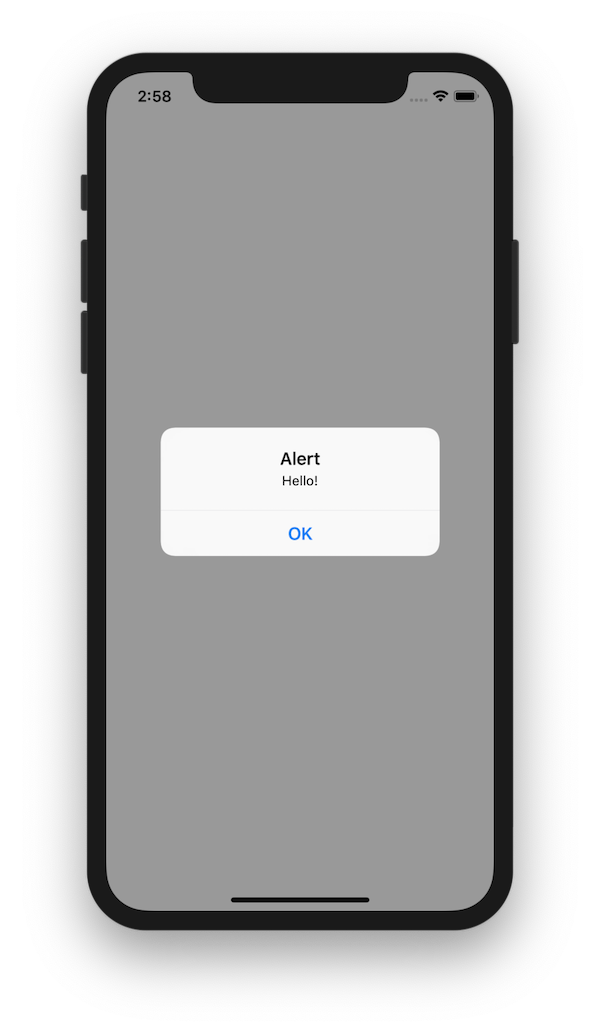
The window.ReactNativeWebView.postMessage method and onMessage prop
Well, the previous approaches are really helpful with injecting JavaScript code using props. But what if the webpage wants to send/communicate something back to your React Native code? That is where you can use window.ReactNativeWebView.postMessage and the onMessage prop.
You must set onMessage or the window.ReactNativeWebView.postMessage method will not be injected into the webpage.
Note: window.ReactNativeWebView.postMessage only accepts one argument, which must be a string.
The result of the code is a Hello! alert, as depicted in the image below:
Conclusion
If you read this whole article, I can say that you probably know more than you’re gonna use in React Native WebView — and I think it’s always better to know more.
LogRocket: Full visibility into your web apps

LogRocket is a frontend application monitoring solution that lets you replay problems as if they happened in your own browser. Instead of guessing why errors happen, or asking users for screenshots and log dumps, LogRocket lets you replay the session to quickly understand what went wrong. It works perfectly with any app, regardless of framework, and has plugins to log additional context from Redux, Vuex, and @ngrx/store.
In addition to logging Redux actions and state, LogRocket records console logs, JavaScript errors, stacktraces, network requests/responses with headers + bodies, browser metadata, and custom logs. It also instruments the DOM to record the HTML and CSS on the page, recreating pixel-perfect videos of even the most complex single-page apps.
React native webview windows
WKWebView Component for React Native
![]()
React Native comes with WebView component, which uses UIWebView on iOS. This component uses WKWebView introduced in iOS 8 with all the performance boost.
Deployment Target >= iOS 8.0 is required (which is React Native’s current minimum deployment target anyway).
- Install from npm (note the postfix in the package name): npm install react-native-wkwebview-reborn
- run react-native link react-native-wkwebview-reborn
Manual alternative
- Install from npm (note the postfix in the package name): npm install react-native-wkwebview-reborn
- In the XCode’s «Project navigator», right click on your project’s Libraries folder ➜ Add Files to
- Go to node_modules ➜ react-native-wkwebview-reborn ➜ ios ➜ select RCTWKWebView.xcodeproj
- Go your build target ➜ Build Phases ➜ Link Binary With Libraries, click «+» and select libRCTWkWebView.a (see the following screenshot for reference)

- Compile and profit (Remember to set Minimum Deployment Target = 8.0)

Try replacing your existing WebView with WKWebView and it should work in most cases.
For React Native >= 0.57, use version 2.x; for React Native
Compatibility with UIWebView
WKWebView aims to be a drop-in replacement for UIWebView. However, some legacy UIWebView properties are not supported.
Since 1.14.0, WkWebView supports onMessage and postMessage as in the default WebView. You can refer to the React Native documentation or the example project. For advanced or customized usage, please refer to Advanced Communication between React Native and WkWebView.
A callback to get the loading progress of WKWebView. Derived from estimatedProgress property.
progress is a double between 0 and 1.
- onNavigationResponse
A callback to get response headers, http status code and http localized status code.
- openNewWindowInWebView
If set to true, links with target=»_blank» or window.open will be opened in the current webview, not in Safari. Default is false.
Set sendCookies to true to copy cookies from sharedHTTPCookieStorage when calling loadRequest. This emulates the behavior of react-native’s WebView component. You can set cookies using react-native-cookies Default is false.
This allows WKWebView loads a local HTML file. Please note the underlying API is only introduced in iOS 9+. So in iOS 8, it will simple ignores these two properties. It allows you to provide a fallback URL for iOS 8 users.
You can also use the require syntax (sendCookies and userAgent will be ignored)
- userAgent=»MyUserAgent» (or customUserAgent=». «)
Set a custom user agent for WKWebView. Note this only works on iOS 9+. Previous version will simply ignore this props.
- hideKeyboardAccessoryView
This will hide the keyboard accessory view ( > and Done ). Default is false.
- allowsLinkPreview
A Boolean value that determines whether pressing on a link displays a preview of the destination for the link. This props is available on devices that support 3D Touch. In iOS 10 and later, the default value is true; before that, the default value is false.
- contentInsetAdjustmentBehavior
This property specifies how the safe area insets are used to modify the content area of the scroll view. The default value of this property is «never». Available on iOS 11 and later. Possible values are «automatic», «scrollableAxes», «never», «always». New in 1.16.0
- keyboardDisplayRequiresUserAction
Enables focusing an input inside a webview and showing the keyboard programatically. New in 1.20.0
- keyboardDismissMode
Sets the manner in which the keyboard is dismissed when a drag begins in the scroll view. Possible values are «none», «on-drag» and «interactive». Default to «none».
- injectJavaScript, injectJavaScriptForMainFrameOnly
Add JavaScript at document start, see WKUserScriptInjectionTimeAtDocumentStart. New in 1.20.0
- injectedJavaScript, injectedJavaScriptForMainFrameOnly
Add JavaScript at document end. Since 1.20.0, the implementation has been changed to use WKUserScript.
- allowsBackForwardNavigationGestures
Enable horizontal swipe gestures will trigger back-forward navigations. Derived from allowsBackForwardNavigationGestures property.
Currently supported props are:
- automaticallyAdjustContentInsets
- contentInset
- html (deprecated)
- injectJavaScript
- injectedJavaScript
- onError
- onLoad
- onLoadEnd
- onLoadStart
- onNavigationStateChange
- renderError
- renderLoading
- source
- startInLoadingState
- style
- url (deprecated)
- bounces
- onShouldStartLoadWithRequest
- pagingEnabled
- scrollEnabled
- directionalLockEnabled
Unsupported props are:
- mediaPlaybackRequiresUserAction
- scalesPageToFit
- domStorageEnabled
- javaScriptEnabled
- allowsInlineMediaPlayback
- decelerationRate
Advanced Communication between React Native and WkWebView
Communication from WKWebview to React Native
This utilizes the message handlers in WKWebView and allows you to post message from webview to React Native. For example:
Then in your webview, you can post message to React Native using
Then you can access the nativeEvent in React Native using the event object returned
The data serialization flow is as follows:
So I recommend to keep your data simple and JSON-friendly.
Communication from React Native to WkWebView
There is a evaluateJavaScript method on WKWebView, which does exactly what its name suggests. To send message from React Native to WebView, you can define a callback method on your WebView:
Then you can send message from React Native with this method call:
If you look at the source, the JavaScript side is mostly derived from React Native’s WebView. The Objective C side mostly deals with the API difference between UIWebView and WKWebView.
We battle test this component against our app. However, we haven’t use all the props so if something does not work as expected, please open an issue or PR.


