- Get Started with Windows
- React native windows build
- About
- Installing React Native on Windows Tutorial
- Step 1. Install Required Software :
- Step 2. Install React Native :
- Step 3. Install JDK( Java Development Kit ) :
- Step 4. Install Android Studio + SDK Manager :
- Step 5. Add Environment Variable ANDROID_HOME in Windows :
- 6. Start Android Virtual Device (AVD) :
- Step 7. Create your first React Native project :
Get Started with Windows
This guide will help you get started on setting up your very first React Native for Windows app.
Make sure you have installed all of the development dependencies.
For information around how to set up React Native, see the React Native Getting Started Guide.
Install React Native for Windows
Remember to call react-native init from the place you want your project directory to live.
To create TypeScript template, run npx react-native init
If you’ve installed react native globally in the past, via npm install -g react-native , and are having issues with the new instructions, try adding —ignore-existing to your npx command:
npx —ignore-existing react-native init
—template react-native@^0.64.0 instead.
Navigate into this newly created directory
Once your project has been initialized, React Native will have created a new sub directory where all your generated files live.
Install the Windows extension
Lastly, install the React Native for Windows packages.
The —overwrite flag copies a custom metro.config.js file. If you are starting a new app, this should have no impact. If you are adding Windows to your existing app and you have modified the metro.config.js file, please back up your changes, run the command and copy over to take effect.
Here are the options that react-native-windows-init takes:
| Option | Input Type | Description |
|---|---|---|
| —help | boolean | Show help. |
| —version | string | The version of react-native-windows to use. |
| —namespace | string | The native project namespace. |
| —verbose | boolean | Enables logging. |
| —language | string [» cs «,» cpp «] [default: » cpp «] | Which language the app is written in. |
| —projectType | string [» app «,» lib «] [default: » app «] | The type of project to initialize. |
| —overwrite | boolean | Overwrite any existing files without prompting. |
| —useWinUI3 | boolean | Targets WinUI 3.0 (Preview) instead of UWP XAML. |
| —no-telemetry | boolean | Disables sending telemetry that allows analysis of usage and failures of the react-native-windows CLI |
This sends telemetry to Microsoft by default. You can prevent the telemetry from being sent by using the —no-telemetry command line option. See the react-native-windows-init README for more details.
Running a React Native Windows App
Make sure a browser is launched and running before running a React Native Windows app. Also ensure your system meets all the requirements to build a Windows app as well.
Without Using Visual Studio
In your React Native Windows project directory, run:
A new Command Prompt window will open with the React packager as well as a react-native-windows app. This step may take a while during first run since it involves building the entire project and all dependencies. You can now start developing! :tada:
This sends telemetry to Microsoft by default. You can prevent the telemetry from being sent by using the —no-telemetry command line option. See the @react-native-windows/cli README for more details.
For a description of the options that run-windows offers, see run-windows usage.
Using Visual Studio
- From the root of the project directory, run the following script which will automatically link your app’s dependencies:
- Open the solution file in the application folder in Visual Studio (e.g., AwesomeProject/windows/AwesomeProject.sln if you used AwesomeProject as
)
- Open your applications folder in VS Code.
- Install the React Native Tools plugin for VS Code.
- Create a new file in the applications root directory, .vscode/launch.json and paste the following configuration:
- Press F5 or navigate to the debug menu (alternatively press Ctrl+Shift+D ) and in the Debug drop-down select «Debug Windows» and press the green arrow to run the application.
Authoring Native Modules
Building a standalone React Native Windows App
Follow these steps to build a version of your app that you can install or publish to the store. This version will package your bundle and assets into the APPX package so you don’t need to run Metro.
- Open the solution in Visual Studio
- Select the Release configuration from the Configuration Manager drop-down.
- Build the solution. You can now launch without first launching Metro.
- If you want to build an APPX package to share or publish, use the Project >Publish >Create App Packages. option.
React native windows build
React Native for Windows
Build native Windows apps with React.
![]()
![]()

See the official React Native website for an introduction to React Native.
React Native is a framework developed by Facebook that enables you to build world-class application experiences on native platforms using a consistent developer experience based on JavaScript and React. The focus of React Native is on developer efficiency across all the platforms you care about — learn once, write anywhere.
This repository adds support for the Windows 10 SDK, which allows you to build apps for all devices supported by Windows 10 including PCs, tablets, 2-in-1s, Xbox, Mixed reality devices etc.
Status and roadmap
Check out our blog if you’d like to stay up to date on the status of React Native for Windows and check out current and past roadmaps. We will post all new releases, updates and general news about the project there.
You can run React Native Windows apps only on devices supported by the Windows 10 SDK.
For a full and detailed list of the system requirements and how to set up your development platform, see our System Requirements documentation on our website.
See the Getting Started Guide on our React Native for Windows + macOS website to build your first React Native for Windows app.
Search the existing issues and try to make sure your problem doesn’t already exist before opening a new issue. If your issue doesn’t exist yet, try to make sure you provide as much information as possible to us so we can help you sooner. It’s helpful if you include information like:
- The version of Windows, React Native, React Native Windows extension, and device family (i.e., mobile, desktop, Xbox, etc.) where you ran into the issue.
- A stack trace and reduced repro case when possible.
- Ensure the appropriate template is used when filing your issue(s).
See Contributing guidelines for how to setup your fork of the repo and start a PR to contribute to React Native for Windows.
good first issue and help wanted are great starting points for PRs.
React Native already has great documentation and we’re working to ensure the React Native Windows is part of that documentation story.
React Native for Windows has it’s own separate documentation site where Windows and macOS specific information, like API docs and blog updates live.
- Using the CLI in the Getting Started guide will set you up with a sample React Native for Windows app that you can begin editing right away.
- If you’re looking for sample code, just browse the RNTester folder in the GitHub web UI
The React Native Windows extension, including modifications to the original Facebook source code, and all newly contributed code is provided under the MIT License. Portions of the React Native Windows extension derived from React Native are copyright Facebook.
Code of Conduct
This project has adopted the Microsoft Open Source Code of Conduct. For more information see the Code of Conduct FAQ or contact opencode@microsoft.com with any additional questions or comments.
About
A framework for building native Windows apps with React.
Installing React Native on Windows Tutorial
Getting Started with React Native Development on Windows XP, Vista, 7, 8.1, 10 for android application development beginners step by step guide.
As we all know that Mobile application development is recently a very big market and everyone is using their own Android or iOS mobile phones. But for companies who has developing Android and iOS apps together gets very high cost for their customers, because they have to develop individual applications for each platform and that makes their application cost high.
So here we comes with React Native. React Native is a fully responsive mobile application development language which gives us the coding environment to code in JavaScript, HTML and CSS. You can find more about React Native on here.
In this tutorial we would going to install, run and create Android app development’s first project using React Native on windows machine. So just follow the below steps . If you like my tutorial than please share it with others.
Step 1. Install Required Software :
The first step to install React Native is Download and Install below required software packages.
NodeJS : Download and install the latest NodeJS windows machine installer software package from nodejs.org .
Python : Download and install the latest Python windows installer package from Python.org .
Step 2. Install React Native :
After installing NodeJS we can access the nmp packages via Command Line Interface ( DOS ) in windows. So open Command prompt type the below command to install React Native .
Step 3. Install JDK( Java Development Kit ) :
JDK : Download and install JDK from Oracle’s official website oracle.com .
Step 4. Install Android Studio + SDK Manager :
Download the Android Studio latest version from Google Android Developers official Page developer.android.com .
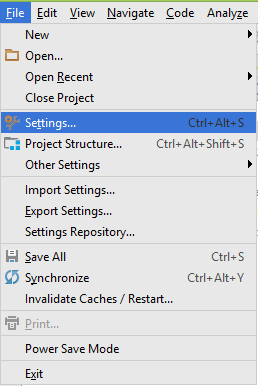
After installing Android Studio Open it Goto Files -> Settings .
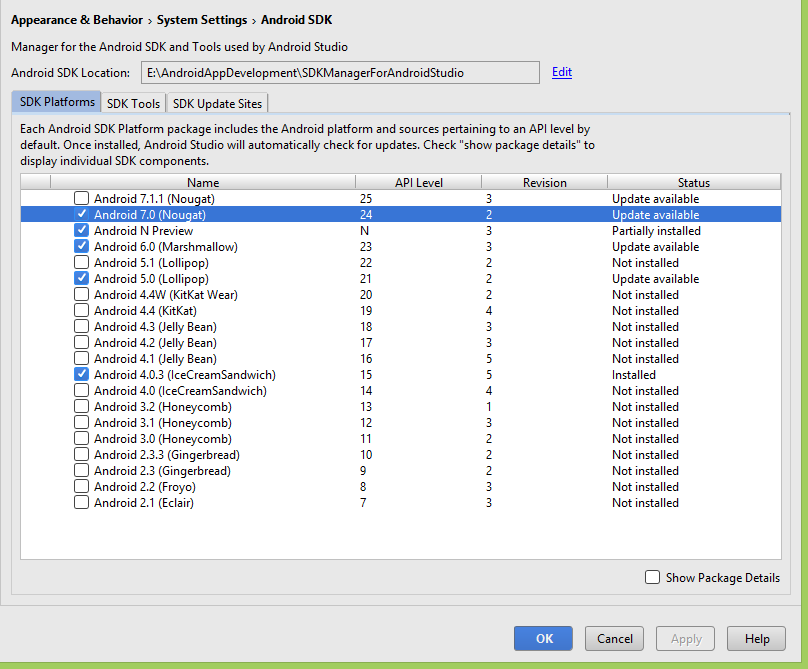
Goto Appearance and Behavior -> System Settings -> Android SDK and install latest android platform.
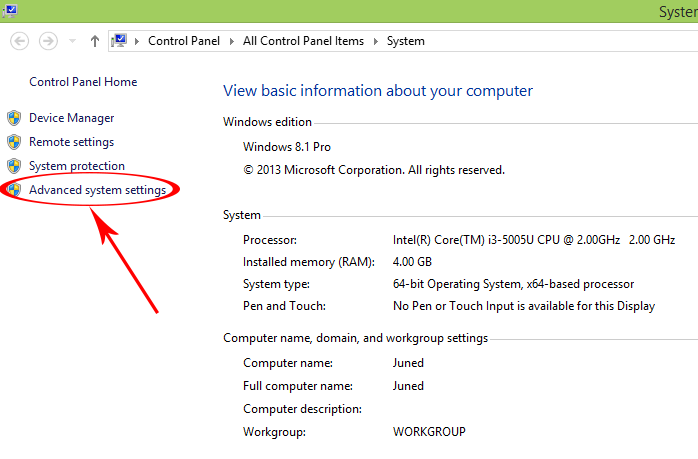
Step 5. Add Environment Variable ANDROID_HOME in Windows :
React Native required ANDROID_HOME variable to compile and run apps. So define the ANDROID_HOME variable.
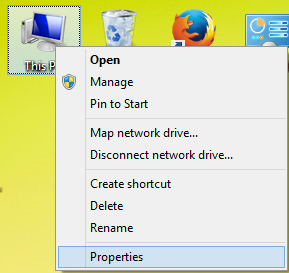
- Right Click on My Computer.
- Goto Properties.

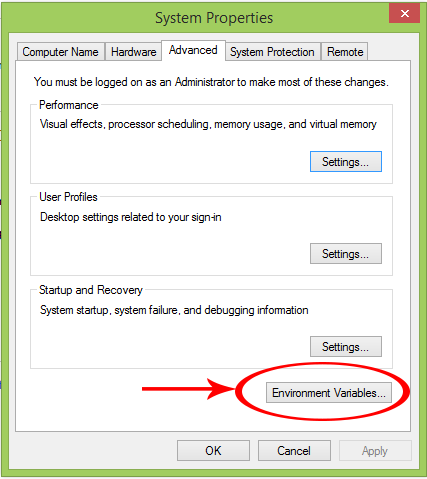
- Click on Advanced System Settings.
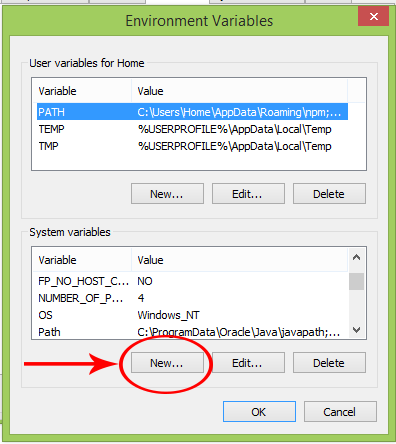
- Click on Environment Variables.
- Under System Variables click on New .
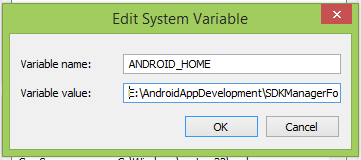
- Set variable name as ANDROID_HOME and variable value as your SDK Manager’s Path.
- Here you go now your ANDROID_HOME variable has been successfully set.
6. Start Android Virtual Device (AVD) :
1. Android virtual device is used to see the test result of our coding inside a virtual android machine just like a real android mobile phone. To setup AVD Open Android Studio -> Tools -> Android -> AVD Manager.
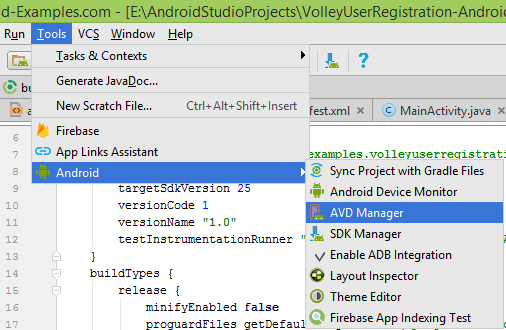
2. Click on Create New Virtual Device.
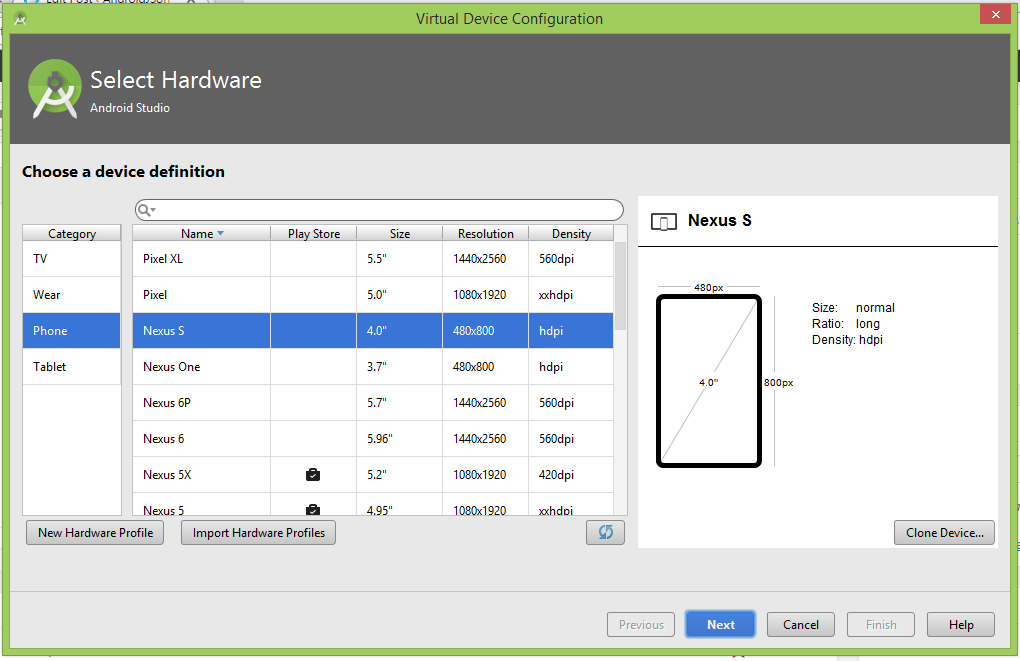
3. Select your device.
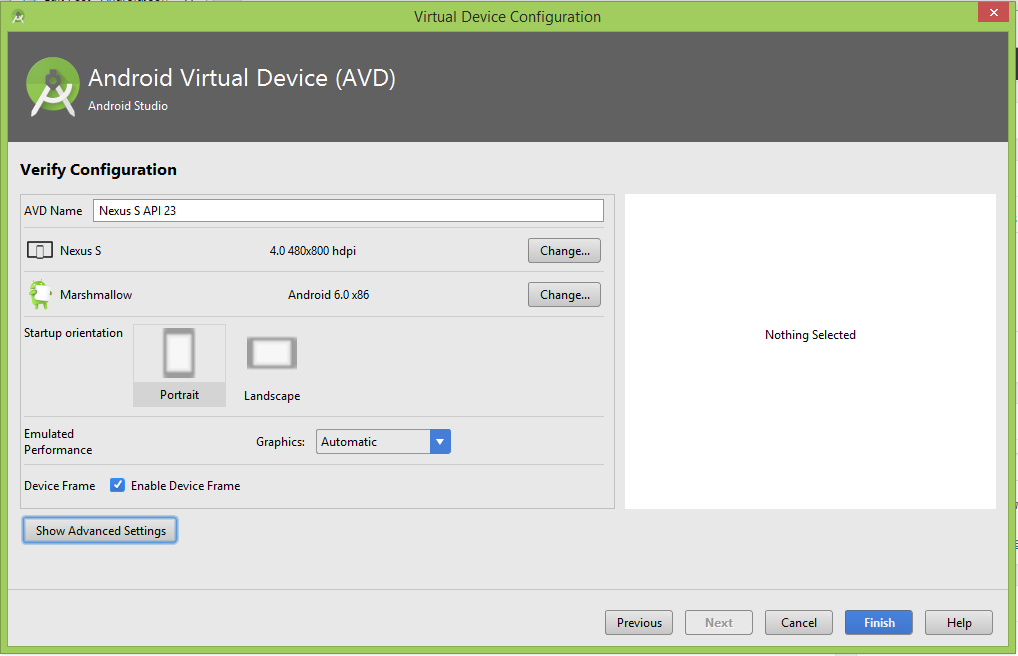
4. Select Android OS version System Image.

5. Name the AVD and hit the Finish button.
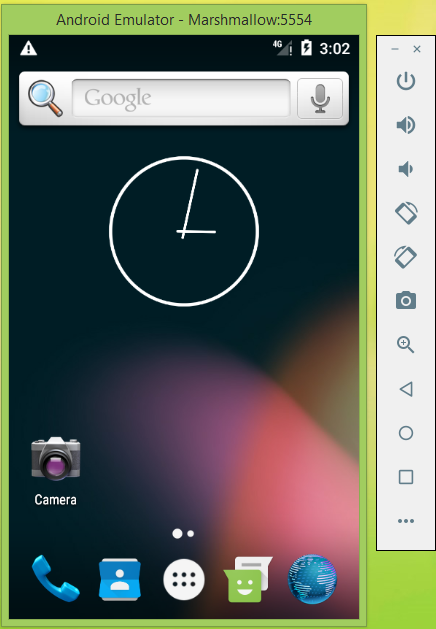
6. After done creating AVD just hit the Run button to start the AVD.
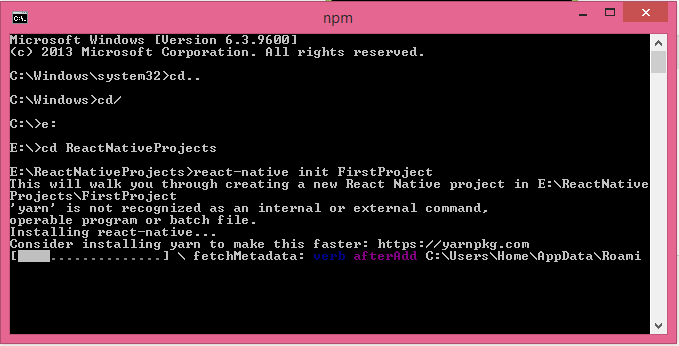
Step 7. Create your first React Native project :
1. Once you have finish all the installing than Create a folder in your drive in which you will store your all React Native projects. Than start command prompt and goto that folder inside command prompt. You can use cd.. command to go back individually from folder to folder.
2. Now type react-native init FirstProject and press enter.

3. Now it will start downloading the React Native app support libraries from internet.
4. The final output will like below screenshot.
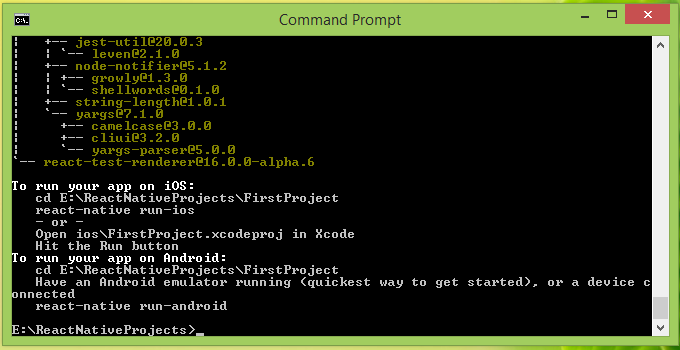
5. Now build the created app and run it into Android Emulator using below command.


