- C — File I/O
- Opening Files
- Closing a File
- Writing a File
- Reading a File
- Binary I/O Functions
- How to read the small memory dump file that is created by Windows if a crash occurs
- Small memory dump files
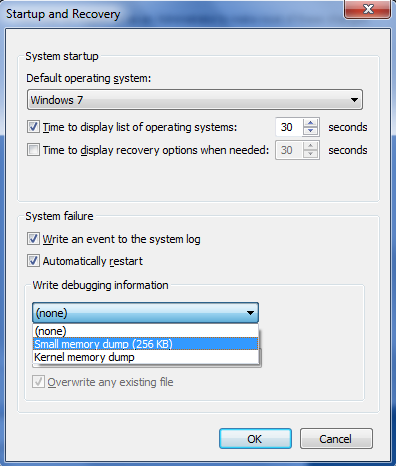
- Configure the dump type
- Tools to read the small memory dump file
- Open the dump file
- Sample commands
- Examine the dump file
- Simplify the commands by using a batch file
- Создание, запись и чтение файла Create, write, and read a file
- Необходимые компоненты Prerequisites
- Создание файла Creating a file
- Запись в файл Writing to a file
- Чтение из файла Reading from a file
C — File I/O
The last chapter explained the standard input and output devices handled by C programming language. This chapter cover how C programmers can create, open, close text or binary files for their data storage.
A file represents a sequence of bytes, regardless of it being a text file or a binary file. C programming language provides access on high level functions as well as low level (OS level) calls to handle file on your storage devices. This chapter will take you through the important calls for file management.
Opening Files
You can use the fopen( ) function to create a new file or to open an existing file. This call will initialize an object of the type FILE, which contains all the information necessary to control the stream. The prototype of this function call is as follows −
Here, filename is a string literal, which you will use to name your file, and access mode can have one of the following values −
| Sr.No. | Mode & Description | |||||||
|---|---|---|---|---|---|---|---|---|
| 1 |
| Placeholder | Explanation |
|---|---|
| SymbolPath | Either the local path where the symbol files have been downloaded or the symbol server path, including a cache folder. Because a small memory dump file contains limited information, the actual binary files must be loaded together with the symbols for the dump file to be correctly read. |
| ImagePath | The path of these files. The files are contained in the I386 folder on the Windows XP CD-ROM. For example, the path may be C:\Windows\I386 . |
| DumpFilePath | The path and file name for the dump file that you are examining. |
Sample commands
You can use the following sample commands to open the dump file. These commands assume the following:
- The contents of the I386 folder on the Windows CD-ROM are copied to the C:\Windows\I386 folder.
- Your dump file is named C:\Windows\Minidump\Minidump.dmp .
Sample 2. If you prefer the graphical version of the debugger instead of the command-line version, type the following command instead:
Examine the dump file
There are several commands that you can use to gather information in the dump file, including the following commands:
- The !analyze -show command displays the Stop error code and its parameters. The Stop error code is also known as the bug check code.
- The !analyze -v command displays verbose output.
- The lm N T command lists the specified loaded modules. The output includes the status and the path of the module.
The !drivers extension command displays a list of all drivers that are loaded on the destination computer, together with summary information about their memory use. The !drivers extension is obsolete in Windows XP and later. To display information about loaded drivers and other modules, use the lm command. The lm N T command displays information in a format that is similar to the old !drivers extension.
For help with other commands and for complete command syntax, see the debugging tools Help documentation. The debugging tools Help documentation can be found in the following location:
C:\Program Files\Debugging Tools for Windows\Debugger.chm
If you have symbol-related issues, use the Symchk utility to verify that the correct symbols are loaded correctly. For more information about how to use Symchk, see Debugging with Symbols.
Simplify the commands by using a batch file
After you identify the command that you must have to load memory dumps, you can create a batch file to examine a dump file. For example, create a batch file and name it Dump.bat. Save it in the folder where the debugging tools are installed. Type the following text in the batch file:
When you want to examine a dump file, type the following command to pass the dump file path to the batch file:
Создание, запись и чтение файла Create, write, and read a file
Важные API Important APIs
Считайте и запишите файл с помощью объекта StorageFile. Read and write a file using a StorageFile object.
Полный пример: пример доступа к файлам. For a complete sample, see the File access sample.
Необходимые компоненты Prerequisites
Общее представление об асинхронном программировании для приложений универсальной платформы Windows (UWP) . Understand async programming for Universal Windows Platform (UWP) apps
Описание процесса написания асинхронных приложений на C# или Visual Basic см. в статье Вызов асинхронных API в C# и Visual Basic. You can learn how to write asynchronous apps in C# or Visual Basic, see Call asynchronous APIs in C# or Visual Basic. Чтобы узнать, как создавать асинхронные приложения с помощью C++/WinRT, ознакомьтесь с разделом Параллельная обработка и асинхронные операции с помощью C++/WinRT. To learn how to write asynchronous apps in C++/WinRT, see Concurrency and asynchronous operations with C++/WinRT. Чтобы узнать, как создавать асинхронные приложения на C++/CX, ознакомьтесь с разделом Асинхронное программирование на языке C++/CX. To learn how to write asynchronous apps in C++/CX, see Asynchronous programming in C++/CX.
Знание порядка вызова файла для считывания, записи или выполнения обеих этих операций. Know how to get the file that you want to read from, write to, or both
Сведения о вызове файла с помощью средства выбора файлов см. в разделе Открытие файлов и папок с помощью средства выбора. You can learn how to get a file by using a file picker in Open files and folders with a picker.
Создание файла Creating a file
Ниже приведен порядок создания файла в локальной папке приложения. Here’s how to create a file in the app’s local folder. Заменим его, если он уже существует. If it already exists, we replace it.
Запись в файл Writing to a file
Ниже приведен порядок записи в доступный для записи файл на диске с помощью класса StorageFile. Here’s how to write to a writable file on disk using the StorageFile class. Первое действие для каждого из способов записи в файл (если запись в файл происходит не сразу же после его создания) — это получение файла с помощью StorageFolder.GetFileAsync. The common first step for each of the ways of writing to a file (unless you’re writing to the file immediately after creating it) is to get the file with StorageFolder.GetFileAsync.
Запись текста в файл Writing text to a file
Запишите текст в файл, вызвав метод FileIO.WriteTextAsync. Write text to your file by calling the FileIO.WriteTextAsync method.
Запись байтов в файл с использованием буфера (2 действия) Writing bytes to a file by using a buffer (2 steps)
Сначала вызовите CryptographicBuffer.ConvertStringToBinary для получения буфера байтов (на основе строки), которые требуется записать в файл. First, call CryptographicBuffer.ConvertStringToBinary to get a buffer of the bytes (based on a string) that you want to write to your file.
Затем запишите байты из буфера в файл, вызвав метод FileIO.WriteBufferAsync. Then write the bytes from your buffer to your file by calling the FileIO.WriteBufferAsync method.
Запись текста в файл с использованием потока (4 действия) Writing text to a file by using a stream (4 steps)
Сначала откройте файл, вызвав метод StorageFile.OpenAsync. First, open the file by calling the StorageFile.OpenAsync method. По завершении операции открытия будет возвращен поток содержимого файла. It returns a stream of the file’s content when the open operation completes.
Далее получите выходной поток, вызвав метод IRandomAccessStream.GetOutputStreamAt из stream . Next, get an output stream by calling the IRandomAccessStream.GetOutputStreamAt method from the stream . Если вы используете C#, вставьте его в оператор using, чтобы управлять временем существования выходного потока. If you’re using C#, then enclose this in a using statement to manage the output stream’s lifetime. Если вы используете C++/WinRT, то можете контролировать его время существования, заключив его в блок или задав значение nullptr по завершении. If you’re using C++/WinRT, then you can control its lifetime by enclosing it in a block, or setting it to nullptr when you’re done with it.
Теперь добавьте этот код (если вы используете C#, то в существующий оператор using) для записи в поток вывода, создав новый объект DataWriter и вызвав метод DataWriter.WriteString. Now add this code (if you’re using C#, within the existing using statement) to write to the output stream by creating a new DataWriter object and calling the DataWriter.WriteString method.
Наконец, добавьте этот код (если вы используете C#, то во внутренний оператор using) для сохранения текста в файл с помощью DataWriter.StoreAsync и закрытия потока с помощью IOutputStream.FlushAsync. Lastly, add this code (if you’re using C#, within the inner using statement) to save the text to your file with DataWriter.StoreAsync and close the stream with IOutputStream.FlushAsync.
Рекомендации по записи в файл Best practices for writing to a file
Дополнительные сведения и рекомендации см. в разделе Рекомендации по записи в файлы. For additional details and best practice guidance, see Best practices for writing to files.
Чтение из файла Reading from a file
Ниже приведен порядок чтения из файла на диске с помощью класса StorageFile. Here’s how to read from a file on disk using the StorageFile class. Первое действие для каждого из способов чтения из файла — это получение файла с помощью StorageFolder.GetFileAsync. The common first step for each of the ways of reading from a file is to get the file with StorageFolder.GetFileAsync.
Чтение текста из файла Reading text from a file
Чтобы выполнить чтение текста из файла, вызовите метод FileIO.ReadTextAsync. Read text from your file by calling the FileIO.ReadTextAsync method.
Чтение текста из файла с использованием буфера (2 действия) Reading text from a file by using a buffer (2 steps)
Затем используйте объект DataReader, чтобы сначала считать длину буфера, а затем его содержимое. Then use a DataReader object to read first the length of the buffer and then its contents.
Чтение текста из файла с использованием потока (4 действия) Reading text from a file by using a stream (4 steps)
Откройте поток для файла, вызвав метод StorageFile.OpenAsync. Open a stream for your file by calling the StorageFile.OpenAsync method. По завершении операции будет возвращен поток содержимого файла. It returns a stream of the file’s content when the operation completes.
Получите размер потока для последующего использования. Get the size of the stream to use later.


