- How to Fix Folder Keeps Reverting to Read Only on Windows 10
- What causes the folder to revert to read-only on Windows 10?
- Solution 1: Disabling Controlled Access
- Solution 2: Login as an Administrator
- Solution 3: Changing the Attribute of the Folder
- Solution 4: Changing Permissions of the Drive
- Solution 5: Disabling your Third-party antivirus
- Fix Folder keeps reverting to Read Only for good
- How can I remove Read only from a folder in Windows 10?
- Solution 1 – Change permissions
- Solution 2 – Change the attributes
- File Permissions for WSL
- WSL metadata on Windows files
- File Access Scenarios
- Accessing Files in the Windows drive file system (DrvFS) from Linux
- Reading file permissions from an existing Windows file
- Changing file permissions on an existing Windows file using chmod
- Creating a file in DriveFS
- Which Linux user and Linux group owns the file?
- Accessing Linux files from Windows using \wsl$
- Creating a new file
- Accessing files in the Linux root file system from Linux
- Configuring file permissions
How to Fix Folder Keeps Reverting to Read Only on Windows 10
If your folder keeps reverting to read-only it could be due to a recent Windows 10 upgrade. Many users have reported that when upgraded their system to Windows 10, they encountered this error. Read-only is a file/folder attribute which lets only a specific group of users read or edit the files or folder. This can get really infuriating, however, the fix is quite simple and easy but may differ depending on the scenario that caused it.
Generally, when you encounter such an issue, you can easily overcome it by unchecking the read-only attribute box found in the properties of the file/folder. However, this case is not that simple. You won’t be able to change the read-only attribute of the file/folder which gets annoying. Nevertheless, this article will teach you how to access your files/folders again — just follow through the instructions.
What causes the folder to revert to read-only on Windows 10?
This might be happening to you due to various reasons, nonetheless, the most generic ones are —
- Windows upgrade. If you’ve recently upgraded your system to Windows 10, this might be occurring due to that as your account permissions may have been altered.
- Account permissions. Sometimes, the error could be simply because of your account permissions which is the most common cause without you realizing it.
The possible and effective solutions for this problem are: –
Solution 1: Disabling Controlled Access
Before we try other technical solutions, we will first try to disable the Controlled Folder Access in your settings. This is a hotfix and you may proceed with other solutions if this doesn’t work for you.
- Press and hold the “Windows Key + I” button to launch Windows Settings.
- Once the Settings are opened, navigate to Update & Security and then click on Windows Security.
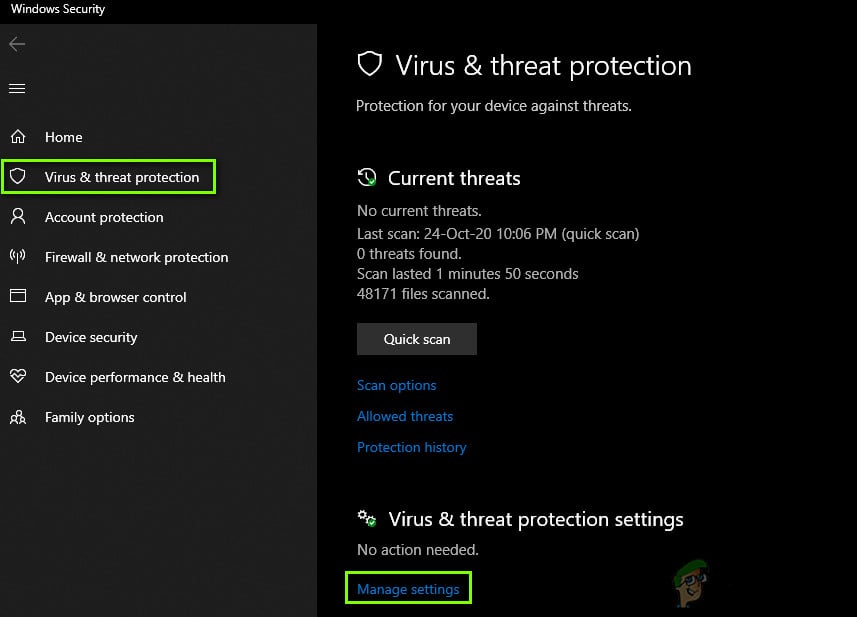
- Now, under the Virus & threat protection settings, click on Manage settings.
 Virus & threat protection settings
 - Under Controlled folder access, select Manage Controlled folder access and switch the access to Off. Manage Controlled folder access to Off
- Restart your computer completely and then check if the issue is resolved.
 Virus & threat protection settings
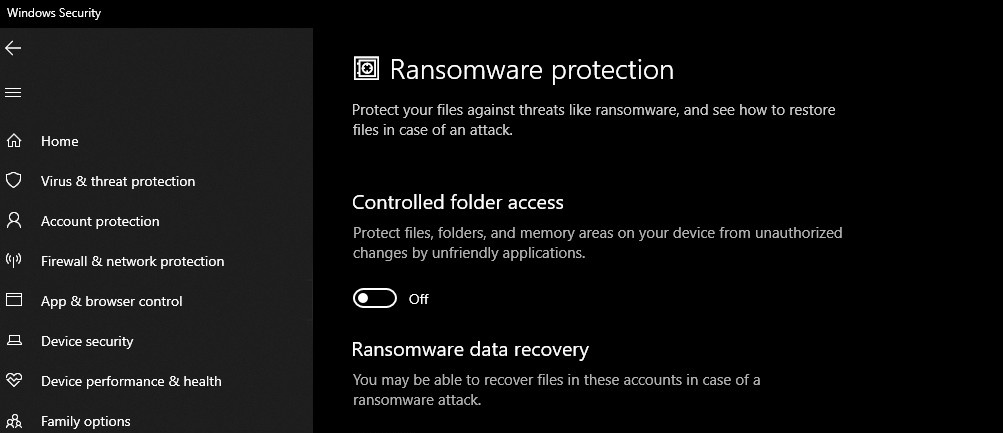 Manage Controlled folder access to Off
Solution 2: Login as an Administrator
To start off with the common mistake, if you have created multiple accounts on your system, make sure you are signed in as an administrator while accessing the file. The reason you are not able to read or edit the file/folder could be that the file/folder was created using an administrator account and you are trying to access it using a guest account or any other. Hence, before you move into the solutions mentioned below, make sure you are using the administrative account.
Solution 3: Changing the Attribute of the Folder
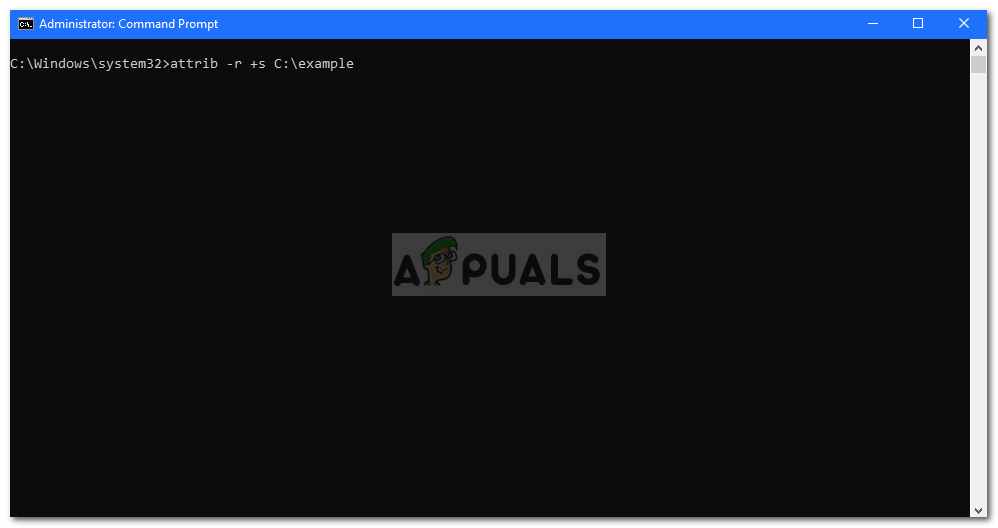
If you are logged in as an administrator and still unable to access the files, then in such a case, you’ll have to change the attribute of the file using the command prompt. To do this, follow the given instructions:
- Press Winkey + X and select Command Prompt (Admin) from the list.
- In order to remove the read-only attribute and set a new attribute, use the following command: Enter the command to remove Read-only Attribute
 Enter the command to remove Read-only Attribute
- The above command will remove the read-only attribute of the file and change it to a system attribute. However, some files/folders do not operate properly in the system attribute so use the following command if you want to remove the system attribute:
Solution 4: Changing Permissions of the Drive
If you are facing this issue after upgrading your system to Windows 10, then changing the permissions of the drive could fix your problem. There have been several reports according to which the issue has been solved via this method. Here’s how to do it:
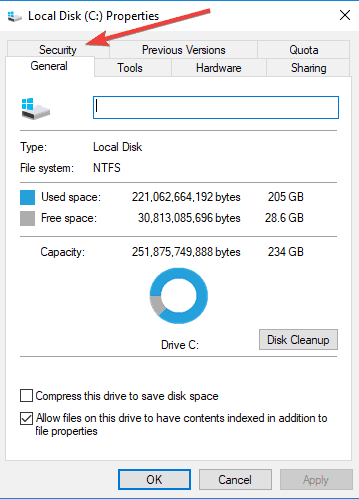
- Right-click on the drive where your files/folders are located.
- Select Properties.
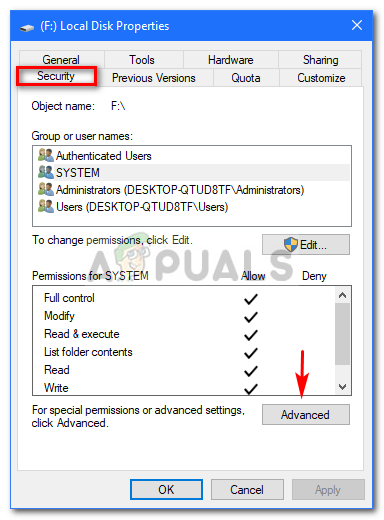
- Navigate to the Security tab. Local Disk Properties (Security)
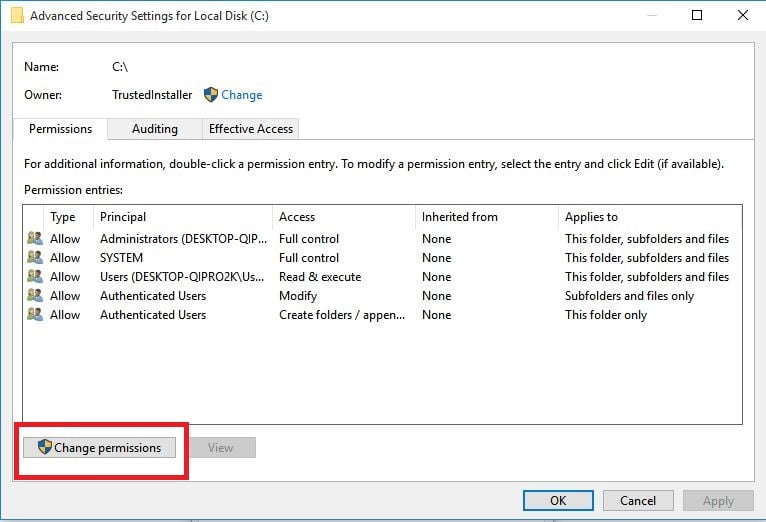
- Click Advanced and then select Change permissions. Select change permissions
- Highlight your user and then click Edit. Highlight your user and click Edit
- Select This folder, subfolders and files from the drop-down list.
- Check the Full Control box under Basic Permissions. Check the Full Control Box
- Click OK.
 Local Disk Properties (Security)
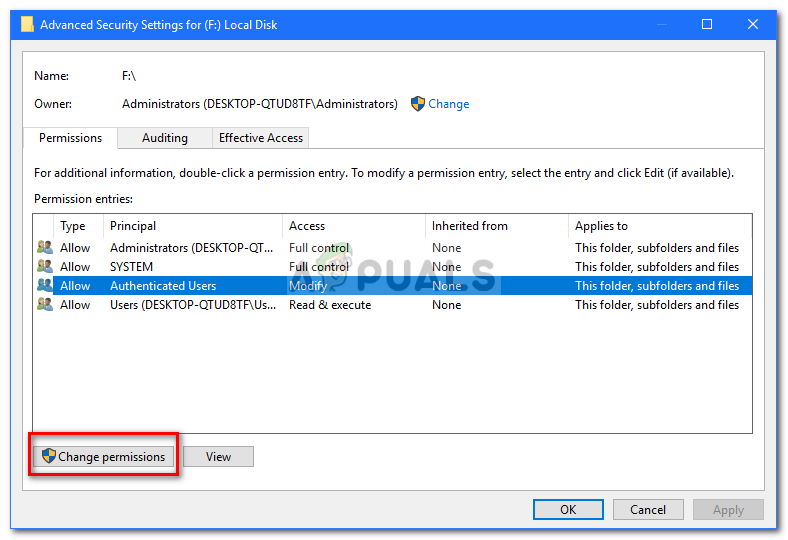 Select change permissions
 Highlight your user and click Edit
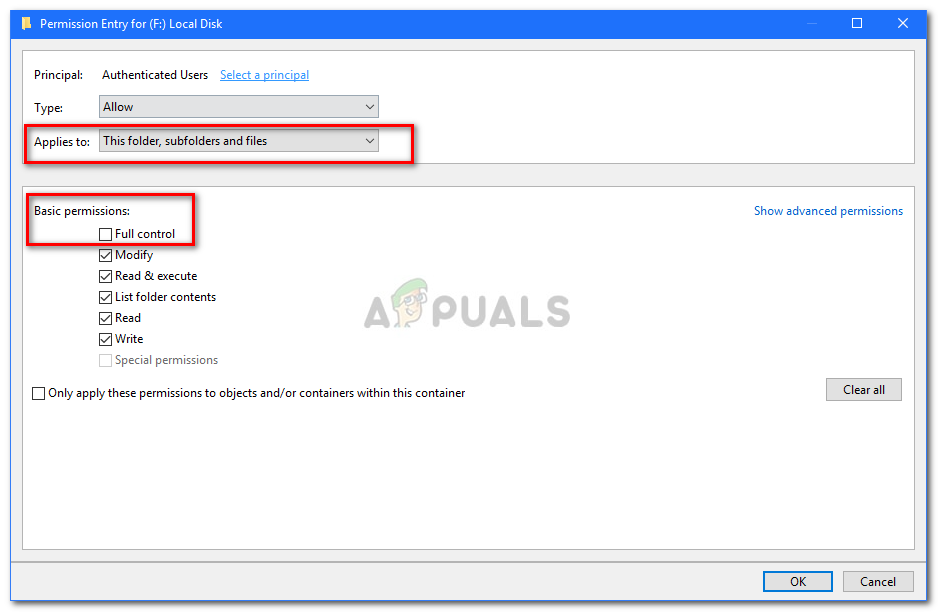 Check the Full Control Box
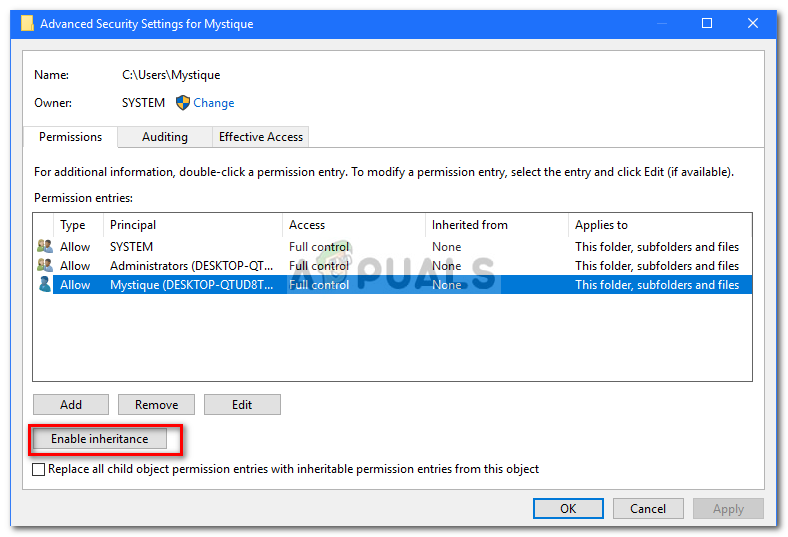
If you have more than one account on the system, then you’ll have to enable inheritance first. Here’s how to do it:
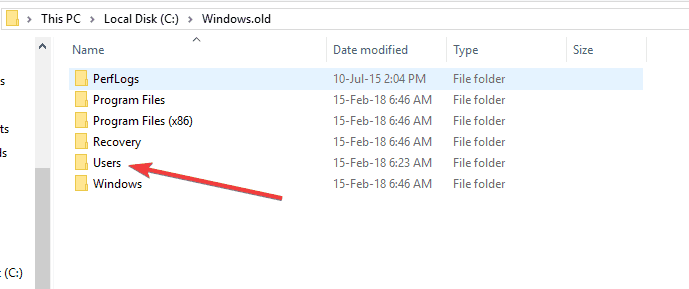
- Go to your System drive (where your Windows is installed).
- Go to the Users folder.
- Right-click on your username and click Properties.
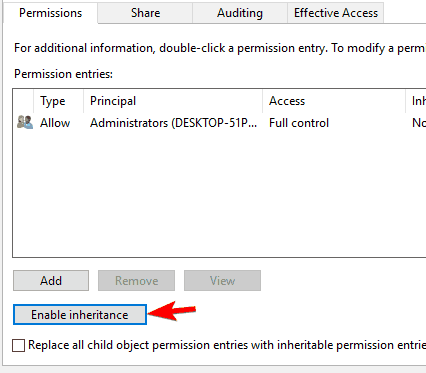
- In the Security tab, click Advanced.
- Hit Enable Inheritance. Highlight your user and click Enable Inheritance
 Highlight your user and click Enable Inheritance
Solution 5: Disabling your Third-party antivirus
If the error persists whenever your system restarts, it could be due to your third-party antivirus software. Your antivirus might be detecting the files as a threat and consequently, stopping you from accessing them. In such a case, you’ll have to disable your antivirus software, change the attributes of the files/folders as mentioned above and restart your system to see if the files/folders still revert to read-only. If they don’t, this means your antivirus is causing the issue and you should probably uninstall it.
Fix Folder keeps reverting to Read Only for good

- A folder is reverting back to the Read-Only status. This problem most often occurred after installing Windows 10 updates, and in some cases, because of account permissions.
- The simplest solution is to change the permissions. Most of the time, some changes in permissions can make a folder read-only.
- If File Explorer is giving you a hard time, you can go to our Fix File Explorer errors hub for answers.
- We wrote thousands of articles about Windows 10, so if you encounter any problems, you will find a solution in our Complete guides on troubleshooting Windows 10 hub.

- Download Restoro PC Repair Tool that comes with Patented Technologies (patent available here).
- Click Start Scan to find Windows issues that could be causing PC problems.
- Click Repair All to fix issues affecting your computer’s security and performance
- Restoro has been downloaded by 0 readers this month.
File and folder attributes are kept by Windows in the file system.
They are stored in the respective location with the file and folder name, extension, date and time stamp, and any other information available.
If you right-click on any given time on a folder and go to its proprieties, you’ll see a Read-Only check-mark.
It seems like many users reported that after they clear the check-mark, the folder is reverting back to the Read-Only status.
This problem most often occurred after installing Windows 10 updates, and in some cases, because of account permissions.
Nevertheless, an issue like this is very annoying and has to be dealt with.
What can I do if a folder reverts to Read-only in Windows 10? The simplest solution is to change the permissions.
Most of the time, some changes in permissions can make a folder read-only. Additionally, you can log in as an administrator or change the attribute of the folders.
For more info on how to do that, check the steps below.
How can I remove Read only from a folder in Windows 10?
If on your Windows 10 PC are more than one accounts, make sure that you’re trying to access the file or the folder from the Administrator account.
Because the folder was created by the admin account and you are trying to access it from a guest one, you won’t be able to make any changes to it.
So first, connect to your computer using the Administrator account.
Solution 1 – Change permissions
A lot of users have reported this problem. Because the majority of them confirmed that they solved it by changing the permissions, we suggest that you try this first.
If you are the only user on the Windows 10 PC, do the following to change the permissions:
- Find your C Drive, right-click it and then choose Properties.
- A new window will appear. Click on Security tab.
- In the bottom right, click Advanced. Then click on Change permissions.
- Choose the user that’s of interest to you and then click Edit.
- Under Applies to: drop-menu, choose This folder, subfolders and files.
- Under Basic permissions check Full control and click OK.
If there are more than one users on that computer, then follow these steps:
- Find your C Drive and double-click on it.
- You will see a Users folder. Double-click on it.
- Now you should see your users folder. Right-click it and choose Proprieties.
- Go to the Security tab, and in the bottom-right click Advanced.
- In the new window, in the bottom-left should see an Enable inheritance button. Click it.

After changing the permissions, the issue should be gone. If your still having problems, then go to the next solution.
Solution 2 – Change the attributes
If a certain folder has the Read-only attribute, then a program can’t save files or make changes to it. To change the Read-only attribute to System by using the Attrib command in cmd, follow the steps:
- In the Windows search box type cmd. Right-click the result and choose Run as administrator.
- To remove the Read-only attribute and to set the System attribute, type in the following command attrib -r +s drive:

.
Keep in mind that removing the Read-only or the System attribute of a folder can cause some customization loss, but it’s not particularly important unless you have something specific in mind.
We hope that these solutions worked for you, as many other Windows 10 users confirmed them.
Don’t forget to leave any other questions you may have in the comments section below, and we’ll be sure to take a look.
File Permissions for WSL
This page details how Linux file permissions are interpreted across the Windows Subsystem for Linux, especially when accessing resources inside of Windows on the NT file system. This documentation assumes a basic understanding of the Linux file system permissions structure and the umask command.
When accessing Windows files from WSL the file permissions are either calculated from Windows permissions, or are read from metadata that has been added to the file by WSL. This metadata is not enabled by default.
WSL metadata on Windows files
When metadata is enabled as a mount option in WSL, extended attributes on Windows NT files can be added and interpreted to supply Linux file system permissions.
WSL can add four NTFS extended attributes:
| Attribute Name | Description |
|---|---|
| $LXUID | User Owner ID |
| $LXGID | Group Owner ID |
| $LXMOD | File mode (File systems permission octals and type, e.g: 0777) |
| $LXDEV | Device, if it is a device file |
Additionally, any file that is not a regular file or directory (e.g: symlinks, FIFOs, block devices, unix sockets, and character devices) also have an NTFS reparse point. This makes it much faster to determine the kind of file in a given directory without having to query its extended attributes.
File Access Scenarios
Below is a description of how permissions are determined when accessing files in different ways using the Windows Subsystem for Linux.
Accessing Files in the Windows drive file system (DrvFS) from Linux
These scenarios occur when you are accessing your Windows files from WSL, most likely via /mnt/c .
Reading file permissions from an existing Windows file
The result depends on if the file already has existing metadata.
DrvFS file does not have metadata (default)
If the file has no metadata associated with it then we translate the effective permissions of the Windows user to read/write/execute bits and set them to the this as the same value for user, group, and other. For example, if your Windows user account has read and execute access but not write access to the file then this will be shown as r-x for user, group and other. If the file has the ‘Read Only’ attribute set in Windows then we do not grant write access in Linux.
The file has metadata
If the file has metadata present, we simply use those metadata values instead of translating effective permissions of the Windows user.
Changing file permissions on an existing Windows file using chmod
The result depends on if the file already has existing metadata.
chmod file does not have metadata (default)
Chmod will only have one effect, if you remove all the write attributes of a file then the ‘read only’ attribute on the Windows file will be set, since this is the same behaviour as CIFS (Common Internet File System) which is the SMB (Server Message Block) client in Linux.
chmod file has metadata
Chmod will change or add metadata depending on the file’s already existing metadata.
Please keep in mind that you cannot give yourself more access than what you have on Windows, even if the metadata says that is the case. For example, you could set the metadata to display that you have write permissions to a file using chmod 777 , but if you tried to access that file you would still not be able to write to it. This is thanks to interopability, as any read or write commands to Windows files are routed through your Windows user permissions.
Creating a file in DriveFS
The result depends on if metadata is enabled.
Metadata is not enabled (default)
The Windows permissions of the newly created file will be the same as if you created the file in Windows without a specific security descriptor, it will inherit the parent’s permissions.
Metadata is enabled
The file’s permission bits are set to follow the Linux umask, and the file will be saved with metadata.
Which Linux user and Linux group owns the file?
The result depends on if the file already has existing metadata.
User file does not have metadata (default)
In the default scenario, when automounting Windows drives, we specify that the user ID (UID) for any file is set to the user ID of your WSL user and the group ID (GID) is set to the principal group ID of your WSL user.
User file has metadata
The UID and GID specified in the metadata is applied as the user owner and group owner of the file.
Accessing Linux files from Windows using \\wsl$
Accessing Linux files via \\wsl$ will use the default user of your WSL distribution. Therefore any Windows app accessing Linux files will have the same permissions as the default user.
Creating a new file
The default umask is applied when creating a new file inside of a WSL distribution from Windows. The default umask is 022 , or in other words it allows all permissions except write permissions to groups and others.
Accessing files in the Linux root file system from Linux
Any files created, modified, or accessed in the Linux root file system follow standard Linux conventions, such as applying the umask to a newly created file.
Configuring file permissions
You can configure your file permissions inside of your Windows drives using the mount options in wsl.conf. The mount options allow you to set umask , dmask and fmask permissions masks. The umask is applied to all files, the dmask is applied just to directories and the fmask is applied just to files. These permission masks are then put through a logical OR operation when being applied to files, e.g: If you have a umask value of 023 and an fmask value of 022 then the resulting permissions mask for files will be 023 .
Please see the Configure per distro launch settings with wslconf article for instructions on how to do this.


