- File Permissions for WSL
- WSL metadata on Windows files
- File Access Scenarios
- Accessing Files in the Windows drive file system (DrvFS) from Linux
- Reading file permissions from an existing Windows file
- Changing file permissions on an existing Windows file using chmod
- Creating a file in DriveFS
- Which Linux user and Linux group owns the file?
- Accessing Linux files from Windows using \wsl$
- Creating a new file
- Accessing files in the Linux root file system from Linux
- Configuring file permissions
- How to Change the Read/Write Permission on a Flash Disk/Memory Card
- 4 Ways to Change the Read/Write Permission on a Flash Drive/Memory Card
- Overview of the Read/Write Permission on a Flash Disk/Memory Card
- Fix 1. Change Permission by Turning Off the Slide Switch
- To switch off the memory card physical switch:
- To switch off USB flash drive physical switch:
- Fix 2. Manually Set Drive Security Permissions
- Fix 3. Remove Write Protection from a USB Stick or Memory Card Using CMD
- Fix 4. Use CMD Alternative — Write Protection Removal Tool
- Further Assistance — How to Manage Partitions
- Related Question to Changing the Read/write Permission
- How do I change the read/write permissions on my external hard drive?
- How do I change a flash drive from read only?
- Why did my external hard drive or USB become read only?
- How do I undo write-protected USB?
File Permissions for WSL
This page details how Linux file permissions are interpreted across the Windows Subsystem for Linux, especially when accessing resources inside of Windows on the NT file system. This documentation assumes a basic understanding of the Linux file system permissions structure and the umask command.
When accessing Windows files from WSL the file permissions are either calculated from Windows permissions, or are read from metadata that has been added to the file by WSL. This metadata is not enabled by default.
WSL metadata on Windows files
When metadata is enabled as a mount option in WSL, extended attributes on Windows NT files can be added and interpreted to supply Linux file system permissions.
WSL can add four NTFS extended attributes:
| Attribute Name | Description |
|---|---|
| $LXUID | User Owner ID |
| $LXGID | Group Owner ID |
| $LXMOD | File mode (File systems permission octals and type, e.g: 0777) |
| $LXDEV | Device, if it is a device file |
Additionally, any file that is not a regular file or directory (e.g: symlinks, FIFOs, block devices, unix sockets, and character devices) also have an NTFS reparse point. This makes it much faster to determine the kind of file in a given directory without having to query its extended attributes.
File Access Scenarios
Below is a description of how permissions are determined when accessing files in different ways using the Windows Subsystem for Linux.
Accessing Files in the Windows drive file system (DrvFS) from Linux
These scenarios occur when you are accessing your Windows files from WSL, most likely via /mnt/c .
Reading file permissions from an existing Windows file
The result depends on if the file already has existing metadata.
DrvFS file does not have metadata (default)
If the file has no metadata associated with it then we translate the effective permissions of the Windows user to read/write/execute bits and set them to the this as the same value for user, group, and other. For example, if your Windows user account has read and execute access but not write access to the file then this will be shown as r-x for user, group and other. If the file has the ‘Read Only’ attribute set in Windows then we do not grant write access in Linux.
The file has metadata
If the file has metadata present, we simply use those metadata values instead of translating effective permissions of the Windows user.
Changing file permissions on an existing Windows file using chmod
The result depends on if the file already has existing metadata.
chmod file does not have metadata (default)
Chmod will only have one effect, if you remove all the write attributes of a file then the ‘read only’ attribute on the Windows file will be set, since this is the same behaviour as CIFS (Common Internet File System) which is the SMB (Server Message Block) client in Linux.
chmod file has metadata
Chmod will change or add metadata depending on the file’s already existing metadata.
Please keep in mind that you cannot give yourself more access than what you have on Windows, even if the metadata says that is the case. For example, you could set the metadata to display that you have write permissions to a file using chmod 777 , but if you tried to access that file you would still not be able to write to it. This is thanks to interopability, as any read or write commands to Windows files are routed through your Windows user permissions.
Creating a file in DriveFS
The result depends on if metadata is enabled.
Metadata is not enabled (default)
The Windows permissions of the newly created file will be the same as if you created the file in Windows without a specific security descriptor, it will inherit the parent’s permissions.
Metadata is enabled
The file’s permission bits are set to follow the Linux umask, and the file will be saved with metadata.
Which Linux user and Linux group owns the file?
The result depends on if the file already has existing metadata.
User file does not have metadata (default)
In the default scenario, when automounting Windows drives, we specify that the user ID (UID) for any file is set to the user ID of your WSL user and the group ID (GID) is set to the principal group ID of your WSL user.
User file has metadata
The UID and GID specified in the metadata is applied as the user owner and group owner of the file.
Accessing Linux files from Windows using \\wsl$
Accessing Linux files via \\wsl$ will use the default user of your WSL distribution. Therefore any Windows app accessing Linux files will have the same permissions as the default user.
Creating a new file
The default umask is applied when creating a new file inside of a WSL distribution from Windows. The default umask is 022 , or in other words it allows all permissions except write permissions to groups and others.
Accessing files in the Linux root file system from Linux
Any files created, modified, or accessed in the Linux root file system follow standard Linux conventions, such as applying the umask to a newly created file.
Configuring file permissions
You can configure your file permissions inside of your Windows drives using the mount options in wsl.conf. The mount options allow you to set umask , dmask and fmask permissions masks. The umask is applied to all files, the dmask is applied just to directories and the fmask is applied just to files. These permission masks are then put through a logical OR operation when being applied to files, e.g: If you have a umask value of 023 and an fmask value of 022 then the resulting permissions mask for files will be 023 .
Please see the Configure per distro launch settings with wslconf article for instructions on how to do this.
How to Change the Read/Write Permission on a Flash Disk/Memory Card
4 Ways to Change the Read/Write Permission on a Flash Drive/Memory Card
You receive the error «current read-only state yes», then you want to change or remove the write protection. However, 99% of the users change the read/write permission on a flash disk/memory card because the device has a physical problem. 99% of the cases cannot be solved. But if you are the 0.1% of people whose device doesn’t have a physical problem, you can solve your problem with the solutions below. That is to say; if your device doesn’t have a physical problem, you can change the read/write permission on a flash disk/memory card with the help of the following fixes.
Altogether, this guide offers four ways to obtain or deny the read/write permission on HDD, SSD, or a removable storage media.
| Workable Solutions | Step-by-step Troubleshooting |
|---|---|
| Fix 1. Turn Off the Slide Switch | Take out your object that doesn’t allow you to make any change on it, and carefully examine it. Full steps |
| Fix 2. Set Security Permissions | Correctly insert your USB stick or SD Card to the computer, and make sure Windows has detected it. Full steps |
| Fix 3. Use Command Prompt | Press «Windows + R» simultaneously, type cmd and run as administrator. Full steps |
| Fix 4. Use CMD Alternative | Run EaseUS Tools M on your PC, choose «Write Protection» mode. Full steps |
| Bonus Tips to Manage Partitions | Install and launch EaseUS Partition Master. Right-click the partition you want to. Full steps |
Overview of the Read/Write Permission on a Flash Disk/Memory Card
As you can figure out by yourself, there are read and write permissions on a hard disk drive, memory card, USB stick, pen drive, and jump drive. To gain full access to a drive and data within, or take further control, for example, copy, edit and delete files, partition, and format the disk, you must be authorized to use the storage with both read and write permissions.В In most cases, the majority of people would be lost when they encountered trouble of not being to read or write data as they used to. So, a comprehensive tutorial about how to change read/write permission on a flash disk/memory card becomes urgent.В
Fix 1. Change Permission by Turning Off the Slide Switch
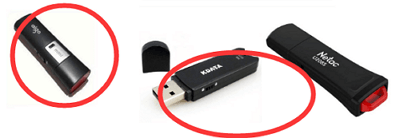
And, here is the first solution. Some USB flash drives or memory cards have a physical switch. If the switch is turned on, it needs to be closed to solve it.
To switch off the memory card physical switch:
Take out your object that doesn’t allow you to make any change on it, and carefully examine it. Is there a little tiny slide switch that points to a Lock position downwards? This switch is designed to avoid accidentally deleting photos or unwanted access to the inside data. So, when you found yourself being blocked, turn the switch to the opposite direction of the Lock position, aka Unlock.
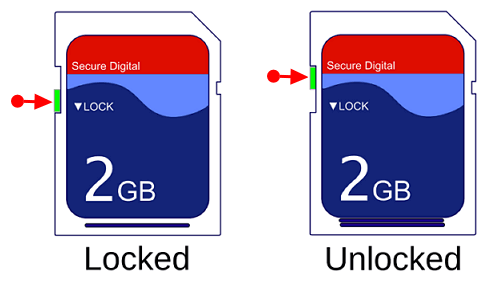
What if the Lock and Unlock switch is broken? Do your best to recover data from a locked SD card.
To switch off USB flash drive physical switch:
Not all the flash drive has the lock switch. So, you should check first. Take out your USB, if there is a physical lock switch on the side, then slide the switch to the unlock area.
Fix 2. Manually Set Drive Security Permissions
Nevertheless, quite a lot of removable storage devices are not coming with the Lock switch, what’s the matter? Where to change the read/write permission? At this moment, you need to get about the task on a computer.
Step 1. Correctly insert your USB stick or SD Card to the computer, and make sure Windows has detected it.
Step 2. In Windows 10, 8 or 7, press «Windows + E» simultaneously to open File Explorer.
Step 3. Locate the drive letter that presents your device. Right-click on it, and select «Properties».
Step 4. Navigate to the Security tab, in the middle of the Properties window; you’ll see ‘To change permissions, click Edit’. This is where you can change read/write permission on the target disk. So, click «Edit», and the Security window immediately pops out.
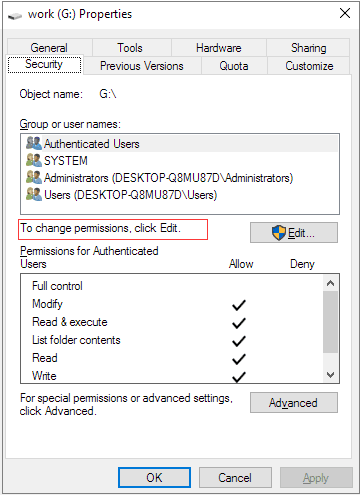
Step 5. Here, you’ll find «Permissions for Authenticated Users» with either an «Allow» or «Deny» option. By checking the Deny boxes next to the permissions like Full Control, Modify, Read and Write, you’re setting the drive and its contents to read-only. Otherwise, to disable the read-only attribute, check the Allow boxes. Click «Apply».
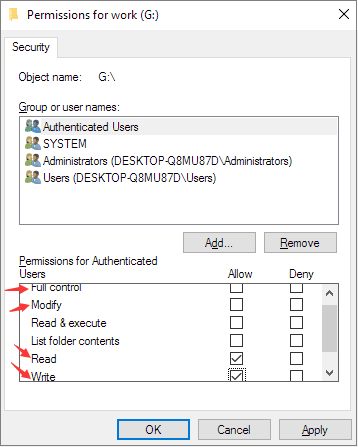
Step 6. Click «OK». You should now do a successful change in the read/write permissions.
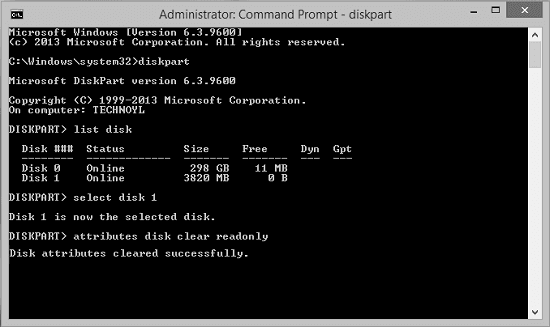
Fix 3. Remove Write Protection from a USB Stick or Memory Card Using CMD
In the event that Windows fails to format a disk with error messages like «the disk is write protected», you have to remove write protection with some advanced measures.
Step 1. Press «Windows + R» simultaneously, type cmd and run administrative «Command Prompt».
Step 2. Type the following command lines and hit Enter after each command line.
diskpart
list disk
select disk #
attributes disk clear readonly
# is the number of the write-protected flash drive or memory card.
Step 3. Exit the Command Prompt.
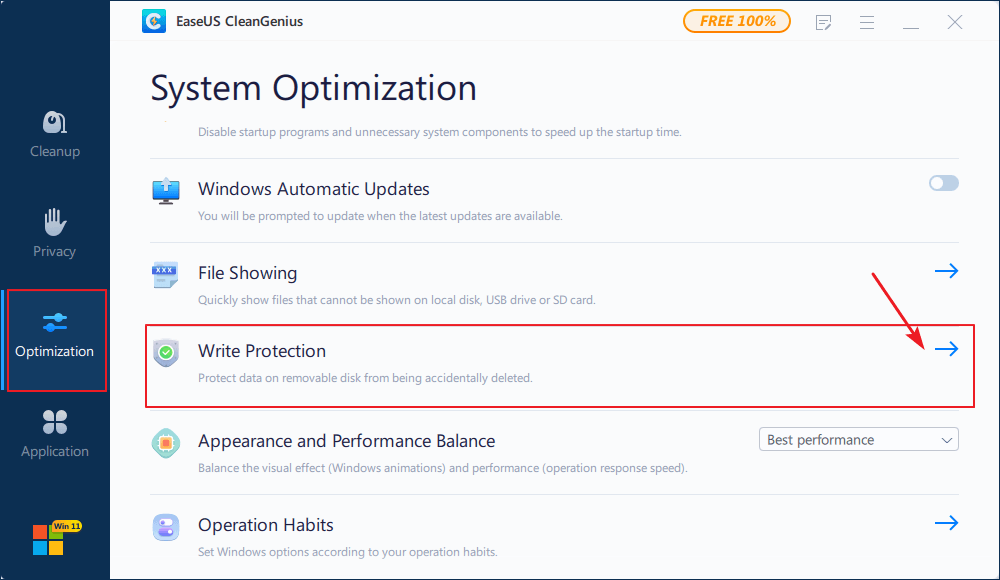
Fix 4. Use CMD Alternative — Write Protection Removal Tool
If you are not professional in computing management and not familiar with command lines, don’t worry. EaseUS R&D team has promoted a fresh kit for helping you resolve the write-protection issue on your hard drive, external hard drive, USB or SD card, etc., devices.
EaseUS Tools M is a practical computer fixing tool that is safe and light-weighted. It’s a perfect alternative to the command line.В
Use this one-click tool to solve the write-protection issues on your own:
Step 1: оњљ DOWNLOADВ and install EaseUS Tools MВ for free.
Step 2: Run EaseUS Tools M on your PC, choose the «Write Protection» mode.
Step 3: Select the device which is now «Write-Protected» and click «Disable» to remove the protection.
Further Assistance — How to Manage Partitions
I hope that at least one solution helps you solve the read-only or write protection issue and gain permission to change read/write attribute as you want. In the final part, I’d like to show you a mighty yet Windows partition manager that facilitates hard drive & partition management in a Windows environment.В It’s EaseUS Partition Master. This tool provides fabulous management features that are useful in many situations.
- Resize/move partition
- Format a write-protected disk drive
- Delete a partition on a USB flash drive in Windows 10
- Recover lost, deleted or unallocated partition
- Copy a partition to make a backup
Try this disk management tool and explore other excellent functions now.
Related Question to Changing the Read/write Permission
Some people still have problems after following the solutions above. Here, I have collected the frequently asked questions, read on.
How do I change the read/write permissions on my external hard drive?
There are four ways to change the read and write permission:
Fix 1. Switch Off the Slide Switch
Fix 2. Set Drive Security Permissions
Fix 3. Remove Write Protection Using CMD
Fix 4. Use Write Protection Removal Tool
How do I change a flash drive from read only?
You can switch off the physical lock if it has. Then, try to clear read-only using CMD:
Step 1. Press Windows + R simultaneously, type cmd and run as administrator.
Step 2. Type diskpart and hit Enter.
Step 3. Type list disk and hit Enter.
Step 4. Type select disk X and hit Enter.
Step 5. Type attributes disk clear readonly and hit Enter.
Step 6. Exit the Command Prompt.
Why did my external hard drive or USB become read only?
The cause of the read only behavior is due to the format of the file system. Many storage devices such as USB drives and external hard disk drives come pre-formatted in NTFS because a larger number of consumers are using them on PCs.
How do I undo write-protected USB?
To remove the write protection, navigate to the Security tab, in the middle of the Properties window. You can see To change permissions, click Edit. This is where you can change read or write permission on the target disk.


