- Доступ к Linux-разделам из-под Windows
- Ext2Fsd
- DiskInternals Linux Reader
- Ext2Explore
- Заключение
- Access EXT4 Partition in Windows 10
- Linux file system types
- Linux reader for Windows 10
- Convert NTFS to EXT4 in Windows
- Create / delete EXT4 partition in Windows 10
- Read & write EXT4 partition in Windows
- Resize EXT4 partition without losing data
- EXT4 data recovery
- Conclusion
Доступ к Linux-разделам из-под Windows
Двойная загрузка операционных систем является очень распространенным сценарием среди пользователей Windows, которые решили попробовать систему Linux. Они поступают так потому, что еще не чувствуют себя достаточно уверенно, чтобы полностью оставить Windows и перейти на Linux. Или же потому, что этим пользователям необходимы некоторые программы и игры, которые невозможно запустить под Linux. Но в обоих случаях, когда пользователь работает между двумя операционными системами, существует потребность во взаимодействии между обеими системами. В операционной системе Linux есть изначальная поддержка «родных» файловых систем Windows (NTFS, FAT). Это означает, что работая под системой Linux, можно иметь доступ к Windows-разделам. С системой Windows дело обстоит с точностью до наоборот. Чтобы получить доступ к Linux-разделам из-под Windows, необходимо установить сторонние программы, специально созданные для этой цели.
В этой статье дан обзор нескольких таких программ, которые позволяют открыть Linux-разделы, работая в операционной системе Windows. Все рассматриваемые программы имеют поддержку файловой системы ext4, которая является таковой по умолчанию для всех дистрибутивов Linux. Также подобные программы могут работать с более ранними версиями файловых систем, таких как ext3 или ext2, а также c файловыми системами другого типа.
Все программы, обзор которых я решил сделать в данной статье, по умолчанию предоставляют доступ к Linux-разделам только в режиме чтения. Это означает, что с помощью таких программ можно читать файлы с Linux-разделов, но нельзя производить запись на них. С моей точки зрения, такой подход является наилучшим вариантом, так как иметь полный доступ к Linux-разделам может быть опасным. Это связано с тем, что при полном доступе к файловой системе Linux, достаточно изменить или удалить хотя бы один файл, что приведет операционную систему Linux в неработоспособное состояние. Пользователь должен иметь точное представление о том, что он собирается изменить, прежде чем приступать к самому изменению. В этом случае риск повредить систему сводится к минимуму.
Ext2Fsd
Ext2Fsd является драйвером файловой системы ext2, написанным под линейку операционных систем Windows (2000, XP, Vista и Win7). Будучи установленным, драйвер предоставляет доступ к Linux-разделам по буквенному обозначению каждого раздела для любой из установленных под Windows программ.
Установщик программы Ext2Fsd во время инсталляции задаст вопрос о добавлении службы ext2fsd в автозагрузку операционной системы. Если согласиться с предложением инсталлятора, то данный сервис будет запускаться каждый раз при загрузке операционной системы Windows, автоматически монтируя указанные в настройках разделы Linux. Если же отказаться от такой возможности, то службу нужно будет запускать вручную в каждом случае, когда необходимо получить доступ к определенным разделам.
Драйвер Ext2Fsd имеет дополнительную опцию для включения прав записи в файловых системах Linux. По причинам, которые я уже называл ранее, рекомендую оставить данную опцию отключенной, за исключением тех случаев, когда действительно необходимо что-либо изменить, и вы что знаете, что делаете.
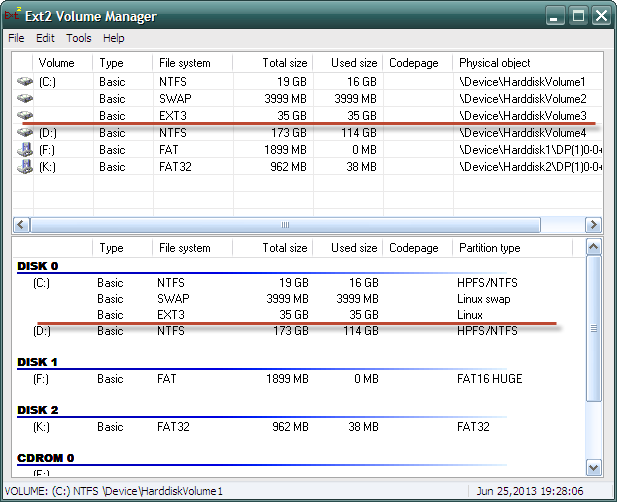
Давайте посмотрим на основное окно программы Ext2Fsd:
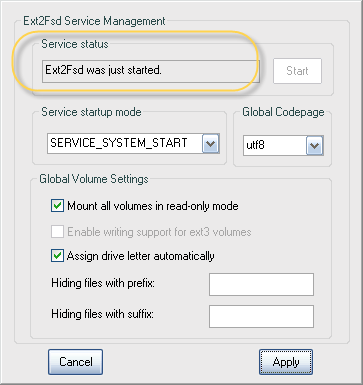
Если нажать горячую клавишу F7 (или перейти в меню по пути «Tools — Service Management»), можно увидеть состояние службы (включена или отключена), и несколько дополнительных настроек, которые относятся к выбранному разделу:
Давайте смонтируем раздел. Это можно выполнить двумя способами. Первый — правым щелчком мыши на выбранном разделе в списке открываем контекстное меню и выбираем «Ext2 Volume Management».
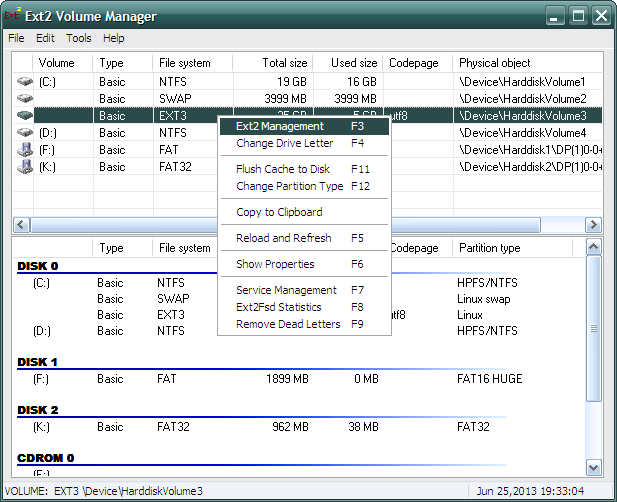
Второй способ — просто нажать горячую клавишу F3 для выделенного в списке раздела.
Откроется следующее окно:
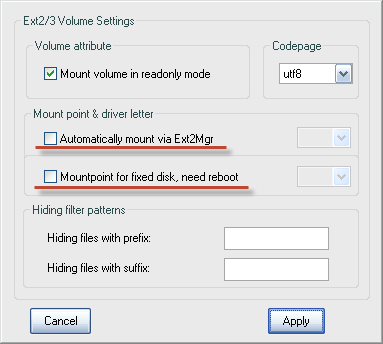
Если раздел, к которому нужно получить доступ, находиться на съемном носителе, то необходимо выбрать пункт «Automatically mount via Ext2Mgr» в контекстном меню. В этом случае указанный раздел будет монтироваться каждый раз, когда будет подключаться съемный носитель. В случае, если нужный раздел располагается на постоянно подключенном носителе, то для его автоматического монтирования необходимо выбрать пункт «Mountpoint for fixed disk, need reboot» в контекстном меню. Выберите данный пункт и выполните перезагрузку, если это необходимо.
Перейдем в «Мой компьютер»:
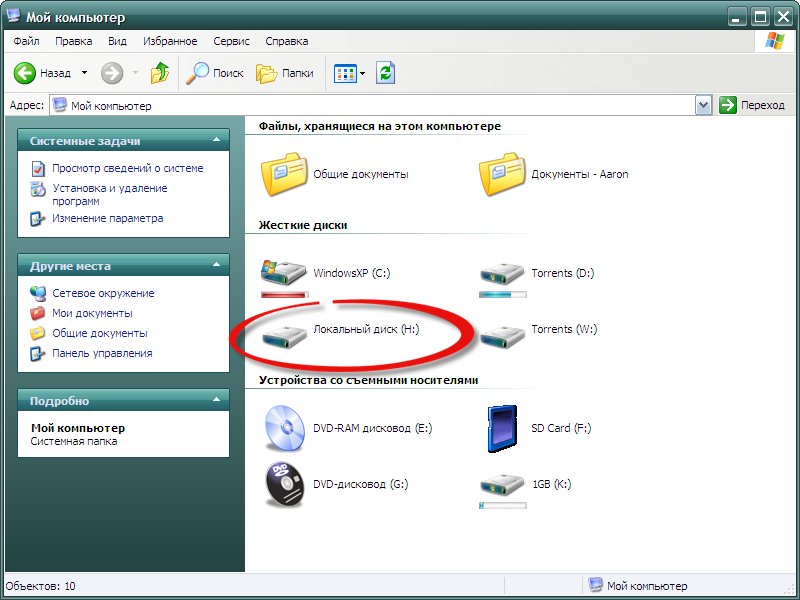
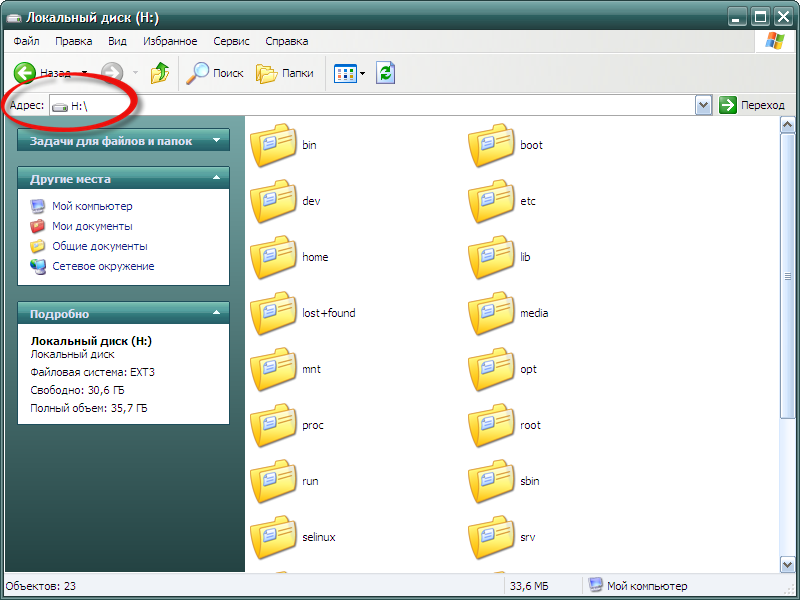
Видим, что Linux-раздел (Локальный диск H) смонтирован и к нему можно получить доступ точно также, как и к любому «нормальному» Windows-разделу. Для проверки открываю указанный раздел для просмотра данных на нем:
DiskInternals Linux Reader
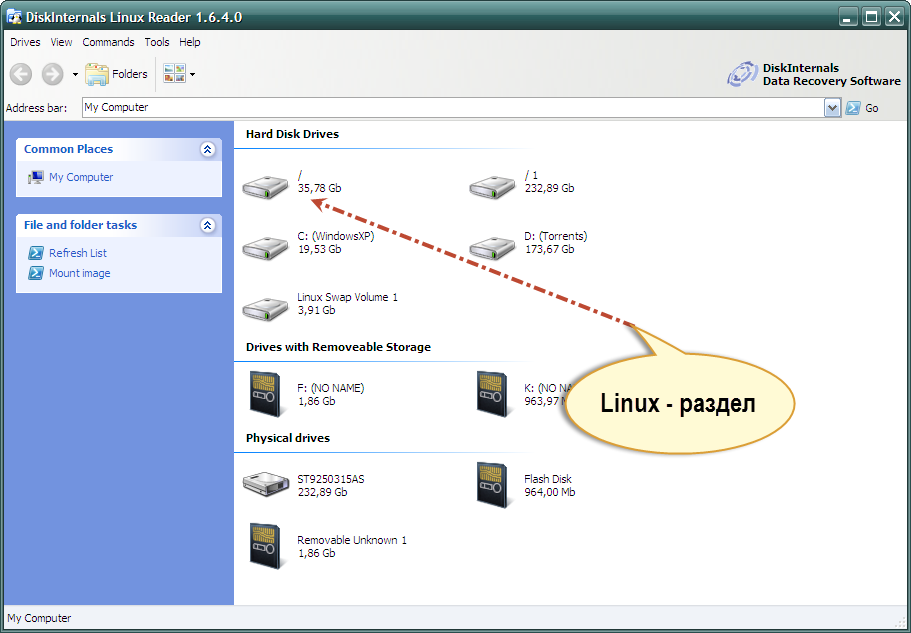
Программа DiskInternals Linux Reader является официально бесплатной и поддерживает целый ряд файловых систем: ext2, ext3, ext4, HFS и ReiserFS.
Подобно программе Ext2Fsd, приложение Linux Reader предоставляет доступ к Linux-разделам только с правами чтения и не разрешает пользователям производить запись на них. Это гарантирует, что изменения в текущей операционной системе не скажутся на работе системы Linux.
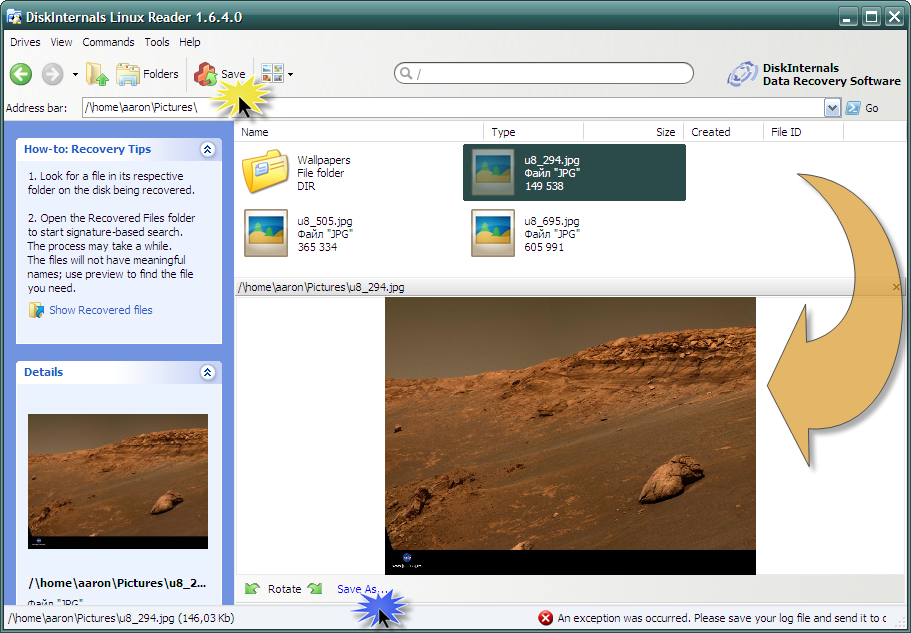
Но, в отличие от предыдущей программы, Linux Reader предоставляет доступ к разделам не через их буквенное обозначение. Для каждого из Linux-разделов запускается своя собственная копия приложения. Такой способ имеет несколько приятных преимуществ, таких как использование «Проводника» Windows и функция предпросмотра. Последняя поддерживает только несколько типов файлов (определенный набор форматов изображений, несколько видео-форматов и еще несколько других, которые у меня не было возможности протестировать). Поэтому, если вы ищете файлы, для которых в программу Linux Reader встроена возможность предпросмотра, то можно просмотреть изменение прежде, чем сохранять их.
На изображении внизу видно функцию предпросмотра в действии. Если щелкнуть на пункте «Сохранить как . » (Save as. ), выбранный файл может быть сохранен в файловой системе Windows. Это бывает полезным, если необходимо работать с этим файлом в обход режима только для чтения.
Также программа Linux Reader может сохранять директорию целиком. Для этого нужно щелкнуть правым щелчком мыши на нужной папке и выбрать пункт «Сохранить» (Save). Затем нажать кнопку «Далее» (Next).
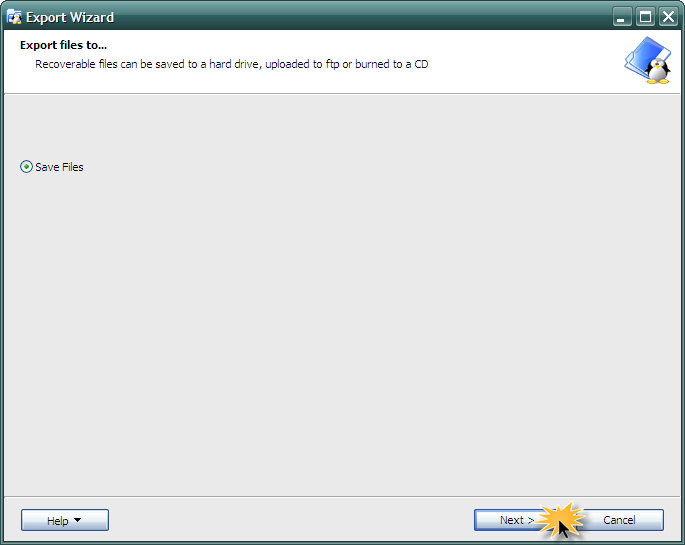
В следующем окне выбираем «Сохранить файлы» (Save Files) и снова нажмем кнопку «Далее» (Next):
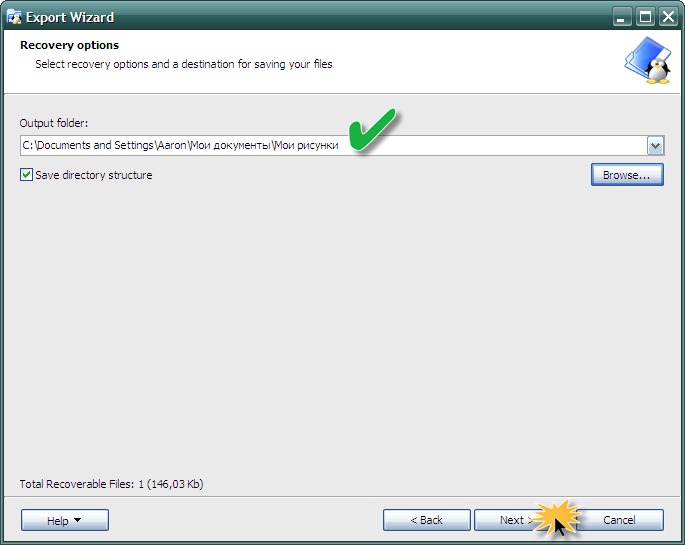
Выберите конечную папку (рисунок вверху), в которую необходимо сохранить файлы и закончите операцию.
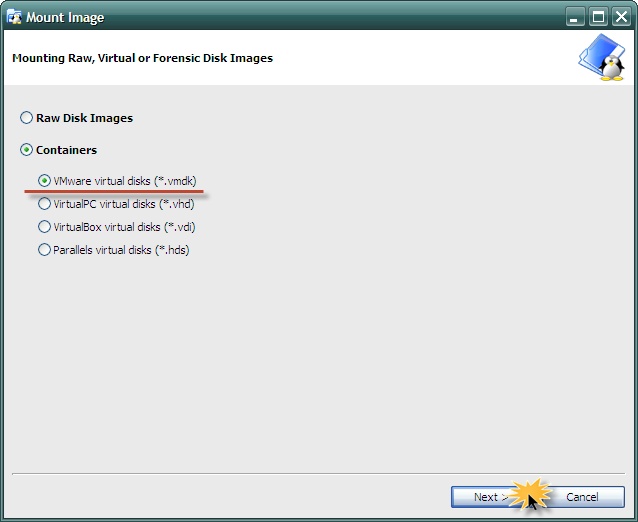
Другой интересной особенностью программы является возможность монтировать образы дисков формата raw (например, таких как ISO-файлы) и контейнеры (примером может быть виртуальные диски VirtualBox). Подобную возможность лично я не тестировал, но как мне кажется, это полезная возможность.
Ext2Explore
Эта программа работает подобно Linux Reader, но поддерживает меньшее количество файловых систем: ext2, ext3, ext4. Данная программа имеет одну уникальную особенность, которой нет у двух предыдущих — она является портабельной. Это означает, что нет необходимости устанавливать программу под операционной системой. Она может быть запущена с любого носителя, включая и съемные.
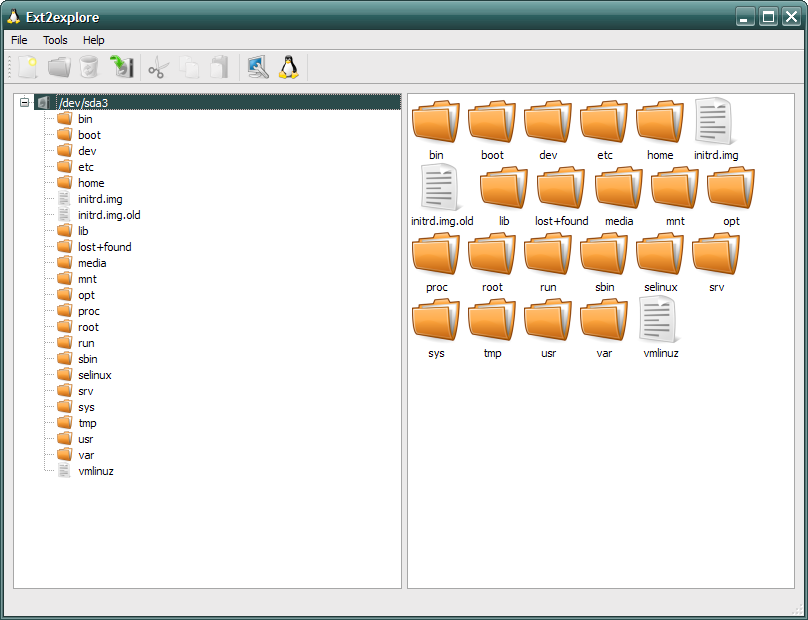
Программа Ext2explore.exe должна запускаться в системе Windows с правами администратора. Это можно выполнить с помощью контекстного меню.
Для дальнейшей работы в программе, чтобы сохранить время, откройте окно свойств файла и включите опцию «Запускать эту программу с правами администратора» (Run this program as an administrator) на вкладке «Совместимость» (Compatibility).
Также, как и в программе Linux Reader, для того, чтобы открыть файл в другой программе, его необходимо первоначально сохранить в определенной директории в файловой системе Windows.
Заключение
Несмотря на то, что все из описанных выше программ выполняют те задачи, для которых они были созданы, имеется еще одна возможность для обмена файлами между двумя операционными системами Linux и Windows, более простая в использовании и интуитивно понятная. Для этого необходимо создать дополнительный раздел, отформатированный в файловой системе, понятной для операционной системы Windows и доступной для системы Linux. Файловая система FAT32 имеет изначальную поддержку как в системе Linux, так и Windows. Кроме того, Linux без проблем может читать и писать на разделы, отформатированные в файловой системе NTFS.
Таким образом, вы можете просматривать и изменять файлы в любое время, без необходимости иметь дополнительное программное обеспечение. Если есть какие-либо файлы, к которым необходимо получить доступ из другой операционной системы, просто скопируйте их в дополнительный раздел, отформатированный в файловой системе, понятной для операционной системы Windows.
Посмотрите также другие статьи раздела об эмуляции возможностей Windows.
Access EXT4 Partition in Windows 10
Position: How Tos — Partition Management — Access EXT4 Partition in Windows 10
Summary
DiskGenius — Powerful Linux reader for Windows provides full access to EXT2, EXT3, and EXT4 partitions.
Table of Contents:
If your computer is dual-boot with Linux and Windows, you are probably very clear that default file systems used in Windows and Linux are different. Partitions used in Windows are formatted as FAT32 or NTFS, while they are formatted as EXT4, EXT3 or EXT2 in Linux. Linux system is able to access Windows partition, but Windows cannot access Linux partitions.
Sometimes we may need to access data of Linux partition from Windows, but Windows does not support Linux file system. In this case, we’ll have to reboot computer to Linux and access desired data. It would be better if we can read and write Linux EXT4/3/2 partition from Windows. The rest part of the instruction is going to explain how to create, format, delete, write, resize and recover EXT4 partition from Windows 10/8/7.
Linux file system types
File system is the way how files are stored and organized on storage device. Windows and Linux use different file system formats, and the most widely used file system in Linux is EXT4, EXT3 and EXT2. EXT means Extended Filesystem and it was mainly introduced for MINIX. EXT2 (the second extended version) was improved based on the original version, and EXT3 improves performance over EXT2. EXT4 is current the default file system of Linux and it improves performance and reliability and adds additional features over EXT3.
Ext3 became available since the year 2001 together with Linux Kernel 2.4.15 and it is a logical extension of Ext2. Ext3 can be converted to Ext3 directly without backup / restore. Ext3 file system was designed with the ability to journal write to the files system, which allows quite fast crash recovery time. It uses indirect block mapping scheme, which makes it efficient to manage small files. However, it does not work effectively when dealing with large files especially when carrying out deletion task, for the mapping retains an entry for each single block and large file usually has many blocks.
Ext4 was available in 2008 with Linux kernel 2.6.1.19. It is a progressive revision of Ext3 file system and overcomes limitations on Ext3. Ext4 works similarly to Ext3, but it becomes able to store large files much more efficiently than ext3 due to the extend based layout. In Ext4, you are allowed to disable the journaling feature. Ext4 is the default file system in most modern Linux distributions
NTFS (New Technology File System) is the default file system of hard drives used under Windows system since Windows XP. It has complicated structure and can be regarded as a journaling file system, as it retains records of all operations on the device. This feature is capable of detecting errors and restoring from them. NTFS is primarily used on hard drives and external hard drive even though USB media can still be formatted to NTFS.
EXT4, the accessor to Ext3, is the most used filesystem type on Linux system for the moment. It is best suited for hard drives, but it can also be used on removable disks. However, it is not supported by Windows system, thus Ext4 partition is not visible under Windows system.
Linux reader for Windows 10
Since Windows system does not support reading or writing any Linux partition, we need to use third-party Linux reader software to access Linux drives from Windows. DiskGenius Professional Edition is an efficient tool which enables full access to Linux Ext4, Ext3 or Ext2 storage devices under Windows operating system. Just connect your hard drive with Linux partitions to computer and launch DiskGenius and you can easily access and manage ext4 partitions in Windows 10/8/7/XP. Main features related to Ext4/3/2 drive provided by DiskGenius:
Partition management: Create, delete, format, resize, clone, image, hide Linux-formatted partition. Support LVM (Logical Volume Management).
Disk Management: Check and repair bad sectors, clone & image disk, wipe disk, convert GPT/MBR, convert dynamic disk to basic, etc.
Data recovery: Recover deleted or lost data from ext4 partition, restore lost Linux partition.
Supported file systems: Read/write: Ext2, Ext3, Ext4, NTFS, exFAT, FAT32, FAT16, FAT12.
Convert NTFS to EXT4 in Windows
The process of converting NTFS to EXT4 will format the partition so that file system can be changed. Due to partition formatting causes data loss, you need to back up crucial data on the drive before formatting it.
Step 1 Launch DiskGenius, select the NTFS partition you want to change file system and click Format button from toolbar. Also, you can right-click on the partition and select Format Current Partition from context menu.
Step 2 The partition formatting window pops up, and you can choose file system types you need from the dropdown list. Currently, DiskGenius can format partition to NTFS, FAT32, exFAT, EXT2, EXT3 and EXT4 file system.

Step 3 Click Format button and you’ll receive a message box asking confirmation. Click Yes to continue and DiskGenius starts to format partition.
Once formatting process completes, the NTFS partition will change to EXT4 file system. Since Windows does not support EXT4 file system, the partition won’t be assigned drive letter and it is not visible to Windows system. If you want to access the partition, you can use DiskGenius to complete required tasks.
Create / delete EXT4 partition in Windows 10
DiskGenius is full-featured partition manager which enables you to manage Ext4 partition under Windows. It is quite easy to create an Ext4 partition or format NTFS partition to EXT4.
Create EXT4 Linux partition in Windows
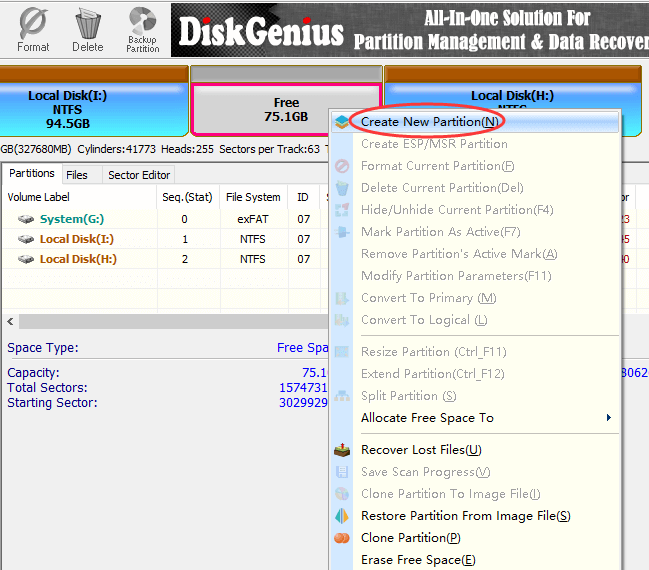
Step 1 Launch DiskGenius from your computer, right-click on free disk space and choose Create New Partition, as below:
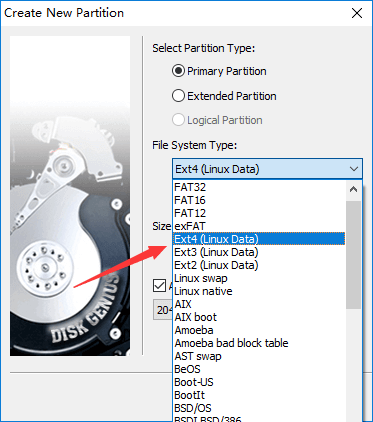
Step 2 On the Create New Partition widows, you can select partition and file system type, set partition size, set 4K sector alignment, etc. There are around a hundred types of file system available here, just choose the one you need. Then click OK button.
Step 3 Click Save All button from toolbar to save the new partition to partition table. Click Yes when DiskGenius asks whether to format the partition. The Ext4 partition will be created successfully after formatting process finishes.
Delete Ext4 partition in Windows
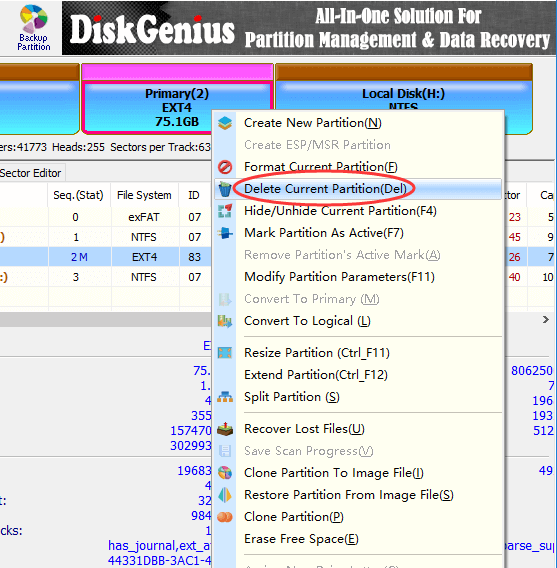
Step 1 Right-click on the Ext4 partition you want to delete and choose Delete Current Partition option.
Step 2 Click Yes when DiskGenius asks confirmation for the deleting operation. Then click Save All button to save changes on partition table.
Read & write EXT4 partition in Windows
Windows partition manager DiskGenius provides full access to Ext4, Ext3 and Ext2 partition. Thus, you can read or write data in Linux partition via DiskGenius in Windows 10/8/7/XP without rebooting computer to Linux system.
Access Linux files from Windows
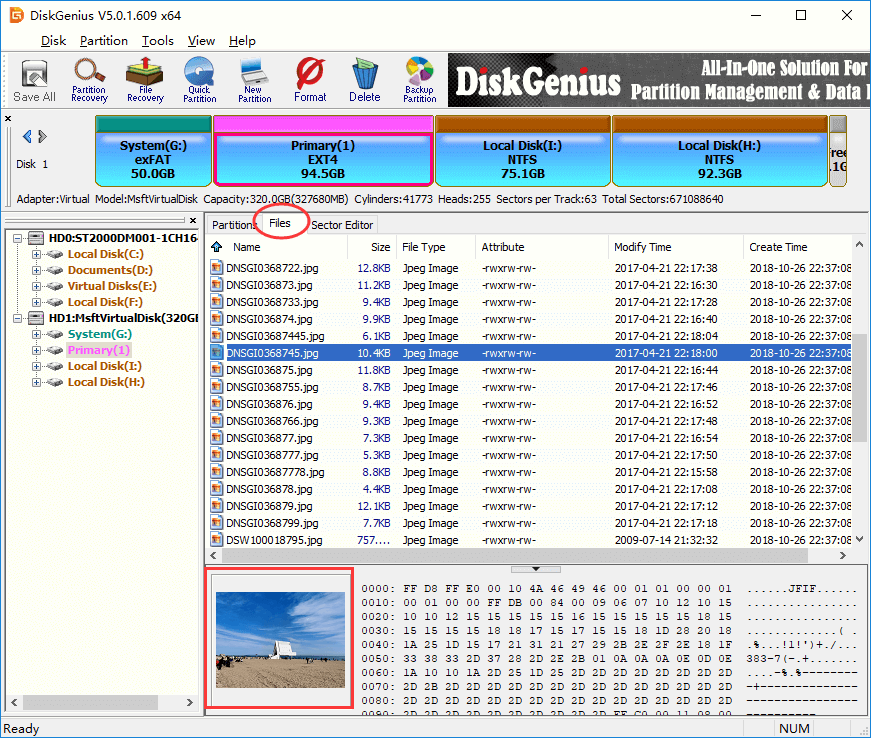
Install and launch DiskGenius from computer, and you can view all disks and partitions connected to the computer. In the middle area, there are three tabs: Partitions, Files and Sector Editor. Select a disk or partition and click Partitions tab, you can view disk or partition parameters in details, such as partition table type, sector count, SN, adapter type, S.M.A.R.T. information, file system, reserved blocks, volume GUID, etc.
Select a partition and click Files tab, you can view files and folders stored on the root directory of the selected partition. Click a file and there will be a thumb preview of the selected files on the lower area, as below:
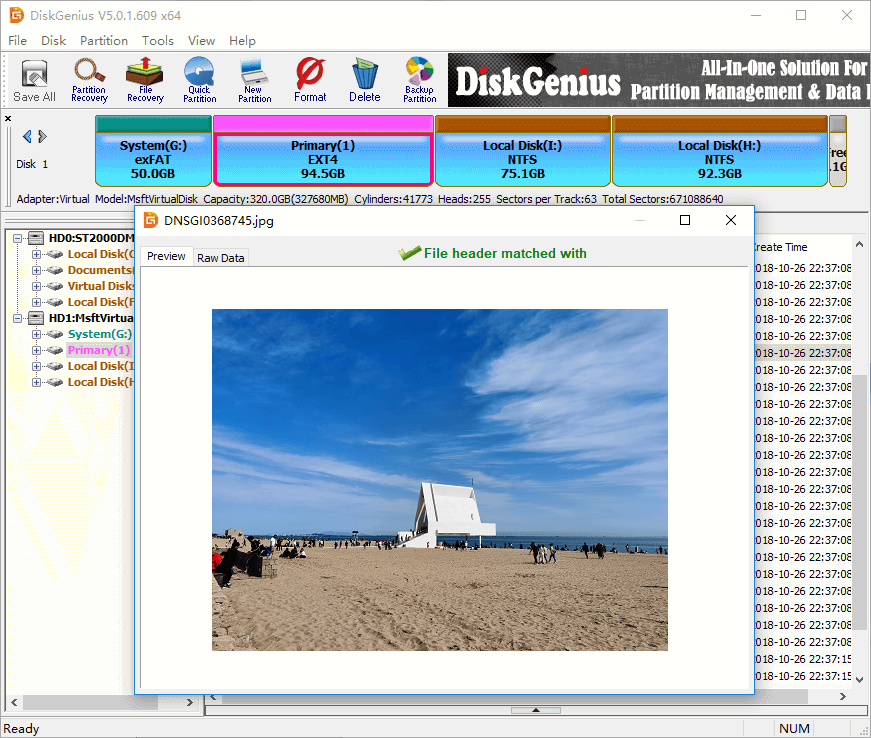
Double-click the file and you can view the file content in its original size. The following screenshot shows DiskGenius is viewing a JPG file.
Write data to EXT4 partition
Writing an EXT4 partition includes too many operations, such as, delete data, create folder, modify file, rename data, store new data, etc. DiskGenius has full access to write ext4 partition and it can do all operations related to writing, but in this section, we only explain how to store data to ext4 partition.
Step 1 Select an Ext4 partition to which you want to store new data, and click Files tab.
Step 2 Right-click on the empty area and choose Copy Files To Current Partition.
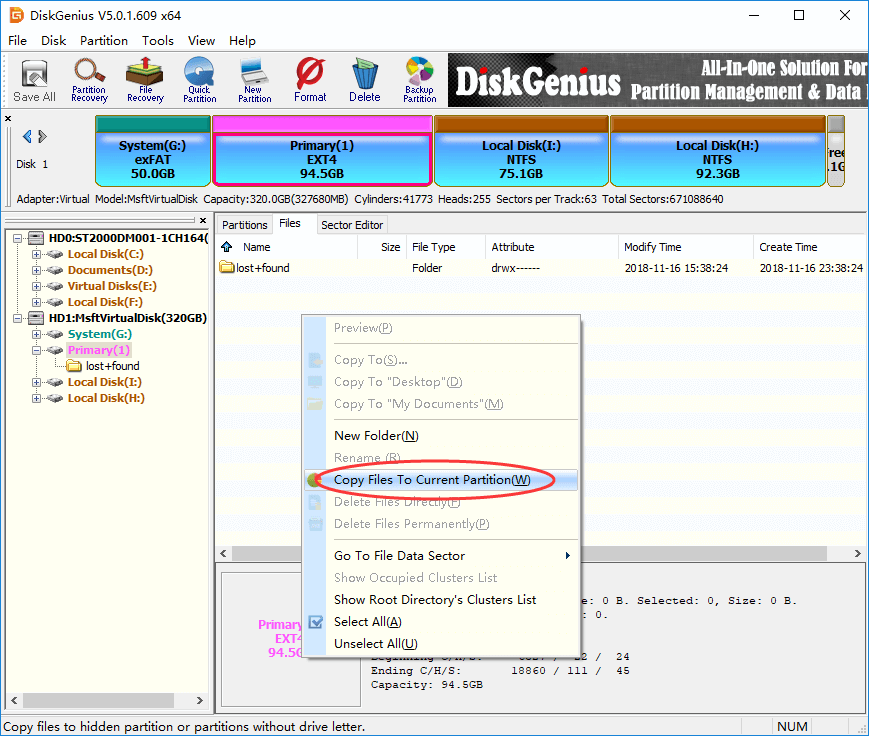
Step 3 Select files you want to copy to the EXT4 partition and click Open.
Resize EXT4 partition without losing data
Apart from resizing Ext4 partition, DiskGenius is also able to split and extend Ext4 partition without losing data.
Step 1 Right-click on the Ext4 partition you want to change its size and choose Resize Partition.
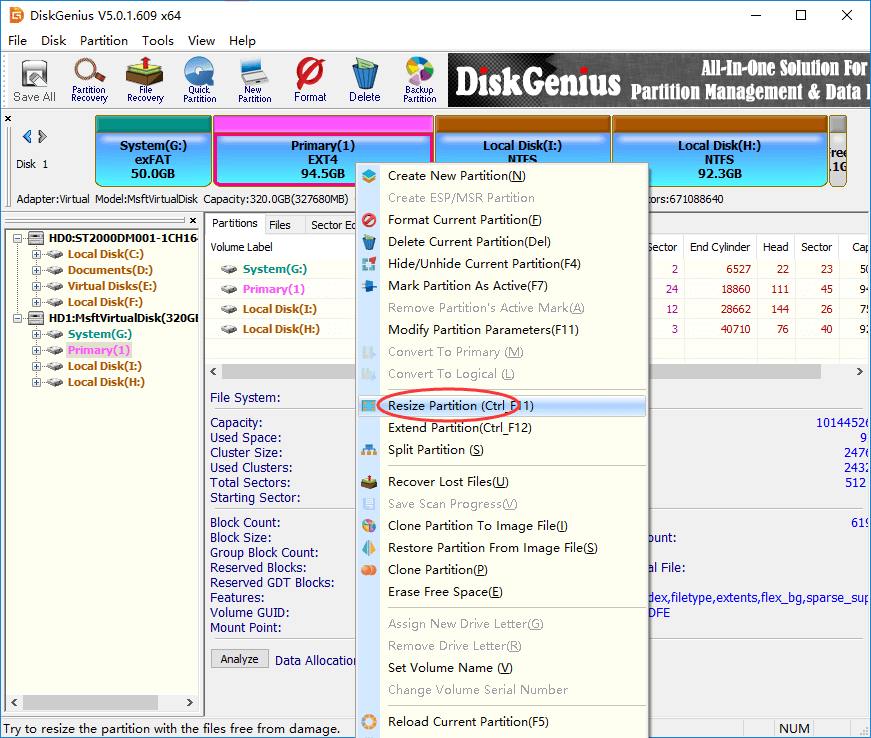
Step 2 Set partition capacity you want to move between partitions and click Start button.
As shown in the screenshot below, DiskGenius is going to move 36.53GB disk space from Ext4 partition to the adjacent NTFS partition Local Disk (I:). The disk space spared from the Ext4 partition can be either kept as unallocated or added to other partitions.
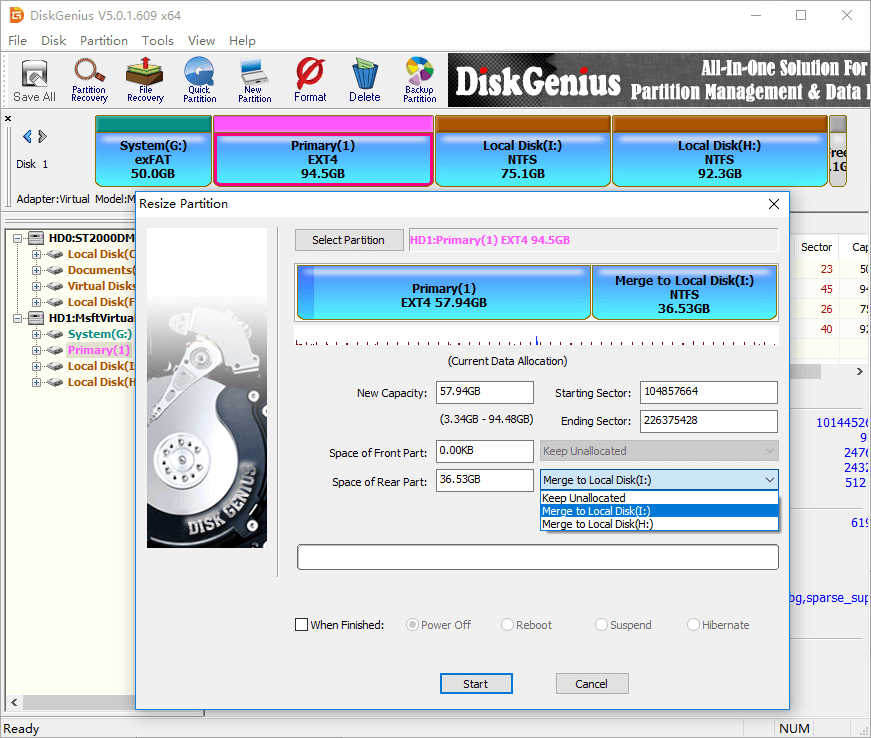
Step 3 Click Yes when DiskGenius prompts rest operations to be done, and it will starts resizing partition.
EXT4 data recovery
Ext4 file recovery and partition recovery is now available for the latest version of DiskGenius. It supports recovering deleted files from ext4 partition, retrieving lost data from formatted or corrupt ext4 partition, and restoring lost or deleted ext4 partition. The following instruction will show you how to recover lost or deleted files from ext4 partition.
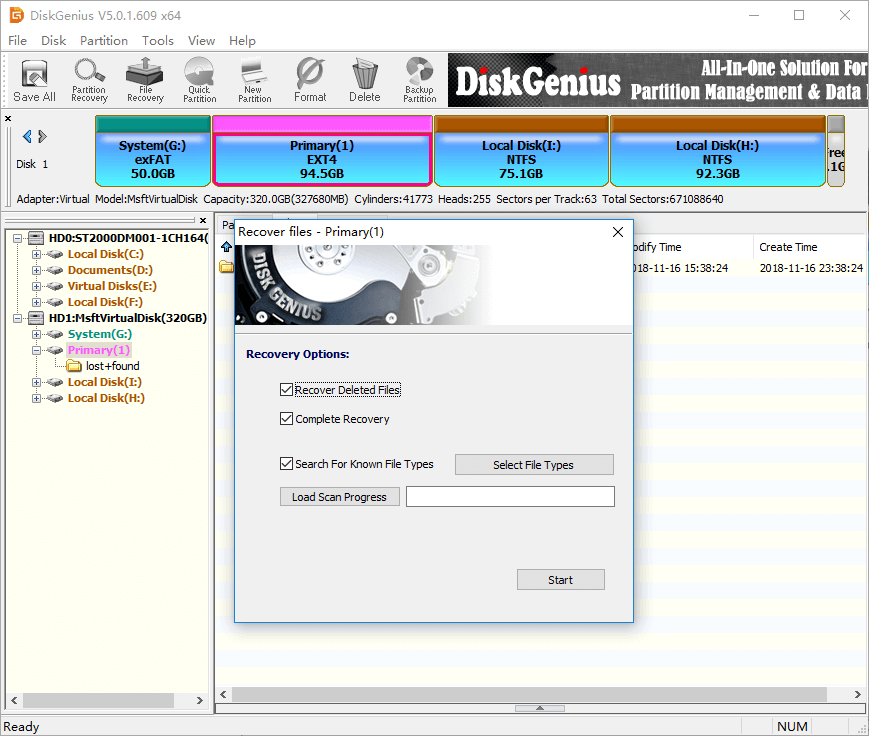
Step 1 Select the ext4 partition where lost files were stored and click File Recovery button from toolbar. This will open Recover Files window, as below.
Step 2 Select recovery options and file types you need and click Start button. Then DiskGenius starts to search for lost data from selected drive.
There are three options on the file recovery window: Recover Deleted Files, Complete Recovery and Search For Known File Types. The default setting gets all of them selected, which can guarantee the software can find out as many files as possible.
Step 3 Preview files during or after scanning process to check if your files can be recovered correctly.
DiskGenius enables users to preview recoverable files listed in scanning result so that you can make sure whether your files are found or overwritten.
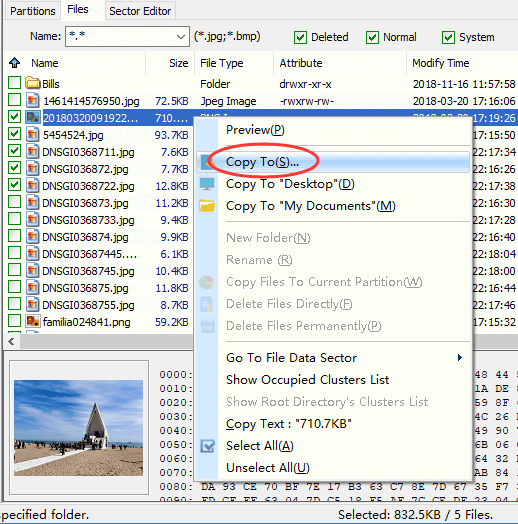
Step 4 Copy and save files you need to get files recovered.
You can select files and folders you want to recover from file list, right-click on selected data and choose «Copy To» option. Then you can select a location which is different from the partition being recovered data, for the recovery process is read-only to original device.
These steps above apply to deleted or lost file recovery only, and you need to perform partition recovery if entire partition gets lost due to hard drive partition, hard drive failure, partition deletion, partition table, etc. Partition recovery function searches for lost partitions and restore them to partition table directly.
Conclusion
With the help of DiskGenius, you can easily and efficiently access and manage Ext4 partition in Windows 10, Windows8 and Windows7. So, reading or writing ext4 Linux partition from Windows is no longer a complicated thing. Fee download DiskGenius and manage ext4 partition in Windows now.
DiskGenius — Effective tool to access and manage EXT4, EXT3, EXT2 Linux partition in Windows.


