- Understanding the /dev directory
- Device Files
- Classification
- Fun with device files
- Creating device files
- Conclusion
- Linux Root Folders Explained
- Linux Root folders
- / – The Root
- /bin – Binaries
- /boot – Boot Files
- /dev – Device Nodes
- /etc – Configuration Files
- /home – Users’ Folder
- /lib – Libraries
- /lost+found – Recovered Files
- /media – Automatic mount point
- /mnt – Manual mount point
- /opt – Optional Software
- /proc – Kernel Files
- /root – Root Home
- /run – Early temp
- /sbin – System Binaries
- /srv – Service Data
- /tmp – Temporary Files
- /usr – User Binaries
- /var – Variable Files
- Conclusion
Understanding the /dev directory
There are many interesting features of the Linux directory structure. In this article I cover some fascinating aspects of the /dev directory. Before you proceed any further with this article, I suggest that, if you have not already done so, you read my earlier articles, Everything is a file, and An introduction to Linux filesystems, both of which introduce some interesting Linux filesystem concepts. Go ahead – I will wait.
Great! Welcome back. Now we can proceed with a more detailed exploration of the /dev directory.
Device Files
Device files are also known as device special files. Device files are employed to provide the operating system and users an interface to the devices that they represent. All Linux device files are located in the /dev directory which is an integral part of the root (/) filesystem because these device files must be available to the operating system during the boot process.
One of the most important things to remember about these device files is that they are most definitely not device drivers. They are more accurately described as portals to the device drivers. Data is passed from an application or the operating system to the device file which then passes it to the device driver which then sends it to the physical device. The reverse data path is also used, from the physical device through the device driver, the device file, and then to an application or another device.
Let’s look at the data flow of a typical command to visualize this.
In Figure 1, above, a simplified data flow is shown for a common command. Issuing the cat /etc/resolv.conf command from a GUI terminal emulator such as Konsole or xterm causes the resolv.conf file to be read from the disk with the disk device driver handling the device specific functions such as locating the file on the hard drive and reading it. The data is passed through the device file and then from the command to the device file and device driver for pseudo-terminal 6 where it is displayed in the terminal session.
Of course the output of the cat command could have been redirected to a file in the following manner, cat /etc/resolv.conf > /etc/resolv.bak in order to create a backup of the file. In that case the data flow on the left side of Figure 1 would remain the same while the data flow on the right would be through the /dev/sda2 device file, the hard drive device driver and then onto the hard drive itself.
These device files make it very easy to use Standard Streams (STD/IO) and redirection to access any and every device on a Linux or Unix computer. Simply directing a data stream to a device file sends the data to that device.
Classification
Device files can be classified in at least two ways. The first and most commonly used classification, is that of the data stream commonly associated with the device. For example tty and serial devices are considered to be character based because the data stream is transferred and handled one character or byte at a time. Block type devices such as hard drives transfer data in blocks, typically a multiple of 256 bytes.
If you have not already, go ahead and as a non-root user in a terminal session, change the present working directory (PWD) to /dev and display a long listing. This shows a list of device files with their file permissions and their major and minor identification numbers. For example the following device files are just a few of the ones in the /dev/directory on my Fedora 24 workstation. They represent disk and tty type devices. Notice the leftmost character of each line in the output. The ones that have a “b” are block type devices and the ones that begin with “c” are character devices.
The more detailed and explicit way to identify device files is using the device major and minor numbers. The disk devices have a major number of 8 which designates them as SCSI block devices. Note that all PATA and SATA hard drives have been managed by the SCSI subsystem because the old ATA subsystem was many years ago deemed as not maintainable due to the poor quality of its code. As a result hard drives that would previously been designated as “hd[a-z]” are now referred to as “sd[a-z]”.
You can probably infer the pattern of disk drive minor numbers in the small sample shown above. Minor numbers 0, 16, 32 and so on up through 240 are the whole disk numbers. So major/minor 8/16 represents the whole disk /dev/sdb and 8/17 is the device file for the first partition, /dev/sdb1. Numbers 8/34 would be /dev/sdc2.
The tty device files in the list above are numbered a bit more simply from tty0 through tty63.
The Linux Allocated Devices file at Kernel.org is the official registry of device types and major and minor number allocations. It can help you understand the major/ minor numbers for all currently defined devices.
Fun with device files
Let’s take a few minutes now and perform a couple fun experiments that will illustrate the power and flexibility of the Linux device files. Most Linux distributions have multiple virtual consoles, 1 through 7, that can be used to login to a local console session with a shell interface. These can be accessed using the key combinations Ctrl-Alt-F1 for console 1, Ctrl-Alt-F2 for console 2, and so on.
Press Ctrl-Alt-F2 to switch to console 2. On some distributions, the login information includes the tty (Teletype) device associated with this console, but many do not. It should be tty2 because you are in console 2.
Login as a non-root user. Then you can use the who am i command—yes, just like that, with spaces—to determine which tty device is connected to this console.
Before we actually perform this experiment, look at a listing of the tty2 and tty3 devices in /dev.
There will be a large number of tty devices defined but we do not care about most of them, just the tty2 and tty3 devices. As device files, there is nothing special about them; they are simply character type devices. We will use these devices for this experiment. The tty2 device is attached to virtual console 2 and the tty3 device is attached to virtual console 3.
Press Ctrl-Alt-F3 to switch to console 3. Login again as the same non-root user. Now enter the following command on console 3.
Press Ctrl-Alt-F2 to return to console 2. The string “Hello world” (without quotes) is displayed on console 2.
This experiment can also be performed with terminal emulators on the GUI desktop. Terminal sessions on the desktop use pseudo terminal devices in the /dev tree, such as /dev/pts/1. Open two terminal sessions using Konsole or Xterm. Determine which pseudo-terminals they are connected to and use one to send a message to the other.
Now continue the experiment by using the cat command to display the /etc/fstab file on a different terminal.
Another interesting experiment is to print a file directly to the printer using the cat command. Assuming that your printer device is /dev/usb/lp0, and that your printer can print PDF files directly, the following command will print the PDF file test.pdf on your printer.
The /dev directory contains some very interesting device files that are portals to hardware that one does not normally think of as a device like a hard drive or display. For one example, system memory – RAM – is not something that is normally considered as a “device,” yet /dev/mem is the portal through which direct access to memory can be achieved. The following example had some interesting results.
The dd command above provides a bit more control than simply using the cat command to dump all of memory. It provides the ability to specify how much data is read from /dev/mem and would also allow me to specify the point at which to start reading data from memory. Although some memory was read, the kernel responded with the following error that I found in /var/log/messages.
What this error means is that the kernel is doing its job by protecting memory that belongs to other processes which is exactly how it should work. So, although you can use /dev/mem to display data stored in RAM memory, access to most memory space is protected and will result in errors. Only that virtual memory which is assigned by the kernel memory manager to the BASH shell running the dd command should be accessible without causing an error. Sorry, but you cannot snoop in memory that does not belong to you unless you find a vulnerability to exploit.
There are some other very interesting device files in /dev. The device files null, zero, random and urandom are not associated with any physical devices.
For example, the null device /dev/null can be used as a target for the redirection of output from shell commands or programs so that they are not displayed on the terminal. I frequently use this in my BASH scripts to prevent users from being presented with output that might be confusing to them. The /dev/null device can be used to produce a string of null characters. Use the dd command as shown below to view some output from the /dev/null device file.
Note that there is really no visible output because null characters are nothing. Note the byte count.
The /dev/random and /dev/urandom devices are also very interesting. As their names imply, they both produce random output – not just numbers but any and all byte combinations. The /dev/urandom device produces deterministic random output and is very fast. That means the output is determined by an algorithm and uses a seed string as a starting point. As a result it is possible, although very difficult, for a hacker to reproduce the output if the original seed is known. Use the command cat /dev/urandom to view typical output. You can use Ctrl-c to break out.
The /dev/random device file produces non-deterministic random output but it produces output more slowly. This output is not determined by an algorithm that is dependent upon the previous number, but is generated in response to keystrokes and mouse movements. This method makes it far more difficult to duplicate a specific series of random numbers. Use the cat command to view some of the output from the /dev/random device file. Try moving the mouse to see how it affects the output.
As its name implies, the /dev/zero device file produces an unending string of zeroes as output. Note that these are Octal zeroes and not the ASCII character zero (0). Use the dd command as shown below to view some output from the /dev/zero device file.
Note that the byte count for this command is non zero.
Creating device files
In the past, the device files in /dev were all created at installation time, resulting in a directory full of almost very possible device file, even though most would never be used. In the unlikely event that a new device file was needed or one was accidentally deleted and needed to be re-created, the mknod program was available to manually create device files. All you had to know was the device major and minor numbers.
CentOS and RHEL 6 and 7, as well as all versions of Fedora going back to at least as far Fedora 15, use the newer method of creating the device files. All device files are created at boot time. This functionality is possible because the udev device manager detects addition and removal of devices as they occur. This allows for true dynamic plug-n-play functionality while the host is up and running. It also performs the same task at boot time by detecting all devices installed on the system very early in the boot process. Linux.com has a good description of udev.
Going back to your listing of the files in /dev, notice the date and time on the files. All of them were created during the last boot. You can verify this using the uptime or last commands. In my device listing above, all of those files were created at 7:06 AM on November 7, which is the last time I booted the system.
Of course the mknod command is still available, but the new MAKEDEV (yes, in all uppercase – which in my opinion is contrary to the Linux philosophy of using all lowercase command names) command provides an easier interface for creating device files, should the need arise. The MAKEDEV command is not installed by default in current versions of Fedora or CentOS 7; it is installed in CentOS 6. You can use YUM or DNF to install the MAKEDEV package.
Conclusion
Interestingly enough, it had been a long time since I needed to create a device file. However, just recently I had an interesting situation where one of the device files I typically use was not created and I did have to create it. I have not had any problem with that device since. So a situation caused by a missing device file can still happen and knowing how to deal with it can be important.
I have not covered many of the myriad different types of device files that you might encounter. That information is available in plenty of detail in the resources cited. I hope I have given you some basic understanding of how these files function and the tools to allow you to explore more on your own.
Источник
Linux Root Folders Explained
In this post, you will finally get the Linux root folders explained. You will learn how these folders are used by your Linux system and how you can use them.
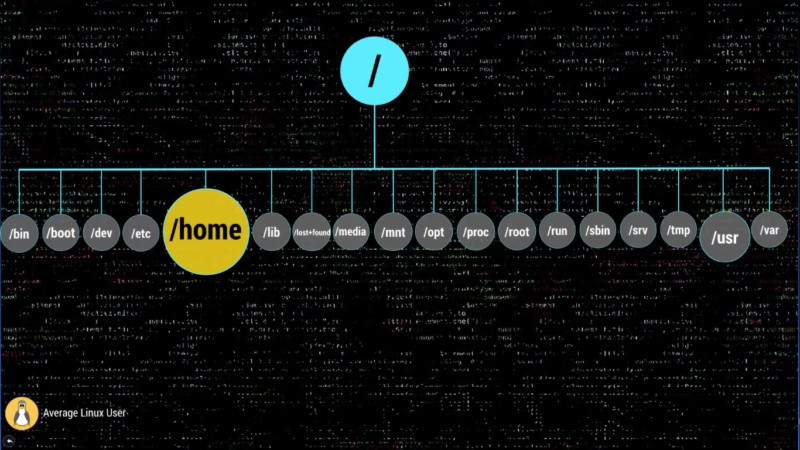
When you open your file manager, you are usually located in your home directory. But if you go two levels up, you will see this set of directories:
This post exactly about all these directories. You can watch the video where these Linux root folders explained or continue reading below.
Linux Root folders
I won’t use the terminal here and I will show you some visual presentation. But you are of course are encouraged to open the terminal and explore all these directories. Let’s get started.
/ – The Root
Everything begins in your system from this directory. All your folders, hard drives, USB drivers, everything is located in this root folder. You cannot go above this directory.
Also, the root directory is designated by the slash sign.
The concept of the root directory may be difficult to understand for Windows users who are used to see something like disk C, disk D and disk E. In Linux, every disk is a represented as a folder that is mounted under this root directory.
This Linux Directory Structure may look like a mess, but believe me when you learn it, you will realize how much sense it makes.
/bin – Binaries
The /bin folder contains programs that are essential for the system to boot and run. So, if you destroy this folder, your system won’t boot and run.
These programs are stored in the binary format. In other words, they are not in text format. You cannot open and read the content of these programs. The advantage of such format is that a computer can read and execute these programs very fast.
/boot – Boot Files
It is easy to guess from the name. This folder is needed to boot your system. It contains the Linux kernel, initial RAM disk image for drives need at boot time, and the bootloader.
I also would like to point out that within this boot folder, you can find the grub folder that contains grub configuration files.
If you read my Arch Linux post, you should remember than I used this command to generate the GRUB configuration file.
The boot folder also contains the Linux kernel.
/dev – Device Nodes
Here, I need to introduce another important concept of Linux – everything is a file. The /dev folder contains files for all devices your Linux is able to recognize.
If you have some Linux experience, you may recall that when you mount a hard drive, you use a name such as /dev/sda1 . The sda is the name of a first hard drive recognized by your Linux kernel and it is located in the dev folder. When the disk is mounted, you see it as a folder in that mounting point.
You can also find here USB devices, CPU etc.
/etc – Configuration Files
The /etc folder comprises all system-wide configuration files and some shell scripts that are executed during the system boot. All files here are text files, so they are human readable.
If you ever did any system-wide configuration, you probably edited some files here.
For example, there is /etc/fstab file that contains a table of storage devices and their mounting points.
/home – Users’ Folder
The home directory contains a home folder for each regular user on your Linux system. For example, I have tow folders in my /home folder. ALU is my home folder. The second folder belongs to another user, whom I named User2. So, the home folder of every user is named by its username.
You have as many folders as many users you have on your system.
These users’ folders are where users store their private data such as documents, videos, picture, music etc. When you open your file manager or your terminal by default you are located in you user’s home folder. It is also often marked as
/lib – Libraries
You already know the /bin directory that contains programs, this /lin folder contains libraries required by those programs from the /bin folder.
A library is a set of functions that are shared between programs. Thus, this /lib folder is also essential for your system to work correctly.
/lost+found – Recovered Files
You will have this directory if you use the ext4 file system. Most of the modern Linux distros use ext4, so most likely you have this folder. This is a file system specific folder that is used for data recovery in case of file corruption. Unless something bad has happened, this folder should be empty on your system.
This /lost+found folder is produced on every separate partition. So, if your /home folder is on a separate partition, you should have this /lost+found folder in your home directory too.
/media – Automatic mount point
This folder is used for automatic mounting of removable media such as USB drives, CD-ROM etc. For example, if your system is configured for automatic mounting, when you insert a USB drive it will be mounted to this folder.
/mnt – Manual mount point
The /mnt folder is similar to the /media folder, it is also used to mount devices, but usually, it is used for manual mounting. You, of course, can manually mount your devices to /media , but to keep some order in your system it is better to separate these two mounting points.
/opt – Optional Software
This folder is not essential for your system to work. Usually, it is used to install commercial programs on your system. For example, my Dropbox installation is located in this folder.
/proc – Kernel Files
This is a virtual file-system maintained by the Linux kernel. Usually, you do not touch anything in this folder. It is needed only for the kernel to run different processes.
/root – Root Home
This is the home directory of your root user. Don’t mix it with the / root directory. The / directory is the parental directory for the whole system, whereas this /root directory is the same as your user home directory but it is for the root account.
If you log in as a root, you will be located in this directory by default. This is a folder for private data and account specific setting of your root account.
/run – Early temp
The /run is a recently introduced folder that is actually a temporary file-system. It is used to store temporary files very early in system boot before the other temporary folders become available.
/sbin – System Binaries
Similar to /bin this folder contains binaries for essential system tasks but they are meant to be run by the super user, in other words, the administrator of the system.
/srv – Service Data
This directory contains service files installed on your system. For example, if you installed a web-served on your Linux system, it will be located in this folder.
/tmp – Temporary Files
This is just a place where programs store temporary files on your system. This directory is usually cleaned on reboot.
/usr – User Binaries
This is probably the largest folder after your home folder. It contains all programs used by a regular user.
I would like to stop little more on sub-directories of this /usr folder.
/usr/bin contains the programs installed by your Linux distribution. There are usually thousands of programs here.
The libraries for this /usr/bin executables are located in the /usr/lib folder.
The /usr/local doesn’t have any programs by default, but if you compile and install a program system-wide it will be placed here.
The most useful folder is /usr/share . It contains all the shared data used by the programs from /usr/bin .
All default configuration files, themes, icons, wallpapers, sound files are stored here, one more folder I would like to mention here is the /usr/share/doc folder, where you can find the documentation files for programs installed on your system.
/var – Variable Files
The /var contains files that are of variable content, so their content is not static and it constantly changes. For example, this is where the log files are stored. If you don’t know, a log file is a file that records all events happening in your system while it is running. These log files often help to find out if something is not working correctly in your system.
Conclusion
Now you have some clue about all those folders in your Linux system.
Please, feel free to add anything in the comments bellow in case I missed something.
Источник


