Realtek rtl8811au kali linux
News: A new version of this driver is now available. Testing has shown it to be a solid driver. The driver located here will be discontinued in the near future so please transition to the new driver as you are able to do so.
Linux Driver for USB WiFi Adapters that are based on the RTL8811AU and RTL8821AU Chipsets
- v5.8.2.3 (Realtek) (2020-04-01)
- Plus updates from the Linux community
- IEEE 802.11 b/g/n/ac WiFi compliant
- 802.1x, WEP, WPA TKIP and WPA2 AES/Mixed mode for PSK and TLS (Radius)
- IEEE 802.11b/g/n/ac Client mode
- Support wireless security for WEP, WPA TKIP and WPA2 AES PSK
- Support site survey scan and manual connect
- Support power saving mode
- Supported interface modes
- IBSS
- Managed
- AP
- Monitor
- P2P-client
- P2P-GO
- Log level control
- LED control
- Power saving control
- VHT control (allows 80 MHz channel width in AP mode)
A FAQ is available at the end of this document.
- Kernels: 2.6.24 — 5.1 (Realtek)
- Kernels: 5.2 — 5.15
Tested Linux Distributions
Arch Linux (kernel 5.4)
Arch Linux (kernel 5.9)
Fedora (kernel 5.11)
Linux Mint 20.2 (Linux Mint based on Ubuntu) (kernel 5.11)
Linux Mint 20 (Linux Mint based on Ubuntu) (kernel 5.4)
LMDE 4 (Linux Mint based on Debian) (kernel 4.19)
Manjaro 20.1 (kernel 5.9)
Raspberry Pi OS (2021-01-11) (ARM 32 bit) (kernel 5.10)
Raspberry Pi Desktop (x86 32 bit) (kernel 4.19)
Ubuntu 21.04 (kernel 5.11)
Ubuntu 20.04 (kernel 5.4)
Download Locations for Tested Linux Distributions
- Alfa AWUS036ACS
- Buffalo WI-U2-433DHP
- Edimax EW-7811UTC
- Edimax EW-7811UAC
- Edimax EW-7811UCB
- ELECOM WDC-433DU2H
- GMYLE — AC450
- Netgear A6100
- Planex GW-450S
- TP Link T2U Nano
- TP Link T2U Plus
- Numerous products that are based on the supported chipsets
Warning: Beware of «multi-state» USB WiFi adapters. Some USB WiFi adapters have proprietary Windows drivers onboard. When plugged in, they act like a flash drive or CDROM and on Windows will attempt to start installing the Windows driver. That won’t work on Linux or MAC or any other non-Windows OS so the adapter sits there in flash drive or CDROM mode. The problem is that the state of the adapter has to be changed for the adapter to show up as the device that you expect, in this case, a WiFi adapter. Most modern Linux distributions ship with a utility called «usb-modeswitch» that will handle this issue for you if it has the correct information for your adapter. It is a good utility but if you buy adapters that are «multi-state,» that is one more potential headache you may have to deal with when something goes wrong. Often you can indentify adapters that are «multi-state» as they are advertised as «free driver» or «free installation driver.» If you are looking to buy a USB WiFi adapter for use on Linux, MAC OS, *NIX or anything besides Windows, it is a good idea to seek out single-state adapters.
Note: Some adapter makers change the chipsets in their products while keeping the same model number so please check to confirm that the product you plan to buy has the chipset you are expecting.
The installation instructions are for the novice user. Experienced users are welcome to alter the installation to meet their needs.
Temporary internet access is required for installation. There are numerous ways to enable temporary internet access depending on your hardware and situation. One method is to use tethering from a phone.. Another method to enable temporary internet access is to keep a wifi adapter that uses an in-kernel driver in your toolkit.
You will need to use the terminal interface. The quick way to open a terminal: Ctrl+Alt+T (hold down on the Ctrl and Alt keys then press the T key)
DKMS is used for the installation. DKMS is a system utility which will automatically recompile and install this driver when a new kernel is installed. DKMS is provided by and maintained by Dell.
It is recommended that you do not delete the driver directory after installation as the directory contains information and scripts that you may need in the future.
There is no need to disable Secure Mode to install this driver. If Secure Mode is properly setup on your system, this installation will support it.
Step 1: Open a terminal (Ctrl+Alt+T)
Step 2: Update the system (select the option for the OS you are using)
Step 3: Install the required packages (select the option for the OS you are using)
Step 4: Create a directory to hold the downloaded driver
Step 5: Move to the newly created directory
Step 6: Download the driver
Step 7: Move to the newly created driver directory
Step 8: Warning: this step only applies if you are installing to Raspberry Pi hardware.
Run a preparation script
Step 9: Run the installation script (For automated builds, use NoPrompt as an option)
A file called 8821au.conf will be installed in /etc/modeprobe.d by default.
This file will be read and applied to the driver on each system boot.
To edit the driver options file, run the edit-options.sh script.
Documentation for Driver Options is included in the file 8821au.conf .
Removal of the Driver
Note: This script should be used in the following situations:
- the driver is no longer needed
- a fresh start with default settings is needed
- a new version of the driver needs to be installed
- a major operating system upgrade is going to be applied
Note: This script removes everything that has been installed, with the exception of the packages installed in Step 3 and the driver directory. The driver directory can and probably should be deleted in most cases after running the script.
Step 1: Open a terminal (Ctrl+Alt+T)
Step 2: Move to the driver directory
Step 3: Run the removal script
Recommended WiFi Router/ Access Point Settings
Note: These are general recommendations, some of which may not apply to your specific situation.
Security: Set WPA2-AES. Do not set WPA2 mixed mode or WPA or TKIP.
Channel width for 2.4G: Set 20 MHz fixed width. Do not use 40 MHz or 20/40 automatic.
Channels for 2.4G: Set channel 1 or 6 or 11 depending on the congestion at your location. Do not set automatic channel selection.
Mode for 2.4G: For best performance, set «N only» if you no longer use B or G capable devices.
Network names: Do not set the 2.4G Network and the 5G Network to the same name. Note: Unfortunately many routers come with both networks set to the same name.
Channels for 5G: Not all devices are capable of using DFS channels. It may be necessary to set a fixed channel in the range of 36 to 48 or 149 to 161 in order for all of your devices to work on 5g. (for US, other countries may vary)
Best location for the wifi router/ access point: Near center of apartment or house, at least a couple of feet away from walls, in an elevated location.
Check congestion: There are apps available for smart phones that allow you to check the congestion levels on wifi channels. The apps generally go by the name of WiFi Analyzer or something similar.
After making and saving changes, reboot the router.
Set regulatory domain to correct setting in OS
Check the current setting
If you get 00, that is the default and may not provide optimal performance.
Set it temporarily
Note: Substitute your country code if you are not in the United States.
Set it permanently
Recommendations regarding USB
Moving your USB WiFi adapter to a different USB port has been known to fix a variety of problems. Problems include WiFi going on and off as well as connections coming and going.
If connecting your USB WiFi adapter to a desktop computer, use the USB ports on the rear of the computer. Why? The ports on the rear are directly connected to the motherboard which will reduce problems with interference and disconnection that can happen with front ports that use cables.
If your USB WiFi adapter is USB 3 capable then plug it into a USB 3 port.
Avoid USB 3.1 Gen 2 ports if possible as almost all currently available adapters have been tested with USB 3.1 Gen 1 (aka USB 3) and not with USB 3.1 Gen 2.
If you use an extension cable and your adapter is USB 3 capable, the cable needs to be USB 3 capable.
Some USB WiFi adapters require considerable electrical current and push the capabilities of the power available via USB port. One example is devices that use the Realtek 8814au chipset. Using a powered multiport USB extension can be a good idea in cases like this.
How to disable onboard WiFi on Raspberry Pi 3B, 3B+, 3A+, 4B and Zero W.
Add the following line to /boot/config.txt
How to forget a saved WiFi network on a Raspberry Pi
Delete the relevant WiFi network block (including the ‘network=’ and opening/closing braces.
Press ctrl-x followed by ‘y’ and enter to save the file.
About
Linux Driver for USB WiFi Adapters that are based on the RTL8811AU and RTL8821AU Chipsets
Источник
how to install rtl8812au driver
Last Updated on May 24, 2021 by Walid Salame 3 Comments
In order for dual-band WiFi adapter with the rtl8812au driver to be used in the Kali Linux, you need to install rtl8812au driver.

Although there are few WiFi adapters that can be put into Monitor mode, those that use RealTek’s RTL88xxAU chipset are particularly well known as “capable”.
however the driver need to be installed in Kali Linux to work and to be able to start monitor mode,
to do so please follow this tutorial step by step..
install rtl8812au driver
The wireless network card is a USB interface, and the chip model is Realtek RTL8811AU. If the wireless network card is placed in the Windows environment, it can be plug and play without installing a driver. But if it is placed under Linux, it may involve reloading the driver. At least, it is so under Kali Linux.
The following methods are fully applicable to rtl8812AU, rtl8821AU and rtl8811AU installed in Linux, other USB wireless NIC drivers should be similar, the detailed process is as follows (please use root privileges for the following operations):
You can follow this tutorial video or check the details below
Install rtl8812au driver
Install linux headers in Kali linux
Because the kernel of the Kali Linux system itself is not very complete, some things are reduced. The kernel header file linux-headers is reflected here, which needs to be installed manually. Other operating systems are similar. This file should be used when installing the driver for a while. The following are the commands for the installation.
Before installation may need to update the software source
If the depot inside the child does not correspond to the first document, the next step may not be successful
which means you must to choose a suitable source software for their own
Through the above steps, we should already have the kernel header file installed.
Download rtl8812au driver
To download the source code, you first need to install the git tool on your own linux (kali comes with it), of course, we can also go directly to the online download, but the method is a bit too low, I do not recommend. We can go directly to the official website to download and install, but here is a lazy, use the command:
Next, what you need to do is clone the source code:

Install DKMS
DKMS (Dynamic Kernel Module Support) is a tool for automatically compiling and installing kernel modules and managing things such as drivers that directly access kernels

now to install the driver go to rtl8812au directory
Install the driver In the directory you moved earlier
Uninstall the driver ? In the same directory as before
When driver installation is completed, if you connect the WiFi adapter to the “Kali Linux” VM, the Wi-Fi item will appear in the network connection indicator in the upper right, and you can select the connection destination.
to check if the driver was installed type this command:

Now reboot the operating system and execute the following commands to get the driver to work:

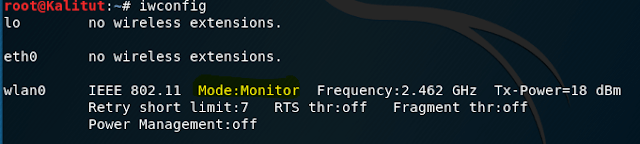
Next, let’s put the WiFi adapter into monitor mode:
check for monitor mode
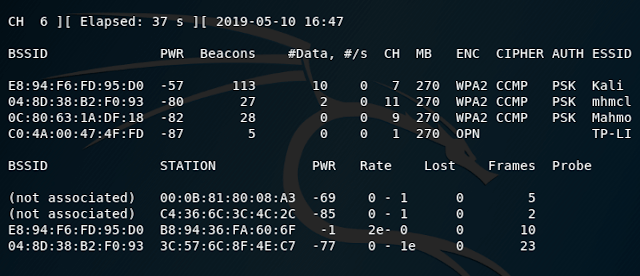
Let’s scan Wi-Fi networks:
now let’s capture handshake
with this command as i’m targeting Kali wifi network
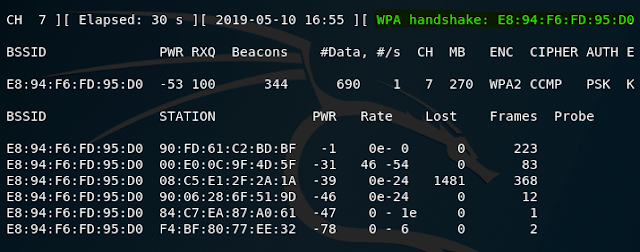
As you can see, everything works.
Comments
Forest Laflamme says
For anyone who can’t make this work, I used this:
Once the git link is cloned and you have cd into the directory:
dkms status
If the module is marked as added, instead of install as in the walk-through, use:
dkms install -m “Name of module you just got with dkms status” -v “version number of dkms status”
it will take a while, then you can verify it’s installed with one last:
dkms status
Hi, I still cant get it to work, the cloned files does not contain any installation script and DKMS status returns nothing.
Источник
Как взломать Wi-Fi? Какие Wifi-адаптеры актульны для Kali Linux

d0ppl4r
Сержант
«Лучший» Wi-Fi адаптер для вардрайвинга
Как уже ноднократно говорили, не существует «лучшего» wi-fi адаптера для вардрайвинга. Бывают случаи, когда мы работаем в «бетонных джунглях» и нам нужно саиое мощное оборудование. А иногда нужно действовать незаметно и нам нужен самый маленький wi-fi свисток. Кто то живёт в районах где ещё уставлены wi-fi роутеры 2.4 Ггц, а до кого то уже добрался wi-fi 5.0 Ггц 801.11ac. Кто то готов потратить 5000 рублей на wi-fi адартер, а кто то ограничен суммой в 500-1000р.
Но есть правила, которым можно следовать при выборе wi-fi адаптера для вардрайвинга:
- Никогда не берём wi-fi адаптеры, на чипах MediaTek.
- Wi-fi адартер с внешней антеной, обычно более чувствительны.
- Чип wi-fi адаптера, в идиале, доджны уметь переходить в режи монитора, инжекта и ap(soft ap).
- Раскрученый бренд, это переплата за название.
- Alfa это всегда дорого, но обычно подходит всем.
Лично я, подбираю адаптер так:
- Смотрю что есть в наличи. (по пораметрам, антеана, ap(soft ap)).
- Смотрю что из этого, на каком чипе.
- Смотрю что умеет этот чтп в таблице: https://wikidevi.com/wiki/Wireless_adapters/Chipset_table Увы она редко обновляется.
Именно так я выбрал себе Totalink A2000ua 801.11ac/a/n/b/g +2 антенны 8 dbi который обощолся мне в 2000 руб и Orient XG-925n+ + антенна 8 dbi обощолся мне в 1000 руб.
В зависимости от выбранного чипсета могут быть нюансы. У чипсета Realtek проблемы (решаемые) при атаках на WPS.
В этой статье я собрал, большой список wi-fi адаптеров, которые поддерживают режим мониторинга и беспроводные инъекции. С любым из этих wi-fi адаптеров, вы сможите захватить handshake и провести большенство без проводных атак. Помнтет, что в некоторых атаках от wi-fi адаптера требуется режим AP(Soft AP).
Если вы купили двухдиапазонный (2.4GHz & 5.0GHz) адаптер на чипе Realtek RTL881xAU, вам нужно установить драйвер. В kali linux это делается так:
Отличие wi-fi адаптеров на чипах Realtek RTL8811au, RTL8812au и RTL8814au в количестве поддерживаемых антенн. Одна аетена на RTL8811au, две на RTL8812au и четыре на RTL8814au
Также некоторые устройства работают только в одном диапазоне по выбору, другие — в двух диапазонах одновременно. Это также нужно учитывать при покупке устройств.
Некоторые производители, например Alfa AWUS036ACH, Alfa AWUS1900, TRENDnet TEW-809UB, используют дополнительные чипы (например, усилители сигнала) и могут иметь другие приятные особенности.
Внутренние Wi-FI адаптеры для ноутбуков, подходящие для вардрайвинга.
В некоторых ноутбуках предустановлены беспроводные адаптеры, которые поддерживают режим монитора и беспроводные инъекции. Например, чипы Intel могут делать это. Причём они также поддерживают режим Точки Доступа и виртуальные интерфейсы. Видимо, дело в хорошей поддержки беспроводных драйверов Intel для Linux. Следовательно, они подходят для ежедневного использования в Linux, а также для беспроводных атак.
Небольшой список таких wi-fi адаптеров:
- Intel Wireless-AC 9560 [Jefferson Peak] (rev 10) — имеет антенны 2×2, поддержку MU-MIMO и поддержку AC
- Intel Centrino Advanced-N 6235 (rev 24)
Они очень хорошо работают для передачи данных или захвата рукопожатий. Я думаю, что все представители линеек Wireless-AC **** и Intel Centrino Advanced-N **** поддерживают режим монитора и беспроводные инъекции. Но, конечно, нужно делать поправку на отсутствие внешних антенн.
Однодиапазонные 2.4GHz беспроводные 802.11a/n/b/g USB Wi-Fi адаптеры подходящие для вардрайвинга.
Источник


