- Настройка звука на хакинтоше
- § Введение
- § Codec Commander
- Настройка
- Установка кекста
- § Завод карт Creative
- § Метод AppleALC
- Шаг 1. Получение оригинального AppleHDA
- Realtek s1220a mac os
- # Fixing audio with AppleALC
- # Finding your layout ID
- # Testing your layout
- # Making Layout ID more permanent
- # Miscellaneous issues
- # No Mic on AMD
- # Same layout ID from Clover doesn’t work on OpenCore
- # Kernel Panic on power state changes in 10.15
- # Troubleshooting
- # Checking if you have the right kexts
- # Checking if AppleALC is patching correctly
- # Checking AppleHDA is vanilla
- # AppleALC working inconsistently
- # AppleALC not working correctly with multiple sound cards
- # AppleALC not working from Windows reboot
Настройка звука
на хакинтоше
§ Введение
Настройка звука на хакинтоше может занять даже больше времени, чем, собственно, сама установка macOS.
Эта статья содержит несколько инструкций, которые не являются панацеей от всех проблем, но могут помочь так же, как помогли мне.
§ Codec Commander
- компьютер перешел в режим сна и затем вышел из него;
- компьютер начал переходить в режим сна, но спустя небольшой промежуток времени (около 5-20 секунд) была нажата какая-либо клавиша и переход в сон отменился (задержка сна на полминуты — это особенность macOS).
В обоих случаях может показаться, что звук есть, но на самом деле его нет или он очень тихий. Для решения этой проблемы, собственно, и нужен Codec Commander.
Настройка
Последняя версия Codec Commander доступна на bitbucket.org. Но не все так просто: без предварительной настройки под ваш кодек кекст может не заработать. Подробное руководство по настройке Codec Commander находится на GitHub. Однако новичку будет очень сложно в нем разобраться. Самый простой способ — найти уже настроенный кекст под кодек своей системы. Я нашел Codec Commander для ALC1150 на tonymackx86.com.
Установка кекста
Устанавливать Codec Commander надо в системную папку. Рекомендую сделать это через Kext Utility.
§ Завод карт Creative
Для настройки звуковых карт Creative на хакинтоше энтузиасты разработали кекст kXAudioDriver, он заводит на хакинтоше следующие карты:
- Creative Live!
- Audigy 1/2
- Audigy RX
- EMU E-DSP
Скачивание и обсуждение кекста доступно на форуме insanelymac.com.
§ Метод AppleALC
AppleALC — кекст, который значительно упрощает настройку звука на хакинтоше. Он позволяет включить поддержку встроенного звукового оборудования компьютера без внесения модификаций в систему и динамически загружает все требуемые изменения в AppleHDA и другие кексты.
AppleALC может помочь, если после других методов завода встроенного звука наблюдаются проблемы.
Поддерживает ли ваш кодек AppleALC можно узнать на wiki-странице проекта. Там же есть и подробное руководство по его установке.
Перед установкой AppleALC требуется отменить все манипуляции с настройкой звука, вернув в систему оригинальный, не затронутый вмешательствами кекст AppleHDA, а также удалить некоторые строки, внесенные в файл конфигурации Clover, которые мог произвести, например, MultiBeast.
Шаг 1. Получение оригинального AppleHDA
На загрузочной флешке, созданной UniBeast, помимо значка «Установка macOS High Sierra» есть множество скрытых системных файлов. Для того чтобы добраться до стандартных кекстов системы, необходимо сделать их видимыми.
С помощью сочетания ⌘ + Shift + . (точка) можно отображать скрытые файлы в macOS и таким же способом их скрывать.
Источник
Realtek s1220a mac os

- UEFI bios:
- Скидываем все настройки в default.
- AHCI — enable;
- Vt-d: Disable (+ в Clover дропнуть DMAR таблицу)
- Vt-x: Enable (только для 10.13 и если используете виртуальные машины)
- Intel Virtualization Technology — Enable
- Serial-port: Disable
- XHCI Hand-off: Disable (рекомендуеться)
- XHCI Hand-off: Enabled (только если что то не работает в режиме Disable )
- IOAPIC 24-119 Entries: Enabled (подмечено что у многих с этим пунктом паникует, поэтому тестируйте)
- CSM: Disable (по возможности)
- Fasboot: Disable
- Secure boot: Disable or Other OS
Legacy bios:
. .
[i]Примечание:
- HDD должен быть подключен к SATA-0, контролер Intel.
- . [/i]
Для установки потребуется флешка не менее 8Гб.
- ПК на ОС Windows XP/7/8.
- Скачать утилиту Boot Disk Utility с страницы разработчика cvad или с форума applelife.ru со страницы посвящённой данной утилите.
- Установить по инструкции
- Зайти на флешку в папку EFI\CLOVER\ и удалить папку OEM и файл config-sample (не путать с config.plist).
- Зайти на https://github.com/aci…pleSupportPkg/releases скачать ApfsDriverLoader.efi и скопировать его в папку EFI\CLOVER\drivers64UEFI (необходимо для macOs 10.13 и выше!)
- Добавить в EFI\CLOVER\Kext\Other https://github.com/acidanthera/Lilu/releases
- Добавить в EFI\CLOVER\Kext\Other https://github.com/aci…WhateverGreen/releases
- Скачать образ Mac OS X по указанным ссылкам:
Нажми и качай! - Развернуть скаченный образ на подготовленную флешку.
- Инструкция с applelife.ru пункт «Заливка дистрибутива macOS на второй том загрузочного USB Flash drive:«:
- Перед распаковкой образа необходимо нажать кнопку ^Format disk^.
- В основном окне программы -> Destination Disk — выбираем наш USB Flash Drive -> Part2.
- Нажимаем кнопку «Restore Partition».
- В открывшемся окне проводника выбираем распакованный файл с расширением *.hfs.
- Тем, кто устанавливает на ноутбук (или имеет PS/2 мышь или клавиатуру) , обязательно скачать
 VoodooPS2Controller.kext.zip ( 97,46 КБ )
, новая версия:VoodooPS2Controller.kext.zip ( 93,86 КБ )
положить в папку EFI/CLOVER/KEXT/10.X или Other - Всё, установочная флешка готова, можно приступать к установке.
 VoodooPS2Controller.kext.zip ( 97,46 КБ )
За данный споcоб установки благодарим cvad и Skvo
Данная инструкция написана по материалам с applelife.ru
Установить один из загрузчиков на диск (если он не входит в состав сборки) :
— Загрузчик №1 — Clover (рекомендуется для большинства пользователей);
Как это сделать: UEFI, Legacy BIOS.
— Загрузчик №2 — OpenCore (для опытных пользователей)
— Загрузчик №3 — Chameleon (на данный момент существует для очень старых систем и особых случаев);
*загрузчик устанавливаем только один, на ваш выбор
После входа в macOS первое, что делаем:
- Устанавливаем кекст для сетевой карты;
- Настраиваем SMbios;
- «Заводим» видео-карту (разрешение должно быть правильным, и верхняя строка прозрачная);
- Поднимаем «нативное управление питанием» процессора;
- Поднимаем звук через AppleALC или VoodooHDA
.
21. Ставим програмулинки и «рюшечки».
Источник
# Fixing audio with AppleALC
So to start, we’ll assume you already have Lilu and AppleALC installed, if you’re unsure if it’s been loaded correctly you can run the following in terminal(This will also check if AppleHDA is loaded, as without this AppleALC has nothing to patch):
If all 3 show up, you’re good to go. And make sure VoodooHDA is not present. This will conflict with AppleALC otherwise.
If you’re having issues, see the Troubleshooting section
# Finding your layout ID
So for this example, we’ll assume your codec is ALC1220. To verify yours, you have a couple options:
- Checking motherboard’s spec page and manual
- Check Device Manager in Windows
- Run cat in terminal on Linux
- cat /proc/asound/card0/codec#0 | less
Now with a codec, we’ll want to cross reference it with AppleALC’s supported codec list:
With the ALC1220, we get the following:
So from this it tells us 2 things:
- Which hardware revision is supported( 0x100003 ), only relevant when multiple revisions are listed with different layouts
- Various layout IDs supported by our codec( layout 1, 2, 3, 5, 7, 11, 13, 15, 16, 21, 27, 28, 29, 34 )
Now with a list of supported layout IDs, we’re ready to try some out
Note: If your Audio Codec is ALC 3XXX this is likely false and just a rebranded controller, do your research and see what the actual controller is.
- An example of this is the ALC3601, but when we load up Linux the real name is shown: ALC 671
# Testing your layout
To test out our layout IDs, we’re going to be using the boot-arg alcid=xxx where xxx is your layout. Remember that to try layout IDs one at a time. Do not add multiple IDs or alcid boot-args, if one doesn’t work then try the next ID and etc
# Making Layout ID more permanent
Once you’ve found a Layout ID that works with your hack, we can create a more permanent solution for closer to how real macs set their Layout ID.
With AppleALC, there’s a priority hierarchy with which properties are prioritized:
- alcid=xxx boot-arg, useful for debugging and overrides all other values
- alc-layout-id in DeviceProperties, should only be used on Apple hardware
- layout-id in DeviceProperties, should be used on both Apple and non-Apple hardware
To start, we’ll need to find out where our Audio controller is located on the PCI map. For this, we’ll be using a handy tool called gfxutil
(opens new window) then with the macOS terminal:

Then add this PciRoot with the child layout-id to your config.plist under DeviceProperties -> Add:

Note that AppleALC can accept both Decimal/Number and Hexadecimal/Data, generally the best method is Hex as you avoid any unnecessary conversions. You can use a simple decimal to hexadecimal calculator
(opens new window) to find yours. printf ‘%x\n’ DECI_VAL :
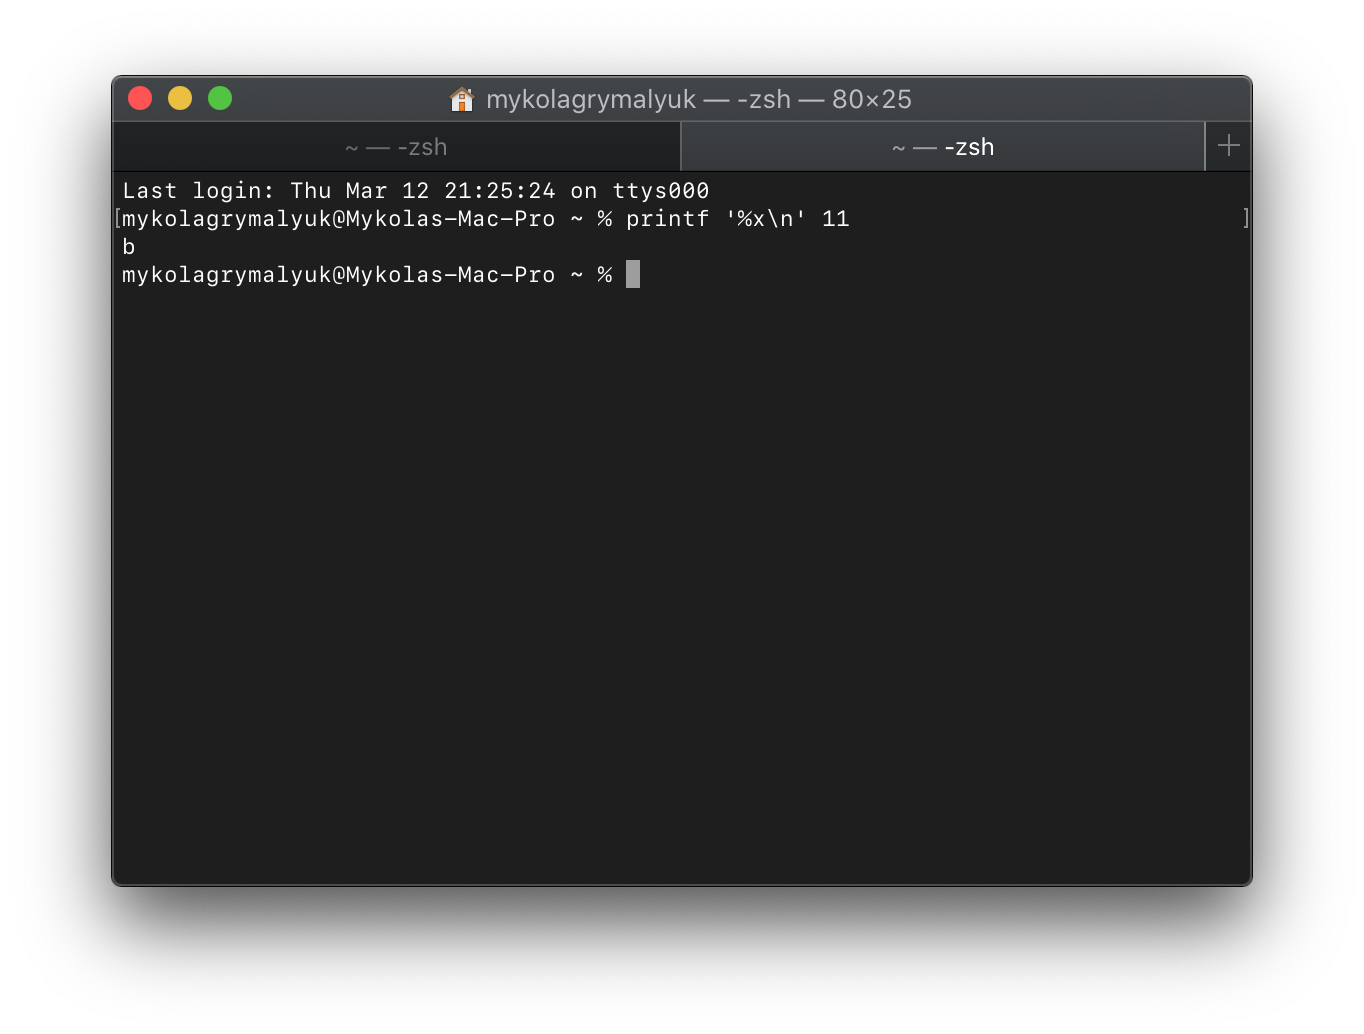
So in this example, alcid=11 would become either:
- layout-id | Data |
- layout-id | Number |
Note that the final HEX/Data value should be 4 bytes in total(ie. 0B 00 00 00 ), for layout IDs surpassing 255( FF 00 00 00 ) will need to remember that the bytes are swapped. So 256 will become FF 01 00 00
- HEX Swapping and data size can be completely ignored using the Decimal/Number method
Reminder: You MUST remove the boot-arg afterwards, as it will always have the top priority and so AppleALC will ignore all other entries like in DeviceProperties
# Miscellaneous issues
# No Mic on AMD
- This is a common issue with when running AppleALC with AMD, specifically no patches have been made to support Mic input. At the moment the «best» solution is to either buy a USB DAC/Mic or go the VoodooHDA.kext method. Problem with VoodooHDA is that it’s been known to be unstable and have worse audio quality than AppleALC
# Same layout ID from Clover doesn’t work on OpenCore
This is likely do to IRQ conflicts, on Clover there’s a whole sweep of ACPI hot-patches that are applied automagically. Fixing this is a little bit painful but SSDTTime
(opens new window) ‘s FixHPET option can handle most cases.
For odd cases where RTC and HPET take IRQs from other devices like USB and audio, you can reference the HP Compaq DC7900 ACPI patch
(opens new window) example in the trashOS repo
# Kernel Panic on power state changes in 10.15
- Enable PowerTimeoutKernelPanic in your config.plist:
- Kernel -> Quirks -> PowerTimeoutKernelPanic -> True
# Troubleshooting
So for troubleshooting, we’ll need to go over a couple things:
# Checking if you have the right kexts
To start, we’ll assume you already have Lilu and AppleALC installed, if you’re unsure if it’s been loaded correctly you can run the following in terminal(This will also check if AppleHDA is loaded, as without this AppleALC has nothing to patch):
If all 3 show up, you’re good to go. And make sure VoodooHDA is not present. This will conflict with AppleALC otherwise. Other kexts to make sure you do not have in your system:
- RealtekALC.kext
- CloverALC.kext
- VoodooHDA.kext
- HDA Blocker.kext
- HDAEnabler#.kext(# can be 1, 2, or 3)
Hey Lilu and/or AppleALC aren’t showing up
Generally the best place to start is by looking through your OpenCore logs and seeing if Lilu and AppleALC injected correctly:
If it says failed to inject:
Main places you can check as to why:
- Injection order: Make sure that Lilu is above AppleALC in kext order
- All kexts are latest release: Especially important for Lilu plugins, as mismatched kexts can cause issues
Note: To setup file logging, see OpenCore Debugging
# Checking if AppleALC is patching correctly
So with AppleALC, one of the most easiest things to check if the patching was done right was to see if your audio controller was renamed correctly. Grab IORegistryExplorer
(opens new window) and see if you have an HDEF device:
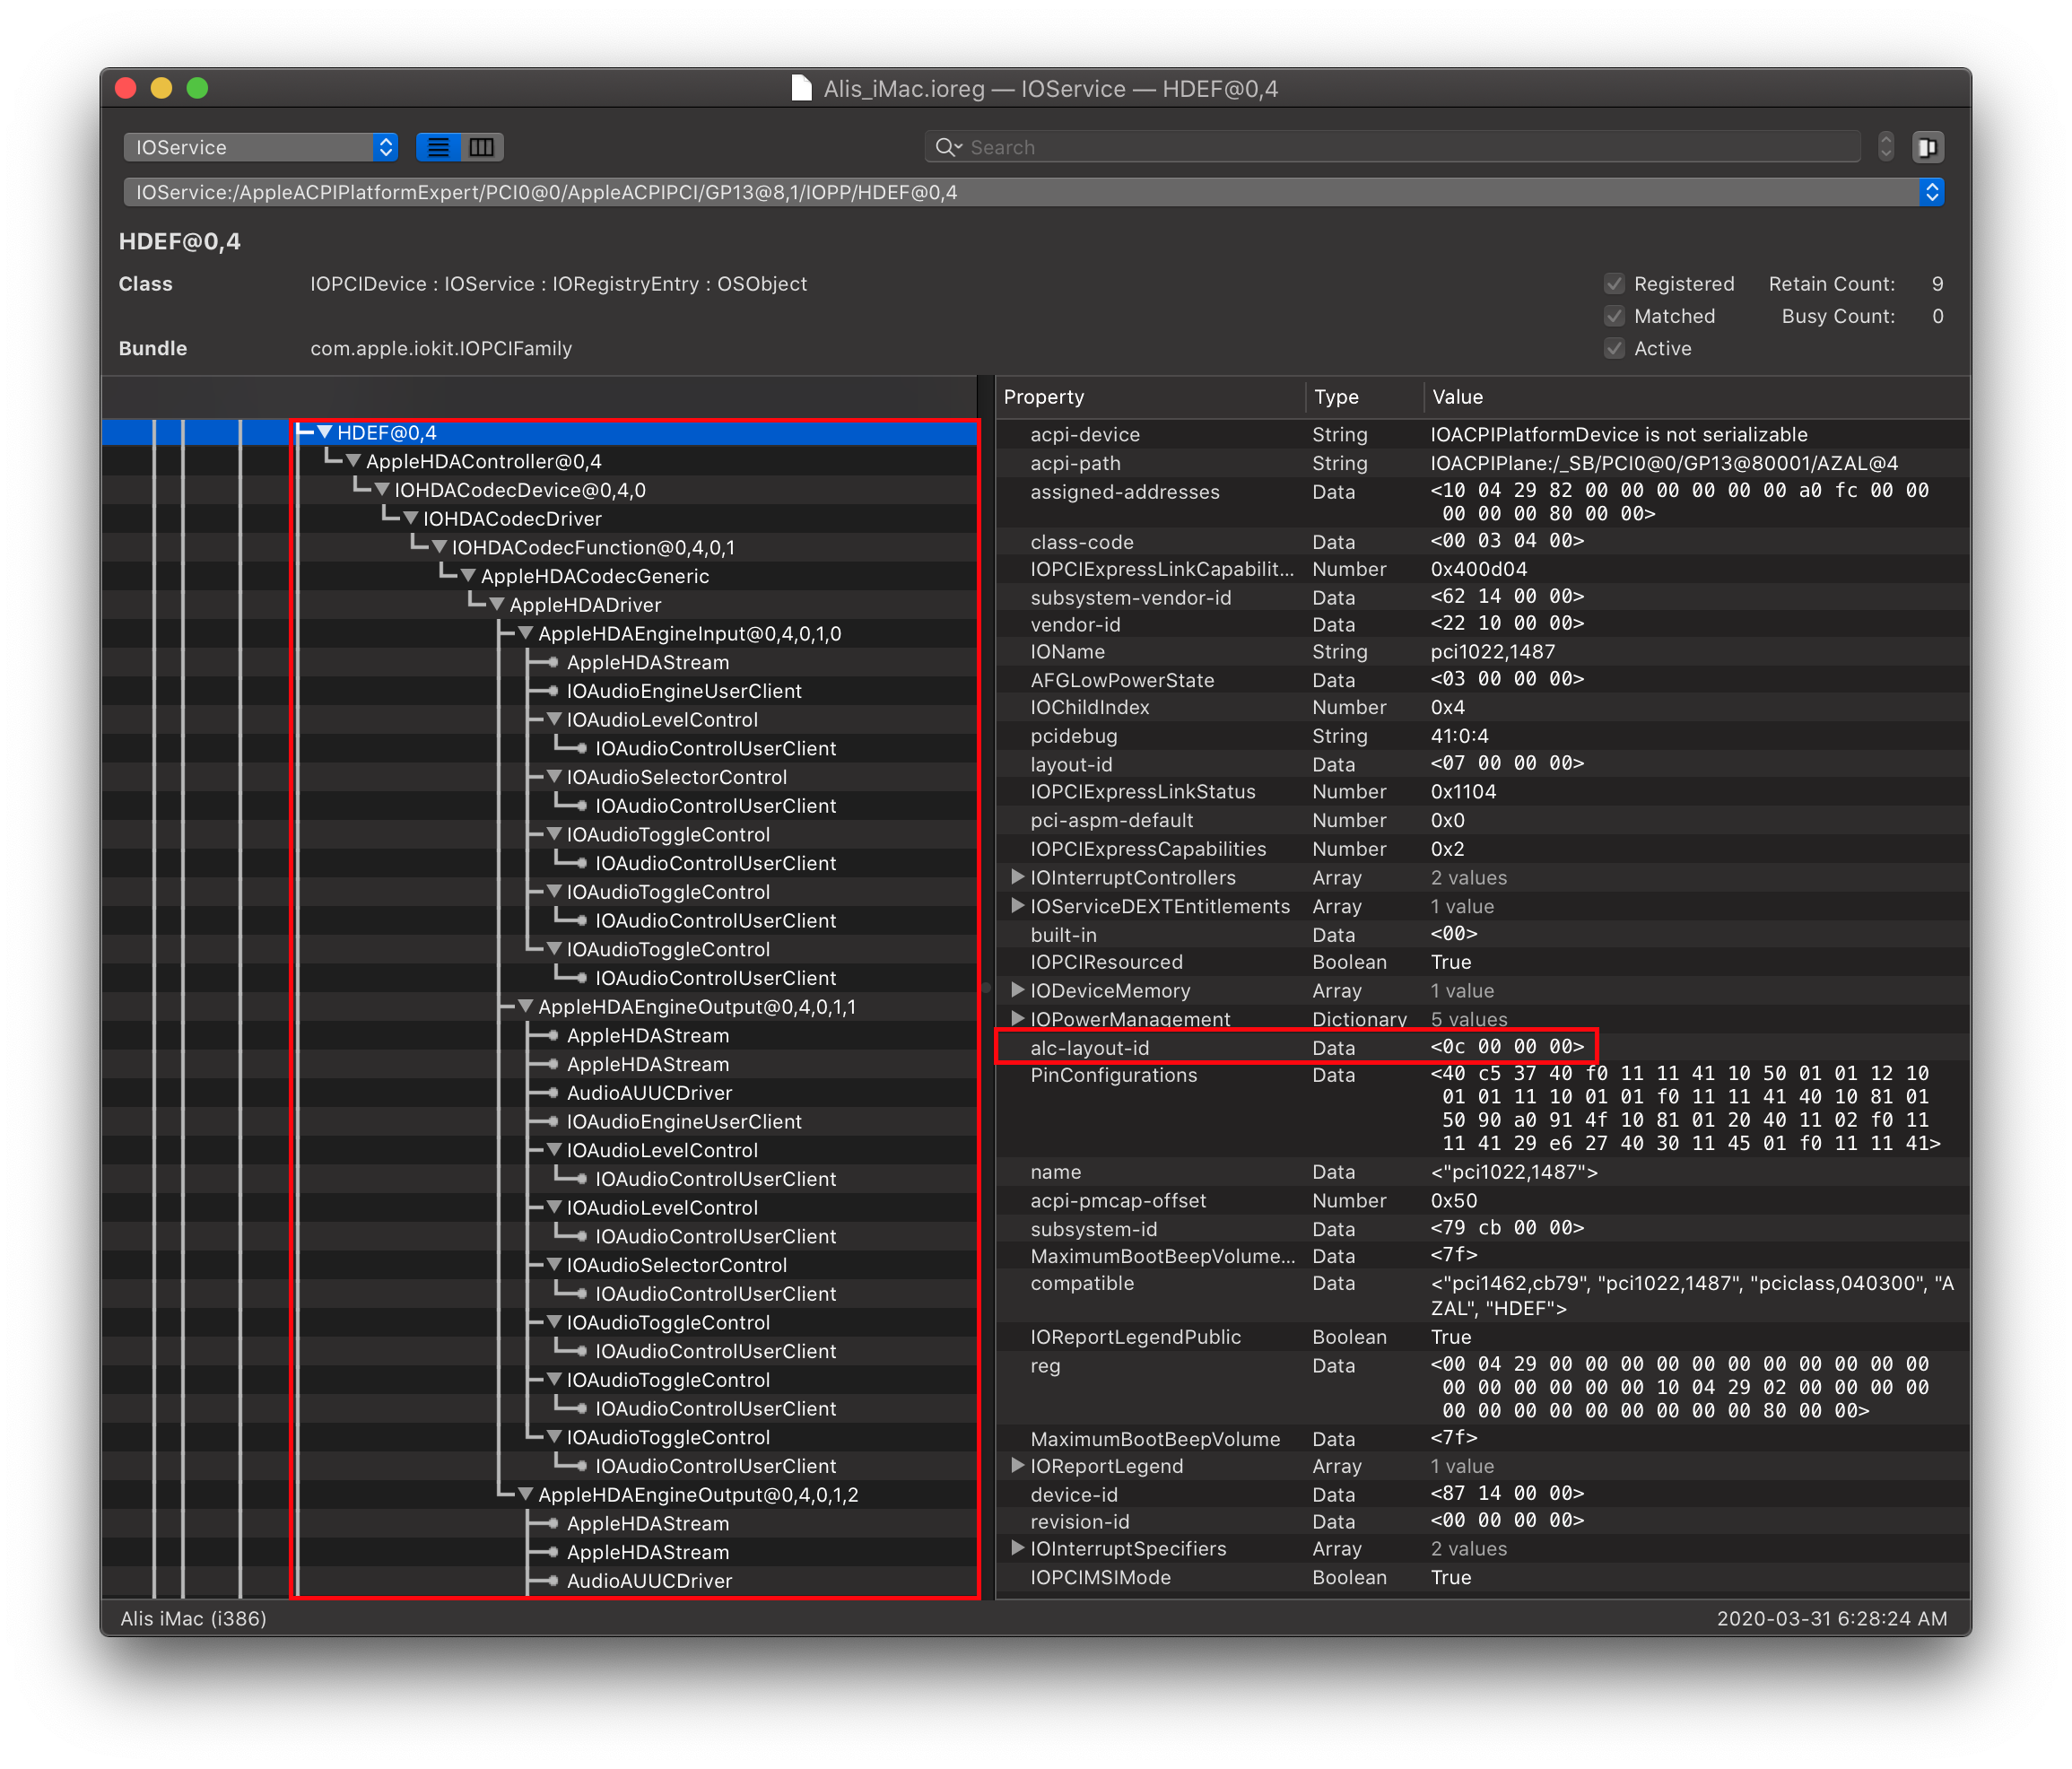
As you can see from the above image, we have the following:
- HDEF Device meaning our rename did the job
- AppleHDAController attached meaning Apple’s audio kext attached successfully
- alc-layout-id is a property showing our boot-arg/DeviceProperty injection was successful
- Note: layout-id | Data | 07000000 is the default layout, and alc-layout-id will override it and be the layout AppleHDA will use
Note: Do not rename your audio controller manually, this can cause issues as AppleALC is trying to patch already. Let AppleALC do it’s work.
More examples:
| Correct layout-id | Incorrect layout-id |
|---|---|
 | 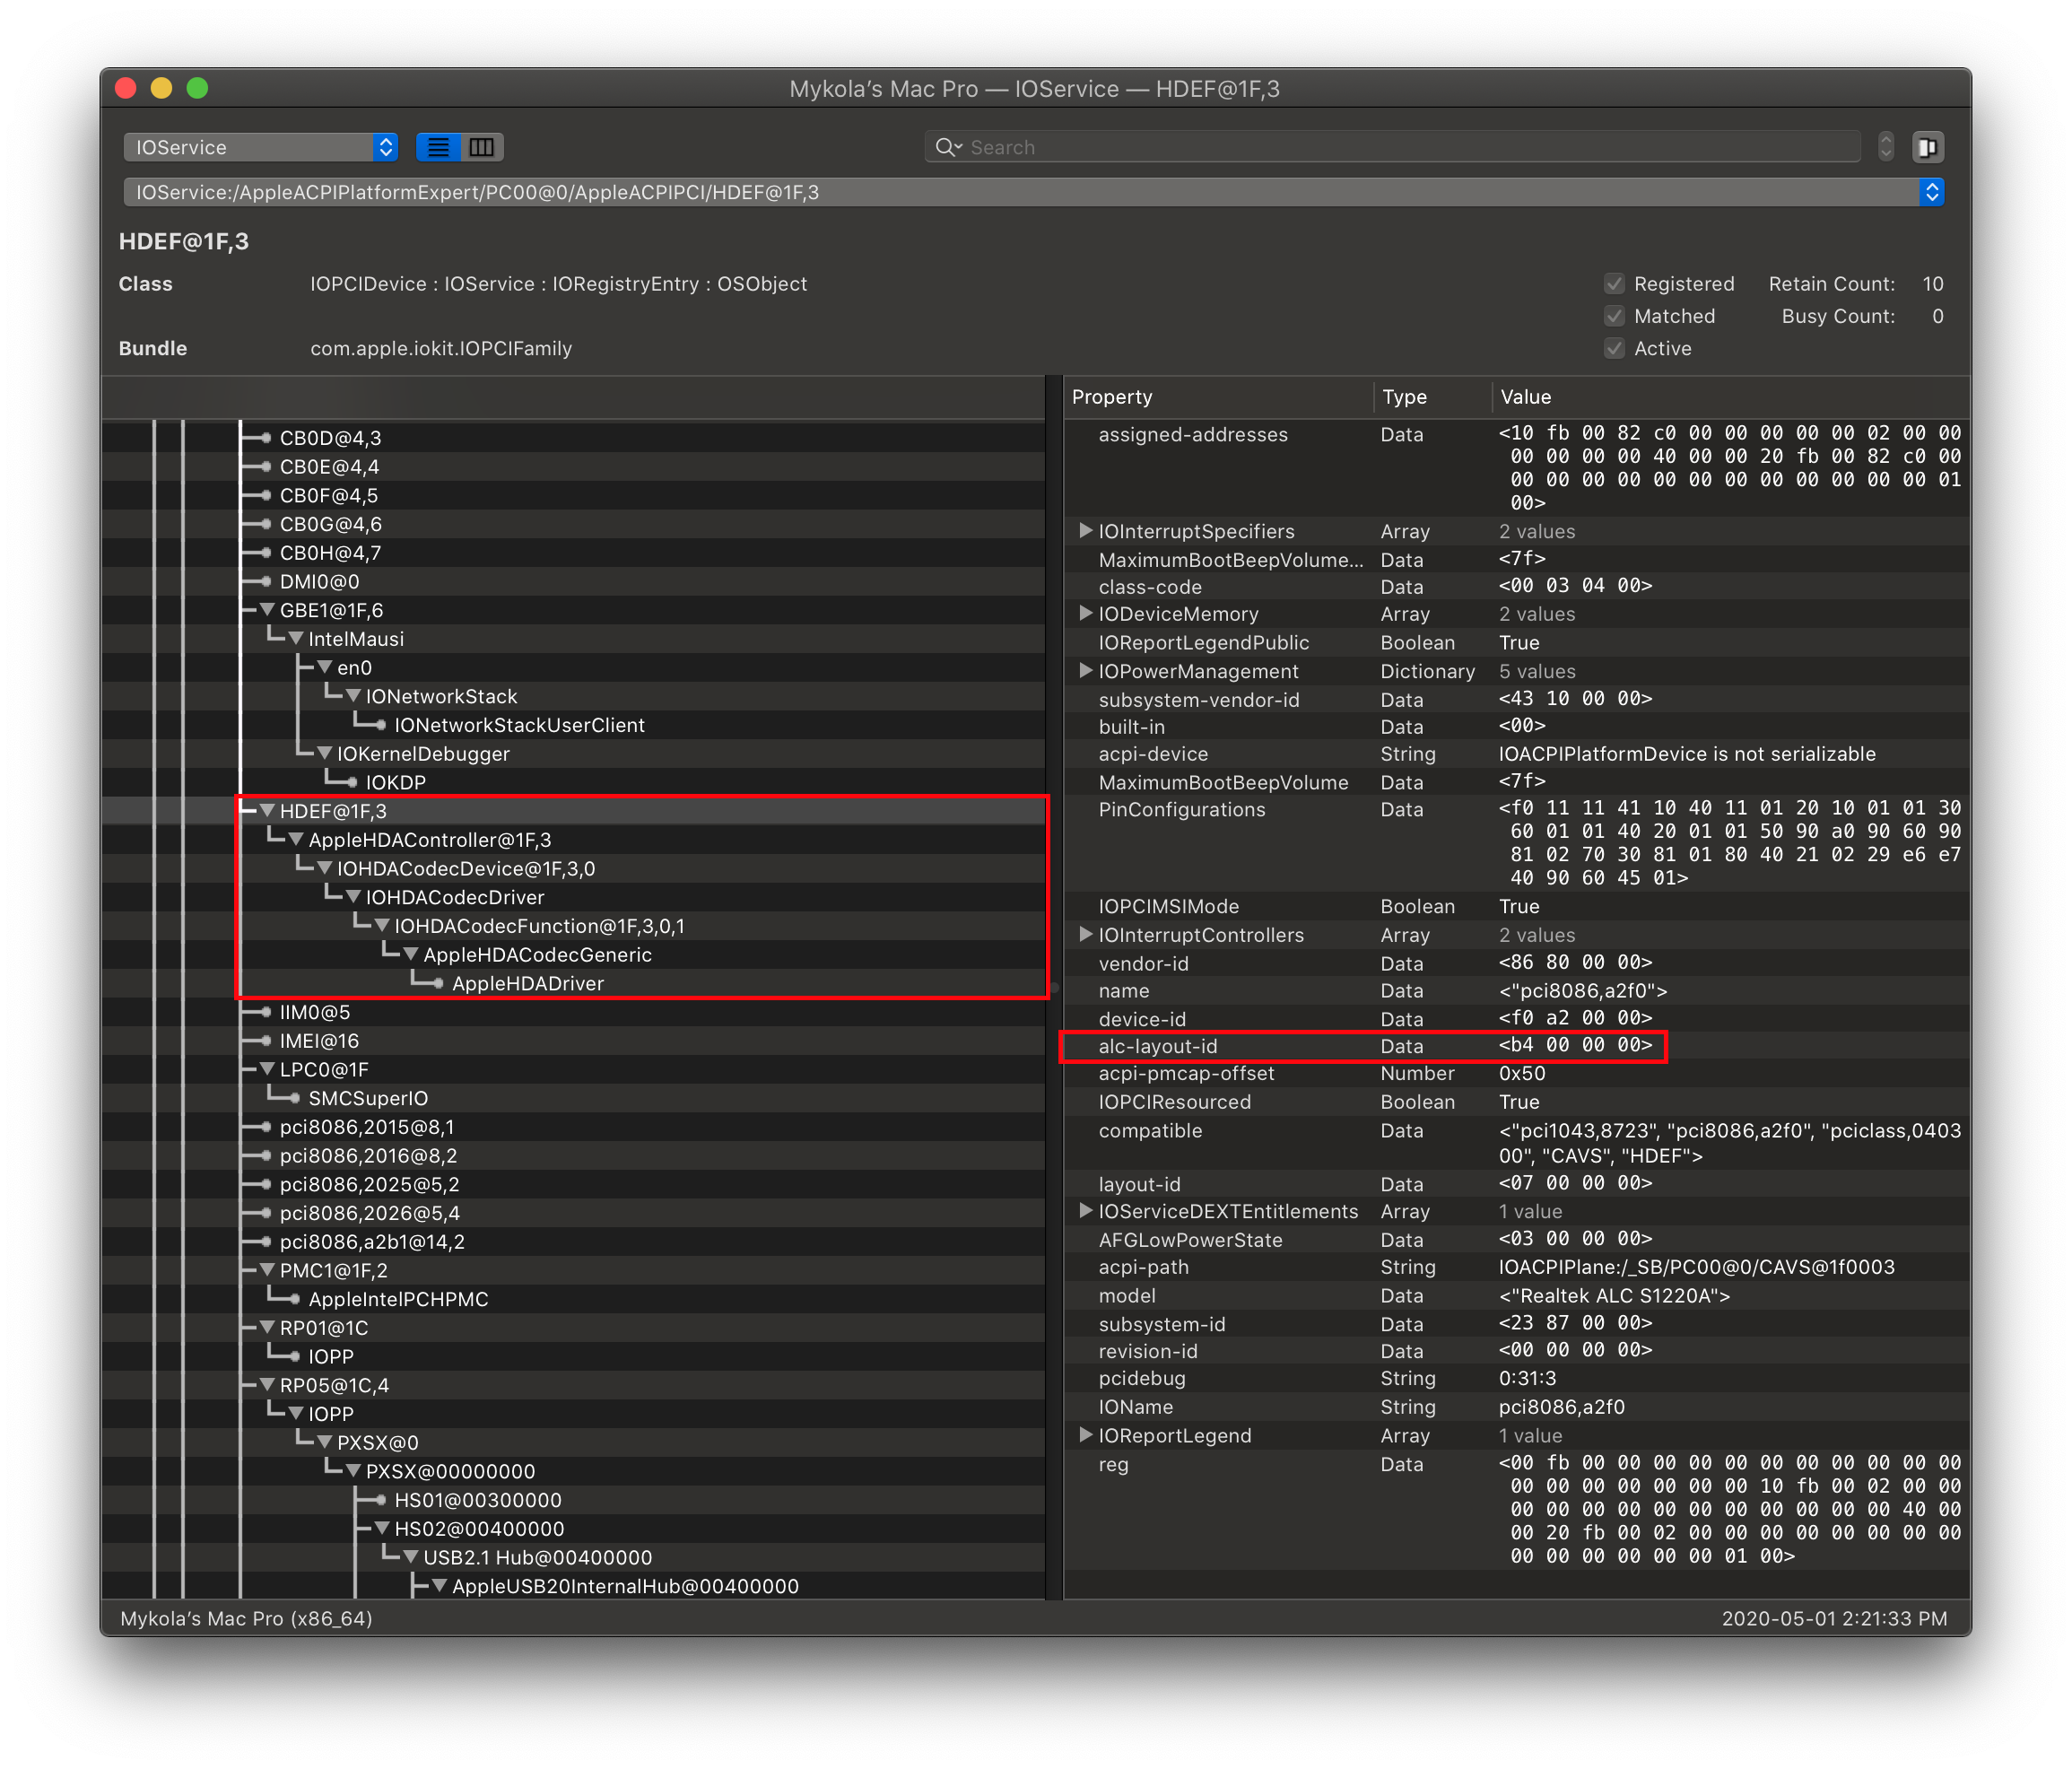 |
As you can see from the above 2, the right image is missing a lot of AppleHDAInput devices, meaning that AppleALC can’t match up your physical ports to something it can understand and output to. This means you’ve got some work to find the right layout ID for your system.
# Checking AppleHDA is vanilla
This section is mainly relevant for those who were replacing the stock AppleHDA with a custom one, this is going to verify whether or not yours is genuine:
This will check if the signature is valid for AppleHDA, if it’s not then you’re going to need to either get an original copy of AppleHDA for your system and replace it or update macOS(kexts will be cleaned out on updates). This will only happen when you’re manually patched AppleHDA so if this is a fresh install it’s highly unlikely you will have signature issues.
# AppleALC working inconsistently
Sometimes race conditions can occur where your hardware isn’t initialized in time for AppleHDAController resulting in no sound output. To get around this, you can either:
Specify in boot-args the delay:
Or Specify via DeviceProperties(in your HDEF device):
The above boot-arg/property will delay AppleHDAController by 1000 ms(1 second), note the ALC delay cannot exceed 3000 ms
# AppleALC not working correctly with multiple sound cards
For rare situations where you have 2 sounds cards(ex. onboard Realtek and an external PCIe card), you may want to avoid AppleALC patching devices you either don’t use or don’t need patching(like native PCIe cards). This is especially important if you find that AppleALC will not patch you onboard audio controller when the external one is present.
To get around this, we’ll first need to identify the location of both our audio controllers. The easiest way is to run gfxutil
(opens new window) and search for the PCI IDs:
Now with this large output you’ll want to find your PciRoot pathing, for this example, lets use a Creative Sound-Blaster AE-9PE PCIe audio card. For this, we know the PCI ID is 1102:0010 . So looking through our gfxutil output we get this:
From here, we can clearly see our PciRoot pathing is:
- Note: This will assume you know both the Vendor and Device ID of the external sound card. For reference, these are the common Vendor IDs:
- Creative Labs: 1102
- AsusTek: 1043
- Note 2: Your ACPI and PciRoot path will look different, so pay attention to your gfxutil output
Now that we have our PciRoot pathing, we can finally open up our config.plist and add our patch.
Under DeviceProperties -> Add, you’ll want to add your PciRoot(as a Dictionary) with the child called external-audio :
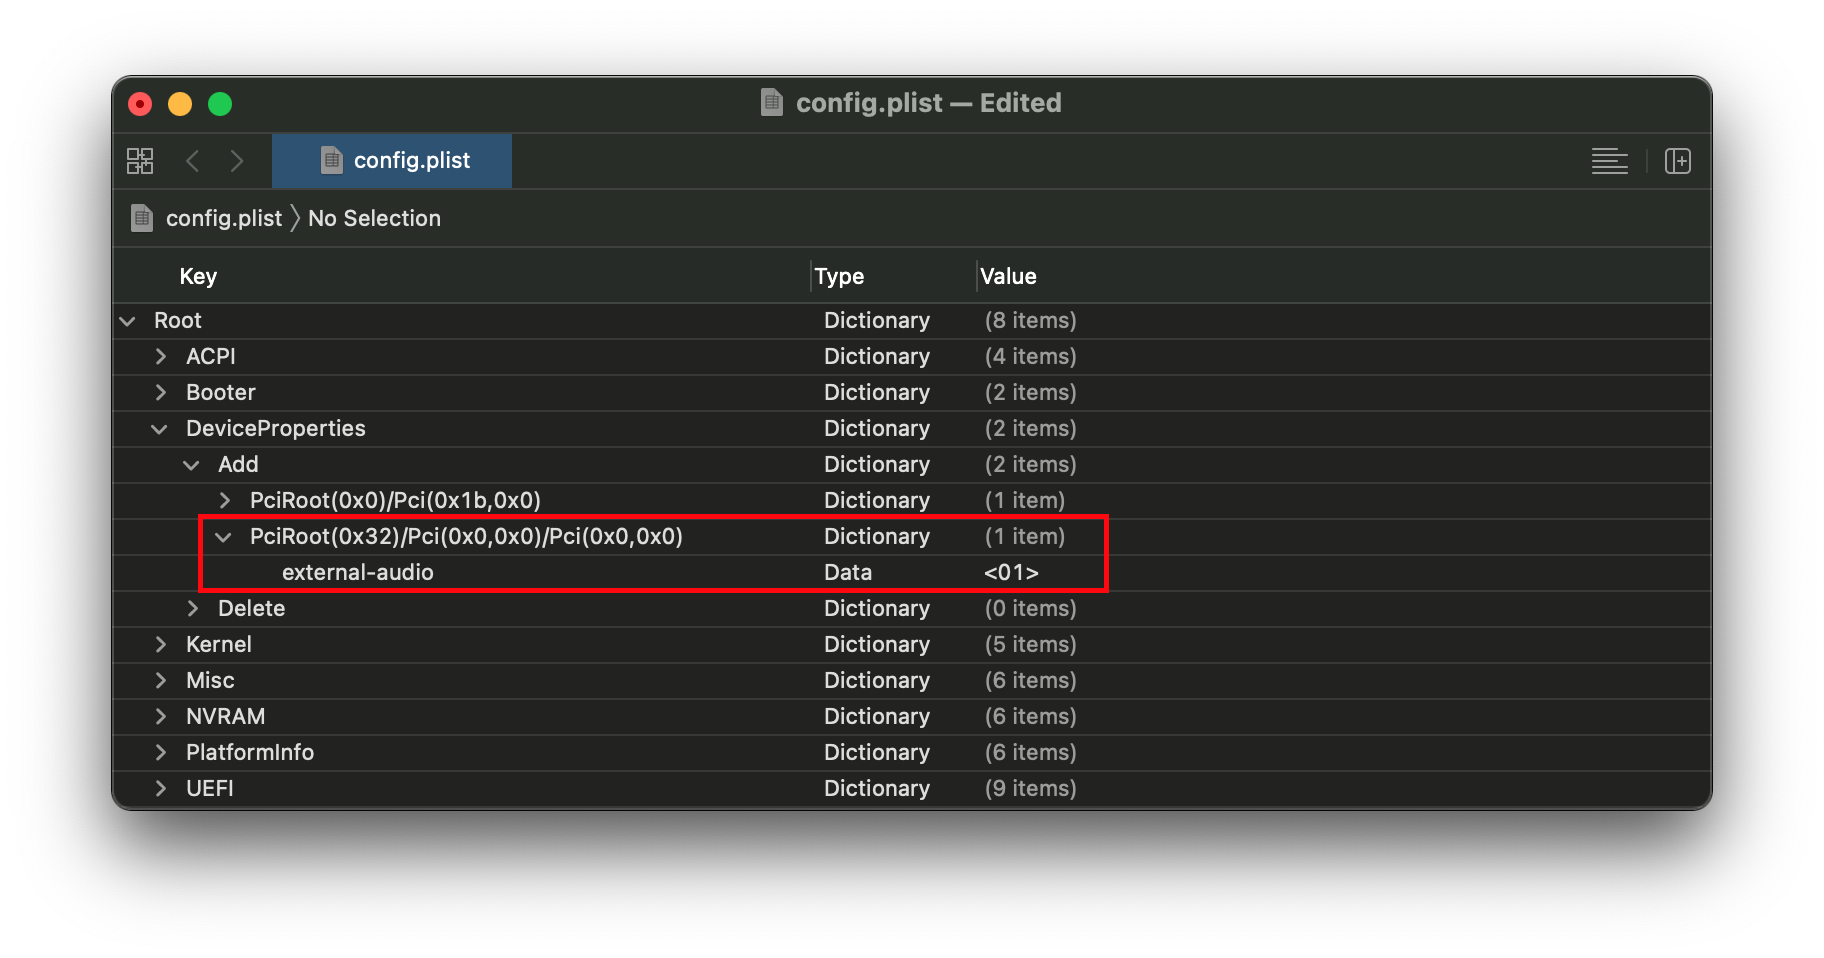
And with this done, you can reboot and AppleALC should now ignore your external audio controller!
# AppleALC not working from Windows reboot
If you find that rebooting from Windows into macOS breaks audio, we recommend either adding alctsel=1 to boot-args or add this property to your audio device in DeviceProperties:
Источник


