Записки IT специалиста
Технический блог специалистов ООО»Интерфейс»
- Главная
- Установка Wi-Fi адаптера в Ubuntu.
Установка Wi-Fi адаптера в Ubuntu.
 С поддержкой W-Fi адаптеров в Ubuntu наблюдаются определенные проблемы. Хорошо если можно выбрать заведомо совместимую модель при покупке, но чаще приходится использовать то оборудование, которое есть. В этом случае придется устанавливать адаптер самостоятельно. Сегодня мы рассмотрим как раз такой случай.
Забегая вперед, скажем, что ничего сложного в подключении неподдерживаемых Wi-Fi адаптеров нет. Несмотря на то, что ряд производимых нами действий можно выполнить при помощи графического интерфейса, мы будем работать исключительно в консоли, что позволит использовать рекомендации данной статьи как для настольных, так и для серверных версий Ubuntu.
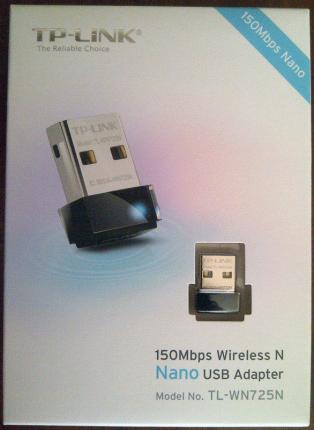
Для примера рассмотрим подключение в Ubuntu 12.04 LTS недорогого USB-адаптера TP-Link TL-WN725N.
 Как это обычно бывает, вы купили Wi-Fi адаптер, распаковали, подключили. И никаких признаков жизни. Становится очевидно, что данная модель не поддерживается используемым дистрибутивом. Что делать?
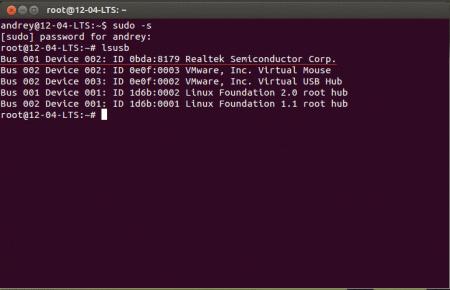
Прежде всего убедимся, что система видит само USB-устройство. Для этого выполним команду
В выводе вы должны увидеть строку, соответсвующую подключенному устройству, скорее всего она будет содержать информацию о чипе, на котором собран адаптер. В нашем случае это Realtek. Если вы не уверены, что адаптер присутсвует в списке, выполните команду два раза, с подключенным и отключенным устройством.
 Следующим шагом вам нужно выяснить модель чипа, на котором собран адаптер. Для этого уточните его полную маркировку и аппаратную версию, так как под одним и тем же наименованием могут выпускаться устройства на разных чипах. Вся необходимая информация указана на этикетке, также она может быть продублирована на самом устройстве.
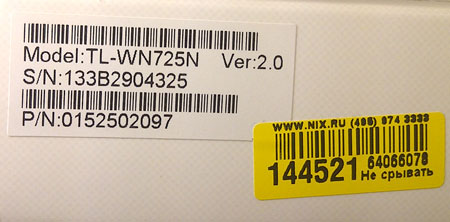 Как видим перед нами устройство с аппаратной версией Ver:2.0, располагая этой информацией несложно выяснить что в основу адаптера положен чип Realtek RTL8188EUS. Мы советуем воспользоваться ресурсом wikidevi.com (по ссылке настроеный пример семантического поиска по бренду TP-Link), перейдя на страницу адаптера мы не только узнаем его чип, но и получим ссылку на Linux драйвера.
Перейдем в домашнюю директорию и скачаем архив репозитория, предварительно повысив права до суперпользователя:
Распакуем архив (при необходимости установив unzip).
Как можно увидеть из вывода команды, содержимое архива распаковалось в директорию rtl8188eu-master, перейдем в нее и выполним сборку модуля:
После сборки модуля в директории должен появиться файл 8188eu.ko, это и есть искомый модуль ядра. Теперь установим его командой:
Осталось включить наш модуль, выполнив команду:
или просто отключить и подключить заново адаптер. В настольной системе вы сразу увидите сообщение о возможности подключиться к беспроводной сети.
 Или выполните в консоли команду:
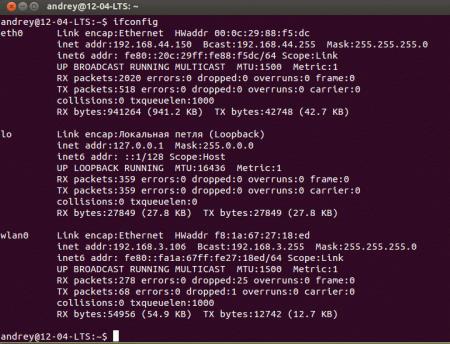
В выводе вы увидите появившийся беспроводной интерфейс wlan0.
 Как видим ничего сложного нет. Однако следует помнить, что модуль собирается и устанавливается под текущую версию ядра, и при его обновлении будет необходимо выполнить сборку и установку модуля заново. Если такой возможности нет, то следует, удерживая Shift при загрузке, выбрать и загрузить версию ядра, для которой собран модуль.
Источник
Realtek usb wireless linux
Realtek RTL8811CU/RTL8821CU USB wifi adapter driver version 5.4.1 for Linux 4.4.x up to 5.x
Before build this driver make sure make , gcc , linux-header / kernel-devel , bc and git have been installed.
First, clone this repository
Check the name of the interface
Check the interface name of your wifi adapter using ifconfig . Usually, it will be wlan0 by default, but it may vary depends on the kernel and your device. On Ubuntu, for example, it may be named as wlx + MAC address. (https://www.freedesktop.org/wiki/Software/systemd/PredictableNetworkInterfaceNames/)
If this is the case, you can either disable the feature following the link above, or replace the name used in the driver by
Build and install with DKMS
DKMS is a system which will automatically recompile and install a kernel module when a new kernel gets installed or updated. To make use of DKMS, install the dkms package.
To make use of the DKMS feature with this project, just run:
If you later on want to remove it, run:
Plug your USB-wifi-adapter into your PC
If wifi can be detected, congratulations. If not, maybe you need to switch your device usb mode by the following steps in terminal:
- find your usb-wifi-adapter device ID, like «0bda:1a2b», by type:
- switch the mode by type: (the device ID must be yours.)
Need install usb_modeswitch (Archlinux: sudo pacman -S usb_modeswitch )
Make it permanent
If steps above worked fine and in order to avoid periodically having to make usb_modeswitch you can make it permanent (Working in Ubuntu 18.04 LTS):
Edit usb_modeswitch rules:
Append before the end line LABEL=»modeswitch_rules_end» the following:
Make sure to set your ATTR
then your configuration in /lib/udev/rules.d/40-usb_modeswitch.rules should be
Build and install without DKMS
Use following commands:
If you later on want to remove it, do the following:
Checking installed driver
If you successfully install the driver, the driver is installed on /lib/modules/
/kernel/drivers/net/wireless/realtek/rtl8821cu . Check the driver with the ls command:
Make sure 8821cu.ko file present on that directory
Check with DKMS (if installing via DKMS):
sudo dkms status
ARM architecture tweak for this driver (this solves compilation problem of this driver):
Use the tool ‘iw’, please don’t use other tools like ‘airmon-ng’
About
Realtek RTL8811CU/RTL8821CU USB Wi-Fi adapter driver for Linux
Источник
Realtek usb wireless linux
News: A new version of this driver is now available. Testing has shown it to be a solid driver. The driver located here will be discontinued in the near future so please transition to the new driver as you are able to do so.
Linux Driver for USB WiFi Adapters that are based on the RTL8811AU and RTL8821AU Chipsets
- v5.8.2.3 (Realtek) (2020-04-01)
- Plus updates from the Linux community
- IEEE 802.11 b/g/n/ac WiFi compliant
- 802.1x, WEP, WPA TKIP and WPA2 AES/Mixed mode for PSK and TLS (Radius)
- IEEE 802.11b/g/n/ac Client mode
- Support wireless security for WEP, WPA TKIP and WPA2 AES PSK
- Support site survey scan and manual connect
- Support power saving mode
- Supported interface modes
- IBSS
- Managed
- AP
- Monitor
- P2P-client
- P2P-GO
- Log level control
- LED control
- Power saving control
- VHT control (allows 80 MHz channel width in AP mode)
A FAQ is available at the end of this document.
- Kernels: 2.6.24 — 5.1 (Realtek)
- Kernels: 5.2 — 5.15
Tested Linux Distributions
Arch Linux (kernel 5.4)
Arch Linux (kernel 5.9)
Fedora (kernel 5.11)
Linux Mint 20.2 (Linux Mint based on Ubuntu) (kernel 5.11)
Linux Mint 20 (Linux Mint based on Ubuntu) (kernel 5.4)
LMDE 4 (Linux Mint based on Debian) (kernel 4.19)
Manjaro 20.1 (kernel 5.9)
Raspberry Pi OS (2021-01-11) (ARM 32 bit) (kernel 5.10)
Raspberry Pi Desktop (x86 32 bit) (kernel 4.19)
Ubuntu 21.04 (kernel 5.11)
Ubuntu 20.04 (kernel 5.4)
Download Locations for Tested Linux Distributions
- Alfa AWUS036ACS
- Buffalo WI-U2-433DHP
- Edimax EW-7811UTC
- Edimax EW-7811UAC
- Edimax EW-7811UCB
- ELECOM WDC-433DU2H
- GMYLE — AC450
- Netgear A6100
- Planex GW-450S
- TP Link T2U Nano
- TP Link T2U Plus
- Numerous products that are based on the supported chipsets
Warning: Beware of «multi-state» USB WiFi adapters. Some USB WiFi adapters have proprietary Windows drivers onboard. When plugged in, they act like a flash drive or CDROM and on Windows will attempt to start installing the Windows driver. That won’t work on Linux or MAC or any other non-Windows OS so the adapter sits there in flash drive or CDROM mode. The problem is that the state of the adapter has to be changed for the adapter to show up as the device that you expect, in this case, a WiFi adapter. Most modern Linux distributions ship with a utility called «usb-modeswitch» that will handle this issue for you if it has the correct information for your adapter. It is a good utility but if you buy adapters that are «multi-state,» that is one more potential headache you may have to deal with when something goes wrong. Often you can indentify adapters that are «multi-state» as they are advertised as «free driver» or «free installation driver.» If you are looking to buy a USB WiFi adapter for use on Linux, MAC OS, *NIX or anything besides Windows, it is a good idea to seek out single-state adapters.
Note: Some adapter makers change the chipsets in their products while keeping the same model number so please check to confirm that the product you plan to buy has the chipset you are expecting.
The installation instructions are for the novice user. Experienced users are welcome to alter the installation to meet their needs.
Temporary internet access is required for installation. There are numerous ways to enable temporary internet access depending on your hardware and situation. One method is to use tethering from a phone.. Another method to enable temporary internet access is to keep a wifi adapter that uses an in-kernel driver in your toolkit.
You will need to use the terminal interface. The quick way to open a terminal: Ctrl+Alt+T (hold down on the Ctrl and Alt keys then press the T key)
DKMS is used for the installation. DKMS is a system utility which will automatically recompile and install this driver when a new kernel is installed. DKMS is provided by and maintained by Dell.
It is recommended that you do not delete the driver directory after installation as the directory contains information and scripts that you may need in the future.
There is no need to disable Secure Mode to install this driver. If Secure Mode is properly setup on your system, this installation will support it.
Step 1: Open a terminal (Ctrl+Alt+T)
Step 2: Update the system (select the option for the OS you are using)
Step 3: Install the required packages (select the option for the OS you are using)
Step 4: Create a directory to hold the downloaded driver
Step 5: Move to the newly created directory
Step 6: Download the driver
Step 7: Move to the newly created driver directory
Step 8: Warning: this step only applies if you are installing to Raspberry Pi hardware.
Run a preparation script
Step 9: Run the installation script (For automated builds, use NoPrompt as an option)
A file called 8821au.conf will be installed in /etc/modeprobe.d by default.
This file will be read and applied to the driver on each system boot.
To edit the driver options file, run the edit-options.sh script.
Documentation for Driver Options is included in the file 8821au.conf .
Removal of the Driver
Note: This script should be used in the following situations:
- the driver is no longer needed
- a fresh start with default settings is needed
- a new version of the driver needs to be installed
- a major operating system upgrade is going to be applied
Note: This script removes everything that has been installed, with the exception of the packages installed in Step 3 and the driver directory. The driver directory can and probably should be deleted in most cases after running the script.
Step 1: Open a terminal (Ctrl+Alt+T)
Step 2: Move to the driver directory
Step 3: Run the removal script
Recommended WiFi Router/ Access Point Settings
Note: These are general recommendations, some of which may not apply to your specific situation.
Security: Set WPA2-AES. Do not set WPA2 mixed mode or WPA or TKIP.
Channel width for 2.4G: Set 20 MHz fixed width. Do not use 40 MHz or 20/40 automatic.
Channels for 2.4G: Set channel 1 or 6 or 11 depending on the congestion at your location. Do not set automatic channel selection.
Mode for 2.4G: For best performance, set «N only» if you no longer use B or G capable devices.
Network names: Do not set the 2.4G Network and the 5G Network to the same name. Note: Unfortunately many routers come with both networks set to the same name.
Channels for 5G: Not all devices are capable of using DFS channels. It may be necessary to set a fixed channel in the range of 36 to 48 or 149 to 161 in order for all of your devices to work on 5g. (for US, other countries may vary)
Best location for the wifi router/ access point: Near center of apartment or house, at least a couple of feet away from walls, in an elevated location.
Check congestion: There are apps available for smart phones that allow you to check the congestion levels on wifi channels. The apps generally go by the name of WiFi Analyzer or something similar.
After making and saving changes, reboot the router.
Set regulatory domain to correct setting in OS
Check the current setting
If you get 00, that is the default and may not provide optimal performance.
Set it temporarily
Note: Substitute your country code if you are not in the United States.
Set it permanently
Recommendations regarding USB
Moving your USB WiFi adapter to a different USB port has been known to fix a variety of problems. Problems include WiFi going on and off as well as connections coming and going.
If connecting your USB WiFi adapter to a desktop computer, use the USB ports on the rear of the computer. Why? The ports on the rear are directly connected to the motherboard which will reduce problems with interference and disconnection that can happen with front ports that use cables.
If your USB WiFi adapter is USB 3 capable then plug it into a USB 3 port.
Avoid USB 3.1 Gen 2 ports if possible as almost all currently available adapters have been tested with USB 3.1 Gen 1 (aka USB 3) and not with USB 3.1 Gen 2.
If you use an extension cable and your adapter is USB 3 capable, the cable needs to be USB 3 capable.
Some USB WiFi adapters require considerable electrical current and push the capabilities of the power available via USB port. One example is devices that use the Realtek 8814au chipset. Using a powered multiport USB extension can be a good idea in cases like this.
How to disable onboard WiFi on Raspberry Pi 3B, 3B+, 3A+, 4B and Zero W.
Add the following line to /boot/config.txt
How to forget a saved WiFi network on a Raspberry Pi
Delete the relevant WiFi network block (including the ‘network=’ and opening/closing braces.
Press ctrl-x followed by ‘y’ and enter to save the file.
About
Linux Driver for USB WiFi Adapters that are based on the RTL8811AU and RTL8821AU Chipsets
Источник


