- Set up a computer running VNC software for Remote Desktop
- Set up a non-macOS client running VNC software
- Configure a client to be controlled by non-Apple VNC software
- Change the VNC port on an existing computer
- Designate a custom VNC port when adding a computer
- Fast, Simple & Secure
- Instantly connect to a remote Mac device with VNC® Connect — Remote Access & Support
- Powerful, secure & reliable remote desktop software for macOS
- Superior performance, security and reliability — perfect for attended & unattended devices
- Why our customers prefer VNC® Connect
- Remote Desktop — VNC 4+
- AndreasPrang
- Screenshots
- Description
- Ratings and Reviews
- works great, but.
- this app is amazing!
- Does what it says. Works between Linux and Macs!
- App Privacy
- No Details Provided
- Подключение к удаленному компьютеру по VNC
Set up a computer running VNC software for Remote Desktop
VNC access is determined by the VNC software. To access a computer running VNC, you only need to know the IP address or fully qualified domain name and the password designated in the VNC software. The VNC password doesn’t necessarily correspond to any other password on the system.
Set up a non-macOS client running VNC software
You can set up a non-macOS client to be viewed with Remote Desktop.
Install the VNC Server software and assign a VNC password on the client computer.
Make sure the client’s firewall has the VNC port open (TCP 5900).
For more detailed instructions on steps 1–2, see the documentation that came with the client operating system, VNC software, and firewall software.
Make sure “Encrypt all network data” isn’t selected in the Security pane of Remote Desktop preferences.
If you encrypt network data, you won’t be able to control the VNC client, because Remote Desktop can’t open the necessary SSH tunnel to that computer. When you try to control a computer running VNC software, you see a warning that the keystrokes aren’t encrypted.
Add the computer to the All Computers list in Remote Desktop using the client’s IP address.
Enter the client computer’s VNC password in the Remote Desktop authentication dialog.
Configure a client to be controlled by non-Apple VNC software
You can configure a Remote Desktop client to be controlled with non–Apple VNC software. Allowing non–Apple VNC software access to a Remote Desktop client is less secure than using Remote Desktop to control the client. The VNC protocol implemented in non–Apple VNC software may not encrypt keystrokes sent over the network, so sensitive information can be intercepted. Also, the non–Apple VNC software expects the password to be stored in a cryptographically unsecured form and location. Granting VNC access to control a screen is the most powerful feature in Remote Desktop, and provides nearly unrestricted access.
WARNING: Don’t select a VNC password that’s the same as the password of any local user on the client computer or of the Remote Desktop administrator.
On the client computer, choose Apple menu > System Preferences, click Sharing, then select Remote Management in the list at the left.
Click Computer Settings, then select “VNC viewers may control screen with password.”
Enter a VNC password, then click OK.
Change the VNC port on an existing computer
After you add a computer running VNC software to a computer list (or when you’re first adding it), you can set a custom port for VNC communication, and you can designate a display to control.
In Remote Desktop  , select a computer list in the sidebar of the main window, select a computer running VNC software, then choose File > Get Info.
Click Edit, edit the Screen Sharing Port field, then click Done.
Designate a custom VNC port when adding a computer
You can pick a custom VNC port on which to view clients. Custom VNC ports are used for Network Address Translation (NAT) implementations, firewall settings, or viewing multiple displays.
In Remote Desktop , choose File > Add by Address, then enter the following:
The IP address or fully qualified domain name of the client computer
The user name and password
If the client computer uses NAT, click the Advanced Options triangle.
Enter the public ports that are mapped to the client in the Remote Management Port field and the Screen Sharing Port field, then click Add.
Источник
Fast, Simple & Secure
Instantly connect to a remote Mac device with VNC® Connect — Remote Access & Support
Powerful, secure & reliable remote desktop software for macOS
- Connect to your Mac remote devices and servers with VNC® Connect’s simple set-up process
- Easily transfer files, print, and chat between computers
- Securely control your unattended devices as if you were there in person
- Remotely connect to your customers and colleagues’ Apple devices without having to pre-install any software
- Our patent-protected technology automatically optimizes to the speed of your network, and is especially effective in low-bandwidth and high-latency environments
- Customize your remote desktop software with your own brand and logo
- Deploy in bulk, offline or remotely using standard enterprise tooling with VNC Connect® Enterprise
Superior performance, security and reliability — perfect for attended & unattended devices

Supports latest macOS and older versions
VNC® Connect is platform-independent and supports earlier versions of mac (from 10.10 Yosemite) as well as other operating systems such as Windows, Linux, Android and Raspberry Pi.

Take control of a colleague or customer’s computer in seconds (with their permission), but without any pre-installed software.

Multi-factor authentication and up to 256-bit AES end-to-end encryption. Our software also supports compliance with the GDPR and other security and privacy frameworks, including HIPAA and PCI DSS.

Intuitive remote control, high-speed streaming, responsive screen sharing, exceptional image quality and high-definition audio – it’s all there, and more.
Why our customers prefer VNC® Connect
RealVNC® remote access software allows us to assist Editors and Animators experiencing IT problems, without needing to leave our desks.
— Paul Reeves, Production Technology, Aardman Animations
— Paul Reeves, Production Technology, Aardman Animations
We’ve gone from being in limp mode to overdrive in one easy step, using RealVNC® as the driving force to get us there.
— Johan Booysen, Founder, Centurion Solar
— Johan Booysen, Founder, Centurion Solar
RealVNC® is a small miracle package that plays an essential role in minimizing disruption to emergency rescue efforts.
— Rashed Sarhadi, Information Technology Services, Clackamas County Fire District
— Rashed Sarhadi, Information Technology Services, Clackamas County Fire District
RealVNC® remote access software is a real game changer. It’s indispensable.
— Rick Pilley, Group Leader, Pratt and Whitney
— Rick Pilley, Group Leader, Pratt and Whitney
Источник
Remote Desktop — VNC 4+
AndreasPrang
Screenshots
![]()
Description
Open VNC connections from your Mac to another as fast as possible.
No playing. No paying. No tricky features. It just works!
Any questions or problems? Please contact me: info@iSolute.de
Ratings and Reviews
works great, but.
— recent connection list didn’t work
— didn’t find a way how to save a connection
— and i didn’t like, that computer where i connect to, has to give permission first, which is not convenient
pls address these issues, and I will change to 5 starts.
I see people complain and see that it is just a wrapper, but i tried to find the original apple app, and i couldn’t 🙂
ok, figured out how to use the Remote Screen client without this app:
Go to Finder -> Go -> Connect to server -> vnc://ip_you_want_to_connect
this app is amazing!
this app is amazing!! that’s right. It does everything that its designed to do and without charging a dime! I looked at the other apps and they were charging ridiculous amount of money for something as simple as remote desktop. That’s crazy. Hats off to the developer for saving us some bucks!
Does what it says. Works between Linux and Macs!
I was trying to find an EASY way to remote connect between my home (Linux) and work (MacBook) Easier than the built in screen share app in Mac. Just pre-authorized VNC on my Linux input the IP address on the Mac and BAM. Done and done. Fast connection, too. Love it.
App Privacy
The developer, AndreasPrang , has not provided details about its privacy practices and handling of data to Apple.
No Details Provided
The developer will be required to provide privacy details when they submit their next app update.
Источник
Подключение к удаленному компьютеру по VNC
Работа с VNC-клиентом. Материал ориентирован на неопытного пользователя.
1. Установка VNC-клиента
2. Подключение VNC-клиента к удаленному компьютеру
3. Отключение VNC-клиента от удаленного компьютера
4. Тюнинг VNC-клиента
5. Частые проблемы
Для работы с удаленным компьютером по VNC на компьютере пользователя нужно запустить программу-клиент (VNC viewer, VNC client). Эта программа передает на удаленный компьютер данные о нажатиях на клавиши и о движениях мыши, сделанных пользователем, и показывает информацию, предназначенную к выводу на экран.
1. Установка VNC-клиента
Для ОС Windows можно бесплатно скачать и инсталлировать VNC-клиент UltraVNC и TightVNC.
Mac OS X начиная с версии 10.5 имеет поддержку VNC-клиента в RemoteDesktop. Для предыдущих версий можно использовать VNC-клиенты JollysFastVNC и Chicken.
Для Linux ветви Debian (Ubuntu) VNC-клиент устанавливается из репозитория командой:
apt-get install vncviewer
Для ветви RedHat (CentOS, Fedora) — командой:
yum install vnc
Для FreeBSD VNC-клиент (TightVNC) устанавливается из пакетов командой:
pkg_add -r tightvnc
2. Подключение VNC-клиента к удаленному компьютеру
Для подключения VNC-клиента к удаленному компьютеру требуется указать его IP-адрес или DNS-имя, и номер дисплея (по умолчанию, :0) или номер TCP-порта (по умолчанию, 5900). Если VNC-сервер требует авторизации, то при подключении к нему VNC-клиент запросит пароль. Обратите внимание, что пароль доступа к VNC-серверу не связан с каким-либо аккаунтом (учетной записью пользователя) на удаленном компьютере, а служит только для ограничения доступа к дисплею VNC-сервера.
После установки соединения и открытия экрана, в зависимости от настроек VNC-сервера может потребоваться авторизация пользователя на виртуальном сервере или может быть открыта уже запущенная рабочая сессия какого-либо пользователя.
Так как на компьютере одновременно могут работать несколько VNC-серверов, для их разделения используют параметр номер дисплея. Например, один VNC-сервер может быть запущен на дисплее :0, другой — на дисплее :1. Каждому номеру дисплея соответствует номер TCP-порта, на котором VNC-сервер принимает соединения. Номер порта для дисплея получается прибавлением номера дисплея к базовому номеру порта — 5900. Дисплею :0 соответствует TCP-порт 5900, дисплею :1 — порт 5901.
3. Отключение VNC-клиента от удаленного компьютера
При закрытии окна VNC-клиента или после выхода из окружения средствами рабочего стола, в зависимости от настроек VNC-сервера, рабочая сессия пользователя может закрыться с остановкой всех используемых программ, или продолжать работу и быть доступной снова при повторном подключении к VNC-серверу.
4. Тюнинг VNC-клиента
Большое количество передаваемой на экран информации влечет за собой повышенные требования к скорости канала — к его пропускной способности и времени передачи пакетов. Нахватка пропускной способности приводит к некомфортным задержкам при больших изменениях показывамой на экране информации — открытии новых окон, скроллинге и т.д. Особенно большие задержки будут возникать при показывании фотографий и других изображений или элементов интерфейса, имеющих большое количество цветов и сложные формы.
Главный параметр, который влияет на объем передаваемых данных — алгоритм кодирования передаваемой графики. Для уменьшения объема и, соответственно, ускорения работы, рекомендуется использовать алгоритмы Tight, ZLib, ZRLE — по сравнению с несжатыми данными (Raw), они обеспечивают сжатие в десятки раз, заметно нагружая процессор. Эти алгоритмы кодирования обеспечивают комфортную работу даже на каналах со скоростью 256-512 Кбит/сек.
Для сокращения объема передаваемой по сети информации также можно устанавливать высокий уровень сжатия (Compression Level, Compression Value), низкий уровень качества JPEG (JPEG Quality) и включать режим уменьшения количества цветов (-bgr233, Restricted colors). Самый большой эффект из них при заметном снижении качества изображения дает режим уменьшения количества цветов — объем передаваемой информации уменьшается в 1.5-3 раза, соответственно, в 1.5-3 раза ускоряется отображение на экране.
JPEG применяется алгоритмом кодирования Tight для сжатия участков экрана, содержащих фотографии и другие сложные изображения с большим числом цветов. Использование Tight+JPEG сокращает в 2-5 раз объем передаваемых при этом данных. Другие алгоритмы кодирования JPEG не поддерживают.
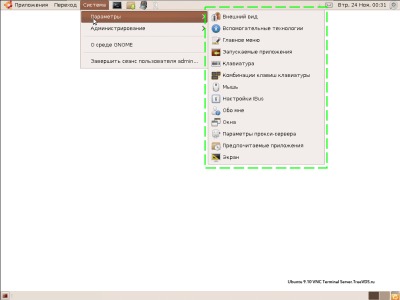
1. Выпадающего меню «Система -> Параметры»
Объем передаваемых данных и скорость отображения на канале 1 Мбит/сек при открытии выпадающего меню «Система -> Параметры» (на рисунке меню выделено зеленым пунктиром):
| Полноцветный режим | 256 цветов (BGR233) | |||
|---|---|---|---|---|
| Объем | Время | Объем | Время | |
| ZLib | 11 Кб | 0.09 сек | 7 Кб | 0.06 сек |
| HexTile | 208 Кб | 1.6 сек | 118 Кб | 0.95 сек |
| Raw | 248 Кб | 2 сек | 128 Кб | 1 сек |
5. Частые проблемы
Не удается подключиться к VNC-серверу
Медленная работа через достаточно быстрый канал
Если VNC-клиент не может согласовать с VNC-сервером использование алгоритм кодирования графики с компрессией данных, выбирается алгоритм по умолчанию — Raw, который передает данные без сжатия. Также кодирование без сжатия или с низким уровнем сжатия может автоматически выбираться VNC-клиентом при работе через быструю локальную сеть. Данную проблему можно исправить, принудительно указав в настройках VNC-клиента алгоритм кодирования с высоким уровнем сжатия — ZLib, ZRLE, Tight.
Однако, для некоторых сочетаний клиента и сервера такое решение может быть бесполезным из-за ошибок в согласовании алгоритма кодирования. Например, клиент TightVNC с сервером RealVNC часто могут работать только с кодировкой Raw. Решением в этом случае будет смена VNC-клиента или VNC-сервера.
Источник


