- Reason 442: Failed to enable virtual adapter [Solved]
- 5 Best VPNs we recommend
- How to fix Cisco VPN client failed to enable virtual adapter
- 1. Turn Off the Internet Connection Sharing (ICS) Service
- ⇒ Install Private Internet Access
- Private Internet Access
- 2. Edit the Registry
- 3. Turn Off Internet Connection Sharing
- Frequently Asked Questions
- Is Cisco VPN client compatible with Windows 10?
- Is Cisco VPN client free?
- What VPN protocol does Cisco AnyConnect use?
- Исправление Cisco VPN не удалось включить виртуальный адаптер (причина 442)
- Отключить службу ICS
- Обновление за апрель 2021 года:
- Удалите VPN-клиент и обновите его до версии 5.0.07.0240-k9-BETA.
- Оптимизация реестра
- Fixing Cisco VPN Failed to Enable Virtual Adapter (Reason 442)
- Disable the ICS service
- April 2021 Update:
- Remove the VPN client and update to version 5.0.07.0240-k9-BETA.
- Registry Optimization
Reason 442: Failed to enable virtual adapter [Solved]

- The Failed to enable Virtual Adapter error in Cisco has a bunch of workarounds.
- More often than not it’s caused by a conflicting ICS setting on your PC.
- Our guide can teach you how to bypass this annoying Cisco issue in no time.
- A popular alternative is upgrading to a better enterprise VPN solution.

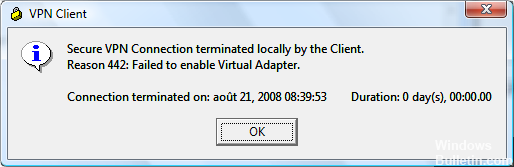
The Failed to enable Virtual Adapter error message is one that pops up for some Cisco VPN client software users. The exact error message states: Secure VPN Connection terminated locally by the Client. Reason 442: Failed to enable Virtual Adapter.
As a result, the Cisco VPN users can’t connect to the VPN server. There are, however, a few confirmed resolutions for that error message.
This is how you can fix virtual adapter errors
5 Best VPNs we recommend
| 79% Off + 2 free Months |  Check offer! Check offer! | |
| 83% Off (2.25$/Month) + 3 free Months | Check offer! | |
| 68% Off + 1, 12 or 24 free Months (random prize) | Check offer! | |
| 83% Off (2.21$/Month) + 3 free Months | Check offer! | |
| 76% (2.83$) on 2 Years plan | Check offer! |
How to fix Cisco VPN client failed to enable virtual adapter
1. Turn Off the Internet Connection Sharing (ICS) Service
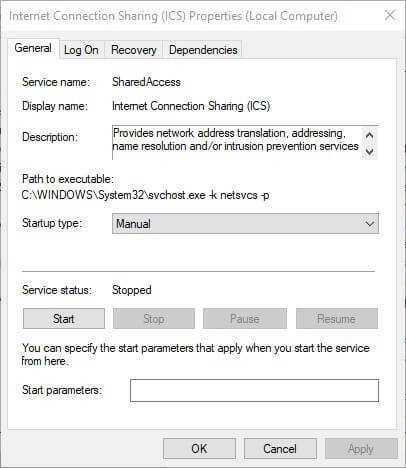
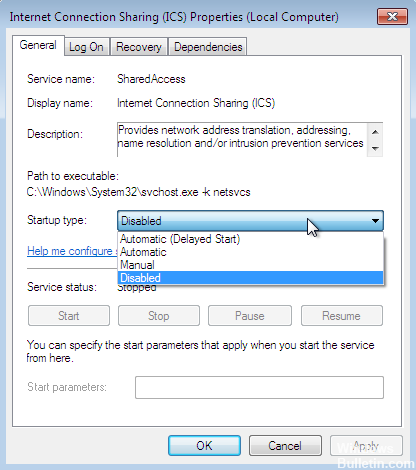
The Virtual Adapter error can be due to the Internet Connection Sharing (ICS) service. Some users have stated that they’ve fixed the error by turning that service off. This is how users can disable Internet Connection Sharing (ICS).
- Open Run by pressing the Windows key + R keys simultaneously.
- Enter services.msc in the Open text box, and press the Return key (or click OK).
- Double-click Cisco Systems, Inc. VPN Service on the Services window.
- Click the Stop button.
- Press the Apply and OK buttons to close the Cisco Systems, Inc.VPN Properties window.
- Double-click Internet Connection Sharing (ICS) to open the window shown directly below.

- Click the Stop button to terminate it.
- Select Disabled from the Startup type drop-down menu.
- Click the Apply button to apply the new settings.
- Select the OK option to close the window.
- Then right-click the Cisco System, Inc. VPN Service and select Start.
- Now try connecting with the Cisco VPN client.
Note: It is important to mention that the Cisco VPN Client is no longer supported by CISCO Systems since 2014 and that no updates were released for this product since 2012.
Running obsolete software can cause more damage than you might think, which is why we recommend a modern VPN client like Private Internet Access.

⇒ Install Private Internet Access
With an impressive network of global gateways, you will never have to worry about your connection to worldwide servers not being successful. Plus, your traffic data will be routed through secure VPN tunnels and protected by the best-in-class encryption technology.
Security-oriented features are complimented by PIA’s absolute privacy guarantee: between IP cloaking, anonymous browsing, and a strict no-log policy, your identity, location, and data including your online activity will never risk falling into the wrong hands.

Private Internet Access
Still using the Cisco VPN client? It’s time to explore the modern face of online privacy with PIA!
2. Edit the Registry
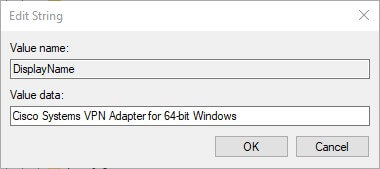
This resolution is more specifically for Windows 10, 8.1, and 8. Lots of Cisco VPN users have stated that editing the DisplayName string value for CVirtA with the Registry Editor fixed the Virtual Adapter error for them. Cisco VPN users should edit the registry as follows.
- First, open the Registry Editor by entering regedit in Run and clicking OK.
- Copy this registry path with the Ctrl + C hotkey:
Then paste the path into the Registry Editor’s address bar with the Ctrl + V hotkey, and press the Return key.
3. Turn Off Internet Connection Sharing
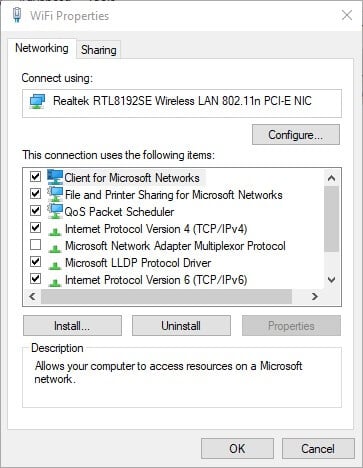
- Some users have also confirmed that turning internet sharing off for the network adapter that provides internet for Cisco VPN fixes the issue. To do that, enter ncpa.cpl in Run and click OK.
- Right-click the internet network adapter and select Properties to open the window below.
- Click the Sharing tab shown directly below.
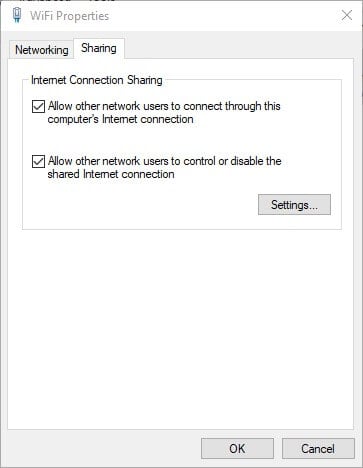
- Deselect the Allow other network users to connect through this computer’s Internet connection option on the Sharing tab.
- Press the OK button to close the properties window.
Those are three confirmed resolutions that fix the Failed to enable Virtual Adapter error in Windows 10, 8.1, 8, and 7.
Note that Windows 10 doesn’t officially support Cisco VPN, so it’s fairly essential to edit the registry as outlined above to get the client up and running on that platform. Ready to tackle this issue? Let us know how it worked in the comments section.
Frequently Asked Questions
Is Cisco VPN client compatible with Windows 10?
Officially, no. Since Cisco ended support for this product back in 2014, the Cisco VPN Client isn’t supported by Windows 10. There are however more modern apps that you can use such as the Cisco AnyConnect VPN or premium, full-scale VPN solutions such as Private Internet Access.
Is Cisco VPN client free?
While the classic Cisco VPN Client is no longer available, you can still download the Cisco AnyConnect VPN software from the Microsoft Store, completely free of charge.
What VPN protocol does Cisco AnyConnect use?
Cisco AnyConnect relies on TLS (Transport Layer Security) protocols to encrypt and route the data traffic through its secure VPN tunnels. Already optimized for privacy and data security, TLS is a popular protocol used for transferring data over the Internet.
Исправление Cisco VPN не удалось включить виртуальный адаптер (причина 442)
Cisco VPN Client является одним из самых популярных инструментов Cisco, используемых администраторами, инженерами и конечными пользователями для подключения к своим удаленным сетям и доступа к ресурсам. В этой статье показано, как устранить неполадки Cisco VPN Client. Причина ошибки 442: не удалось включить виртуальный адаптер при попытке подключения к удаленному VPN-шлюзу или маршрутизатору из операционной системы Windows 8 (бит 32 и бит 64).
С введением Windows 8 пользователи Cisco VPN столкнулись с проблемой: программное обеспечение Cisco VPN установлено правильно, но невозможно подключиться к удаленной сети VPN. При попытке подключиться к сети VPN с помощью операционной системы Windows 8 (32 или 64-bit) клиент Cisco VPN не может подключиться. Как только пользователь дважды щелкает по выбранной записи соединения, VPN-клиент начинает согласование и запрашивает имя пользователя и пароль.
Эта проблема обычно возникает из-за того, что адаптер Cisco VPN не включен должным образом при попытке подключения к концентратору.
Отключить службу ICS
К сожалению, старый добрый метод удаления и повторной установки в данном случае не уведет вас слишком далеко, потому что проблема не в программе клиента Cisco VPN, а в сервисе Microsoft Internet Connection Sharing (ICS).
Обновление за апрель 2021 года:
Теперь мы рекомендуем использовать этот инструмент для вашей ошибки. Кроме того, этот инструмент исправляет распространенные компьютерные ошибки, защищает вас от потери файлов, вредоносных программ, сбоев оборудования и оптимизирует ваш компьютер для максимальной производительности. Вы можете быстро исправить проблемы с вашим ПК и предотвратить появление других программ с этим программным обеспечением:
- Шаг 1: Скачать PC Repair & Optimizer Tool (Windows 10, 8, 7, XP, Vista — Microsoft Gold Certified).
- Шаг 2: Нажмите «Начать сканирование”, Чтобы найти проблемы реестра Windows, которые могут вызывать проблемы с ПК.
- Шаг 3: Нажмите «Починить все», Чтобы исправить все проблемы.

Чтобы исправить эту ошибку, выполните следующие действия:
1. Нажмите кнопку «Пуск» и введите «services.msc», как показано:
2 Найдите и остановите службу Cisco Systems, Inc. VPN;
3 Остановить и отключить службу общего доступа к Интернету (ICS);
4. перезапустите Cisco System, Inc. VPN-сервис.
Перезапустите клиент Cisco VPN, и проблема решена!
Это относится, по крайней мере, к версии клиента Cisco Systems VPN 5.0.07.0290 в Windows 7 Pro 64-Bit Edition.
Удалите VPN-клиент и обновите его до версии 5.0.07.0240-k9-BETA.
1. щелкните Пуск> Компьютер.
2. дважды щелкните на вашем диске C :.
3. Дважды щелкните Program Files> Cisco Systems> VPN Client.
4. Щелкните правой кнопкой мыши файл cvpnd.exe и выберите «Свойства».
5. нажмите на вкладку «Совместимость».
6. Установите флажок рядом с параметром, запустите эту программу в режиме совместимости для:.
7. Убедитесь, что выбран Windows XP Service Pack 2.
8. нажмите Применить, затем нажмите ОК.
9. Щелкните правой кнопкой мыши vpngui.exe и выберите «Свойства».
10. Установите флажок рядом с параметром, Запустите эту программу в режиме совместимости для:.
11. Убедитесь, что выбран Windows XP Service Pack 2.
12. Нажмите Применить, затем нажмите ОК.
13. Перезагрузите компьютер.
Оптимизация реестра

- Нажмите Пуск, введите regedit в поле поиска, затем нажмите Enter.
- Перейдите к HKEY_LOCAL_MACHINE \ SYSTEM \ CurrentControlSet \ Services \ CVirtA
- Найдите значение строки с именем DisplayName.
- Щелкните правой кнопкой мыши и выберите «Изменить» в контекстном меню.
- В данных значения удалите @ oemX.inf,% CVirtA_Desc% ;. Данные значения должны содержать только адаптеры Cisco Systems VPN для 64-битной Windows.
- Нажмите на ОК.
- Закройте редактор реестра.
- Попробуйте снова подключиться к клиенту Cisco VPN.
Если у вас есть другие проблемы с вашим VPN, это может быть признаком большей проблемы. Если отключение программы не работает, попробуйте перезагрузить систему и повторить шаги.

CCNA, веб-разработчик, ПК для устранения неполадок
Я компьютерный энтузиаст и практикующий ИТ-специалист. У меня за плечами многолетний опыт работы в области компьютерного программирования, устранения неисправностей и ремонта оборудования. Я специализируюсь на веб-разработке и дизайне баз данных. У меня также есть сертификат CCNA для проектирования сетей и устранения неполадок.
Fixing Cisco VPN Failed to Enable Virtual Adapter (Reason 442)
The Cisco VPN Client is one of the most popular Cisco tools used by administrators, engineers and end users to connect to their remote networks and access resources. This article shows how to troubleshoot the Cisco VPN Client Error Reason 442: Failed To Enable Virtual Adapter when trying to connect to a remote VPN gateway or router from the Windows 8 operating system (32-bit and 64-bit).
With the introduction of Windows 8, Cisco VPN users are faced with a problem: Cisco VPN software is installed correctly, but cannot connect to a remote VPN network. When you try to connect to a VPN network using a Windows 8 (32 or 64-bit) operating system, the Cisco VPN client cannot connect. As soon as the user double-clicks on the selected connection entry, the VPN client starts the negotiation and asks for the user name and password.
This problem is usually due to the fact that the Cisco VPN adapter is not properly enabled when trying to connect to the hub.
Disable the ICS service
Unfortunately, the good old-fashioned method of deleting and reinstalling does not take you very far in this case, because the problem is not with the Cisco VPN client program, but with Microsoft’s Internet Connection Sharing (ICS) service.
April 2021 Update:
We now recommend using this tool for your error. Additionally, this tool fixes common computer errors, protects you against file loss, malware, hardware failures and optimizes your PC for maximum performance. You can fix your PC problems quickly and prevent others from happening with this software:
- Step 1 : Download PC Repair & Optimizer Tool (Windows 10, 8, 7, XP, Vista – Microsoft Gold Certified).
- Step 2 : Click “Start Scan” to find Windows registry issues that could be causing PC problems.
- Step 3 : Click “Repair All” to fix all issues.
Follow the steps below to correct this error:
1. Press the Start key and enter “services.msc” as shown:
2 Locate and stop Cisco Systems, Inc. VPN service;
3 Stop and disable the Internet Connection Sharing (ICS) service;
4. restart Cisco System, Inc. VPN Service.
Restart the Cisco VPN client and the problem is solved!
This applies at least to Cisco Systems VPN Client version 5.0.07.0290 on Windows 7 Pro 64-Bit Edition.
Remove the VPN client and update to version 5.0.07.0240-k9-BETA.
1. click Start > Computer.
2. double-click on your drive C:.
3. Double-click Program Files > Cisco Systems > VPN Client.
4. Right-click on cvpnd.exe and select Properties.
5. click on the Compatibility tab.
6. Check the box next to the option, run this program in compatibility mode for:.
7. Make sure that Windows XP Service Pack 2 is selected.
8. click Apply, then click OK.
9. Right-click on vpngui.exe and select Properties.
10.Check the box next to the option, Run this program in compatibility mode for:.
11. Make sure that Windows XP Service Pack 2 is selected.
12. Click Apply, then click OK.
13. Restart your computer.
Registry Optimization
- Click on Start, type regedit in the search box, then press Enter.
- Navigate to HKEY_LOCAL_MACHINE\SYSTEM\CurrentControlSet\Services\CVirtA
- Find the value of the string with the name DisplayName.
- Right-click and choose Edit from the context menu.
- In the value data, delete @oemX.inf,%CVirtA_Desc%;. The value data must only contain Cisco Systems VPN adapters for 64-bit Windows.
- Click on Ok.
- Close the registry editor.
- Try your Cisco VPN Client connection again.
If you have other difficulties with your VPN, this could be a sign of a bigger problem. If program disablement does not work, try restarting the system and repeating the steps.
CCNA, Web Developer, PC Troubleshooter
I am a computer enthusiast and a practicing IT Professional. I have years of experience behind me in computer programming, hardware troubleshooting and repair. I specialise in Web Development and Database Design. I also have a CCNA certification for Network Design and Troubleshooting.


