- Windows 10 USB Clean Installation Reboot Loop
- Replies (7)
- How to Boot from USB Drive in Windows 10
- Boot from a USB drive at PC startup
- About Sergey Tkachenko
- 1 thought on “ How to Boot from USB Drive in Windows 10 ”
- Install Windows from a USB Flash Drive
- What you need
- Step 1 — Format the drive and set the primary partition as active
- Step 2 — Copy Windows Setup to the USB flash drive
- Step 3 — Install Windows to the new PC
- If your Windows image is larger than 4GB
- WinSetupFromUSB: создание загрузочной флешки Windows 10 для UEFI и BIOS. Инструкция
- Как создать загрузочную флешку с Windows 10
Windows 10 USB Clean Installation Reboot Loop
After successfully upgrading Windows 10 I chose to perform a clean installation using a 16 GB USB drive. Upon running through the installation setup I get all the way to ‘Finishing Up’ at which point the computer says that it requires a reboot in order to complete installation of Windows. Following the reboot, the initial installation menu opens up again (where you select language, time, etc. )
Any thoughts or help would be appreciated.
Other pertinent info:
1. All external devices have been disconnected (other than mouse and keyboard)
2. Boot order is changed so that the USB is the only option
3. The error was encountered when using custom install where two HDD disk partitions are displayed. The first is Disk 0 System Reserve and is 500 megabytes (large?) while the second is Disk 0 and is 465 gigabytes.
Could the drive be faulty?
Replies (7)
Thank you for posting your query on Microsoft Community.
If you are unable to boot to the computer then I would suggest you to create installation media and then try to perform automatic repair and see if it helps you to fix the issue.
Step 1: Create ISO for Windows 10
You may also refer to the article mentioned below to for downloading Windows 10 on your computer.
Step 2: Perform an Automatic repair
The Automatic repair can detect and fix the issues that prevent the computer from working normally.
After you have a Windows 10 installation disc/USB, follow these steps:
- When your computer starts, wait for the manufacturer logo to check the option for boot menu, it will usually be F12.
- The boot menu key might differ with each manufacturer. If you are unable to find the boot menu key, you may refer the user manual.
- Restart the computer, when the manufacturer’s logo is displayed, keep pressing the Boot menu option key to enter the boot menu and change the boot option to CD\DVD ROM (in case you create DVD). Select USB in case you create USB.
- After you boot your computer using Windows DVD or System Repair Disc, a black screen appears with gray text » Press any key to boot from CD or DVD «. Press any key.
- Select the correct time and Keyboard type.
- Click Repair your computer in the lower left corner.
- Click on Troubleshooting , advanced option and then click Startup Repair .
Hope this would help. If issue still persists post back with current status of your computer and result of the proposed suggestion, we will be happy to assist you.
How to Boot from USB Drive in Windows 10
The days of burning operating system ISO images to a disc are long gone. Today, most PCs can boot from USB so it’s just easier to update and more convenient to install Windows from a USB flash drive. If you do not have an optical drive for reading DVDs or Blu-Rays in your PC but have a bootable USB drive, you may be interested in learning how to start your computer using that drive. There are a number of methods you can use.
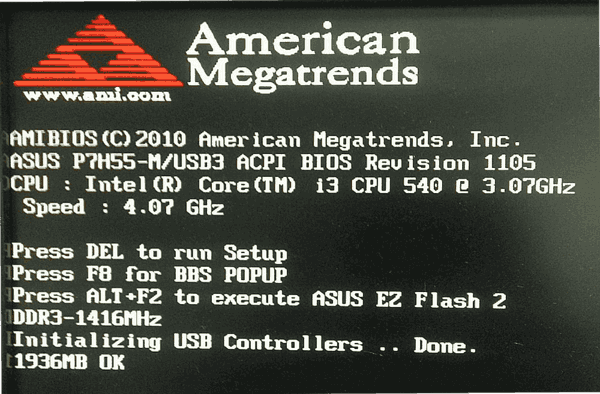
There are a number of methods you can use in Windows 10 to start your PC from a USB drive. They can vary depending on your hardware and software. Modern computers allows you to select a bootable device at the startup (BIOS stage). UEFI firmware environments with Fast and Ultra Fast boot options often do not allow selecting a boot device. They provide a special option in advanced startup options instead.
To boot from a USB drive in Windows 10, do the following.
- Plug your bootable USB drive to your computer.
- Open the Advanced Startup Options screen.
- Click on the item Use a device.

- Click on the USB drive that you want to use to boot from.
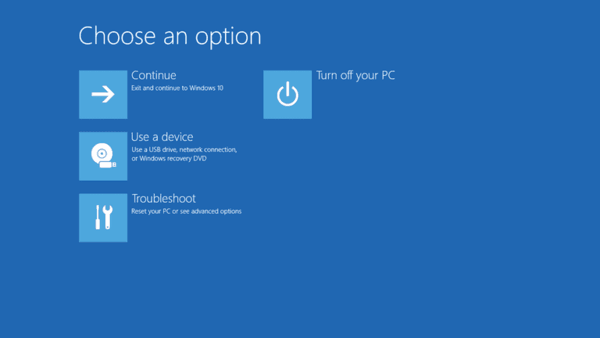
The computer will restart and start from the selected USB device.
Note: If you don’t have such an item on the Advanced Startup Options screen, this means it is not supported by your hardware, or you have the Fast/Ultra Fast boot option enabled in UEFI.
In this case, the option you should choose in the UEFI BIOS screen should be the one to boot your PC from an external USB boot device.
Boot from a USB drive at PC startup
- Shutdown your PC or laptop.
- Connect your USB drive.
- Start your PC.
- If prompted, press a special key, e.g. F8.
- In the boot menu, select your USB drive and continue.
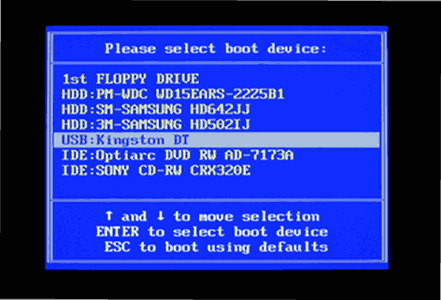
Tip: Refer to your laptop or motherboard manual to learn which key you need to press if your motherboard firmware shows no hint. The most common keys are F8 (ASUS), F11, and F12 (Acer) or Escape. You can try them if you have no user manual around.
If you need to create a Bootable USB drive, refer to the following articles:
Winaero greatly relies on your support. You can help the site keep bringing you interesting and useful content and software by using these options:
Share this post
About Sergey Tkachenko
Sergey Tkachenko is a software developer from Russia who started Winaero back in 2011. On this blog, Sergey is writing about everything connected to Microsoft, Windows and popular software. Follow him on Telegram, Twitter, and YouTube.
1 thought on “ How to Boot from USB Drive in Windows 10 ”
I found multiple similar blogs but somehow wasn’t able to follow the steps properly, your explanation helped me realize what step I was missing to move forward… thank you so much for this blog post, really helped me save hours.
Install Windows from a USB Flash Drive
Here’s how to create a bootable Windows installation USB drive starting with a Windows .iso file or a Windows Setup DVD.
If you’re looking for an easy way to create a bootable USB Windows installation drive, use the media creation tool.
What you need
- Windows 10 install .iso or DVD
- USB flash drive with at least 5GB free space. This drive will be formatted, so make sure it doesn’t have any important files on it.
- Technician PC — Windows PC that you’ll use to format the USB flash drive
- Destination PC — A PC that you’ll install Windows on
Step 1 — Format the drive and set the primary partition as active
Connect the USB flash drive to your technician PC.
Open Disk Management: Right-click on Start and choose Disk Management.
Format the partition: Right-click the USB drive partition and choose Format. Select the FAT32 file system to be able to boot either BIOS-based or UEFI-based PCs.
Set the partition as active: Right-click the USB drive partition and click Mark Partition as Active.
If Mark Partition as Active isn’t available, you can instead use diskpart to select the partition and mark it active.
Step 2 — Copy Windows Setup to the USB flash drive
Use File Explorer to copy and paste the entire contents of the Windows product DVD or ISO to the USB flash drive.
Optional: add an unattend file to automate the installation process. For more information, see Automate Windows Setup.
Step 3 — Install Windows to the new PC
Connect the USB flash drive to a new PC.
Turn on the PC and press the key that opens the boot-device selection menu for the computer, such as the Esc/F10/F12 keys. Select the option that boots the PC from the USB flash drive.
Windows Setup starts. Follow the instructions to install Windows.
Remove the USB flash drive.
If your Windows image is larger than 4GB
Windows USB install drives are formatted as FAT32, which has a 4GB filesize limit. If your image is larger than the filesize limit:
Copy everything except the Windows image file (sources\install.wim) to the USB drive (either drag and drop, or use this command, where D: is the mounted ISO and E: is the USB flash drive.)
Split the Windows image file into smaller files, and put the smaller files onto the USB drive:
WinSetupFromUSB: создание загрузочной флешки Windows 10 для UEFI и BIOS. Инструкция
 Доброго времени суток!
Достаточно много вопросов возникает при создании загрузочных флешек (ну и вообще, в пространстве вокруг этой темы 👀).
Тем более сейчас, когда в продаже все больше ПК/ноутбуков, которые идут без привода компакт дисков (а иногда, и без предустановленной ОС Windows). Т.е. это я веду к тому, что без загрузочной флешки/диска — обойтись не так просто.
Одна из самых удобных программ для подготовки и создания установочных (загрузочных) носителей — это WinSetupFromUSB . Самый главный критерий, почему выбор пал именно на нее — это функциональность, бесплатность и удобство работы.
Посудите сами, утилита способна создавать загрузочные USB-накопители, которые будут работать на самых разных ПК и ноутбуках: т.е. универсальный вариант , подходящий, как для UEFI, так и для BIOS .
В общем, даже если вам непонятны последние зашифровки, скажу так — созданный нами загрузочный накопитель (в этой статье), должен позволить загружаться на большинстве компьютеров/ноутбуков.
И так, приступим к делу.
Как создать загрузочную флешку с Windows 10
❶ Что нужно для начала работы
1) Утилита WinSetupFromUSB
На мой взгляд, это одна из лучших утилит для создания загрузочных флешек. Во-первых, она бесплатная и не нуждается в установке, во-вторых, отлично работает и поддерживает большинство ОС (Windows XP, 7, 8, 10), видит все накопители, подключенные к системе, и позволяет легко их отформатировать.
Кроме этого, она может делать мульти-загрузочные носители (с несколькими ОС), ведет журнал событий и пр.
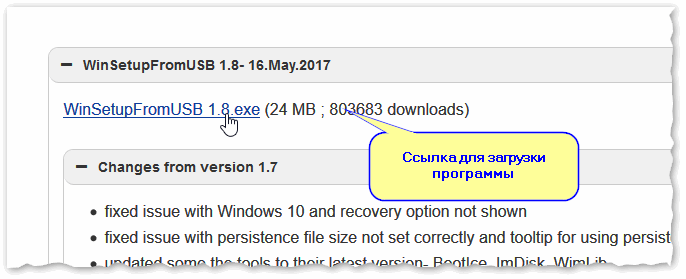
Где скачать программу WinSetupFromUSB: на официальном сайте (ссылка приведена выше), рекомендую выбирать последнюю версию (на данный момент это 1.8).
Также очень важный плюс в том (чуть выше уже казал об этом), что WinSetupFromUSB позволяет создавать загрузочные USB-флешки, которые могут загружаться как в BIOS, так и в UEFI (т.е. своего рода, универсальный вариант, который будет работать на подавляющем большинстве компьютеров).
2) Загрузочный образ ISO с Windows 10
В общем-то, такой образ сейчас можно загрузить даже с официального сайта Microsoft. Крайне желательно, использовать образ ISO, на котором одна конкретная версия ОС (с одной разрядностью). Поясню на примере:
- удачный вариант: «Windows 10 Home x64» ;
- неудачный вариант: «Windows 10 — 20 in 1 (x86 + x64)» — со всеми этими сборками (от народных умельцев), с разными версиями разрядности, с несколькими версиями ОС, происходит множество ошибок и проблем (как при создании установочных накопителей, так и при последующем их использовании).
3) Флешка минимум на 4 ГБ (лучше 8 ГБ и больше)
Самая обычная USB-флешка на 4-8 ГБ (желательно на 8 ГБ, т.к. многие образы ISO с Windows 10 размером выше, чем 4 ГБ).
Как выбрать флешку с высокой скоростью работы (на что обратить внимание при выборе флешки).
❷ Запускаем WinSetupFromUSB
Скачанный файл с программой WinSetupFromUSB (с официального сайта) представляет из себя обычный архив, запакованный программой 7-Zip. Для того, чтобы извлечь из него все файлы программы, достаточно просто его запустить.
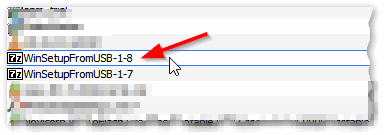
Открываем загруженный файл
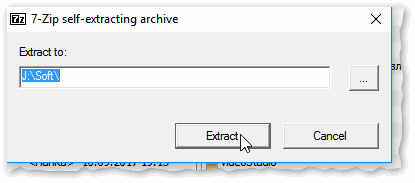
Далее указать папку, куда извлечь файлы программы. Для извлечения нажмите кнопку «Extract».
В папке с программой есть две версии: для x64 и x32 систем. Если вы не знаете какая у вас ОС, попробуйте поочередно запустить оба файла (если откроете не тот файл — программа просто не запустится, выдав ошибку).
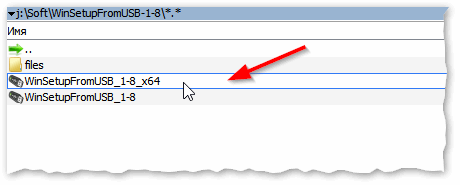
Открываем исполняемый файл
❸ Задаем настройки записи загрузочного образа
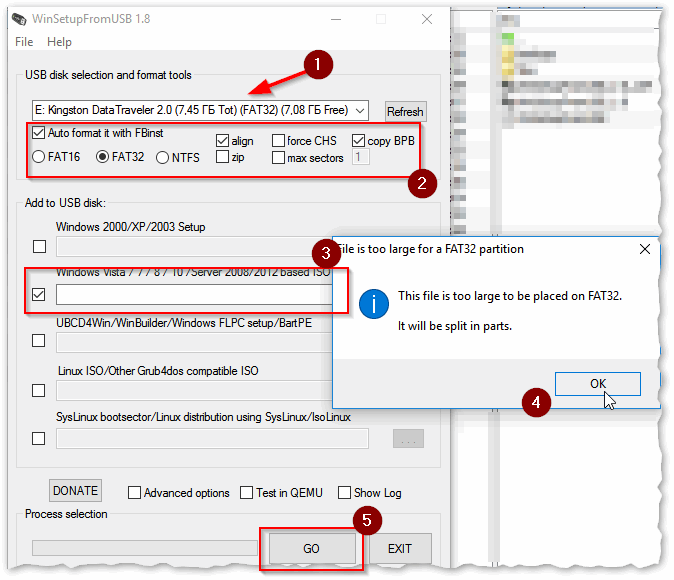
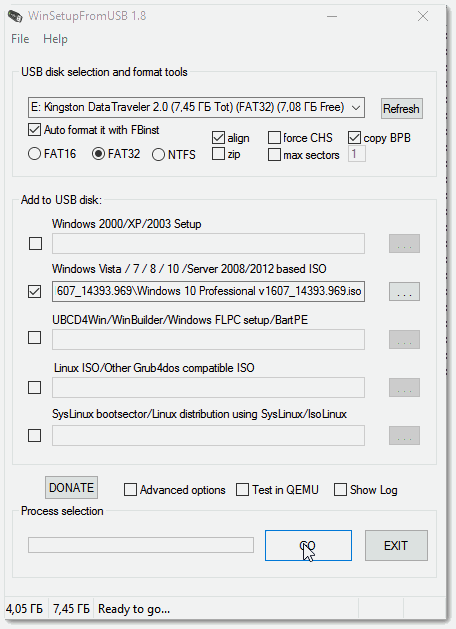
1) Для начала скопируйте все нужное с флешки , с которой будем работать (в процессе записи Windows — с нее будет все удалено). Далее в WinSetupFromUSB нажмите кнопку Refresh , чтобы программа «увидела» ваш накопитель (см. стрелка-1 на скрине ниже).
2) Затем поставьте галочки (птички) напротив следующих пунктов : Auto Format it with FBinst, FAT 32, align, Copy BPB (так, как показано в прямоугольнике-2 на скрине ниже). Этим самым мы отформатируем и приведем флешку к загрузочному типу.
3) В строке 3 (см. скрин ниже) «Vista/7/8/10/Server 2008/2012 based ISO» укажите ваш загрузочный образ с Windows 10 (если будет предупреждение, как у меня на скрине ниже — просто согласитесь. Речь в этом окне о том, что образ с Windows больше 4 ГБ и такой файл записать на файловую систему FAT 32 нельзя (примечание: утилита WinSetupFromUSB его разобьет, так, что здесь все в порядке ☺) ).
4) Ну и для начала работы утилиты — нажмите кнопку GO .
Кстати, ниже приведу еще один скрин, как выглядят все настройки, только уже без моих подчеркиваний.
Еще раз настройки крупным планом (без стрелок)
❹ Подтверждаем и даем согласие на форматирование флешки
После нажатия кнопки GO — утилита предупредит вас о том, что все данные на флешке будут удалены. Поэтому, еще раз советую, предварительно все данные перенести, сделать бэкап.
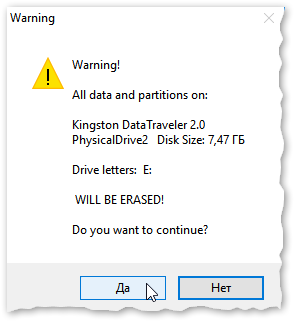
Предупреждение (об удалении всех данных с флеш-накопителя)
Кстати, предупреждения целых 2 (обычно) .

Во время работы WinSetupFromUSB лучше не запускать ресурсоёмких приложений (игр, видео- и фото-редакторов и пр.) и не закрывать окно программы (иногда, некоторым кажется, что она зависла, т.к. не подает признаков жизни ☺. Но это не так, в нижней части окна «заполняется» небольшая зеленая полоска, меняются надписи о состоянии процесса — это и есть индикаторы).
Если накопитель успешно был создан (и в процессе не возникло никаких ошибок) — вы должны увидеть небольшое окно с одной короткой фразой «Job Done» (работа завершена). Теперь флешкой можно пользоваться.
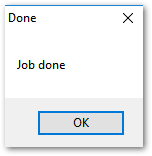
Работа выполнена — накопитель был подготовлен
❺ Проверяем, как работает флешка
Для проверки накопителя я использовал относительно современный ноутбук с UEFI. Вызвав Boot Menu — ноутбук показал, что флешку видит (как и установленную на жестком диске Windows). Попробовал загрузиться с флешки.
Инструкция о том, как зайти в Boot Menu (загрузочное меню) . Может потребоваться, когда вам нужно загрузиться, например, с флешки.
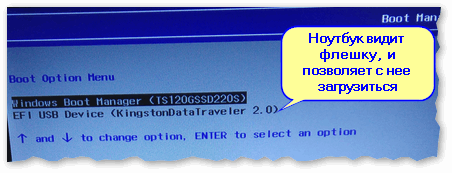
Ноутбук видит созданную нами флешку
Как видно на фото ниже, загрузка и установка ОС проходит в обычном штатном режиме (подробное руководство по установке Windows 10 — см. тут: 👉 https://ocomp.info/ustanovka-windows-10.html).

Запустилась установка Windows.
Вот так вот, и сложно, и просто одновременно.


