- Rebuild icon cache in Windows 7, Windows 8 & Vista easily
- Purge & rebuild the Icon Cache in Windows 8/7
- Rebuild The Icon Cache
- How to Clear and Rebuild the Icon Cache Completely in Windows
- Clear icon cache completely in Windows
- How to Clear and Rebuild the Icon Cache in Windows
- Method 1: Clear & Rebuild icon cache using ClearIconCache.exe freeware tool
- Method 2: Clear & Rebuild the Icon Cache Database Manually
- Method 3: Automatically Clear & Rebuild the Icon Cache Using Script
- How To Rebuild The Icon Cache In Windows 10
- Manually rebuild the icon cache in Windows 10
- Use third-party software to easily rebuild the icon cache
- Rebuild the icon cache via Command Prompt
- Related Articles
- Comments
Rebuild icon cache in Windows 7, Windows 8 & Vista easily
Last Updated: 4 years ago
It might have happened to you that the icons on your computer are not displaying normally due to unknown reasons. When this happens, and you are sure that you didn’t delete or move the program that this shortcut leads to, or that this only occurs to icons of a specific file extension, then you might need to consider that this could be caused by the corrupted icon cache.
So, you might need to rebuild the icon cache so your icon images could be reloaded and reset.
This tutorial is done on Windows 7 operating system and it will present you two methods that you could use to rebuild your icon cache to fix the problem.
Method One: Automatically Rebuild the Icon Cache
1) Please download the file and save it onto your desktop.
2) Double click to run it.
3) Follow the instructions in the Command Prompt to rebuild the Icon Cache.
The following screen shot is for your reference.
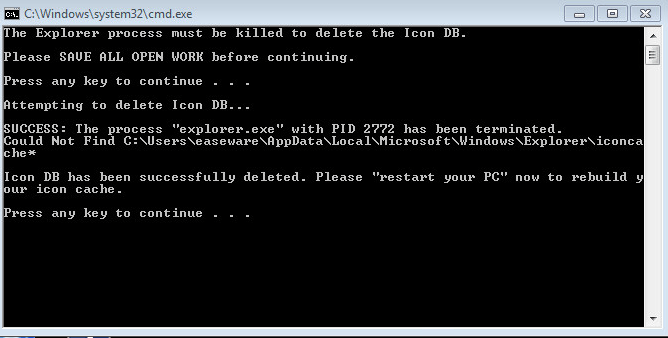
Then press any key to exit Command Prompt.
4) Restart your computer to generate a new IconCache.db file.
Method Two: Using Task Manager
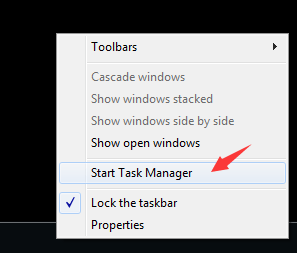
1) Right click on the empty spot of the task bar and choose Start Task Manager.
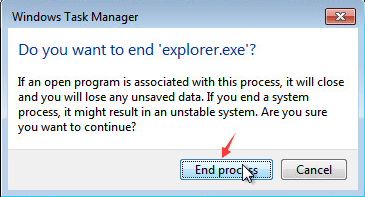
2) Under Processes tab, find the name explorer.exe, select it and choose End Process on the right corner.
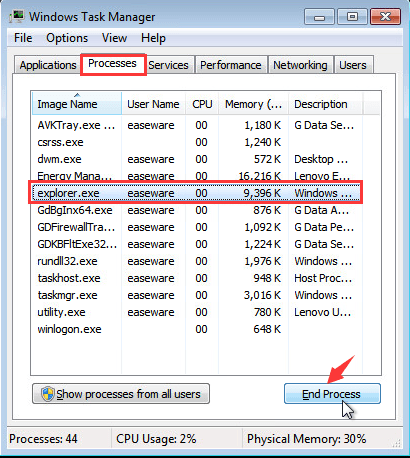
Continue with the procedure by choosing End process here.
3) Go to Application bar, choose New Task… option.
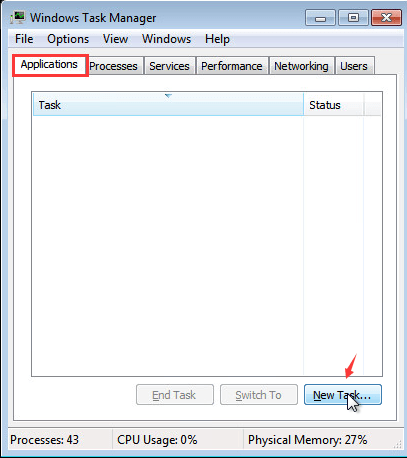
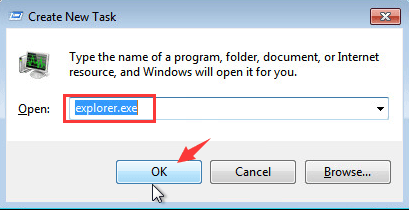
4) Type in explorer.exe and press OK.
The icons on your desk top should be displayed normally now.
If you have more or better ways to deal with this issue, please feel free to leave a comment for the others to see. Thanks in advance.
Purge & rebuild the Icon Cache in Windows 8/7
If you find that one or more of your icons are not displaying correctly, or that your Icon Cache is corrupted, you might want to rebuild the Icon Cache. The Icon Cache or IconCache.db is a special database file that Windows utilizes to keep copies of each icon handy. When Windows needs to draw an icon, it uses the copy from the cache instead of retrieving the icon image from the original application file. This helps in making Windows draw the icons faster.
Rebuild The Icon Cache
In Windows 8, Windows 7 and Windows Vista, this IconCache.db file is located at:
Whereas, it is different in the older version of Windows i.e. Windows XP.
If you find your Windows displaying icons on the desktop in the wrong manner you can purge & rebuild the Icon Cache In Windows.
If you need to rebuild the Icon cache, Open File Explorer > Folder Options > Views to show Hidden System Files. Next, go to C:\Users\Username\AppData\Local folder and delete the hidden IconCache.db file. Reboot. This action will purge and rebuild the icon cache.
There is also another way to do it, should the above method not work for you.
Kill Explorer.exe process. In Windows 7, click Start button > Hold down Ctrl+Shift & Right Click on an empty area in the Start Menu > Click “Exit Explorer”. In Windows 8, you may do so via the Task Manager.
Open the command prompt window, type each of the following and after every command, hit the Enter button:
Your Windows Icon Cache would have been rebuilt.
You may also want to check out our freeware Icon Cache Rebuilder Tool to automate the entire process of repairing icon cache.
How to Clear and Rebuild the Icon Cache Completely in Windows
Icon cache corruption may happen sometimes, causing wrong icons to show up for certain programs or in certain areas of the Windows shell, or no icons at all. My earlier post Incorrect icon shown for a file type tells you how to refresh the shell icons using Default Programs.
In case the solution posted in that link does not help, you may want to completely clear and rebuild the icon cache database. This post explains how to completely clear the icon cache (and let Windows rebuild it), using a specialized tool, or with a script I wrote, or manually — for all versions of Windows, including Windows 10.
Clear icon cache completely in Windows
How to Clear and Rebuild the Icon Cache in Windows
To render the icons for various shell objects like folders, special folders, and files, Windows caches the icons in database files so that Windows doesn’t have to read the file or folder icon and extract them every time. Occasionally, you’ll see icon-caching bugs in Windows resulting in incorrect, missing or out-of-date icons being shown for programs and desktop shortcuts, and other areas of the shell.
If refreshing the icons using ie4uinit.exe or Default apps doesn’t help, you’ll have to completely clear the icon cache.
Let’s see how to clear the icon cache completely, and let Windows rebuild it as and when it requires.
Method 1: Clear & Rebuild icon cache using ClearIconCache.exe freeware tool
Clear Icon Cache (ClearIconCache.exe) utility from Leo Davidson will cleanly exit Explorer, delete the shell icon cache (IconCache*.db) and localized thumbnail cache (ThumbCache*.db) and then restart Explorer.
Leo Davidson is a trusted source — he is the one wrote the famous PDF x64 thumbnail & preview fix for Windows few years back. And, he’s the owner of FileTypeDiag and many other useful portable tools.
With Clear Icon Cache, you just double-click the program and it takes care of the details for you. Clear Icon Cache works in Windows Vista, Windows 7, Windows 8 and Windows 10.
To run the utility in noninteractive or silent mode, run ClearIconCache.exe /QUIET
As said earlier, the utility also clears the thumbnail caches on the computer.
Method 2: Clear & Rebuild the Icon Cache Database Manually
The icon cache database files are located in your LocalAppData folder with file names prefixed with iconcache_ – each icon size has a separate cache (database) file.
The file names look like this:
- Close all folder windows that are currently open.
- Launch Task Manager using the Ctrl + Shift + Esc key sequence.
- In the Task Manager Process tab, right-click on the Explorer.exe process and select End Process.
If you receive Access is Denied error when deleting the IconCache*.db files, then one or more of the open programs is using the icon cache database. Close all programs and try again, or try clearing them from Safe mode.
In Task Manager, click File, select New Task (Run…)
Editor’s note: Instead of using Task Manager to exit Explorer.exe in Step 3 above, even better way to do this is to terminate the Explorer.exe Shell cleanly using the method described in article Terminate and Restart Explorer.exe Process Cleanly in Windows 7 & Windows Vista. If you’re using Windows 8 or Windows 10, check the article How to Exit Explorer and Restart Explorer in Windows 10.
Method 3: Automatically Clear & Rebuild the Icon Cache Using Script
This first method uses a small script that I wrote to clean up the icon cache completely. Once done, the script restarts Explorer shell for the change to take effect.
To clear the icon caches for Windows Vista, 7, 8 and Windows 10, download the zip file below, unzip and run the script file cleariconcache.vbs.
- Download cleariconcache.zip and extract the contents to a folder.
- Save all your work, and close all programs so that icon cache files are not locked by any program.
- Double-click the script file cleariconcache.vbs
- Click Yes when you’re prompted to restart the shell.
If the Icon Cache database files can’t be deleted, some programs are using it. Close all applications and try running the script again.
Once you close all programs, the program should be able to delete the icon cache files.
After clearing the cache, Explorer shell should start automatically, and rebuilds a fresh set of icon cache.
Hope you were able to fix icon rendering issues on your Windows computer by clearing the icon cache completely.
How To Rebuild The Icon Cache In Windows 10
Last Updated on October 13, 2020 by admin 2 Comments
On your Windows 10 PC, if one or more icons are not displaying as they should, it’s likely because of corrupt icon cache and rebuilding the icon cache should fix the issue.
For those who are not aware, Windows saves all icons in a file called IconCache.db located under the profile folder so that it can quickly display icons without having to search for them.
If Windows 10 showing a white color instead of the actual icon or if you are seeing same icons even after changing icons using a third-party icon pack, you can fix the issue by rebuilding the icon cache.
NOTE: None of these guides help you fix issues with thumbnails. If you are having problems with thumbnails, you need to clear or reset the thumbnail cache.
Method 1 of 3
Manually rebuild the icon cache in Windows 10
This is the easiest way to clear the icon cache without the help of third-party utilities. In this method, we manually delete the icon cache file and restart the PC to let Windows 10 automatically create the new icon cache file.
Step 1: Open File Explorer (Windows Explorer). Click the View tab and then put a checkmark next to Hidden items to make File Explorer show hidden files and folders.
Step 2: Navigate to the following folder:
In the above path, UserName is your account user name on the PC, and “C” is the drive letter of the drive where Windows 10 is installed.
Step 3: Under Local directory, locate the file named IconCache (IconCache.db), right-click on the file, and then click Delete.
Click Yes if you see the confirmation box. You might not see the confirmation prompt if you haven’t enabled delete confirmation dialog.
Step 4: Finally, right-click on the Recycle Bin icon on the desktop and then click Empty Recycle Bin to clear IconCache.db and other files.
Step 5: Close all running applications and reboot your PC once to create a new IconCache.
Method 2 of 3
Use third-party software to easily rebuild the icon cache
The method mentioned above (Method 1) is the best way out there to rebuild the cache. But if you’re unable to delete the icon cache by following the directions in Method 1, you can use a free software called Rebuild Icon Cache. The program not only rebuilds the cache but also backs up the original icon cache file so that you can restore the original file if you start experiencing issues with the new cache.
Step 1: Visit this page of DeviantArt and click the download button located on the right-side to download Rebuild Icon Cache software. Extract the downloaded RAR file using WinRAR, 7-Zip, or ZipWare to get Rebuild Icon Cache. Double-click on the folder to see Rebuild Icon Cache application.
Step 2: Right-click on Rebuild Icon Cache software and click Run as administrator. Click Yes button when you see the User Account Prompt. And if you’re asked to enter the admin password, please do the needful.
Step 3: Once Rebuild Icon Cache is launched, click on the gears icon (the first one from the left) to rebuild the icon cache.
As mentioned before, the software creates a backup of the original icon cache before rebuilding the new one. Should you experience any issues with icons, which is unlikely, click the recycle bin icon on Rebuild Icon Cache software to restore the original icon cache.
Method 3 of 3
Rebuild the icon cache via Command Prompt
If none of the above techniques working for you, please use this method to rebuild the icon cache via Command Prompt.
Step 1: Open the Task Manager either by right-clicking on the taskbar and then click Task Manager or using Ctrl + Shift + Esc keyboard shortcut.
Step 2: If you’re seeing the lighter version of Task Manager, as shown in the picture below, click More details. If you see the full version, skip to the next step.
Step 3: Under the Processes tab, right-click on Windows Explorer entry and then click End task to kill the Windows Explorer. Once you kill Windows Explorer, the taskbar and Start menu will be invisible.
Step 4: Click the File menu of Task Manager, click Run new task, enter CMD.exe, and then click OK button to open Command Prompt.
Step 5: In the Command Prompt, type the following commands one after another and press the Enter key after typing each command to execute it.
CD /d %userprofile%\AppData\Local
Del IconCache.db /a
Step 6: Click the File menu of the Task Manager again, click Run new task, enter Explorer.exe and then click OK button to restart the File Explorer.
Related Articles
Comments
Mario Green says
This method is won’t work on windows 10 anymore. Although the file still exists but you need, besides that file, to delete all db files from %userprofile%\AppData\Local\Microsoft\Windows\Explorer
This can be done by killing the process explorer.exe then deleting the files using a cmd launched from task manager, then starting explorer from task manager.
Like all the different methods shown for clearing the icon cache. But it doesn’t correct the problem with the Windows 10 Start Menu. All programs appear with a generic icon. The only applications or programs that display a correct icon would be the ‘Windows’ programs like Microsoft Edge, Weather, Movies & TV, Store, Get Office, Calendar, Mail, Xbox, etc.. The stuff that more or less comes with Windows 10 and their store apps. The millions of other programs don’t display their icons.
I know it’s something causing the problem within Windows 10’s Start menu because if I load any Start Menu substitute like ‘Start10’ (or any other) and you choose to display a Windows 7 type Start Menu, or any other type, ALL programs icon’s display properly in the Start Menu. But switch back to the Windows 10 Start Menu and all the programs get generic icons…. Thankfully programs like Start10 allow to switch back and forth cause I do like some features of the Windows 10 Start Menu.
Anyways without getting off topic, all the cache rebuilding in the world does not fix this problem. I know that not all Windows 10 users experience this problem, yet there are just as many (so it seems) that do have this icon issue with the W10 Start Menu.


