- How to record the screen on your Mac
- Use the Screenshot toolbar
- Record the entire screen
- Record a selected portion of the screen
- Trim, share, and save
- Change the settings
- How to Record Screen on Mac with Audio
- Part 1: Record Mac with Screenshot Toolbar
- Part 2: Record Screen and Audio on Mac with QuickTime
- Part 3: Use an Easy Mac Screen Recorder
- Conclusion
- Take screenshots or screen recordings on Mac
- Take pictures or screen recordings using Screenshot
- Take pictures using keyboard shortcuts
How to record the screen on your Mac
You can make a video recording of the entire screen or just a selected portion of it.
Use the Screenshot toolbar

To view the Screenshot toolbar, press these three keys together: Shift, Command, and 5. You will see onscreen controls for recording the entire screen, recording a selected portion of the screen, or capturing a still image of your screen:
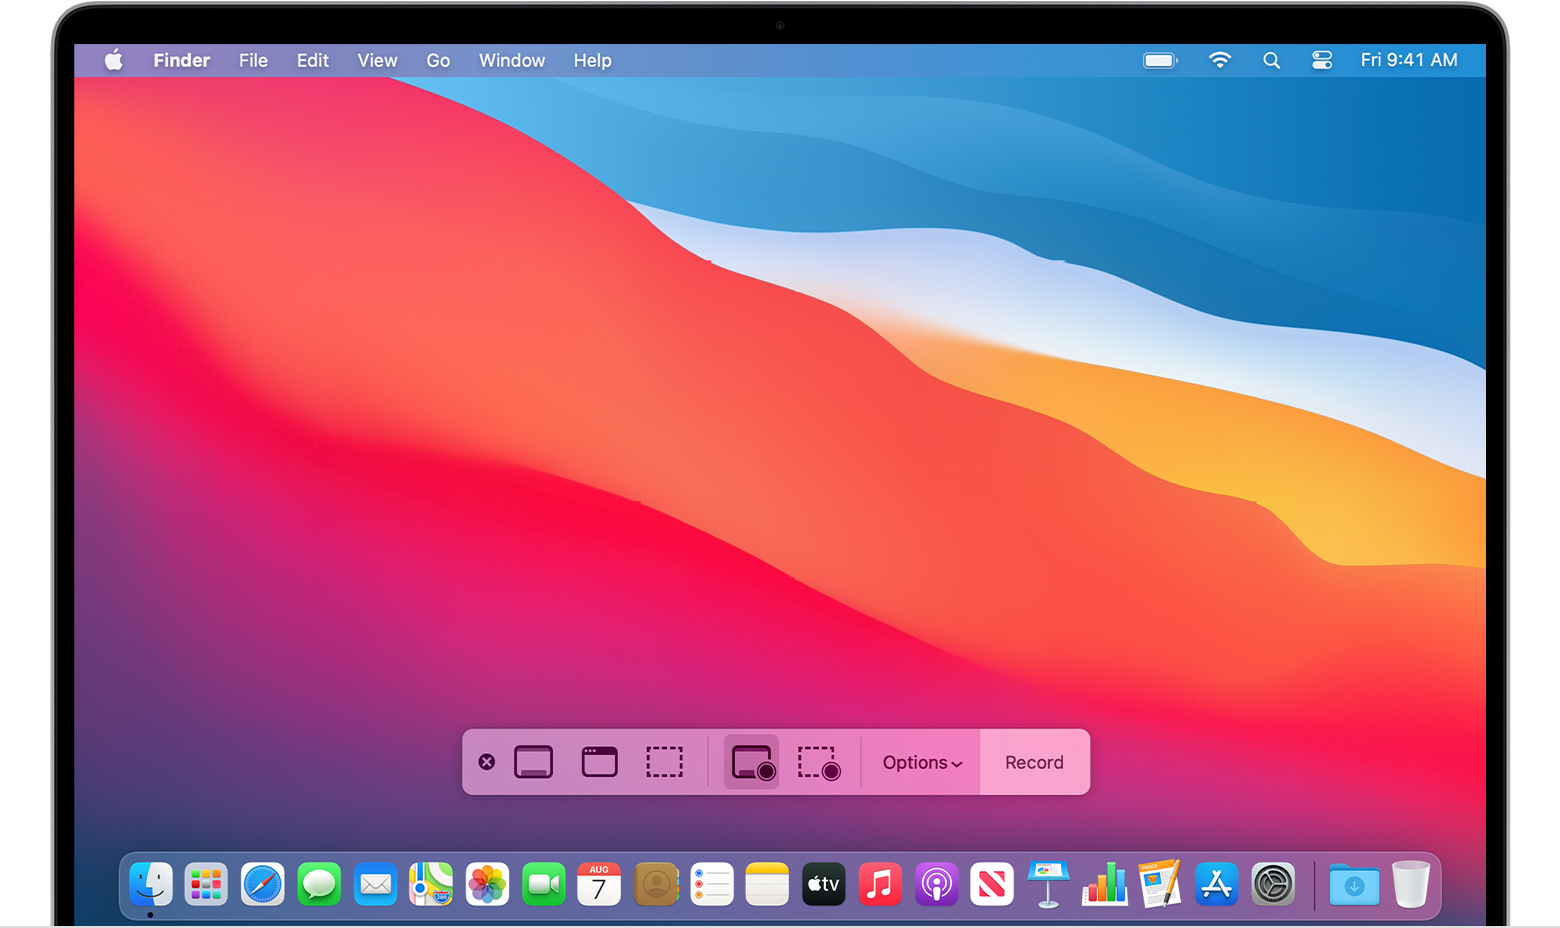
Record the entire screen
- Click in the onscreen controls. Your pointer changes to a camera .
- Click any screen to start recording that screen, or click Record in the onscreen controls.
- To stop recording, click in the menu bar. Or press Command-Control-Esc (Escape).
- Use the thumbnail to trim, share, save, or take other actions.
Record a selected portion of the screen
- Click in the onscreen controls.
- Drag to select an area of the screen to record. To move the entire selection, drag from within the selection.
- To start recording, click Record in the onscreen controls.
- To stop recording, click in the menu bar. Or press Command-Control-Esc (Escape).
- Use the thumbnail to trim, share, save, or take other actions.
Trim, share, and save
After you stop recording, a thumbnail of the video appears briefly in the lower-right corner of your screen.
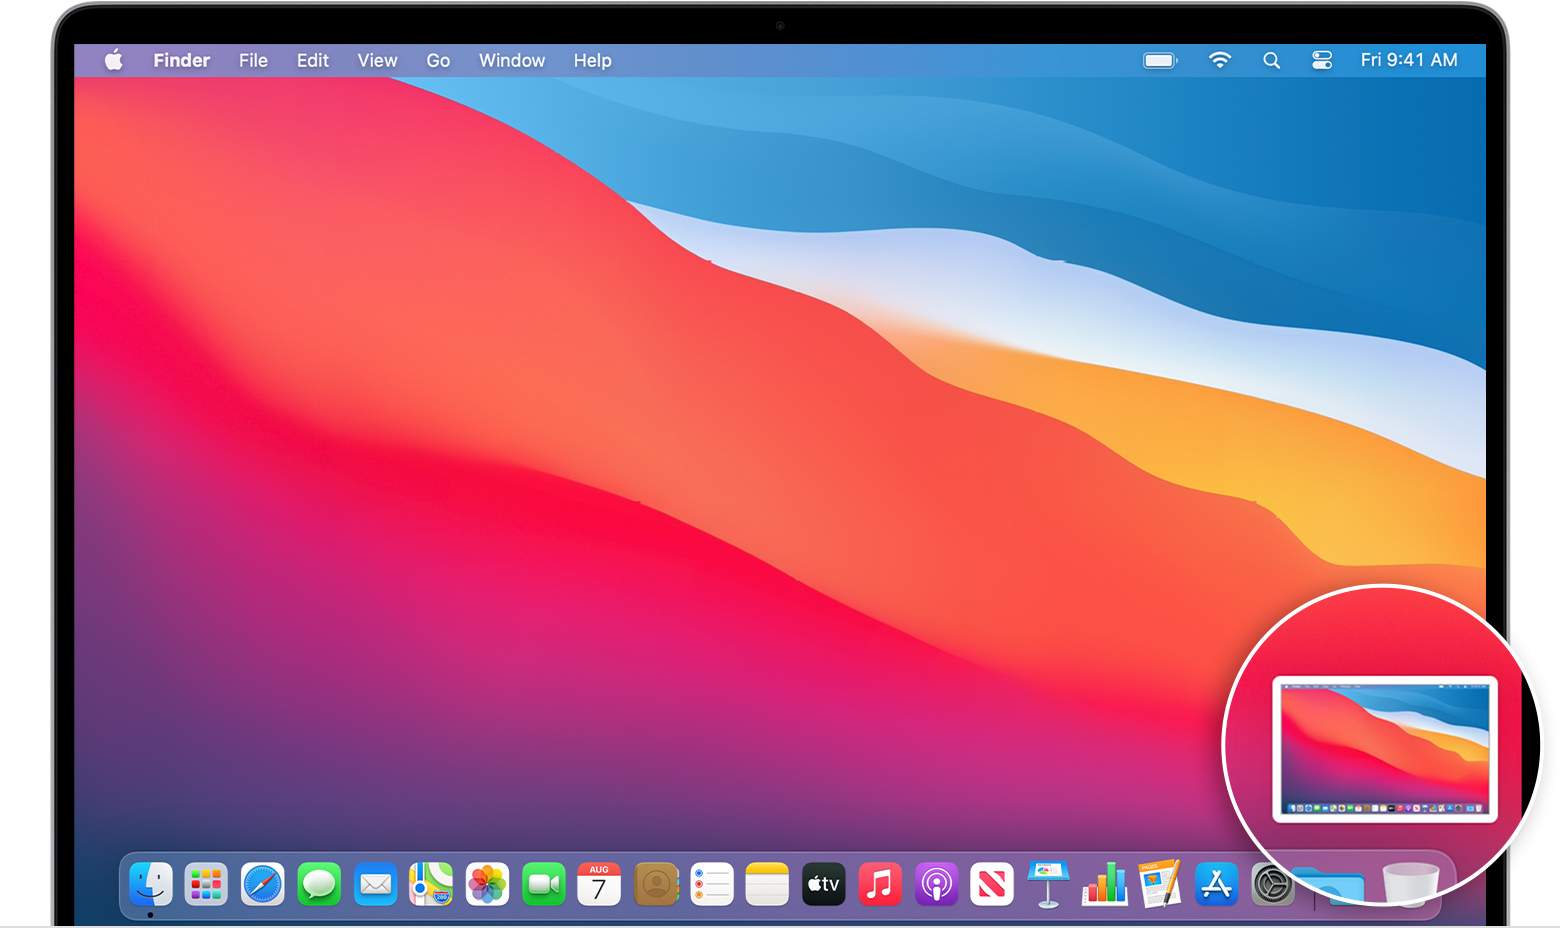
- Take no action or swipe the thumbnail to the right and the recording is automatically saved.
- Click the thumbnail to open the recording. You can then click to trim the recording, or click to share it.
- Drag the thumbnail to move the recording to another location, such as to a document, an email, a Finder window, or the Trash.
- Control-click the thumbnail for more options. For example, you can change the save location, open the recording in an app, or delete the recording without saving it.
Change the settings
Click Options in the onscreen controls to change these settings:
- Save to: Choose where your recordings are automatically saved, such as Desktop, Documents, or Clipboard.
- Timer: Choose when to begin recording: immediately, 5 seconds, or 10 seconds after you click to record.
- Microphone: To record your voice or other audio along with your recording, choose a microphone.
- Show Floating Thumbnail: Choose whether to show the thumbnail.
- Remember Last Selection: Choose whether to default to the selections you made the last time you used this tool.
- Show Mouse Clicks: Choose whether to show a black circle around your pointer when you click in the recording.
Источник
How to Record Screen on Mac with Audio

Capturing onscreen activities on your MacBook or iMac is like a daily routine. May it be a presentation, gameplay or tutorials, you always need to screen record Mac with audio. Here, we’ll give you the easiest game plans. Most undertakings that will permit you to record system sound can be very exorbitant. This is an issue for by far most that need a humble technique to record structure sound for no good reason, for instance, screen accounts, or legitimately recording copyrighted sound. Fortunately, there is a way around this issue. You can play out this endeavor with unprecedented venture reserves and convincing philosophy. Stick with us to find how.
MacBook’s clients frequently face this trouble, the same number of the clients don’t have the foggiest idea how to record video and audio on Mac. With our suggested application apparatus, you can manage with no issue. This Mac screen recorder empowers you to record everything occurring on your screen with extraordinary quality. You are permitted to make demo recordings for preparing or showing purposes, and make video instructional exercises for exhibiting your video ongoing interaction accomplishments and even item shows. At the point when you record your screen, you can incorporate composing the location into your program and show all your mouse developments and snaps to allow individuals to see precisely where to go and how to arrive.
Part 1: Record Mac with Screenshot Toolbar
Usually, you can incorporate video and sound when you record your screen as well. Use mouthpiece sound to portray your video from your PC’s underlying amplifier or an outer mic. Discover in impending areas. Regardless of whether a screencast, video instructional exercise, or an online class, you can undoubtedly record the screen on your Mac. As of macOS Mojave, dispatched in September 2019, there’s an incorporated choice that allows you to catch a video of your Mac screen. On account of the all-encompassing screen capture image toolbar in macOS Mojave, recording the screen on your MacBook or another Mac gadget can be actuated in only a couple of steps. Also, how to record internal audio on Mac is because Apple has expanded its Mac screen capture instrument with a screen recording highlight. Learn more with the upcoming steps:
Step 1. Open Screenshot Toolbar
In the very first step, you need to launch the toolbar with all the buttons available for doing screen recording. To proceed with that, hit the SFT + Command + 5 buttons to launch the Screenshot Toolbar. The tools which will be displayed are as follows:

Step 2: Select Record Option
In the next step, the toolbar will eventually display the various buttons with the specified actions for each button. From the leftmost button, you can record your entire screen with the following button:
If you want to record a portion of your Mac screen, then you need to hit this button:
Step 3: Customize your Recording
After the appropriate button pressing, now you can customize your screen recording, especially if you’ve selected a specific area to record on your MacBook.

Step 4: Start/Stop Recording
In the next step, as soon as you’ve customized the recording area of your MacBook, now is the time to hit the Record button and for the stopping of the recording, hit the Stop
In this way, you can accomplish the screen recording on your MacBook using the Screenshot tool of macOS.
Part 2: Record Screen and Audio on Mac with QuickTime
If you own a high-level Mac, there is a free Mac screen recorder worked in the QuickTime Player application. QuickTime can record whatever you have appeared on the screen, including video playing on locales. You have confined options on what you can use as a sound source. On a PC, you’re looking at the decisions of «Worked in Microphone» and «None.»
Right when a condition arises where you need to record the sound close by your screen recording on your Mac, you could offer to raise the volume a chance your speakers and assumption that a fundamental beneficiary gets that sound, anyway that is far from flawless. QuickTime can record sound from your PC mic. This will get the including sound, similarly as the PC sound, yet at impressively less quality and with a little deferral. However, for a quick video, this can work uncommon. Follow the steps below to record:
Step 1: Launch QuickTime Player
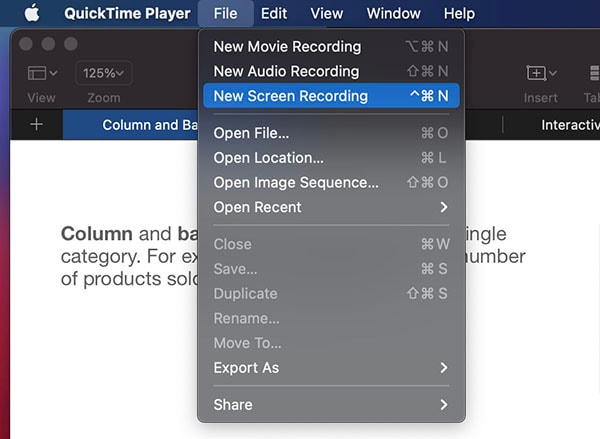
To start with the screen recording with the help of Apple’s built-in application, go to the utilities and find the QuickTime Player icon and launch it from there.
Step 2: Open Screen Recorder
In the next step, meanwhile within the QuickTime Player, you need to open the recorder window. For that, go to the File of the player and select the New Screen Recording option to open a screen recorder.
Step 3: Enable the Audio Recording
Now, within the QuickTime Player recorder, go to the drop-down button and select the audio recording option from the following.
Note: If you’ve newer versions of your macOS, then this option won’t appear for you.
Step 4: Start Recording
In the final step, after enabling the audio recorder, you need to start the recording by hitting the Red Circled button situated within the screen recorder window.

In this way, you can perform the screen recording with audio with the help of QuickTime player, which is a built-in application of MacBook.
Part 3: Use an Easy Mac Screen Recorder
Although, you can record your MacBook screen with audio with built-in tools and applications like QuickTime player, it doesn’t give you a professional look if you’re a pro-level videographer or if you want to do some editing on your screen recordings. Besides, you can have a problem with the audio recording as the newer versions of macOS have skipped the audio recording option inside the QuickTime player, so you need to get help from a third-party application. In compliance with this need of the hour, Wondershare DemoCreator is here to assist you in this regard as with this toolkit, Mac records screen, and audio without any flap.
Wondershare DemoCreator is a perfect solution if you want to learn how to record a screen on Mac with audio and facing trouble doing it. This application on macOS can perform this task with the various other customizations and the altering options afterward. You can also draw on your screen meanwhile recording it at the same time with the perfect screen drawing tool inside the recorder. Moreover, if you just forget to add or edit something in your recording tutorial, then worry not! You can of course alter it with the powerful editing toolkit of this application. To learn how to record audio on MacBook Pro, follow the steps below:
Step 1: Launch DemoCreator
In the foremost step, you need to install this software on your MacBook if it isn’t installed already. To assist you, here is the link where you can download it easily for your MacBook:
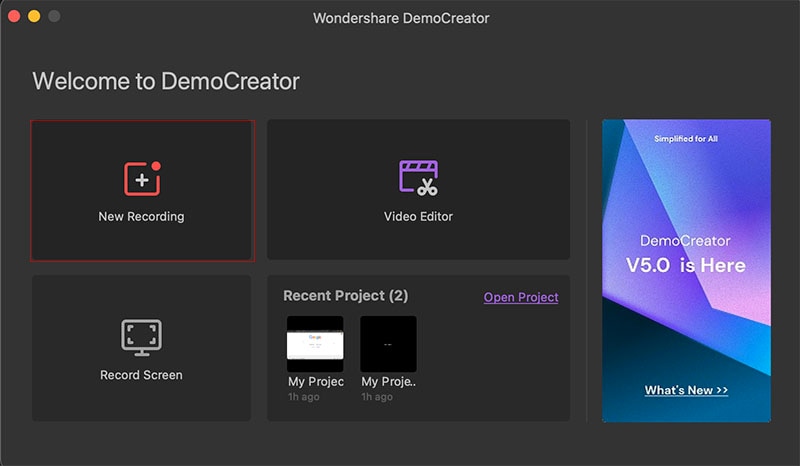
After the installation/Updating will be done, now launch the software from the Applications/Utilities of MacBook. Click «New Recording» option from the main interface.
Step 2: Setup Audio/Video Options
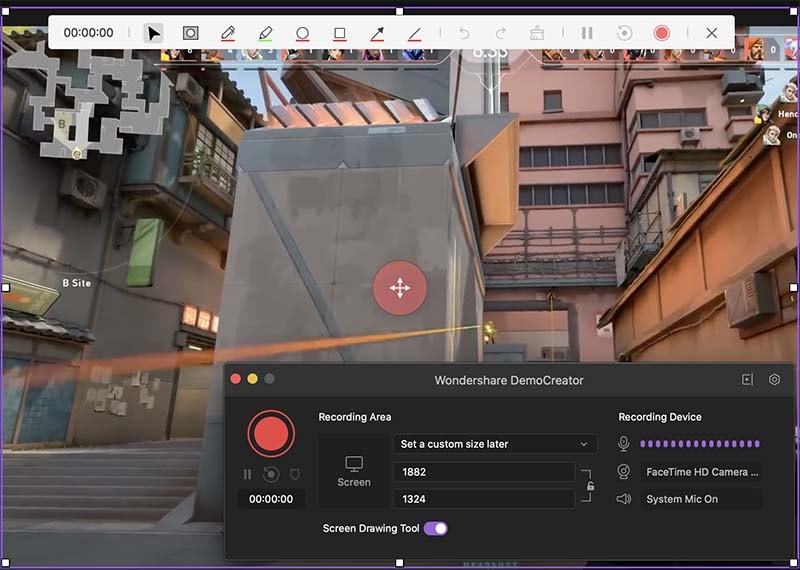
In the next step, you need to set up the audio and video settings from the recorder window. You can customize the screen which you want to include in your recording as well as the audio source, either you want to include the Microphone recording or the System sound recording from the straightforward buttons available to you in the recorder window as following:
After you’ve set up the screen and audio, now hit the record button, which will start recording.

Step 3. Start Recording
Now you can click on the red button to start recording screen and audio. Use the screen drawing tools to express your ideas better.
Step 4: Export/Share your Recording
Press Shift+Cmd+2 to end the recording, and then the clip will be opened in the editor. You can make editing and export the video locally or share it with YouTube.
Conclusion
Apple demands that iOS and macOS won’t ever transform into a similar advanced monster, however at any rate it’s inexorably ready to divide the most helpful highlights among every stage. With macOS Mojave, that equivalent extraordinary element goes to Apple’s work area framework, alongside a heap of Mac-proper improvements. But what’s worrisome when you have got a complete package available to you that will solve all your troubles, just download the best Mac screen recorder Wondershare DemoCreator and follow the above-mentioned steps which will perform the audio as well as video recording without any trouble.
Источник
Take screenshots or screen recordings on Mac
You can take pictures (called screenshots) or recordings of the screen on your Mac using Screenshot or keyboard shortcuts. Screenshot provides a panel of tools that let you easily take screenshots and screen recordings, with options to control what you capture — for example, you can set a timer delay or include the pointer or clicks.
Take pictures or screen recordings using Screenshot
On your Mac, press Shift-Command-5 (or use Launchpad) to open Screenshot and display the tools.

Click a tool to use to select what you want to capture or record (or use the Touch Bar).
For a portion of the screen, drag the frame to reposition it or drag its edges to adjust the size of the area you want to capture or record.
Capture the entire screen

Capture a window

Capture a portion of the screen

Record the entire screen

Record a portion of the screen

Click Options if you want.
The available options vary based on whether you’re taking a screenshot or a screen recording. For example, you can choose to set a timed delay or show the mouse pointer or clicks, and specify where to save the file.
The Show Floating Thumbnail option helps you work more easily with a completed shot or recording — it floats in the bottom-right corner of the screen for a few seconds so you have time to drag it into a document, mark it up or share it before it’s saved to the location you specified.
Start the screenshot or screen recording:
For the entire screen or a portion of it: Click Capture.
For a window: Move the cursor to the window, then click the window.
For recordings: Click Record. To stop recording, click the Stop Recording button  in the menu bar.
When the Show Floating Thumbnail option is set, you can do any of the following while the thumbnail is briefly displayed in the bottom-right corner of the screen:
Swipe right to immediately save the file and make it disappear.
Drag the thumbnail into a document, an email, a note or a Finder window.
Click the thumbnail to open a window where you can mark up the screenshot or trim the recording, or share it.
Depending on where you chose to save the screenshot or recording, an app may open.
Take pictures using keyboard shortcuts
You can use various keyboard shortcuts on your Mac to take pictures of the screen. The files are saved to the desktop.
Tip: To copy a screenshot so you can paste it somewhere — like in an email or to another device — press and hold the Control key while you press the other keys. For example, to copy the whole screen, press Shift-Command-Control-3.
Capture the entire screen
Capture a portion of the screen
Press Shift-Command-4, then move the crosshair pointer to where you want to start the screenshot. Press the mouse or trackpad button, drag over the area you want to capture, then release the mouse or trackpad button.
Capture a window or the menu bar
Press Shift-Command-4, then press the Space bar. Move the camera pointer over the window or the menu bar to highlight it, then click.
Capture a menu and menu items
Open the menu, press Shift-Command-4, then drag the pointer over the menu items you want to capture.
Press Shift-Command 5.
Capture the Touch Bar
You can customise these keyboard shortcuts in the Shortcuts pane of Keyboard preferences. On your Mac, choose Apple menu

> System Preferences, click Keyboard, then click Shortcuts.
Screenshots are saved as .png files and screen recordings are saved as .mov files. Filenames begin with “Screenshot” or “Screen Recording” and include the date and time.
You may not be able to take pictures of windows in some apps, such as DVD Player.
Источник


