- How to fix sound recording problems in Windows 10
- Can’t record sound on PC? Here are 5 solutions to fix it
- 1. Update your drivers
- 2. Enable microphone / recording device
- 3. Adjust microphone levels
- 4. Select the correct recording device
- Run a System Scan to discover potential errors
- 5. Grant audio recording permission
- 6. Try a different recorder application
- 7. Run the built-in audio troubleshooter
- 8. Clean boot your computer
- How to Record Computer Audio
- How to Record Audio From Computer Online with Screen Capture
- Sound Recorder app for Windows: FAQ
- How to record sound with Voice Recorder app on Windows 10
- How to add Voice Recorder app on Windows 10
- How to use Voice Recorder app on Windows 10
- Record audio
- Budget friendly
- Blue Yeti Nano
- Play audio recordings
- Trim audio recording
- Rename audio files
- Share audio recording
- How to fix Voice Recorder app problems on Windows 10
- Fix Voice Recorder microphone access
- Fix microphone problems
- More Windows 10 resources
- The Dell XPS 15 is our choice for best 15-inch laptop
- Halo: MCC’s live service elements make it better, not worse
- Microsoft’s Surface Duo is not ‘failing up’
- These are the best PC sticks when you’re on the move
How to fix sound recording problems in Windows 10

- Download Restoro PC Repair Tool that comes with Patented Technologies (patent available here).
- Click Start Scan to find Windows issues that could be causing PC problems.
- Click Repair All to fix issues affecting your computer’s security and performance
- Restoro has been downloaded by 0 readers this month.
Even though the possibility of recording sound on a computer is a basic function and something we take for granted when it works correctly, configuring and troubleshooting it can be difficult when it doesn’t work out of the box.
Users have faced problems with recording sound in every version of Windows, or any other operating system for that matter, and Windows 10 is no exception. Today we’ll go through some of the most common sound recording fixes.
Can’t record sound on PC? Here are 5 solutions to fix it
1. Update your drivers
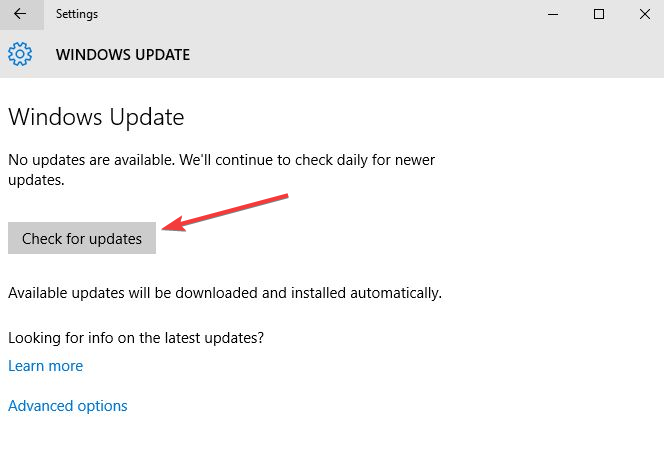
Drivers are the pieces of software that help the OS communicate with the hardware components and are usually the first thing to check. Windows Update delivers a reliable method of updating the drivers in most cases.
To do so just click on the Start menu button, open the Settings window and select Update & Security. From the left pane select Windows Update and click on the Check for updates button in the right half of the window.
If Windows Update fails to update your sound card and recording hardware drivers then you’ll need to download them from the manufacturers’ website. There you’ll usually find a Support or Download section where you’ll find the latest drivers.
We strongly recommend TweakBit Driver Updater (100% safe and tested by us) to automatically download all the outdated drivers on your PC.
2. Enable microphone / recording device
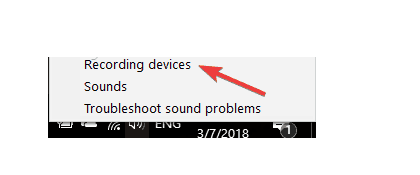
If your computer uses more than one recording device some of them might be disabled. To check if the correct one is enabled right click on the volume / speaker icon from the Windows taskbar and select Recording devices.
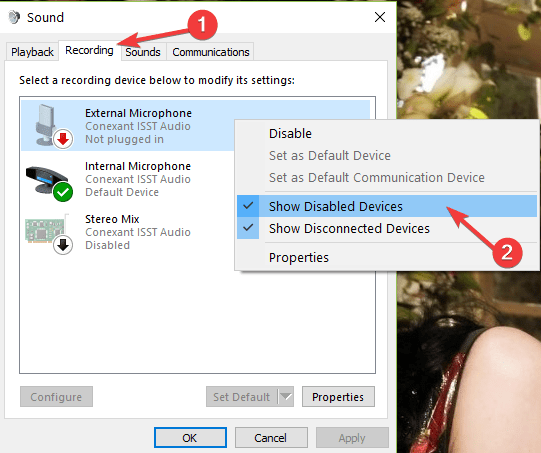
In the resulting window locate your recording device and make sure it is enabled. If it isn’t you can do so by right clicking on it and selecting Enable. Disabled devices might also be hidden and you’ll have to right click the device list and select Show disabled devices.
3. Adjust microphone levels
Each device has its own input and output levels which can be adjusted depending on your needs. You can do this from the same Recording devices window by right clicking on your device and selecting Properties. Under the Levels tab you’ll find sliders for adjusting the input level similar to the ones in the below image.
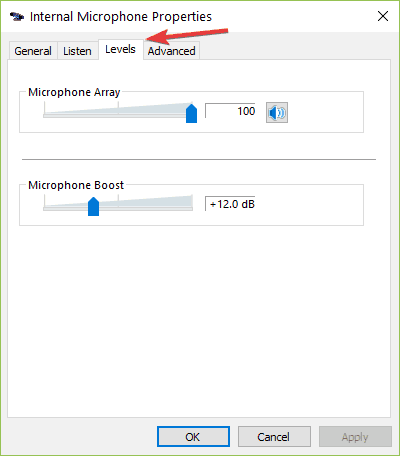
Try changing the values found here and check if these help with your problem. Some microphones even have a Boost option that needs to be enabled for it to work properly.
4. Select the correct recording device
Run a System Scan to discover potential errors


If you have multiple recording devices installed on your machine Windows might not know which one to use and you’ll have to select it manually as the default recording device.
This can be achieved from the same window opened in the second solution. Right click on the device you want to use and select Set as default device.
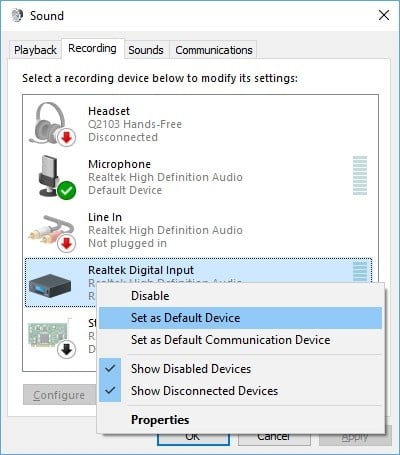
This will let Windows know which of the installed devices you want to use and make it the default one for all situations. If you tend to switch between recording devices, like the microphone and stereo mix, then you’ll have to change it each time you want to use one or the other.
5. Grant audio recording permission
Windows 10 introduced new privacy options that give us more control over the data we share and how we, and other users, access the installed hardware. These are options that we can all benefit from but sometimes they can cause problems if not configured correctly.
These options can be found by clicking the Start menu button and opening the Settings window. Now go to Privacy and select the Microphone tab.
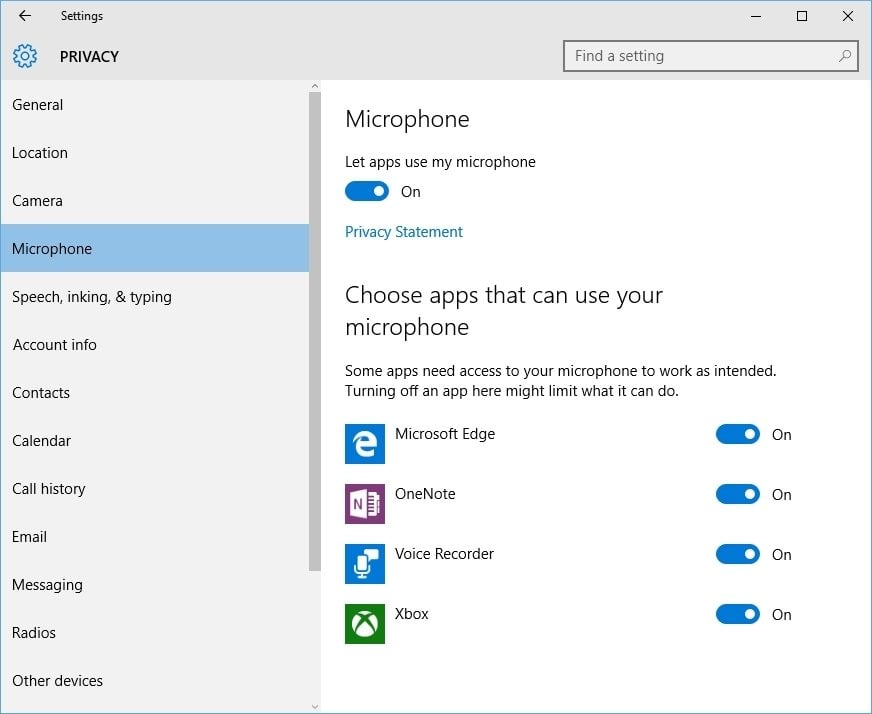
Here you’ll find a list of all the apps installed on your system that can use the microphone and you can enable or disable access for each one of them independently. There is also a master switch at the top that disables and enables access to the microphone for all applications.
6. Try a different recorder application
Sound recording applications are a dime a dozen and some can work differently from others. The fact that one of them doesn’t work for you doesn’t mean that all of them won’t work and sometimes the problem might be with the application and not with your PC.
Some applications, depending on the way they connect to the recording device, might also need to be updated in order to work with recent versions of Windows.
Before you start looking for faults in your system you might want to consider trying a different recording application. The Microsoft application Store offers many sound recording alternatives to the default Windows Voice Recorder, like Recorder 8 or Quick Voice Recorder which can record sound in higher quality, different formats and even save them your OneDrive account.
7. Run the built-in audio troubleshooter
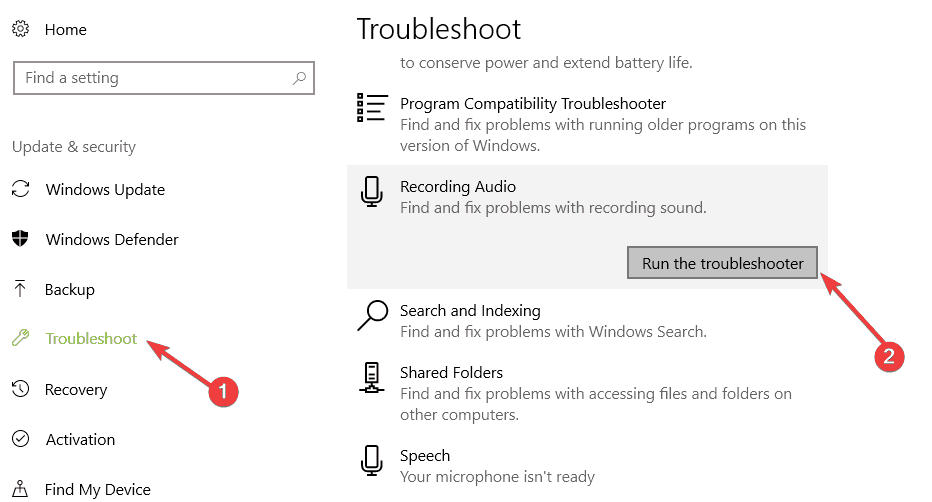
If you still can’t record sound on Windows 10, try running Microsoft’s dedicated audio recording troubleshooter. This tool automatically detects and repairs audio issues that may prevent you from recording sound on your computer.
Here’s how to launch the audio troubleshooter:
- Go to Start > type ‘settings’ > double-click on the first result to launch the Settings page
- Navigate to Update & Security > select Troubleshooter > right-click on the ‘Recording Audio’ troubleshooter

- Run the tool and follow the on-screen instructions to fix the problem.
- ALSO READ: Quick fix: Windows 10 build has no audio
8. Clean boot your computer
If certain apps and programs are preventing you from recording audio on your computer, try performing a clean boot. Placing your machine in Clean Boot allows you to identify any third party apps that are causing this problem.
Here are the steps to follow to place your computer in Clean Boot State:
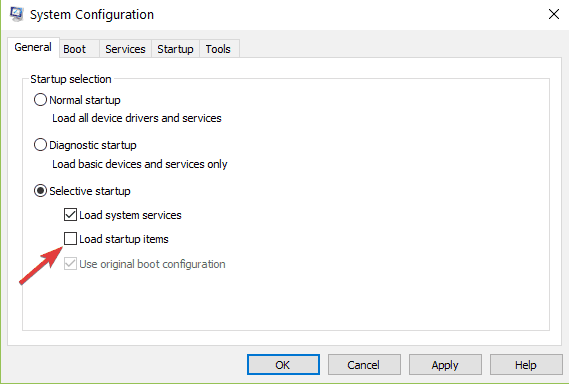
- Go to Start > type msconfig > hit Enter to launch System Configuration
- Go to the General tab > select Selective startup > uncheck Load startup items
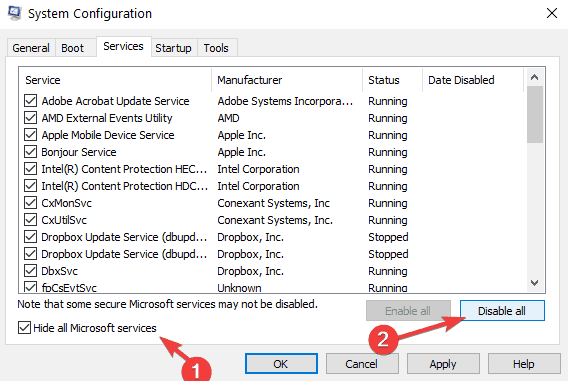
- Go to the Services tab > check Hide all Microsoft services > click Disable all
- Click Apply > click OK > Restart your computer and try to record audio again.
There you go, we hope that the solutions listed above helped you fix the problem. If you record audio again, use the comments below to tell us which solution worked for you.
RELATED STORIES TO CHECK OUT:
How to Record Computer Audio
To record desktop audio, you can choose from three types of tool – an online service, a desktop program, or the built-in Windows recorder. In this article, you’ll find step-by-step instructions for each approach as well as their pros and cons.
Some people find it challenging to grab audio playing on the computer. But in fact, there’s no secret about how to record computer audio. You just need to get an app that records PC audio. And that’s where problems can start.
If you Google how to record audio on PC, you’ll be shown plenty of programs. They can be free or paid, online or desktop, easy or advanced, with different output formats and system requirements. If you try to explore all of them, you risk wasting half of your life.
To make your life easier, we recommend you choose one of the following recorders – Screen Capture, Audacity, or Windows Voice Recorder.
How to Record Audio From Computer Online with Screen Capture
Best for: making fast recordings on-the-go
Trustpilot rating: 4.5 out of 5 stars, 75 reviews
Let’s start with the easiest and fastest way to record system audio. Let us introduce you to Screen Capture – an online recorder that is free to use. Whether you need to capture output from speakers, video playback, or internal audio coming from your computer, you can easily do it online for free.
The grabber has a simple interface that is comfortable to work with. You can record audio and video simultaneously or separately. Webcam recording is also supported.
Advantages of Screen Capture:
- You don’t need to install any software on your computer.
- The service has an easy-to-use interface and clear settings.
- It provides high quality output files.
Disadvantages of Screen Capture:
- No audio editing tools
- No choice of output formats
- Watermark on the video in the free version
Here’s a short guide to how to record audio from a computer online.
Sound Recorder app for Windows: FAQ
Sound Recorder is an app you can use to record audio for up to three hours per recording file. You can use it side by side with other apps, which allows you to record sound while you continue working on your PC. (While there is also a desktop program called Sound Recorder, this article is about the Sound Recorder app.)
To start recording, tap or click the circular button with a microphone in the center. This is your Record button.
To pause recording, tap or click Pause.

To resume the same recording you paused, tap or click Pause again.
To save the recording tap or click Stop. You’ll see the recording appear in your list of recordings.

(The next time you tap or click Record, you’ll start a new recording.)
Tap or click the recording you want to rename.
Tap or click Rename.
Enter a new name for your recording. Tap or click Rename.
Your recordings are stored within the Sound Recorder app. If you uninstall the app, your recordings will be deleted. To send the recording file to someone through another app, use the Share charm.
Open Sound Recorder.
Tap or click the recording you want to share.
Swipe in from the right edge of the screen, and then tap Share.
(If you’re using a mouse, point to the upper-right corner of the screen, move the mouse pointer down, and then click Share.)
You’ll see a list of the apps you have that can share. To mail your recording, tap or click Mail and follow the instructions. To share your recording to an app, tap or click the app and follow the instructions.
You can also send recording files as attachments right from the Mail app. Tap or click Sound Recorder from the menu when you’re choosing a file to attach to an email.
Tap or click the recording you want to trim.
Tap or click Trim.
Drag the left and right ends of the timeline to the new start and stop points you want.You can play the trimmed recording to make sure it starts and stops where you want. Adjust the start or stop points as needed. Tap or click OK.
Do one of the following:
If you’d like to save the trimmed portion as a new recording file, tap or click Save a copy.
If you’d like to replace your recording with the trimmed portion, tap or click Update original.
Note: You can’t trim if you have minimized Sound Recorder to take up less than 672px of width on the screen—you’ll have to make Sound Recorder larger in order to trim.
How to record sound with Voice Recorder app on Windows 10
 Source: Windows Central
On Windows 10, the Voice Recorder app is a quick and convenient solution that anyone can use to record lectures, conversations, interviews, podcasts, and virtually anything else.
Although you can find many other applications with many different features, the free Voice Recorder app included on Windows 10 is simple and ships with all the necessary functionalities to record, trim, flag important moments, and share audio tracks.
In this Windows 10 guide, we will walk you through the steps to use the Voice Recorder app on your computer.
How to add Voice Recorder app on Windows 10
Voice Recorder comes installed on Windows 10, but you will have to install it manually if you don’t have it.
To install the app to record voice, use these steps:
Click the Get button.
 Source: Windows Central
Once you complete the steps, the app will be available from the Start menu to record audio on your desktop or laptop.
How to use Voice Recorder app on Windows 10
On Windows 10, Voice Recorder is a straightforward app. You only need one of the best microphones. The one built-in on your device, the one from a webcam, or any microphone will do just fine for basic recording.
The instructions below include everything you need to get started recording, listing, and editing sound files.
Record audio
To record audio on Windows 10, make sure the microphone is connected (if applicable), and use these steps:
- Open Start.
- Search for Video Recorder, and click the top result to open the app.
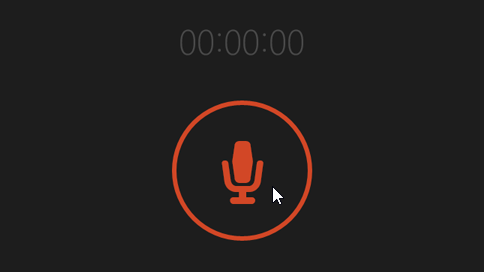
Click the Record button.
 Source: Windows Central
Quick tip: You can also start recording using the Ctrl + R keyboard shortcut.
(Optional) Click the Flag button to add a marker to the recording.
Quick note: This option won’t interrupt the audio recording, but you can quickly jump to important parts of the recording when editing the track. You can use the marking feature while recording or listening to the audio file.
Click the Stop button to end the voice recording.
Source: Windows Central
Quick note: You can also use the Spacebar, Backspace, Enter, or Esc key to stop recording.
Once you complete the steps, the audio will save automatically using a .m4a file format in the «Sound recordings» folder inside the «Documents» folder.
If you need the best microphone, we recommend the Blue Yeti Nano since it offers good quality sound and a relatively low price.
Budget friendly

Blue Yeti Nano
The Blue Yeti Nano has impressive sound and built quality considering its price. It’s a USB-powered plug-and-play device, and it features no-latency headphone output, headphone volume, and mute button.
Play audio recordings
To play recorded audio tracks on Windows 10, use these steps:
- Open Start.
- Search for Video Recorder, and click the top result to open the app.
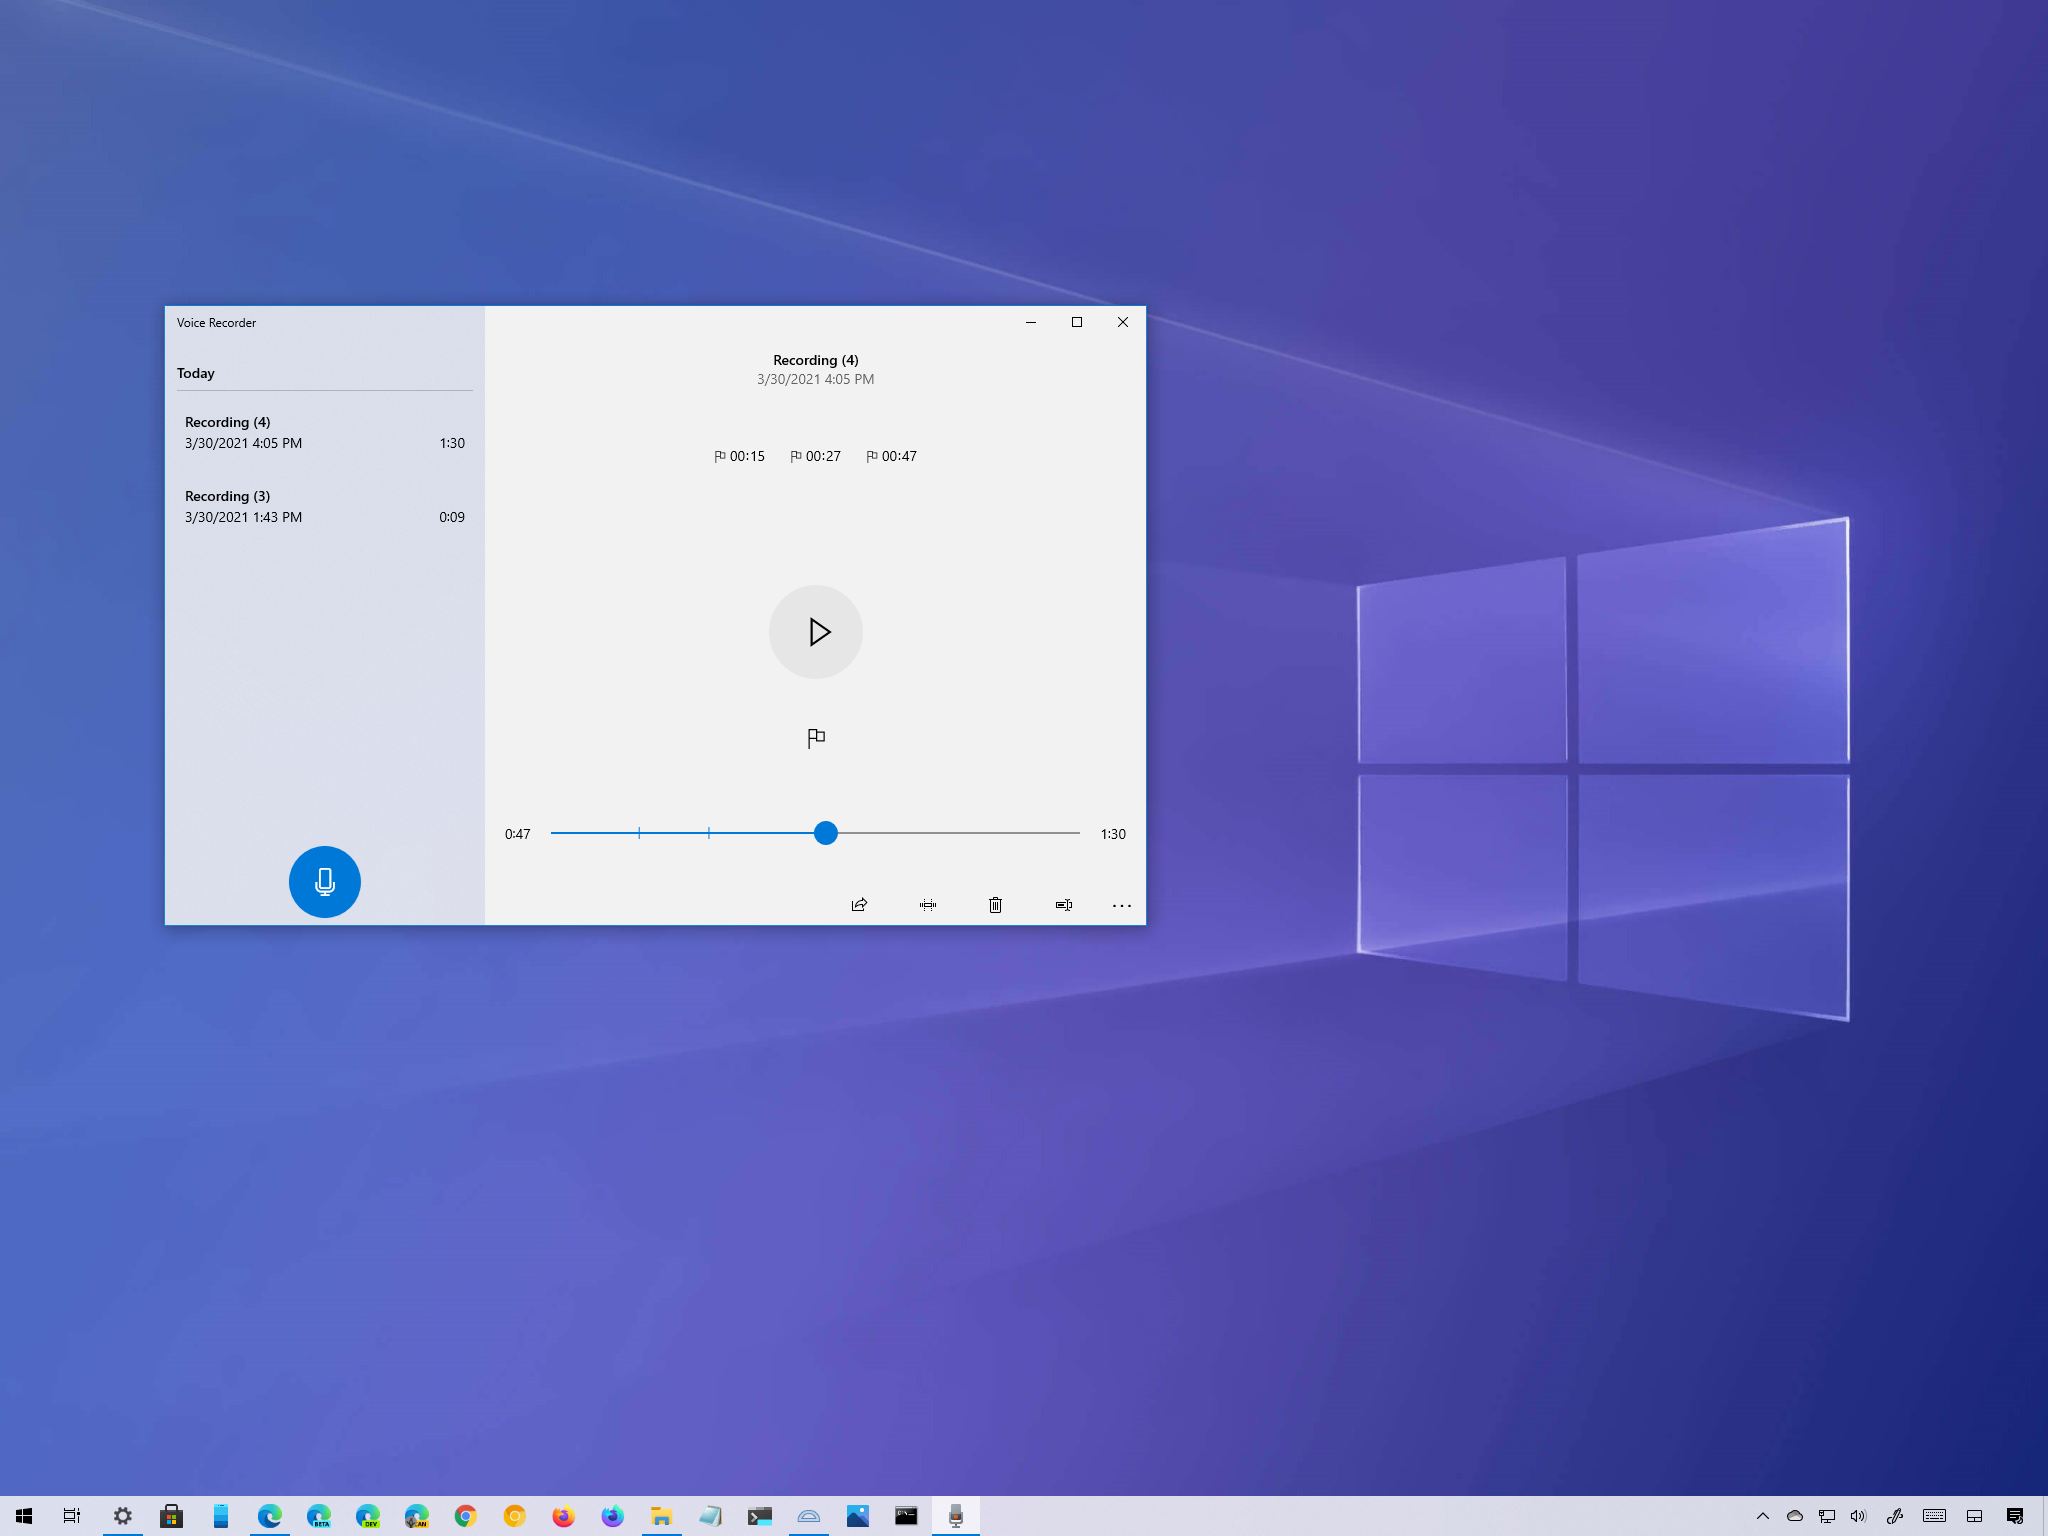
Select the track from the left pane to play the audio.
Source: Windows Central
Once you complete the steps, click the Pause button to stop listening or select another recording from the playlist.
Trim audio recording
To trim an audio track after a recording session, use these steps:
- Open Start.
- Search for Video Recorder, and click the top result to open the app.
- Select the recording from the left pane.
Click the Trim button from the bottom-right corner.
Source: Windows Central
Use the pins in the track to select the beginning and end of the recording, leaving out the parts you want to trim.
Source: Windows Central
Select the Save a copy (recommended) or the Update original option.
Source: Windows Central
After you complete the steps, you will end up with a shorter version of the file.
Rename audio files
Although the app saves every recording file automatically, it uses generic names, which are not descriptive enough to keep your recordings organized.
To rename a recording file on Windows 10, use these steps:
- Open Start.
- Search for Video Recorder, and click the top result to open the app.
- Select the recording from the left pane.
- Click the Rename button in the bottom right corner.
- Type a descriptive name for the file — for example, interview_satya_nadella_april2021.
Click the Rename button.
Source: Windows Central
Once you complete these steps, the audio file will be saved with the name you specified in the «Sound recording» folder inside the «Documents» folder.
Share audio recording
To share a recording on social media or email, use these steps:
- Open Start.
- Search for Video Recorder, and click the top result to open the app.
- Select the recording from the left pane.
Click the Share button from the bottom-right corner.
Source: Windows Central
If you have to import the audio file into another project, you do not need to share it. Instead, copy and paste the file from the «Sound recordings» folder to your «Documents» folder or any other location.
How to fix Voice Recorder app problems on Windows 10
In the event that the app is not working, there is likely a problem with the microphone or privacy settings on Windows 10.
Fix Voice Recorder microphone access
To allow the Voice Recorder app to access the microphone, use these steps:
- Open Settings.
- Click on Privacy.
- Click on Microphone.
- Under the «Allow access to the microphone on this device» section, click the Change button.
- Turn on the Microphone for this device toggle switch.
Under the «Allow apps to access your microphone» section, make sure the toggle switch is in the On position.
Source: Windows Central
Under the «Choose which Microsoft Store apps can access your microphone» section, turn on the Voice Recorder toggle switch.
Source: Windows Central
After you complete the steps, the app should now be able to record audio from the microphone.
Fix microphone problems
If the app can’t find the microphone, you can use the «Sound» troubleshooter to fix this problem.
To fix microphone problems on Windows 10, use these steps:
- Open Settings.
- Click on Update & Security.
- Click on Troubleshoot.
Click the Additional troubleshooters option.
Source: Windows Central
Click the Run the troubleshooter button.
Source: Windows Central
Click the Next button.
Source: Windows Central
Once you complete the steps, any problems with the microphone should be resolved, and Voice Recorder should now work correctly.
If the microphone still does not work, check it is connected properly to the computer. In the case that you have multiple microphones, you can use these steps to set the system default. If it is a USB microphone, you can try a different port on the device or USB cable.
In the case that you have a Bluetooth microphone, confirm it appears on Settings > Devices > Bluetooth & other devices. Also, make sure that Bluetooth is enabled on your device from the settings page. You can learn more about using Bluetooth in this comprehensive guide.
More Windows 10 resources
For more helpful articles, coverage, and answers to common questions about Windows 10, visit the following resources:
We may earn a commission for purchases using our links. Learn more.
![]()
The Dell XPS 15 is our choice for best 15-inch laptop
For a lot of people, a 15-inch laptop is a perfect size that offers enough screen for multitasking, and in a lot of cases, some extra performance from powerful hardware. We’ve rounded up the best of the best at this size.
![]()
Halo: MCC’s live service elements make it better, not worse
Halo: The Master Chief Collection is more popular than ever, but some fans don’t agree with the live service approach 343 Industries has taken with it. Here’s why those elements are, at the end of the day, great for the game and for Halo overall.
![]()
Microsoft’s Surface Duo is not ‘failing up’
Microsoft announced this week that it was expanding Surface Duo availability to nine new commercial markets. While Surface Duo is undoubtedly a work in progress, this is not a sign of a disaster. It’s also doesn’t mean that Surface Duo is selling a ton either. Instead, the reason for the expansion is a lot more straightforward.
![]()
These are the best PC sticks when you’re on the move
Instant computer — just add a screen. That’s the general idea behind the ultra-portable PC, but it can be hard to know which one you want. Relax, we have you covered!


