- How To Add Recycle Bin Icon To Desktop In Windows 10
- Adding or restoring Recycle Bin icon
- Add or restore Recycle Bin icon to Windows 10 desktop
- Windows 10: Change Recycle Bin Icon
- Recycle Bin is greyed out in Desktop Icon Settings on Windows 10
- Recycle Bin is greyed out in Desktop Icon Settings
- Using Group Policy Editor
- Using Registry Editor
- How to Change the Recycle Bin Icon on Windows 10?
- A Guide on How to Change the Recycle Bin Icon to the Custom One on Windows 10
- Password Recovery
How To Add Recycle Bin Icon To Desktop In Windows 10
Last Updated on February 22, 2020 by admin 6 Comments
When you perform a clean install of Windows 10 or create a new user account, the Recycle Bin icon appears on the desktop by default.
Not all users use the Recycle Bin as many prefer to use the Shift + Del hotkey to permanently delete files instead of moving them to Recycle Bin. That said, many users often use the Recycle Bin to restore deleted files, and it’s a wise idea to delete files to Recycle Bin as recovering permanently deleted files can’t be done without the help of third-party tools.
Users often complain about missing the Recycle Bin icon from the Windows 10 desktop. Recycle Bin icon can’t be easily deleted, unlike other icons and files. But if the Recycle Bin icon is not appearing on the desktop, you can restore the icon with ease.
Adding or restoring Recycle Bin icon
Unlike previous Windows versions, adding or removing the Recycle Bin icon from the desktop is not very straight-forward in Windows 10 thanks to the omission of classic Personalization window. Users need to perform a couple of more steps in order to add the Recycle Bin to the desktop or completely remove it from the desktop.
Whether you have deleted the Recycle Bin icon from the desktop or it does not appear on the desktop for any other reason, follow the given below directions to add or restore the Recycle Bin icon to the desktop in Windows 10.
Add or restore Recycle Bin icon to Windows 10 desktop
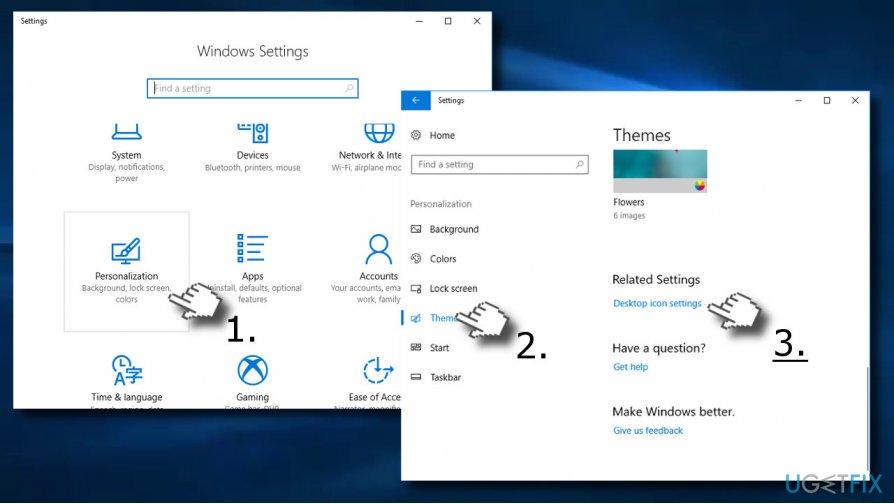
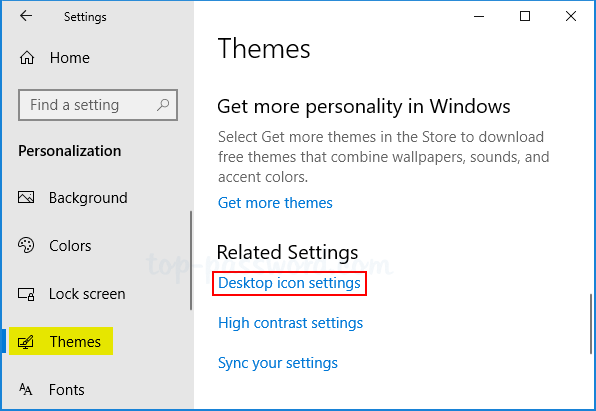
Step 1: Right-click on desktop, click Personalize. This will open the Personalization section of the Settings app.
Step 2: Click Themes. In the Related settings section, click Desktop icon settings link to open the same.

Step 3: Here, under the Desktop Icons section, check the option labeled Recycle Bin. Click the Apply button to add the Recycle Bin to your Windows 10 desktop.
As you can see in the picture above, here you can also change the default icon of Recycle Bin, This PC, Network, and profile folder.
To change an icon, select the icon, click Change icon button, browse to the icon file (must be in .ico format), and then select the same. Refer to our how to change the default icon of Recycle Bin in Windows 10 guide for step-by-step instructions.
Windows 10: Change Recycle Bin Icon
Posted on May 11, 2020 by Mel Hawthorne 2 Comments
Configuring your computer to look the way you want is an important part of making a new computer feel like it’s really yours. Changing the appearance of your desktop icons is a way to do this that few people know about. While most people are used to the default icons for apps like Recycle Bin on their desktop, you can change the icon.
Windows includes a set of default icons that you can choose from, it’s also possible to import your own icons if you prefer. This guide will walk you through the process of changing the icon for Recycle Bin in Windows 10.
To change the icon for Recycle Bin you need to open the Settings app to the Themes settings in the Personalisation section. To do so, press the Windows key, type “Themes, and related settings” and hit enter. The link to “Desktop icon settings” is on the far right of the page at the top of the “Related Settings” settings.
Click “Desktop icon settings” on the far right of the window.
The Desktop Icon Settings window allows you to configure which desktop icon is displayed on the desktop. To change the actual icon used to represent Recycle Bin, highlight one of the Recycle Bin icons, and click “Change Icon…”.
Tip: There are two different icons for Recycle Bin, “full” and “empty”. The “full” icon is used when the Recycle Bin has files in it, whereas the “empty” icon is used when there’s nothing in it.
Highlight one of the Recycle Bin icons and click “Change Icon…”.
The Change Icon window contains a list of default icons you can choose from. This list contains generic icons which are mostly designed for other purposes. If you don’t want to use any of those icons, you can import your own icon file by clicking “Browse…”.
Select the icon you want to use from the list or import an icon to use.
Once you’ve selected the icon you want to use, click “OK” to confirm your selection. You’ll need to click “Apply” in the Desktop Icon Settings window to apply the change.
Tip: You can disable the Recycle Bin desktop icon entirely if you want. You can do so by unticking the Recycle Bin checkbox at the top of the Desktop Icon Settings window and then clicking the “Apply” button.
Recycle Bin is greyed out in Desktop Icon Settings on Windows 10
If the Recycle Bin option is greyed out in the Desktop Icon Settings window in Windows 10, you can check out this step by step guide to troubleshoot the issue. It will help you get back the Recycle Bin option in the Desktop Icon Settings panel so that you can show or hide Recycle Bin on Desktop. You can fix the problem quickly when it is disabled by mistake or by any malware, adware, etc.
There are two ways to fix the issue on your Windows 10 computer. You can use either Local Group Policy Editor or Registry Editor. If you have Windows 10 Home edition, you should try out the Registry Editor method as Local Group Policy Editor is not available on your computer.
Recycle Bin is greyed out in Desktop Icon Settings
Using Group Policy Editor
To fix Recycle Bin is greyed out in Desktop Icon Settings window problem using Group Policy Editor, follow these steps-
- Open Local Group Policy Editor
- Navigate to the Desktop section under Administrative Templates
- Double-click on Remove Recycle Bin icon from desktop setting
- Select Not Configured and save your change
To know the steps in detail, you need to keep reading.
Open the Local Group Policy Editor on your Windows computer. You can press Win+R, type gpedit.msc, and hit the Enter button. Alternatively, you can search for it in the Taskbar search box. Following that, you must navigate to this path-
After clicking the Desktop menu on your left-hand side, you should find some settings on your right-hand side. Double-click on Remove Recycle Bin icon from desktop setting, and make sure that the Not Configured option is selected.
If not, do choose that option, and save your change.
The second method is based on Registry Editor. It is recommended to backup the Registry or create a system restore point first.
Using Registry Editor
If Recycle Bin is greyed out in Desktop Icon Settings, follow these steps-
- Open Registry Editor on Windows computer
- Navigate to NonEnum folder
- Create a DWORD (32-bit) Value
- Name it as <645ff040-5081-101b-9f08-00aa002f954e>
- Set the Value data as 0.
Open the Registry Editor on your Windows computer. You can press Win+R, type regedit, and hit the Enter button. Also, you can search for it in the Taskbar search box and open the corresponding result.
After that, navigate to this path-
In the NoneNum folder, you should find a DWORD value named <645ff040-5081-101b-9f08-00aa002f954e>. If it doesn’t exist on your computer, you need to create it. For that, right-click on the space, select New > DWORD (32-bit) Value. Following that, name it as:
Now, check if the Value data is set to 0 or not. To do so, double-click on this DWORD Value, and check if it is set to 0. If not, you need to make the necessary change and save your setting.
TIP: You can also use our freeware FixWin to fix thisproblem with a single click.
That’s it! Now you should find the Recycle Bin option in the Desktop Icon Settings window.
How to Change the Recycle Bin Icon on Windows 10?
Issue: How to Change the Recycle Bin Icon on Windows 10?
I don’t like the look of the Recycle Bin icon on my Windows 10. I wonder is it possible to change it to something else?
Windows 10 introduced many innovations, including settings, apps, features, and design. While the latter changes triggered the least people’s discussions and complaints, there are many small things that Windows 10 users opt for changing. For example, the Recycle Bin icon. Although it’s a small thing, the icon that falls out from the context of the modern operating system may become an irritating thing, especially keeping in mind that it shows up right on the desktop all the time.
Luckily, Microsoft did not leave the Recycle Bin icon immutable. The possibility to change the default Windows Recycle Bin icon has been transferred to Windows 10 from the earlier versions, so you can do that without a delay. For this purpose, you’ll have to open the Desktop Icon Settings. The panel will provide options to change default Windows Recycle Bin, This PC, and Network icons to custom ones.
NOTE: earlier Windows versions had a Personalization window, which had a link to Desktop icon settings. Thus, if you are using an older version, you can open the Personalization window, click on the mentioned link and locate the option to change the Recycle Bin icon. In Windows 10, the procedure is a little bit more complicated, but still not too difficult to master.
A Guide on How to Change the Recycle Bin Icon to the Custom One on Windows 10
1. Press Windows key to open Settings.
2. Now open Personalization section and click Themes on the left pane.
3. Scroll down until you find the Desktop Icon Settings link. Click it.
4. Click on the Recycle Bin (Full) icon and select Change icon button.
5. Now you can either select the icon from the icons given on the list or click the Browse button.
6. If you have chosen to Browser, navigate to the location where the preferable icon is stored. Select the icon.

7. Click Open to set the new icon.
8. Then go back to the Settings -> Personalization -> Themes -> Desktop Icon Settings and click on the Recycle Bin (Empty) icon.
9. Click on Change button and follow the steps given on 5 and 6.
10. Finally, click OK and Apply to save the changes.
IMPORTANT: make sure to download an icon file that is in .ico format. Otherwise, it will be rejected. Besides, select a reliable source for downloading icons. Irrelevant websites may be spreading virus infection even under .ico format files. To prevent any damage, keep anti-virus tool up-to-date and make sure to enable real time protection.
Password Recovery
Recycle Bin icon is missing or disappeared after Windows 10 update? How can I get to the Recycle Bin without the desktop icon in Windows 10? In this tutorial we’ll show you all possible ways to restore or open Recycle Bin in Windows 10.
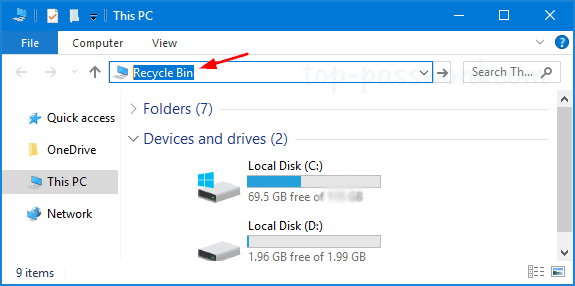
Method 1: Open Recycle Bin from File Explorer’s Address Bar
Open File Explorer then type “recycle bin” in the address bar. Press Enter to open Recycle Bin directly.
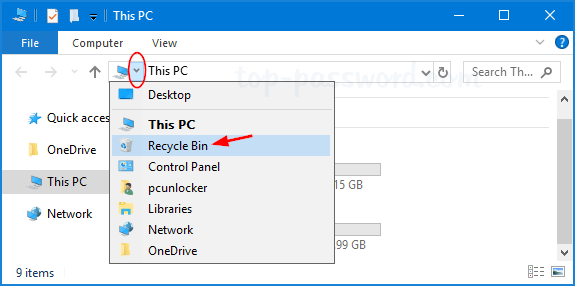
Another way is to click on the first “>” icon in the address bar to open a drop-down menu that contains all of the desktop icons, including Recycle Bin.
Method 2: Open Recycle Bin from Run Command
Use the Windows Key + R shortkey to open the Run prompt, type the following command and press Enter.
explorer.exe shell:RecycleBinFolder
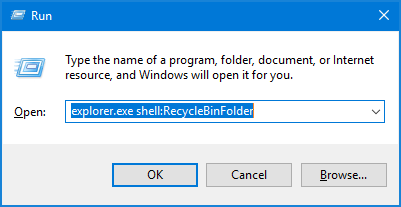
This will launch Recycle Bin immediately.
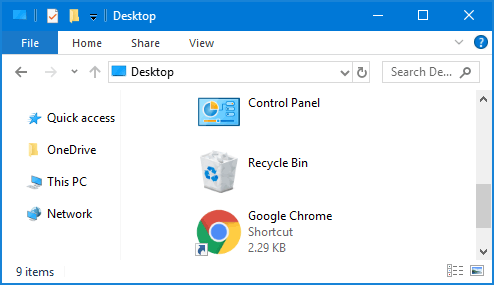
Method 3: Open Recycle Bin from Desktop Location
Use the Windows Key + R shortkey to open the Run prompt, type shell:desktop and press Enter.
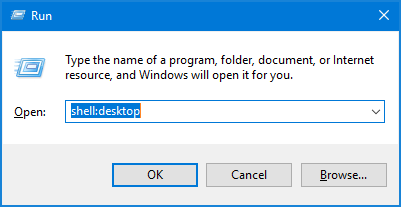
You can then access the Recycle Bin in a File Explorer window.
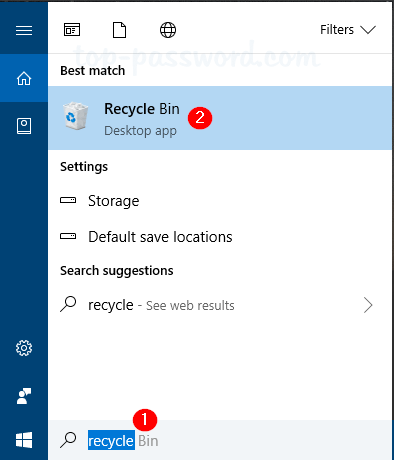
Method 4: Open Recycle Bin from Cortana Search
Click Start, type “recycle” and you can then open the “Recycle Bin” desktop app from the search result.
Method 5: Add Recycle Bin to Windows 10 Desktop
Use the Windows key + I shortkey to open the Settings app. Navigate to Personalization -> Themes. On the right pane, scroll down to the Related Settings section, and click the “Desktop icon settings” link.
Select the check box for the Recycle Bin icon you want to appear on your desktop, and then click OK.
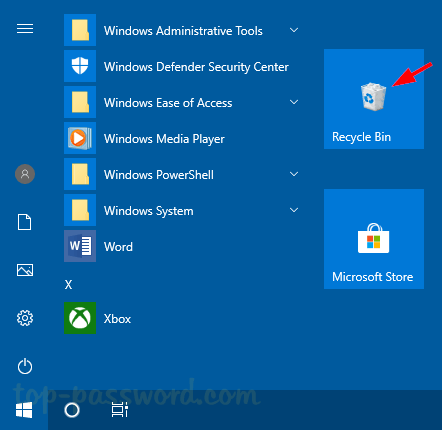
Method 6: Pin Recycle Bin to Start Menu
If you want to pin Recycle Bin to the Start Menu, just right-click the Recycle Bin icon on the desktop and then choose “Pin to Start“.
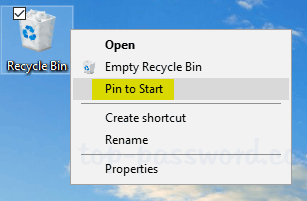
You should see the Recycle Bin icon show up in the Start Menu as a tile.
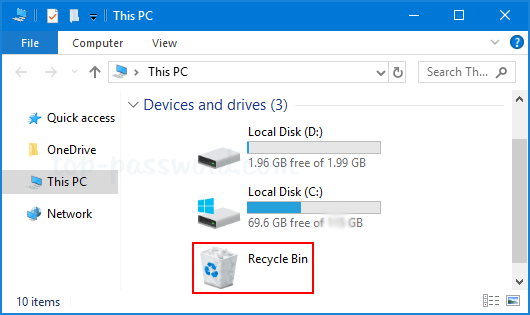
Method 7: Add Recycle Bin to My Computer
If you need to access Recycle Bin frequently, here is a way to add the Recycle Bin to the “This PC” view in File Explorer. Follow these steps:
Open the Command Prompt as administrator. Type the following command and press Enter.
reg add HKLM\SOFTWARE\Microsoft\Windows\CurrentVersion\Explorer\MyComputer\NameSpace\
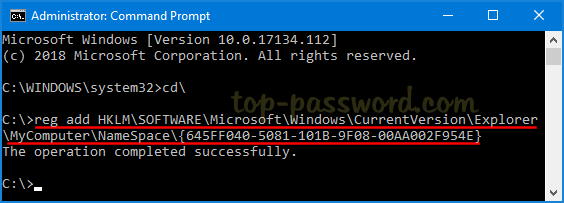
When it’s done, open File Explorer again and go to “This PC” view. You’ll see the Recycle Bin shortcut.
If you want to remove the Recycle Bin from My Computer (“This PC”) later, just open the elevated Command Prompt again and run this command:
reg delete HKLM\SOFTWARE\Microsoft\Windows\CurrentVersion\Explorer\MyComputer\NameSpace\ <645ff040-5081-101b-9f08-00aa002f954e>/f


