- Red hat enterprise linux networking
- Основные конфигурационные файлы.
- Файл настройки общей интформации /etc/sysconfig/network
- Скрипты настройки сетевых интерфейсов /etc/sysconfig/network-scripts/ifcfg-*
- Файл настройки статических маршрутов /etc/sysconfig/static-routes
- Скрипт для настройки статических маршрутов для конкретного интерфейса /etc/sysconfig/network-scripts/route-eth0
- Файл /etc/hosts
- Файл настроек DNS серверов /etc/resolv.conf
- Управление сетевыми интерфейсами.
- Red Hat Customer Portal
- Log in to Your Red Hat Account
- Red Hat Account
- Customer Portal
- Select Your Language
- Red Hat Training
- Chapter 11. Configuring a network bridge
- 11.1. Configuring a network bridge using nmcli commands
- 11.2. Configuring a network bridge using nm-connection-editor
- 11.3. Configuring a network bridge using nmstatectl
Red hat enterprise linux networking
Рассмотрим конфигурирование сети в операционных системах по управлением Red Hat Enterprise Linux (RHEL) / CentOS / Fedora.
Коротко о дистрибутивах:
Red Hat Enterprise Linux (RHEL) — Операционная система на снове Linux выпускаемая компанией Red Hat для корпоративного использования и распространяется по годовой платной подписке. Состоит из хорошо провереных и отлаженных компонентов.
Fedora — Операционная система выпускаемая также компанией Red Hat, но в отличие от RHEL проект Fedora распространяется свободно, на Fedore тестируются новых разработки компании Red Hat, которые в дальнейшем уже испольуются для корпоративно дистрибутива RHEL.
CentOS — Операционная система основанная на исходном коде RHEL и по сути является ее клоном. Проект был создан и поддерживается интернациональной командой энтузиастов.
Основные конфигурационные файлы.
Сетевые настройка осуществляется методом правки конфигурационных файлов, т.к. Fedora и CentOS основаны на RHEL, то и сами файлы настроек и их расположение однинаковое, поэтому дальнейшие примеры настроек будут подходить ко всем трем дистрибутивам.
Файл настройки общей интформации /etc/sysconfig/network
В этом файле задается сетевое имя компьютера (HOSTNAME), дефолтный маршрут (GATEWAY), DNS-домен (DOMAINNAME).
Пример конфигурации в файле network для Red Hat / CentOS / Fedora.
Скрипты настройки сетевых интерфейсов /etc/sysconfig/network-scripts/ifcfg-*
В этих файлах настраиваются основные данные для сетевых интерфейсов такие как ip адрес (IPADDR), сетевая маска (NETMASK), адрес сети (NETWORK), braodcast адрес (BROADCAST). Под звездочкой понимается имя сетевого интерфейса, например eth0, eth1, eth2, lo и т.п., зависит от количества установленных сетевых карт в системе.
Приведу пример файла cо статической настройкой сетевых параметров интерфейса eth0 для Red Hat / CentOS / Fedora.
Пример файла с настройкой интерфейса eth1 на получаение сетевых адресов по протоколу DHCP для Red Hat / CentOS / Fedora.
Также во всех система присуствует файл с настройками loopback интерфеса (lo).
Файл настройки статических маршрутов /etc/sysconfig/static-routes
Все записи о статических маршрутах содержащемся в этом файле будут автоматически добавлены при загрузке системы в таблицу маршрутизации. В формае записи маршрута сначала идет интерфейс, можно указать any, что будет означать любой интерфейс, потом идет тип маршрута (host — адрес хоста или net — адрес сети) , сеть, маска данной сети, и шлюз.
Скрипт для настройки статических маршрутов для конкретного интерфейса /etc/sysconfig/network-scripts/route-eth0
Если данного файла вы ненайдете в системе неотчаивайтеь просто создайте его и пропишити нужный вам маршрут.
Файл /etc/hosts
Впоследнее время неактуален раньше использовался для соответствия списока ip-адресов и символьных имен.
Файл настроек DNS серверов /etc/resolv.conf
В этом файле перечисляется список ip адресов DNS серверов.
Управление сетевыми интерфейсами.
Для просмотра состояния и конфигурации интерфейса существуют специальные команды.
Посмотреть таблицу маршрутизации модно используя команду:
В Red Hat Enterprise Linux (RHEL) / CentOS / Fedora существуют специальные сценарии для управления сетевыми интерфейсами.
Сценарии ifup и ifdown позволяют включить или отключить сетевой интерфейс. В качестве аргумента эти сценарии принемают имя интерфейса.
Сценарий service network или /etc/init.d/network позволяют включить (start), отключить (stop) или перезапустить (restart) все интерфейсы разом.
И на последок, функция маршрутизации между интерфейсами по умолчанию отключена, однако ее можно включить для этого надо добавить в файл /ete/sysctl.conf запись net.ipv4.ip_forward=1 и перезапустить систему.
На этом рассмотрение настройки сети в операционных системах Red Hat Enterprise Linux (RHEL) / CentOS / Fedora завершено.
1″ :pagination=»pagination» :callback=»loadData» :options=»paginationOptions»>
Источник
Red Hat Customer Portal
Log in to Your Red Hat Account
Your Red Hat account gives you access to your profile, preferences, and services, depending on your status.
If you are a new customer, register now for access to product evaluations and purchasing capabilities.
Need access to an account?
If your company has an existing Red Hat account, your organization administrator can grant you access.
Red Hat Account
Customer Portal
For your security, if you’re on a public computer and have finished using your Red Hat services, please be sure to log out.
Select Your Language
Red Hat Training
A Red Hat training course is available for RHEL 8
Chapter 11. Configuring a network bridge
A network bridge is a link-layer device which forwards traffic between networks based on a table of MAC addresses. The bridge builds the MAC addresses table by listening to network traffic and thereby learning what hosts are connected to each network. For example, you can use a software bridge on a Red Hat Enterprise Linux host to emulate a hardware bridge or in virtualization environments, to integrate virtual machines (VM) to the same network as the host.
A bridge requires a network device in each network the bridge should connect. When you configure a bridge, the bridge is called controller and the devices it uses ports .
You can create bridges on different types of devices, such as:
- Physical and virtual Ethernet devices
- Network bonds
- Network teams
- VLAN devices
Due to the IEEE 802.11 standard which specifies the use of 3-address frames in Wi-Fi for the efficient use of airtime, you cannot configure a bridge over Wi-Fi networks operating in Ad-Hoc or Infrastructure modes.
11.1. Configuring a network bridge using nmcli commands
This section explains how to configure a network bridge using the nmcli utility.
Prerequisites
- Two or more physical or virtual network devices are installed on the server.
- To use Ethernet devices as ports of the bridge, the physical or virtual Ethernet devices must be installed on the server.
To use team, bond, or VLAN devices as ports of the bridge, you can either create these devices while you create the bridge or you can create them in advance as described in:
Procedure
Create a bridge interface:
This command creates a bridge named bridge0 , enter:
Display the network interfaces, and note the names of the interfaces you want to add to the bridge:
In this example:
- enp7s0 and enp8s0 are not configured. To use these devices as ports, add connection profiles in the next step.
- bond0 and bond1 have existing connection profiles. To use these devices as ports, modify their profiles in the next step.
Assign the interfaces to the bridge.
If the interfaces you want to assign to the bridge are not configured, create new connection profiles for them:
These commands create profiles for enp7s0 and enp8s0 , and add them to the bridge0 connection.
If you want to assign an existing connection profile to the bridge, set the master parameter of these connections to bridge0 :
These commands assign the existing connection profiles named bond0 and bond1 to the bridge0 connection.
Configure the IP settings of the bridge. Skip this step if you want to use this bridge as a ports of other devices.
Configure the IPv4 settings. For example, to set a static IPv4 address, network mask, default gateway, DNS server, and DNS search domain of the bridge0 connection, enter:
Configure the IPv6 settings. For example, to set a static IPv6 address, network mask, default gateway, DNS server, and DNS search domain of the bridge0 connection, enter:
Optional: Configure further properties of the bridge. For example, to set the Spanning Tree Protocol (STP) priority of bridge0 to 16384 , enter:
By default, STP is enabled.
Activate the connection:
Verify that the ports are connected, and the CONNECTION column displays the port’s connection name:
Red Hat Enterprise Linux activates controller and ports when the system boots. By activating any port connection, the controller is also activated. However, in this case, only one port connection is activated. By default, activating the controller does not automatically activate the ports. However, you can enable this behavior by setting:
Enable the connection.autoconnect-slaves parameter of the bridge connection:
Reactivate the bridge:
Verification steps
Display the link status of Ethernet devices that are ports of a specific bridge:
Display the status of Ethernet devices that are ports of any bridge device:
To display the status for a specific Ethernet device, use the bridge link show dev ethernet_device_name command.
Additional resources
11.2. Configuring a network bridge using nm-connection-editor
This section explains how to configure a network bridge using the nm-connection-editor application.
Note that nm-connection-editor can add only new ports to a bridge. To use an existing connection profile as a port, create the bridge using the nmcli utility as described in Configuring a network bridge using nmcli commands.
Prerequisites
- Two or more physical or virtual network devices are installed on the server.
- To use Ethernet devices as ports of the bridge, the physical or virtual Ethernet devices must be installed on the server.
- To use team, bond, or VLAN devices as ports of the bridge, ensure that these devices are not already configured.
Procedure
Open a terminal, and enter nm-connection-editor :
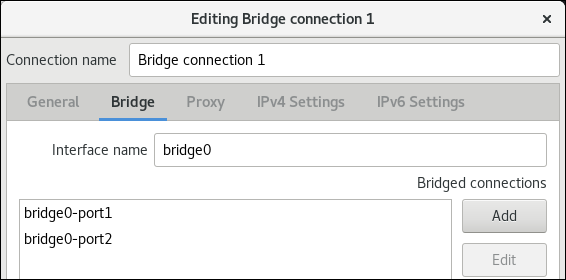
In the Bridge tab:
- Optional: Set the name of the bridge interface in the Interface name field.
Click the Add button to create a new connection profile for a network interface and adding the profile as a port to the bridge.
- Select the connection type of the interface. For example, select Ethernet for a wired connection.
- Optionally, set a connection name for the port device.
- If you create a connection profile for an Ethernet device, open the Ethernet tab, and select in the Device field the network interface you want to add as a port to the bridge. If you selected a different device type, configure it accordingly.
- Click Save .
Repeat the previous step for each interface you want to add to the bridge.
Configure the IP settings of the bridge. Skip this step if you want to use this bridge as a port of other devices.
In the IPv4 Settings tab, configure the IPv4 settings. For example, set a static IPv4 address, network mask, default gateway, DNS server, and DNS search domain:

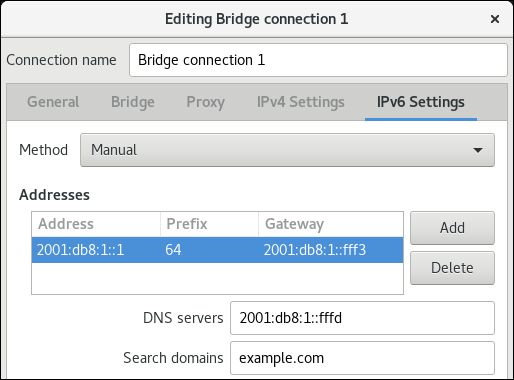
In the IPv6 Settings tab, configure the IPv6 settings. For example, set a static IPv6 address, network mask, default gateway, DNS server, and DNS search domain:
Verification steps
Display the link status of Ethernet devices that are ports of a specific bridge.
Display the status of Ethernet devices that are ports in any bridge device:
To display the status for a specific Ethernet device, use the bridge link show dev ethernet_device_name command.
Additional resources
11.3. Configuring a network bridge using nmstatectl
This section describes how to use the nmstatectl utility to configure a Linux network bridge bridge0 with following settings:
- Network interfaces in the bridge: enp1s0 and enp7s0
- Spanning Tree Protocol (STP): Enabled
- Static IPv4 address: 192.0.2.1 with the /24 subnet mask
- Static IPv6 address: 2001:db8:1::1 with the /64 subnet mask
- IPv4 default gateway: 192.0.2.254
- IPv6 default gateway: 2001:db8:1::fffe
- IPv4 DNS server: 192.0.2.200
- IPv6 DNS server: 2001:db8:1::ffbb
- DNS search domain: example.com
Prerequisites
- Two or more physical or virtual network devices are installed on the server.
- To use Ethernet devices as ports in the bridge, the physical or virtual Ethernet devices must be installed on the server.
- To use team, bond, or VLAN devices as ports in the bridge, set the interface name in the port list, and define the corresponding interfaces.
- The nmstate package is installed.
Procedure
Create a YAML file, for example
/create-bridge.yml , with the following contents:
Apply the settings to the system:
Verification steps
Display the status of the devices and connections:
Display all settings of the connection profile:
Display the connection settings in YAML format:
Additional resources
- nmstatectl(8) man page
- /usr/share/doc/nmstate/examples/
Источник


